-------------------------------------------------------
Alternative Yarn – See how to change yarns here
Yarn Groups A to F – Use the same pattern and change the yarn here
Yarn usage using an alternative yarn – Use our yarn converter here
-------------------------------------------------------
This pattern has been corrected. Click here to see the correction/s.
All measurements in charts are in cm.
= K | |
= P | |
= 1 YO between 2 sts | |
= slip 1 st as if to K, K 2 tog, psso | |
= slip 1 st as if to K, K 1, psso | |
= K 2 tog | |
= inc round |
Each of our patterns has specific tutorial videos to help you.
These step-by-step tutorials might also help you:
Why is the knitting/crochet tension so important?
Knitting tension is what determines the final measurements of your work, and is usually measured per 10 x 10 cm. It is provided like so: number of stitches in width x number of rows in height - eg: 19 stitches x 26 rows = 10 x 10 cm.
The knitting tension is very individual; some people knit/crochet loosely while others work tightly. You adjust the knitting tension with the needle size, which is why the suggested needle size only serve as a guide! You need to adjust this (up or down) to ensure that YOUR knitting tension matches the knitting tension provided in the pattern. If you work with a different knitting tension than provided you will have a different yarn consumption, and your work will have different measurements than what the pattern suggests.
The knitting tension also determines which yarns can replace each other. As long as you achieve the same knitting tension you can replace one yarn with another.
See DROPS lesson: How to measure your tension/gauge
See DROPS video: How to make a gauge tension swatch
How do I know how many balls of yarn I need?
The required amount of yarn is provided in grams, eg: 450 g. To calculate how many balls you’ll need you first need to know how many grams are in 1 ball (25g, 50g or 100g). This information is available if you click on the individual yarn quality on our pages. Divide the amount required with the amount of each ball. For example, if each ball is 50g (the most common amount), the calculation will be as follows: 450 / 50 = 9 balls.
Can I use a different yarn than what the pattern suggests?
The important thing when changing from one yarn to another is that the knitting/crochet tension remains the same. This is so that the measurements of the finished piece will be the same as on the sketch provided. It is easier to achieve the same knitting tension using yarns from the same yarn group. It is also possible to work with multiple strands of a thinner yarn to achieve the knitting tension of a thicker one. Please try our yarn converter. We recommend you to always work a test swatch.
Please NOTE: when changing yarn the garment might have a different look and feel to the garment in the photo, due to individual properties and qualities of each yarn.
See DROPS lesson: Can I use a different yarn than the one mentioned in the pattern?
What are the yarn groups?
All our yarns are categorised into yarn groups (from A to F) according to thickness and knitting tension – group A contains the thinnest yarns and group F the thickest. This makes it easier for you to find alternative yarns to our patterns, should you wish to switch yarn. All yarns within the same group have a similar knitting tension and can easily replace each other. However, different yarn qualities have different structures and properties which will give the finished work a unique look and feel.
How do I use the yarn converter?
At the top of all our patterns you’ll find a link to our yarn converter, which is a helpful tool should you wish to use a different yarn than suggested. By filling in the yarn quality you wish to replace, the amount (in your size) and number of strands, the converter will present good alternative yarns with the same knitting tension. Additionally it will tell you how much you’ll require in the new qualities and whether you’ll need to work with multiple strands. Most skeins are 50g (some are 25g or 100g).
If the pattern is worked with multiple colours, every colour will have to be converted separately. Similarly, if the pattern is worked with several strands of different yarns (for example 1 strand Alpaca and 1 strand Kid-Silk) you will have to find alternatives for each, individually.
Why do you show discontinued yarns in the patterns?
Since different yarns have different qualities and textures we have chosen to keep the original yarn in our patterns. However, you can easily find options among our available qualities by using our yarn converter, or simply pick a yarn from the same yarn group.
It is possible that some retailers still have discontinued yarns in stock, or that someone has a few skeins at home that they would like to find patterns for.
The yarn converter will provide both alternative yarn as well as required amount in the new quality.
What size should I knit?
If you think it's hard to decide what size to make, it can be a good idea to measure a garment you own already and like the size of. Then you can pick the size by comparing those measures with the ones available in the pattern's size chart.
You'll find the size chart at the bottom of the pattern.
See DROPS lesson: How to read size chart
Why do I get the wrong knitting tension with the suggested needle size?
The needle size provided in the pattern serves only as a guide, the important thing is to follow the knitting tension. And since knitting tension is very individual, you will have to adjust the needle size to ensure that YOUR tension is the same as in the pattern – maybe you’ll have to adjust 1, or even 2 needle sizes, up or down to achieve the correct tension. For this, we recommend that you work test swatches.
Should you work with a different knitting tension than the one provided, the measurements of the finished garment might deviate from the measurement sketch.
See DROPS lesson: How to measure your tension/gauge
See DROPS video: How to make a gauge tension swatch
Why is the pattern worked top-down?
Working a garment top-down provides more flexibility and room for personal adjustment. For example it is easier to try the garment on while working, as well as making adjustments to length of yoke and shoulder caps.
The instructions are carefully explaining every step, in the correct order. Diagrams are adjusted to the knitting direction and are worked as usual.
How do I work according to a knitting diagram?
The diagram depicts all rows/rounds, and every stitch seen from the right side. It is read from bottom to top, from right to left. 1 square = 1 stitch.
When working back and forth, every other row is worked from the right side and every other row is worked from the wrong side. When working from the wrong side, the diagram will have to be worked reversed: from left to right, knit stitches are purled, purl stitches are knit etc.
When working in the round every round is worked from the right side and the diagram are worked from right to left on all rounds.
See DROPS lesson: How to read knitting diagrams
How do I work according to a crochet diagram?
The diagram depicts all rows/rounds, and every stitch seen from the right side. It is worked from bottom to top, from right to left.
When working back and forth every other row is worked from the right side: from right to left and every other row is worked from the wrong side: from left to right.
When working in the round, every row in the diagram are worked from the right side, from right to left.
When working a circular diagram you start in the middle and work your way outwards, counter clockwise, row by row.
The rows usually start with a given number of chain stitches (equivalent to the height of the following stitch), this will either be depicted in the diagram or explained in the pattern.
See DROPS lesson: How to read crochet diagrams
How do I work several diagrams simultaneously on the same row/round?
Instructions for working several diagrams after each other on the same row/round, will often be written like so: “work A.1, A.2, A.3 a total of 0-0-2-3-4 times". This means you work A.1 once, then A.2 is worked once, and A.3 is repeated (in width) the number of times provided for your size – in this case like so: S = 0 times, M = 0 times, L=2 times, XL= 3 times and XXL = 4 times.
The diagrams are worked as usual: begin with the first row in A.1, then work the first row in A.2 etc.
See DROPS lesson: How to read knitting diagrams
See DROPS lesson: How to read crochet diagrams
Why are the sleeves shorter in larger sizes?
The total width of the garment (from wrist-to-wrist) will be larger in the larger sizes, despite the actual sleeves being shorter. The larger sizes have longer sleeve caps and wider shoulders, so there will be a good fit in all sizes.
Where on the garment is the length measured?
The measurement sketch/schematic drawing provides information regarding the full length of the garment. If it’s a jumper or a jacket the length is measured from the highest point on the shoulder (usually closest to the neckline), and straight down to the bottom of the garment. It is NOT measured from the tip of shoulder. Similarly, the length of yoke is measured from the highest point on the shoulder and down to where yoke is split into body and sleeves.
See DROPS lesson: How to read a schematic drawing
What is a repeat?
Diagrams are often repeated on the round or in height. 1 repeat is the diagram the way it appears in the pattern. If it says to work 5 repeats of A.1 in the round, then you work A.1 a total of 5 times after/next to each other in the round. If it says to work 2 repeats of A.1 vertically/in height you work the entire diagram once, then begin again at the start and work the entire diagram one more time.
Why does the piece start with more chain stitches than it’s worked with?
Chain stitches are slightly narrower than other stitches and to avoid working the cast-on edge too tight, we simply chain more stitches to begin with. The stitch count will be adjusted on the following row to fit the pattern and measurement sketch.
Why increase before the rib edge when the piece is worked top-down?
The rib edge is more elastic and will contract slightly compared to, for example, stocking stitch. By increasing before the rib edge, you avoid a visible difference in width between the rib edge and the rest of the body.
Why increase in the cast-off edge?
It’s very easy to cast off too tightly, and by making yarn overs while casting off (and simultaneously casting these off) you avoid a too tight cast off edge.
See DROPS video: How to bind off with yarn overs (yo)
How do I increase/decrease on every 3rd and 4th row/round alternately?
To achieve an even increase (or decrease) you can increase on, for example: every 3rd and 4th row alternately, like so: work 2 rows and increase on the 3rd row, work 3 rows and increase on the 4th. Repeat this until the increase is complete.
See DROPS lesson: Increase or decrease 1 st on every 3rd and 4th row alternately
How can I work a jacket in the round instead of back and forth?
Should you prefer to work in the round instead of back and forth, you may of course adjust the pattern. You’ll need to add steeks mid-front (usually 5 stitches), and follow the instructions. When you would normally turn and work from the wrong side, simply work across the steek and continue in the round. At the end you’ll cut the piece open, pick up stitches to work bands, and cover the cut edges.
See DROPS video: How to knit steeks and cut open
Can I work a jumper back and forth instead of in the round?
Should you prefer to work back and forth instead of in the round, you may of course adjust the pattern so you work the pieces separately and then assemble them at the end. Divide the stitches for the body in 2, add 1 edge stitch in each side (for sewing) and work the front and back pieces separately.
See DROPS lesson: Can I adapt a pattern for circular needles into straight needles?
Why is the pattern slightly different than what I see in the photo?
Pattern repeats can vary slightly in the different sizes, in order to get the correct proportions. If you’re not working the exact same size as the garment in the photo, yours might deviate slightly. This has been carefully developed and adjusted so that the complete impression of the garment is the same in all sizes.
Make sure to follow instructions and diagrams for your size!
How do I make a women’s size garment into a men’s size one?
If you have found a pattern you like which is available in women’s size it’s not very difficult to convert it to men’s size. The biggest difference will be the length of sleeves and body. Start working on the women size that you think would fit across the chest. The additional length will be worked right before you cast off for the armhole/sleeve cap. If the pattern is worked top-down you can add the length right after the armhole or before the first decrease on sleeve.
Regarding additional yarn amount, this will depend on how much length you add, but it is better with a skein too many than too few.
How do I prevent a hairy garment from shedding?
All yarns will have excess fibres (from production) that might come off as lint or shedding. Brushed yarns (ie hairier yarns) have more of these loose, excess fibres, causing more shedding.
Shedding also depends on what is worn under or over the garment, and whether this pulls at the yarn fibres. It’s therefore not possible to guarantee that there will be no shedding
Below are some tips on how to get the best result when working with hairier yarns:
1. When the garment is finished (before you wash it) shake it vigorously so the looser hairs come off. NOTE: do NOT use a lint roller, brush or any method that pulls at the yarn.
2. Place the garment in a plastic bag and put it in your freezer - the temperature will cause the fibres to become less attached to each other, and excess fibres will come off easier.
3. Leave in the freezer for a few hours before taking it out and shaking it again.
4. Wash the garment according to the instructions on the yarn label.
Why does my garment pill?
Pilling is a natural process that happens to even the most exclusive of fibers. It's a natural sign of wear and tear that is hard to avoid, and that is most visible in high friction areas of your garment like a sweater's arms and cuffs.
You can make your garment look as new by removing the pilling, using a fabric comb or a pill/lint remover.
Alvina |
||||||||||||||||||||||
|
|
|||||||||||||||||||||
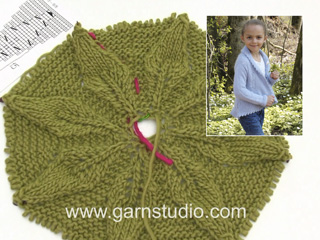
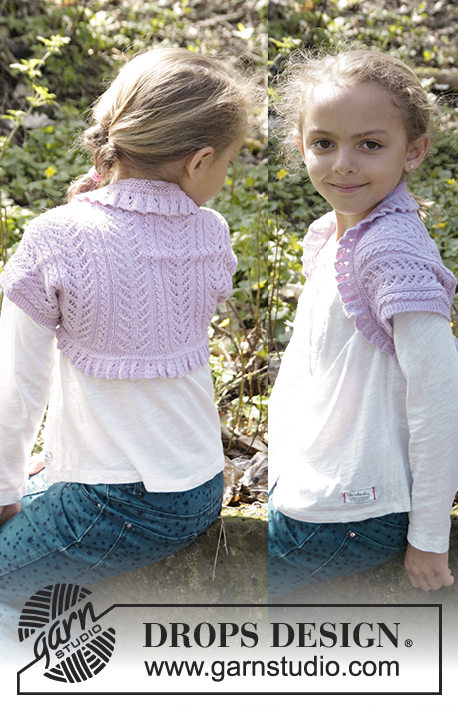
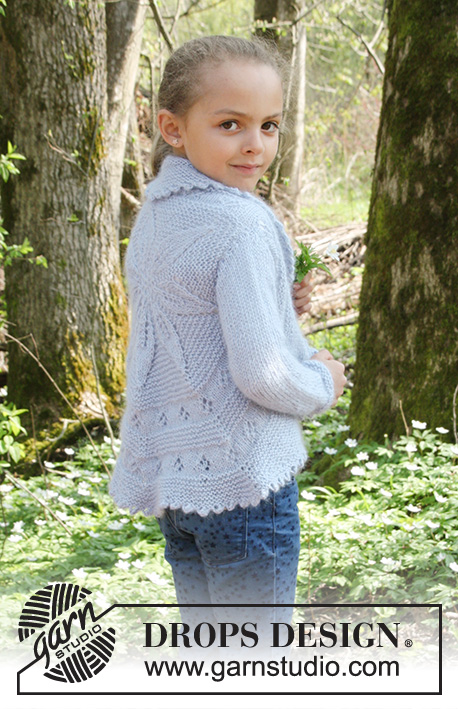
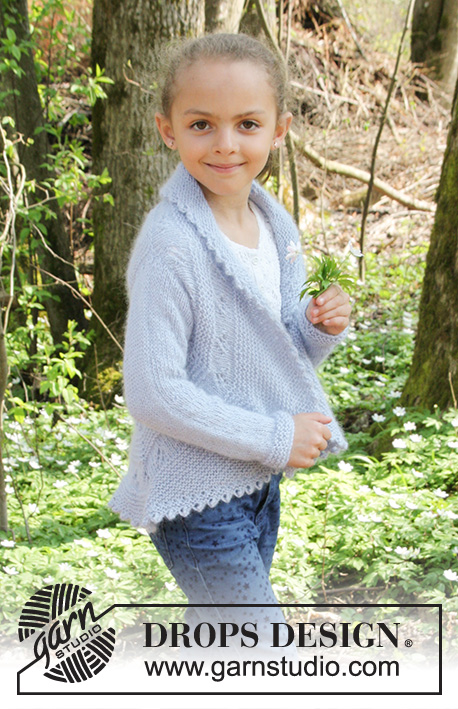
Knitted circle jacket in garter st with leaf pattern in DROPS BabyAlpaca Silk and DROPS Kid-Silk. Size children 3 - 12 years
DROPS Children 27-12 |
||||||||||||||||||||||
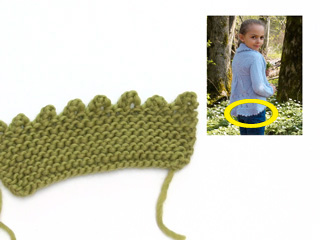
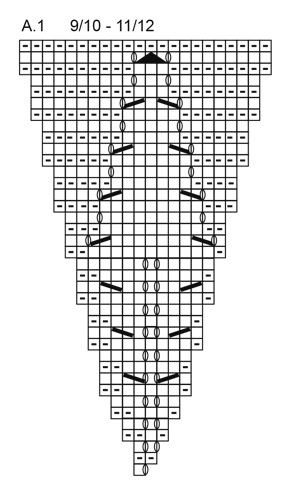
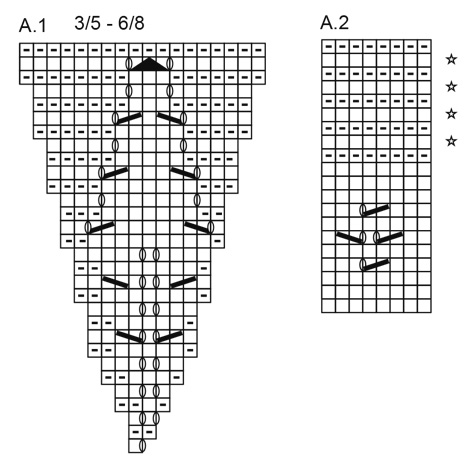
PATTERN: See diagrams A.1 to A.2. See diagram for correct size. GARTER ST (worked in the round): 1 ridge = 2 rounds. * K 1 round and P 1 round *, repeat from *-*. GARTER ST (back and forth): K all rows. 1 ridge = K2 rows. ---------------------------------------------------------- BACK PIECE: Cast on 8 sts with 1 strand BabyAlpaca Silk and 1 strand Kid-Silk (= 2 strands) and divide them on 4 double pointed needles size 5 mm / US 8 (= 2 sts on per needle). Work according to A.1 (= 8 repetitions of A.1 in width). When the first 15-15-19-19 rounds in A.1 have been worked, displace beg of round 1 st towards the left first on every other round, then every 4th round – i.e. beg of round is always before first YO in diagram so make it less visible. Beg of round at the end will be in middle of the first repetition of A.1. REMEMBER THE KNITTING GAUGE Switch to circular needle when needed. When A.1 has been worked one time vertically = 144-144-176-176 sts on round and piece measures approx. 22-22-28-28 cm / 8 3/4"-8 3/4"-11"-11" in diameter. Insert 8 markers in piece, insert 1st marker in 1st st on round, then insert 7 markers 17-17-21-21 sts apart, markers are directly over tip on each leaf. Work in GARTER ST - see explanation above, AT THE SAME TIME on first round inc 1 st on each side of markers. Inc with 1 YO on each side of sts with marker – on next round P YO twisted to avoid holes = 16 inc sts per round. Inc like this every other round a total of 1-2-1-2 times = 160-176-192-208 sts. Continue in garter st until piece measures 26-28-32-34 cm / 10 1/4"-11"-12½"-13½" in diameter. On next round K, AT THE SAME TIME bind off all sts between 2nd and 3rd marker and 7th and 8th marker + 1 st on each side of marker for armholes (= bind off 23-25-27-29 sts in each side). P next round, AT THE SAME TIME cast on 23-25-27-29 new (loose) sts over the bound off sts between 2nd and 3rd marker and 7th and 8th marker. When all sts are cast on again, there are 160-176-192-208 sts on needle. Then work as follows: Work A.2 over all sts, AT THE SAME TIME inc 1 st on each side of sts with marker on every round with star (= 16 sts per inc round). Work A.2 2 times vertically = 288-304-320-336 sts. Piece measures approx. 56-58-62-64 cm / 22"-22 3/4"-24½"-25 1/4" in diameter. LEFT FRONT PIECE: Then work as follows: Keep sts between 2nd and 4th marker on needle, slip the remaining sts on a stitch holder = 72-76-80-84 sts on needle. Work in GARTER ST - see explanation above - back and forth over these sts, AT THE SAME TIME at the end of every row slip the last 2 sts on stitch holder (do not work them, turn). NOTE: Continue with inc on each side of the 3rd marker every 4th row. Continue until 32 sts remain on needle. Slip the last 32 sts on stitch holder. RIGHT FRONT PIECE: Slip sts between 6th and 8th marker on circular needle size 5 mm / US 8, and work the same way as on left front piece. Then K all sts from stitch holder from RS back onto circular needle size 5 mm / US 8 - pick up and twist yarn between every time st on stitch holder in each side is slipped on needle (i.e. between every other st to avoid holes in transition) = approx. 352-376-400-424 sts. Work 2 ridges. Loosely bind off with K from RS as follows: K 1, ((** insert right needle in between the first 2 sts on left needle (i.e. between sts on needle, not through sts), make 1 YO on right needle, pull YO forwards between sts and slip YO on left needle **, repeat from **-** 2 more times (= 3 new sts on left needle). * K first st on left needle, pass first st on right needle over last st worked *)), repeat from *-* 6 times in total and repeat from ((-)) along the entire jacket until 1 st remains, cut the yarn and pull it through last st. SLEEVES: Worked in the round on double pointed needles. Cast on 30-30-32-34 sts on double pointed needles size 5 mm / US 8 with 1 strand BabyAlpaca Silk and 1 strand Kid-Silk (= 2 strands). Work 4 ridges, then work in stockinette st. Insert 1 marker mid under sleeve. When piece measures 6 cm / 2 3/8'', inc 1 st on each side of marker under sleeve. Inc like this every 4-3½-3½-4 cm / 1½"-1 1/4"-1 1/4"-1½" a total of 7-9-10-10 times = 44-48-52-54 sts. Work until piece measures 35-40-44-48 cm / 13 3/4"-15 3/4"-17 1/4"-19", bind off. Make another sleeve. ASSEMBLY: Sew in sleeves. |
||||||||||||||||||||||
Diagram explanations |
||||||||||||||||||||||
|
||||||||||||||||||||||
Have you made this or any other of our designs? Tag your pictures in social media with #dropsdesign so we can see them! Do you need help with this pattern?You'll find tutorial videos, a Comments/Questions area and more by visiting the pattern on garnstudio.com. © 1982-2024 DROPS Design A/S. We reserve all rights. This document, including all its sub-sections, has copyrights. Read more about what you can do with our patterns at the bottom of each pattern on our site. |
With over 40 years in knitting and crochet design, DROPS Design offers one of the most extensive collections of free patterns on the internet - translated to 17 languages. As of today we count 304 catalogs and 11422 patterns - 11417 of which are translated into English (US/in).
We work hard to bring you the best knitting and crochet have to offer, inspiration and advice as well as great quality yarns at incredible prices! Would you like to use our patterns for other than personal use? You can read what you are allowed to do in the Copyright text at the bottom of all our patterns. Happy crafting!
Comments / Questions (71)
Caro wrote:
Guten Tag, leider verstehe ich den Teil nicht beim Muster stricken mit dem Rundenbeginn verschieben und der dann immer rechts vor dem ersten Umschlag beginnen soll. Ich hab auch schon im Internet gesucht aber nichts dazu gefunden. In Runde 16 fange ich ja an mit einer linken und dann 9 rechten Maschen und 2 linken. Heißt das jetzt wenn ich den rundenanfang versetzen soll muss ich dann mit den 9 rechten anfangen? Oder wie ist das gemeint? Und ab wann mach ich das dann nur in jeder 4. Runde?
14.01.2022 - 16:23DROPS Design answered:
Liebe Caro, wenn Sie der 1. Umschlag in A.1 bei der 21. Reihe in A.1 ist es einfacher, daß die Runden vor diesem Umschlag anfangen, so sehen die Krausrippen besser aus. Dieses Video zeigt bei 14:36 Anfang Runde 17 und wie man der Markierer nach der 1. Masche verschiebt. Viel Spaß beim stricken!
19.01.2022 - 10:37Nini Tielle wrote:
Ik zie op de foto dat de gaatjes bij A2 in het tricot gedeelte zit. Bij de teltekening zitten de gaatjes in het ribbel gedeelte. Zie ik dit verkeerd?
30.12.2021 - 21:42DROPS Design answered:
Dag Nini,
Het telpatroon wordt in de rondte gebreid en het deel waar je steeds recht breit is dus het deel in tricotsteek. Hier zitten de gaatjes. Aan de bovenkant van A.2 zie je aan aantal naalden in averecht. Deze zorgen ervoor dat er ribbels ontstaan en hier zitten geen gaatjes.
06.01.2022 - 10:13Sylvia Baer wrote:
Kann man bei dieser hübschen Jacke auch vorne ein Knopfloch für einen Knopf anbringen? Wenn ja, bitte wo. Ich stricke gerade die Größe für 6-8 Jahre.
17.03.2021 - 12:47DROPS Design answered:
Liebe Frau Baer, wahrscheinlich können Sie ein Knofloch anbrigen, am besten stricken Sie zuerst das Vorderteil ohne Knopfloch, so finden Sie das beste Platz für das Knofloch am 2. Vorderteil. Viel Spaß beim stricken!
17.03.2021 - 13:21Tania wrote:
Salve al termine del motivo A1 devo inserire i segnapunti ogni 17 maglie. Ma facendo così i prossimi non cadono sulla punta della foglia....help
07.12.2020 - 12:34DROPS Design answered:
Buongiorno Tania, deve inserire il 1° segnapunti nella 1° maglia e gli altri a 17 maglie di distanza. Si ricordi di inserire il segnapunti NELLA maglia, non TRA le maglie. Buon lavoro!
07.12.2020 - 14:15Solveig Næss Nielsen wrote:
Hvordan forskydes 1 maske til Venstre
19.11.2020 - 23:15Lisa wrote:
Figured out my mistake! :p
16.08.2020 - 01:08Lisa wrote:
In row 9, if I understand it correctly, it is knit 1, k 2 together, yarn over and knit, yarn over, slip 1 as if to knit, knit 1, pass slipped stitch over, However doing this decreases each needle by 2 stitches. Where am I going wrong?
15.08.2020 - 19:24DROPS Design answered:
Hi Lisa, You have the 2 yarn overs (increase 2 stitches) and the knit together (1 stitch decreased) and slip 1 stitch, knit and pass slipped stitch over (1 stitch decreased). So the number of stitches remains the same. Happy knitting!
17.08.2020 - 07:07Dilys wrote:
Hi there, Before I even start I’m confused about the tension. I would like to do this with one thread, so looking at a yarn from group C. But to get the number of stitches required (17), it seems I would only get about 22-24 rows rather than the 34 required. This is a huge difference. Is it because it’s garter stitch? I don’t want to order my yarn until I know more clearly what I’m aiming at. Thanks. Love the design, want to do it for my grand daughter.
30.07.2020 - 04:08DROPS Design answered:
Dear Dilys, make sure to work your swatch in garter stitch, so that the 34 rows in garter stitch will give you 17 ridges - read more about tension here. Happy knitting!
30.07.2020 - 09:15Jyotsna wrote:
Clarfy - pick up and twist yarn between every time st on stitch holder in each side is slipped on needle (i.e. between every other st to avoid holes in transition) = approx. 352-376-400-424 sts. Work 2 ridges. Loosely cast off with K from RS as follows: K 1, ((** insert right needle in between the first 2 sts on left needle (i.e. between sts on needle, not through sts), make 1 YO on right needle, pull YO forwards between sts
13.07.2020 - 05:43DROPS Design answered:
Dear Jyotsna, this video shows from time code 06:24 how to pck up sts to avoid holes in transition and this video how to cast off the stitches in that pattern. Happy knitting!
13.07.2020 - 09:21Nad wrote:
Bonjour,j'aimerais tricoter le model alvina 27/12 en Drops Muskat pour une taille de 11/12 ans ,est-ce possible?. cordialement vôtre.
10.05.2020 - 18:05DROPS Design answered:
Bonjour Nad, ce modèle se tricote avec 2 fils du groupe A, vous pouvez les remplacer par 1 fil du groupe C mais pas par 1 fil du groupe B comme Muskat - essayez notre convertisseur pour voir d'autres alternatives ou demandez conseil à votre magasin. Bon tricot!
11.05.2020 - 10:10