
Popular categories
Looking for a yarn?


|
|||||||||||||||||||
Mathilda |
|||||||||||||||||||
 |
 |
||||||||||||||||||
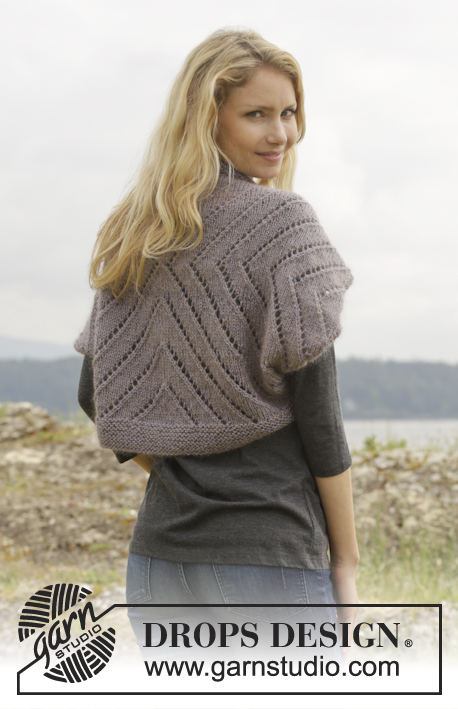
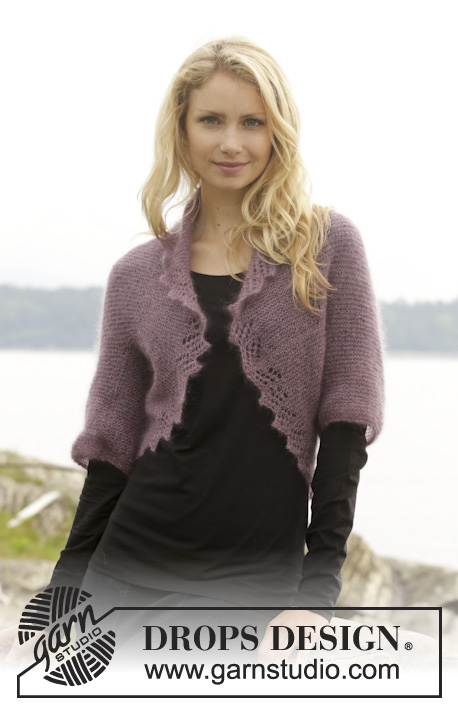
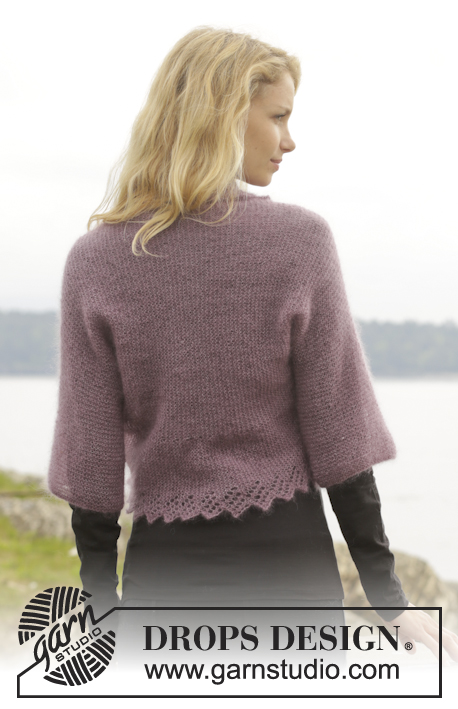
Knitted DROPS bolero in garter st with lace edge in ”Kid-Silk”. Size S-XXXL.
DROPS 156-34 |
|||||||||||||||||||
|
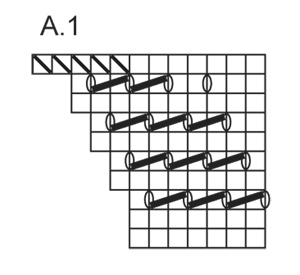
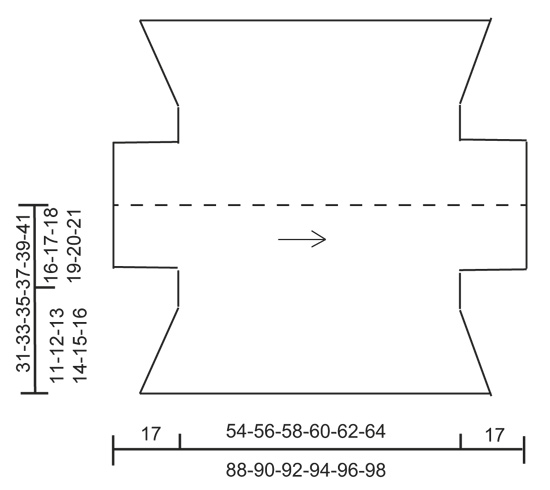
GARTER ST (back and forth on needle): K all rows. 1 ridge = K2 rows. PATTERN: See diagram A.1. To make the pattern the same in each side, work first row in diagram at the end of first row from RS and at the end of the second row from WS. I.e. all rows where YOs and sts-tog are worked, must be worked at the end of row. No of sts in diagram will vary from 7 to 12. SHORT ROWS: Work 6 rows over all sts, * work until marker in one side, turn, tighten yarn and work the rest of row. Work 1 row over all sts, turn, work until marker in the other side, turn, tighten yarn and work the rest of row. Work 5 rows over all sts *, repeat from *-*. I.e. work 6 rows (= 3 ridges) over the middle 90-96-102-106-112-116 sts and 8 rows (4 ridges) over sts in each side in every repetition. ---------------------------------------------------------- BOLERO: Worked sideways back and forth on circular needle. Beg with right sleeve, cast on sts for back and collar in both sides of piece, bind off again for left sleeve. Then fold double and sew sleeve and side seams. Cast on 74-78-82-88-92-96 sts with 2 strands Kid-Silk on circular needle size 3.5 mm / US 4. Remove 1 strand and work in GARTER ST - see explanation above! REMEMBER THE GAUGE! When piece measures 17 cm / 6 3/4'' (= sleeve), loosely cast on 34-37-40-41-44-46 new sts in each side at the end of the next 2 rows = 142-152-162-170-180-188 sts. Insert 1 marker in piece 26-28-30-32-34-36 sts in from each side (= 90-96-102-106-112-116 sts between markers). Then work A.1 over the outermost 7 sts in each side of piece – READ PATTERN – and garter st over the remaining sts – AT THE SAME TIME work SHORT ROWS – see explanation above. When piece measures approx. 71-73-75-77-79-81 cm / 28''-28¾''-29½''-30 3/8''-31''-32'' (from cast-on edge), adjust after 1 whole repetition of A.1, loosely bind off 34-37-40-41-44-46 sts in each side at beg of the next 2 rows = 74-78-82-88-92-96 sts. Continue in garter st over sleeve. When sleeve measures 17 cm / 6 3/4'', loosely bind off with 2 strands. Piece measures approx. 88-90-92-94-96-98 cm / 34½"-35½"-36 1/4"-37"-37 3/4"-38½". ASSEMBLY: Fold the bolero double. Sew sleeve and side seams in outer loops of edge sts, and make sure to avoid a tight edge. |
|||||||||||||||||||
Diagram explanations |
|||||||||||||||||||
|
|||||||||||||||||||
|
|||||||||||||||||||
|
|||||||||||||||||||
|
Have you made this or any other of our designs? Tag your pictures in social media with #dropsdesign so we can see them! Do you need help with this pattern?You'll find tutorial videos, a Comments/Questions area and more by visiting the pattern on garnstudio.com. © 1982-2024 DROPS Design A/S. We reserve all rights. This document, including all its sub-sections, has copyrights. Read more about what you can do with our patterns at the bottom of each pattern on our site. |
|||||||||||||||||||


With over 40 years in knitting and crochet design, DROPS Design offers one of the most extensive collections of free patterns on the internet - translated to 17 languages. As of today we count 304 catalogs and 11422 patterns - 11417 of which are translated into English (US/in).
We work hard to bring you the best knitting and crochet have to offer, inspiration and advice as well as great quality yarns at incredible prices! Would you like to use our patterns for other than personal use? You can read what you are allowed to do in the Copyright text at the bottom of all our patterns. Happy crafting!
Comments / Questions (58)
Hallo, tut mir leid, aber ich verstehe das Musterdiagramm A1 nicht so ganz. Sind es 10 Reihen (also 5 hin und 5 zurück) oder 10 Hinreihen und dazwischen immer eine Reihe rechts, also insgesamt 20 Reihen?
24.03.2018 - 14:21DROPS Design answered:
Liebe Carolin, es sind insgesamt 10 Reihen, denn es sind alle Reihen (Hin- und Rück-Reihen) im Diagramm eingezeichnet. Viel Spaß beim Stricken!
02.04.2018 - 10:08Faut’il vraiment 75g de laine pour tricoter une taille s? Cela me parait peu Merci
06.03.2018 - 17:04DROPS Design answered:
Mme Albouy, oui, ca suffit. Bon travail!
06.03.2018 - 18:12Faut’il vraiment 75g de laine pour tricoter une taille s? Merci
06.03.2018 - 16:58DROPS Design answered:
Bonjour Mme Albouy, tout à fait, à condition de bien respecter l'échantillon en largeur et en hauteur, il faudra 75 g Kid-Silk en taille S. Bon tricot!
07.03.2018 - 09:09I don’t understand if this pattern is worked throughout with one strand of yarn or two. Cast on with two but let one go? I looked above but don’t see explanation. Thanks for your help.
22.12.2017 - 18:00DROPS Design answered:
Hi Kim, You cast on with 2 strands to make the cast on edge more elastic and then work on with just 1 strand. Happy Christmas!
24.12.2017 - 07:08Apologies for still being confused. Do I make only 8 rows of short rows or do I make approx. 168 rows of short rows--that is, all the rows of the body section between the sleeves (after casting on after sleeve 1 and for whole body before binding off before starting sleeve 2)? Thank you in advance.
09.12.2017 - 04:06DROPS Design answered:
Dear Rachael, each short row repeat is 6 rows. You need to repeat this 6 row until the piece will be 71-73-75-77-79-81 cm. I hope this helps. Happy knitting!
10.12.2017 - 01:14Re DROPS Mathilde Bolero: Despite reading Comments & Q/As, I still don't know if the short rows occur only in the first iteration of A1 lace schematic. Oreo they continue for the rest of the sweater? I made a cloth model but it hasn't reassured me that I should stop with short rows once I've done the 6 rows (3 ridges) over middle stitches and the 8 rows (4 ridges) on the side stitches. Please clarify. Thank you so very much!
28.11.2017 - 02:43DROPS Design answered:
Dear Mrs Wenz, short rows are worked from the new sts cast on on each side at the same time as you will work A.1 until you will have to cast off the sts on each side. Happy knitting!
28.11.2017 - 09:20Ik wil het patroon zo aanpassen dat ik langs de mouwen ook kant heb, en dan met de punt op de vouw. Hoe kan ik dat het beste doen?
04.09.2017 - 17:56DROPS Design answered:
Hoi Veronica, Het patroon is niet zo ontworpen dat je dit makkelijk kunt doen, maar je zou evt, als het werk verder klaar is, steken op kunnen nemen rondom de mouw en dan het kantpatroon a.h.w. in omgekeerde richting breien. Let er op dat je dan de steken ook andersom moet doen, dus waar er geminderd wordt, moet er nu gemeerderd worden, omdat je het andersom breit. (Evt. eerst even op een proeflapje proberen hoe dit uitpakt.) Het aantal steken moet dan deelbaar zijn door de breedte van het kantpatroon.
04.11.2017 - 16:04Bonjour Madame, Pourriez-vous m'indiquez combien de mailles dois-je prendre si je souhaite tricoter ce modèle avec les aiguilles n° 5. Je vous remercie sincèrement pour votre réponse.
24.07.2017 - 16:16DROPS Design answered:
Bonjour Anna, je vous conseille de faire un echantillon 10x10 cm pour voir combien de mailles vous avez besoin pour 10 cm (en longueur). Esuite vous devriez multiplier le nombre de mailles obtenu en se referant aux mesures dans le schemat en bas de page pour votre taille. Bon tricot!
25.07.2017 - 10:53Linda wrote:
I am confused about the short rows and diagram A.1. Do I work them both at the same time or one after the other through the pattern? Also, if working them together patter says 4 ridges over side stitches but there is 10 rows to diagram A.1.? Help! Please be very specific in you instructions. Thank you so much! Linda..:)
12.06.2017 - 17:28DROPS Design answered:
Hi Linda, yes, the pattern isn't very clear on this. You work A1 over the outermost 7 stitches on both sides of the piece, which gives you the lace pattern down the diagonal sides. The short rows (at the same time as A1) are worked in garter stitch (6 rows of short rows) as described at the top of the text, where the short rows alternate from the left and right side so that the sides are even. After the short rows have been completed, follow the text for completing the garment. I hope this helps, Kind regards, Deirdre
13.06.2017 - 08:32I have a question on the Short Rows. Please explain how many repeats for each side. Thank you.
05.02.2017 - 03:33DROPS Design answered:
Dear Colleen, when working the short rows, you have 6 rows (= 3 ridges) over the middle sts and 8 rows (4 ridges) on each side. Repeat the short rows until stated measurement for your size, adjusting after a whole repeat of A.1 in height. Happy knitting!
06.02.2017 - 10:07