DROPS Belle
DROPS Belle
53% Cotton, 33% Viscose, 14% Linen
from 2.00 £ /50g
Get the yarn to make this pattern from 18.00£.

The yarn cost is calculated from the pattern’s smallest size and the yarn’s cheapest product type. Looking for an even better price? You might find it on the DROPS Deals!

DROPS SS24

Bonnie Blue

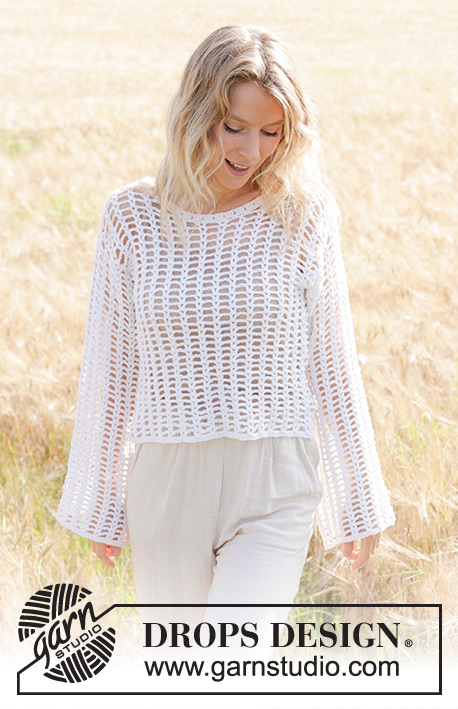
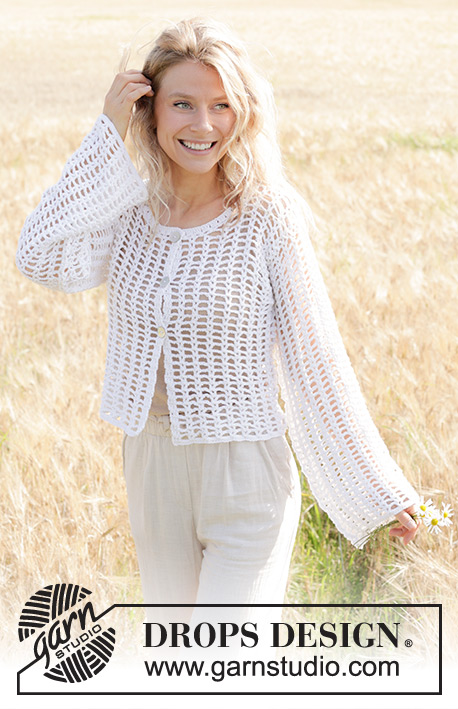
Crocheted jumper in DROPS Belle. The piece is worked in the round, top down with round yoke, lace pattern, short sleeves and split in sides. Sizes S - XXXL.

DROPS 250-9
DROPS Design: Pattern vs-112
Yarn group B
-------------------------------------------------------

SIZES:
S - M - L - XL - XXL - XXXL

YARN:
DROPS BELLE from Garnstudio (belongs to yarn group B)
450-500-550-600-650-700 g colour 15, jeans blue

CROCHET HOOK:
DROPS CROCHET HOOK SIZE 3.5 MM.

CROCHET TENSION:
20 treble crochets in width and 10 rows in height = 10 x 10 cm.
Hook size is only a guide. If you get too many stitches on 10 cm, change to a larger hook size. If you get too few stitches on 10 cm, change to a smaller hook size.

-------------------------------------------------------

Alternative Yarn – See how to change yarns here
Yarn Groups A to F – Use the same pattern and change the yarn here
Yarn usage using an alternative yarn – Use our yarn converter here

-------------------------------------------------------

DROPS Belle
DROPS Belle
53% Cotton, 33% Viscose, 14% Linen
from 2.00 £ /50g
Get the yarn to make this pattern from 18.00£.

The yarn cost is calculated from the pattern’s smallest size and the yarn’s cheapest product type. Looking for an even better price? You might find it on the DROPS Deals!

Pattern instructions

NOTE: This pattern is written in British English. All measurements in charts are in cm. For conversion from cm to inches - click here. There are different terms for crocheting in British and American English. If this pattern includes crochet, click for "crochet terms" here. For this pattern in American English, please click here.
-------------------------------------------------------

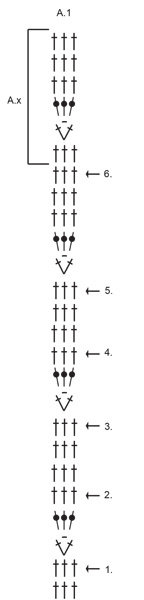
EXPLANATIONS FOR THE PATTERN:

-------------------------------------------------------

CHAIN STITCH:
If you work outermost on the hook the chain stitch will often be too tight; 1 chain stitch should be as long as 1 treble crochet is wide.

CROCHET INFORMATION:
At the beginning of each round, work 3 chain stitches (= this is 1 treble crochet) in addition to the stitches in diagram A.1. The round finishes with 1 slip stitch in the third chain stitch at the beginning of the round.

PATTERN:
See diagram A.1. A.x shows how the pattern is repeated in height.

INCREASE TIP (evenly spaced):
Increase on a round with 1 treble crochet in each treble crochet. To work out how to increase evenly, count the total number of stitches on the round (e.g., 100 stitches) and divide by the number of increases to be made (e.g., 22) = 4,5.
In this example, increase by working 2 treble crochets in alternately each 4th and each 5th stitch.

DECREASE TIP (for sleeves):
Decrease on a round with 1 treble crochet in each treble crochet, by working 2 treble crochets together as follows:
* Make 1 yarn over, insert hook through next treble crochet, pick up strand, make 1 yarn over and pull it through the first 2 loops on hook *, work from *-* a total of 2 times, make 1 yarn over and pull it through all 3 loops on hook (1 treble crochet decreased).

-------------------------------------------------------

START THE PIECE HERE:

-------------------------------------------------------

JUMPER – SHORT OVERVIEW OF THE PIECE:
The neck and yoke are worked in the round from mid back and top down. The yoke is divided for body and sleeves and the body is continued in the round, while the sleeves wait. The body is divided and finished back and forth, working a split in each side. The sleeves are worked in the round. A round of double crochets is worked around the neckline to finish.

NECKLINE:
Work 100-106-109-115-118-130 CHAIN STITCHES – see description above, with hook size 3.5 mm and DROPS Belle. Form them into a ring with 1 slip stitch in the first chain stitch. Read CROCHET INFORMATION above, work 1 round of treble crochets and increase 22-22-22-25-25-25 treble crochets evenly on the round - read INCREASE TIP = 121-127-130-139-142-154 stitches.

YOKE:
Start the round with 3 chain stitches (= 1 treble crochet), then repeat A.1 on the round. On the rounds marked with arrows in the diagram increase as follows - remember INCREASE TIP and THE CROCHET TENSION!
ARROW 1: Increase 24-27-27-30-36-39 treble crochets evenly spaced = 145-154-157-169-178-193 stitches.
ARROW 2: Increase 24-27-30-36-36-42 treble crochets evenly spaced = 169-181-187-205-214-235 stitches.
ARROW 3: Increase 27-27-30-39-42-45 treble crochets evenly spaced = 196-208-217-244-256-280 stitches.
ARROW 4: Increase 27-30-33-39-42-45 treble crochets evenly spaced = 223-238-250-283-298-325 stitches.
ARROW 5: Increase 27-30-33-39-42-45 treble crochets evenly spaced = 250-268-283-322-340-370 stitches.
ARROW 6: Increase 27-33-36-39-45-45 treble crochets evenly spaced = 277-301-319-361-385-415 stitches.
Continue the pattern as shown in A.x until the piece measures 20-20-23-23-25-27 cm and the next round is a round with 1 treble crochet in each treble crochet. The piece is now measured from here!

DIVIDE FOR BODY AND SLEEVES:
Work 3 chain stitches (= 1 treble crochet), 43-48-49-55-60-64 treble crochets (approx. half back piece), 9-9-12-12-15-18 chain stitches (in side under sleeve), skip 52-55-61-70-73-79 treble crochets (sleeve), work 86-95-98-110-119-128 treble crochets (front piece), 9-9-12-12-15-18 chain stitches (in side under sleeve), skip 52-55-61-70-73-79 treble crochets (sleeve) and work 43-47-49-55-59-64 treble crochets (approx. half back piece). The body and sleeves are finished separately.

BODY:
= 190-208-220-244-268-292 stitches. Work 3 chain stitches (= 1 treble crochet) and pattern A.x as before, until the body measures 6-6-7-7-7-9 cm from the division. Now increase 6-6-6-6-6-6 treble crochets evenly spaced - remember INCREASE TIP = 196-214-226-250-274-298 stitches.
When the body measures 13-13-14-14-14-16 cm from the division, increase 9-6-9-6-6-6 treble crochets evenly spaced = 205-220-235-256-280-304 stitches.
Continue working until the body measures 24-26-25-26-26-26 cm from the division. Cut the strand. Now divide for the split in each side. Lay the piece flat and insert 1 marker in each side with 102-110-117-128-140-152 stitches on the front piece and 103-110-118-128-140-152 stitches on the back piece. Finish the front and back separately.

FRONT PIECE:
= 102-110-117-128-140-152 stitches. Work back and forth with 1 treble crochet in each treble crochet, until the split measures 4 cm. The jumper measures approx. 52-54-56-58-60-62 cm from the shoulder.

BACK PIECE:
= 103-110-118-128-140-152 stitches. Work back and forth with 1 treble crochet in each treble crochet, until the split measures 4 cm.

SLEEVES:
Start the round in the middle of the 9-9-12-12-15-18 chain stitches worked on one side of the body. Work 3 chain stitches (= 1 treble crochet) and A.x in the round as before = 61-64-73-82-88-97 stitches. When the sleeve measures 3-3-4-4-5-5 cm, decrease 3-3-3-3-3-3 treble crochets evenly spaced – read DECREASE TIP = 58-61-70-79-85-94 stitches.

SIZE XL:
When the sleeve measures 8 cm, decrease 3 treble crochets evenly spaced – remember DECREASE TIP = 76 stitches.

ALL SIZES:
Continue the pattern until the sleeve measures 17-17-15-16-14-12, with at least 2 rounds without lace pattern at the bottom of the sleeve.

NECKLINE:
Start mid-back, fasten the strand with 1 slip stitch and work 1 double crochet between each treble crochet from round 1. Finish with 1 slip stitch in the first double crochet.

Diagram

symbols = 1 chain stitch - if you work outermost on the hook the chain stitch will often be too tight; 1 chain stitch should be as long as 1 treble crochet is wide.
symbols = 1 treble crochet in stitch below
symbols = Increase-round
diagram
diagram
Do you have a question? See a list of frequently asked questions (FAQ)

Knitting tension is what determines the final measurements of your work, and is usually measured per 10 x 10 cm. It is provided like so: number of stitches in width x number of rows in height - eg: 19 stitches x 26 rows = 10 x 10 cm.

The knitting tension is very individual; some people knit/crochet loosely while others work tightly. You adjust the knitting tension with the needle size, which is why the suggested needle size is only meant as a guide! You need to adjust this (up or down) to ensure that YOUR knitting tension matches the knitting tension provided in the pattern. If you work with a different knitting tension than provided you will have a different yarn consumption, and your work will have different measurements than what the pattern suggests.

The knitting tension also determines which yarns can replace each other. As long as you achieve the same knitting tension you can replace one yarn with another.

See DROPS lesson: How to measure your tension/gauge

See DROPS video: How to make a gauge tension swatch

The required amount of yarn is provided in grams, eg: 450 g. To calculate how many balls you’ll need you first need to know how many grams are in 1 ball (25g, 50g or 100g). This information is available if you click on the individual yarn quality on our pages. Divide the amount required with the amount of each ball. For example, if each ball is 50g (the most common amount), the calculation will be as follows: 450 / 50 = 9 balls.

The important thing when changing from one yarn to another is that the knitting/crochet tension remains the same. This is so that the measurements of the finished piece will be the same as on the sketch provided. It is easier to achieve the same knitting tension using yarns from the same yarn group. It is also possible to work with multiple strands of a thinner yarn to achieve the knitting tension of a thicker one. Please try our yarn converter. We recommend you to always work a test swatch.

Please NOTE: when changing yarn the garment might have a different look and feel to the garment in the photo, due to individual properties and qualities of each yarn.

See DROPS lesson: Can I use a different yarn than the one mentioned in the pattern?

All our yarns are categorised into yarn groups (from A to F) according to thickness and knitting tension – group A contains the thinnest yarns and group F the thickest. This makes it easier for you to find alternative yarns to our patterns, should you wish to switch yarn. All yarns within the same group have a similar knitting tension and can easily replace each other. However, different yarn qualities have different structures and properties which will give the finished work a unique look and feel.

Click here for an overview of the yarns in each yarn group

At the top of all our patterns you’ll find a link to our yarn calculator, which is a helpful tool should you wish to use a different yarn than suggested. By filling in the yarn quality you wish to replace, the amount (in your size) and number of strands, the calculator will present good alternative yarns with the same knitting tension. Additionally it will tell you how much you’ll require in the new qualities and whether you’ll need to work with multiple strands. Most skeins are 50g (some are 25g or 100g).

If the pattern is worked with multiple colours, every colour will have to be calculated separately. Similarly, if the pattern is worked with several strands of different yarns (for example 1 strand Alpaca and 1 strand Kid-Silk) you will have to find alternatives for each, individually.

Click here to see our yarn calculator

Since different yarns have different qualities and textures we have chosen to keep the original yarn in our patterns. However, you can easily find options among our available qualities by using our yarn calculator, or simply pick a yarn from the same yarn group.

It is possible that some retailers still have discontinued yarns in stock, or that someone has a few skeins at home that they would like to find patterns for.

The yarn calculator will provide both alternative yarn as well as required amount in the new quality.

If you think it's hard to decide what size to make, it can be a good idea to measure a garment you own already and like the size of. Then you can pick the size by comparing those measures with the ones available in the pattern's size chart.

You'll find the size chart at the bottom of the pattern.

See DROPS lesson: How to read size chart

The needle size provided in the pattern serves only as a guide, the important thing is to follow the knitting tension. And since knitting tension is very individual, you will have to adjust the needle size to ensure that YOUR tension is the same as in the pattern – maybe you’ll have to adjust 1, or even 2 needle sizes, up or down to achieve the correct tension. For this, we recommend that you work test swatches.

Should you work with a different knitting tension than the one provided, the measurements of the finished garment might deviate from the measurement sketch.

See DROPS lesson: How to measure your tension/gauge

See DROPS video: How to make a tension/gauge swatch

Working a garment top-down provides more flexibility and room for personal adjustment. For example it is easier to try the garment on while working, as well as making adjustments to length of yoke and shoulder caps.

The instructions are carefully explaining every step, in the correct order. Diagrams are adjusted to the knitting direction and are worked as usual.

The diagram depicts all rows/rounds, and every stitch seen from the right side. It is read from bottom to top, from right to left. 1 square = 1 stitch.

When working back and forth, every other row is worked from the right side and every other row is worked from the wrong side. When working from the wrong side, the diagram will have to be worked reversed: from left to right, knit stitches are purled, purl stitches are knit etc.

When working in the round every round is worked from the right side and the diagram are worked from right to left on all rounds.

See DROPS lesson: How to read knitting diagrams

The diagram depicts all rows/rounds, and every stitch seen from the right side. It is worked from bottom to top, from right to left.

When working back and forth every other row is worked from the right side: from right to left and every other row is worked from the wrong side: from left to right.

When working in the round, every row in the diagram are worked from the right side, from right to left.

When working a circular diagram you start in the middle and work your way outwards, counter clockwise, row by row.

The rows usually start with a given number of chain stitches (equivalent to the height of the following stitch), this will either be depicted in the diagram or explained in the pattern.

See DROPS lesson: How to read crochet diagrams

Instructions for working several diagrams after each other on the same row/round, will often be written like so: “work A.1, A.2, A.3 a total of 0-0-2-3-4 times". This means you work A.1 once, then A.2 is worked once, and A.3 is repeated (in width) the number of times provided for your size – in this case like so: S = 0 times, M = 0 times, L=2 times, XL= 3 times and XXL = 4 times.

The diagrams are worked as usual: begin with the first row in A.1, then work the first row in A.2 etc.

See DROPS lesson: How to read knitting diagrams

See DROPS lesson: How to read crochet diagrams

The total width of the garment (from wrist-to-wrist) will be larger in the larger sizes, despite the actual sleeves being shorter. The larger sizes have longer sleeve caps and wider shoulders, so there will be a good fit in all sizes.

The measurement sketch/schematic drawing provides information regarding the full length of the garment. If it’s a jumper or a jacket the length is measured from the highest point on the shoulder closest to the neckline, and straight down to the bottom of the garment. It is NOT measured from the tip of shoulder. Similarly, the length of yoke is measured from the highest point on the shoulder and down to where yoke is split into body and sleeves.

On a jacket measures are never taken along bands, unless specifically stated. Always measure inside band stitches when measuring the length.

See DROPS lesson: How to read a schematic drawing

Diagrams are often repeated on the round or in height. 1 repeat is the diagram the way it appears in the pattern. If it says to work 5 repeats of A.1 in the round, then you work A.1 a total of 5 times after/next to each other in the round. If it says to work 2 repeats of A.1 vertically/in height you work the entire diagram once, then begin again at the start and work the entire diagram one more time.

Chain stitches are slightly narrower than other stitches and to avoid working the cast-on edge too tight, we simply chain more stitches to begin with. The stitch count will be adjusted on the following row to fit the pattern and measurement sketch.

The rib edge is more elastic and will contract slightly compared to, for example, stocking stitch. By increasing before the rib edge, you avoid a visible difference in width between the rib edge and the rest of the body.

It’s very easy to cast off too tightly, and by making yarn overs while casting off (and simultaneously casting these off) you avoid a too tight cast off edge.

See DROPS video: How to bind off with yarn overs (yo)

To achieve an even increase (or decrease) you can increase on, for example: every 3rd and 4th row alternately, like so: work 2 rows and increase on the 3rd row, work 3 rows and increase on the 4th. Repeat this until the increase is complete.

See DROPS lesson: Increase or decrease 1 st on every 3rd and 4th row alternately

Should you prefer to work in the round instead of back and forth, you may of course adjust the pattern. You’ll need to add steeks mid-front (usually 5 stitches), and follow the instructions. When you would normally turn and work from the wrong side, simply work across the steek and continue in the round. At the end you’ll cut the piece open, pick up stitches to work bands, and cover the cut edges.

See DROPS video: How to knit steeks and cut open

Should you prefer to work back and forth instead of in the round, you may of course adjust the pattern so you work the pieces separately and then assemble them at the end. Divide the stitches for the body in 2, add 1 edge stitch in each side (for sewing) and work the front and back pieces separately.

See DROPS lesson: Can I adapt a pattern for circular needles into straight needles?

Pattern repeats can vary slightly in the different sizes, in order to get the correct proportions. If you’re not working the exact same size as the garment in the photo, yours might deviate slightly. This has been carefully developed and adjusted so that the complete impression of the garment is the same in all sizes.

Make sure to follow instructions and diagrams for your size!

If you have found a pattern you like which is available in women’s size it’s not very difficult to convert it to men’s size. The biggest difference will be the length of sleeves and body. Start working on the women size that you think would fit across the chest. The additional length will be worked right before you cast off for the armhole/sleeve cap. If the pattern is worked top-down you can add the length right after the armhole or before the first decrease on sleeve.

Regarding additional yarn amount, this will depend on how much length you add, but it is better with a skein too many than too few.

All yarns will have excess fibres (from production) that might come off as lint or shedding. Brushed yarns (ie hairier yarns) have more of these loose, excess fibres, causing more shedding.

Shedding also depends on what is worn under or over the garment, and whether this pulls at the yarn fibres. It’s therefore not possible to guarantee that there will be no shedding

Below are some tips on how to get the best result when working with hairier yarns:

1. When the garment is finished (before you wash it) shake it vigorously so the looser hairs come off. NOTE: do NOT use a lint roller, brush or any method that pulls at the yarn.

2. Place the garment in a plastic bag and put it in your freezer - the temperature will cause the fibres to become less attached to each other, and excess fibres will come off easier.

3. Leave in the freezer for a few hours before taking it out and shaking it again.

4. Wash the garment according to the instructions on the yarn label.

Pilling is a natural process that happens to even the most exclusive of fibers. It's a natural sign of wear and tear that is hard to avoid, and that is most visible in high friction areas of your garment like a sweater's arms and cuffs.

You can make your garment look as new by removing the pilling, using a fabric comb or a pill/lint remover.

Still can't find the answer you need? Then scroll down and leave your question so one of our experts can try to help you. This will be done normally within 5 to 10 working days.
In the meantime, you can read the questions and answers that others have left to this pattern or join the DROPS Workshop on Facebook to get help from fellow knitters/crocheters!

You might also like...

Post a comment to pattern DROPS 250-9

We would love to hear what you have to say about this pattern!

If you want to leave a question, please make sure you select the correct category in the form below, to speed up the answering process. Required fields are marked *.

Comments / Questions (29)

country flag Marion Gelder wrote:

Ik heb pijl 1 gehad, dan volg ik instructie verder ben nu bij de toer dat ik 3stokjes om de losse moet maken maar dan heb ik toch teveel stokjes ik kom nu uit op 234 stokjes? En dan zou ik nu in rij twee moeten gaan meerderen naar 187 stokjes, u begrijpt ik snap het niet. Help Marion

26.04.2024 - 14:00

country flag Arina wrote:

Kan ik dit truitje ook met muskat haken ik heb 14 bollen Spring Renaissance Top Voor dit truitje moet het wel lukken

22.04.2024 - 00:41

DROPS Design answered:

Dag Arina,/p>

Muskat valt ook in garencategorie B, dus dat kan prima. Om te berekenen hoeveel je nodig hebt in een ander garen, kun je trouwens ook de garenververvanger gebruiken. Hiervan vindt je een link onder de materialenlijst bij ieder patroon.

22.04.2024 - 20:40

country flag Paula wrote:

Ik haak dit in XL en wat doe ik na de pas met de 12 lossen? Blijven die gewoon bungelen of ?

19.04.2024 - 17:49

country flag Karin Hahn wrote:

Hallo, so schön der Pullover auch ist verzwefle ich gerade an den Zunahmen...... Toll dass Sie uns ein beispiel für das Zunehmen zeigen. jedoch ist das sicherlich aus gutem Grund so gewählt dass man immer abwechselnd in jeder 4 und 5 Masche verdoppeln muss. Nun seien Sie doch bitte so lieb und erklären mir wie das zum Beispiel bei einer Maschenzahl von 130 Stk, Zunahme 27 x auf eine Maschenanzahl von 157 Stk ausgerechnet wird ,dass die Zunahmen gleichmäßig verteilt sind. I Danke

17.04.2024 - 13:40

DROPS Design answered:

Liebe Frau Hahn, in dieser Lektion erklären wir, wie man regelmäßig verteilt, je nach dem Ergebnis von der Division., je nach der Zahl eine halbe oder ganze Zahl abgerundet wird. Viel Spaß beim Stricken!

17.04.2024 - 15:26

country flag Paula wrote:

Ik krijg niet zo’n gaatjespatroon in de pas wat doe ik verkeerd?

05.04.2024 - 19:18

country flag Irmeli Andersson wrote:

Perun kysymykseeni. Huomasin etten ollut huomioinut ollenkaan 1. kerroksella tehtäviä lisäyksiä, vaan hyppäsin suoraan 1. lisäykseen. Pitäisi lukea ohjeet tarkemmin:) yst terveisin Irmeli A

04.04.2024 - 20:02

country flag Irmeli Andersson wrote:

Hei, kysyisin lisäyksestä, jota en aivan tajua. Minulla on aloituksessa 100 pylvästä ja lisään 24 pylvästä ja ohjeessa sanotaan että tuloksena on 145 s. Onko siis p ja s eri asia? En ole juurikaan tehnyt neuleita virkkaamalla, joten tämä on minulle outo asia. T Irmeli A

04.04.2024 - 18:59

DROPS Design answered:

Hei, oletko tehnyt pääntien reunuksen lisäykset? Työssä on aluksi 100 ketjusilmukkaa ja ne suljetaan renkaaksi 1 piilosilmukalla (= 99 ketjusilmukkaa kerroksella). Ensimmäisellä pylväskerroksella työhön lisätään 22 pylvästä ja työssä on tämän jälkeen 121 pylvästä.

05.04.2024 - 18:15

country flag Pirjo Irmeli Andersson wrote:

Hei, en oikein käsitä näitä lisäyksiä; aloituksessa minulla on 100 pylvästä, lisätään 24 pylvästä ja tulos on 145 silmää. Ovatko siis pylväät ja silmukat eri juttu? Olen tehnyt neuleita harvemmin virkkaamalla joten tämä on minulle outo asia. Terveisin Irmeli A

04.04.2024 - 18:55

country flag Marie wrote:

Bonjour, à la séparation des manches (+9 mailles en l’air) faut-il de suite crocheter ces 9 mailles lors de du 1er rang en aller-retour dos/devant ? Ou bien faut-il les laisser en attente ? Car mon ouvrage s’arrondit malgré le bon nombre de mailles , alors que d’après le modèle il devrait descendre droit. \r\nMerci pour vos explications

01.04.2024 - 10:05

DROPS Design answered:

Bonjour Marie, après la division, crochetez toutes les mailles du tour = les mailles de l'empiècement partie devant et dos + les 9 mailles en l'air de chaque côté à la place des manches. Bon crochet!

02.04.2024 - 15:04

country flag Inge Mollet wrote:

Ik snap het gedeelte na de pas niet goed. Ik heb voor het lijf 48+48+86 steken maar geen 190. Waar gaat het mis. En moeten die 9 lossen daar blijven bungelen?

31.03.2024 - 16:29

DROPS Design answered:

Dag Inge,

Als je maat S haakt, dan haak je eerst 43 stokjes (in plaats van 48), dan 9 lossen (onder de mouw, dus bij de oksel), 86 stokjes, 9 lossen en tot slot weer 43 stokjes. Hiermee kom je op een totaal van 43+9+86+9+43 = 190. De eerste 3 lossen op het begin van de toer worden aanvullend op de toer gehaakt (zie bovenaan bij informatie voor het haken).

04.04.2024 - 20:25