
Popular categories
Looking for a yarn?


|
|
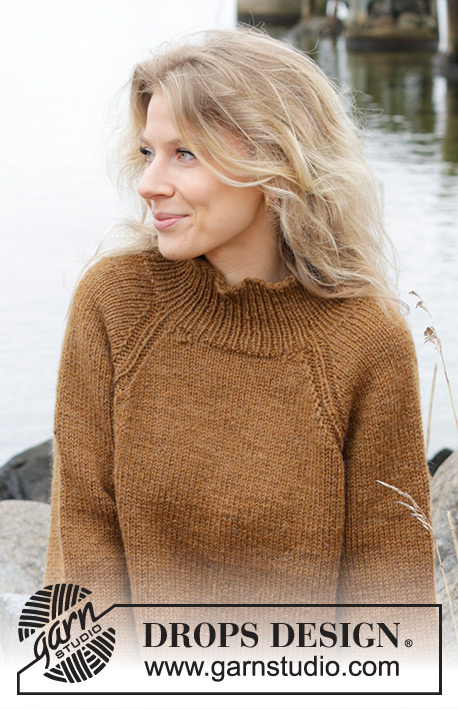
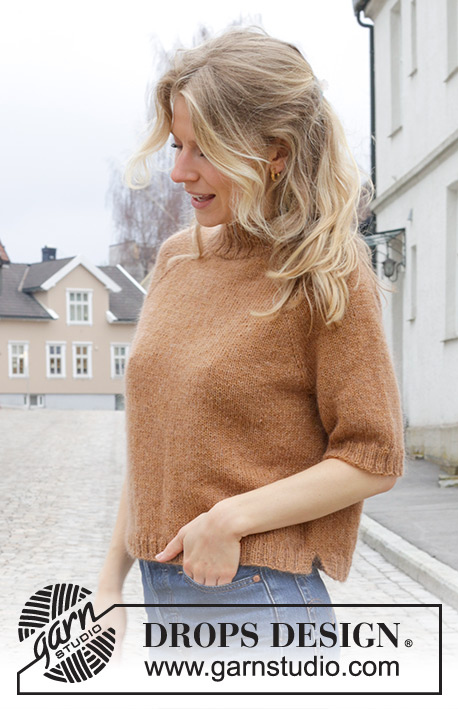
Ginger Tea Top |
|
 |
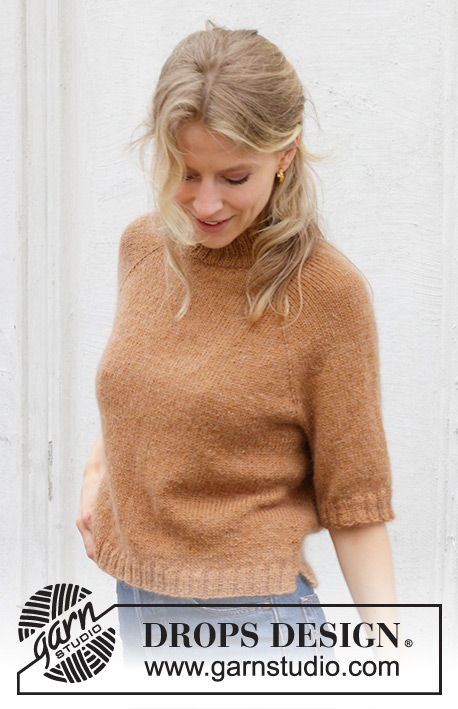 |
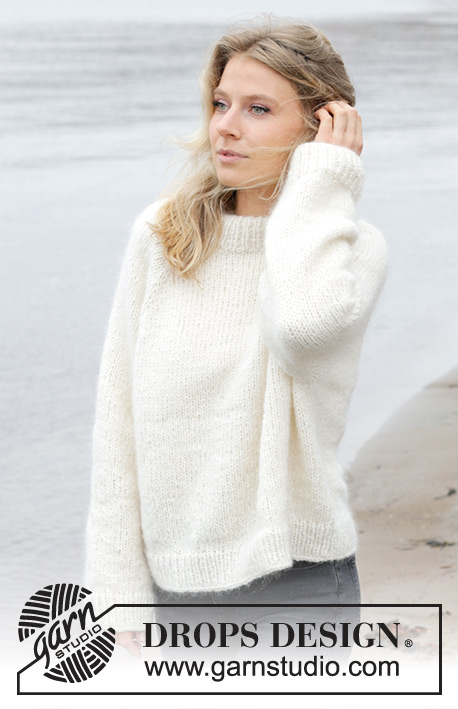
Knitted jumper in DROPS Flora and DROPS Kid-Silk. The piece is worked top down in stocking stitch with raglan and short sleeves. Sizes S - XXXL.
DROPS 244-15 |
|
|
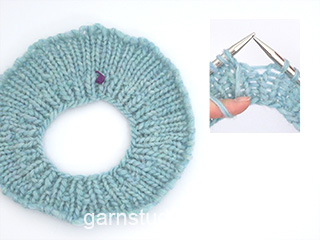
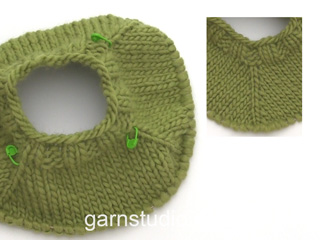
------------------------------------------------------- EXPLANATIONS FOR THE PATTERN: ------------------------------------------------------- RAGLAN-1: Increase 1 stitch before/after 2 stocking stitches in each transition between body and sleeves. The marker-thread sits between these 2 stitches. Increase 1 stitch by making 1 yarn over, which is worked as follows on the next round: BEFORE MARKER-THREAD: Slip the yarn over knit-wise, then place it back onto the left needle the other way around, knit the front loop (stitch twists to the right). No hole. AFTER MARKER-THREAD: Knit the back loop (stitch twists to the left). No hole. The new stitches are worked in stocking stitch. RAGLAN-2: Increase 1 extra stitch before/after the marker-threads on the body (not on the sleeves). Raglan-2 is worked in addition to Raglan-1. BEFORE MARKER-THREAD: Work until there are 3 stitches left before the marker-thread, use the left needle to pick up the strand from behind between the next 2 stitches, knit the front loop. No hole. AFTER MARKER-THREAD: Work to 3 stitches after the marker-thread (any yarn overs from the previous row are not counted in this stitch-count), use the left needle to pick up the strand from the front between the next 2 stitches, knit the back loop. No hole. DECREASE TIP (for sleeves): Decrease 1 stitch on each side of the marker-thread as follows: Work until there are 3 stitches left before the marker-thread, slip 1 stitch knit-wise, knit 1 and pass the slipped stitch over the knitted stitch, knit 2 (marker-thread sits between these 2 stitches), knit 2 together (2 stitches decreased). GARTER STITCH (worked back and forth): Knit all rows. 1 ridge = knit 2 rows. ------------------------------------------------------- START THE PIECE HERE: ------------------------------------------------------- JUMPER – SHORT OVERVIEW OF THE PIECE: The piece is worked from top down. The neck is first worked in the round with circular needle, then an elevation is worked back and forth with circular needle at the back of the neck. The yoke is continued in the round with circular needle, then divided for body and sleeves. The body is continued in the round with circular needle as far as the split, then finished back and forth. The sleeves are worked in the round with circular needle/double pointed needles. NECK: Cast on 96-104-104-112-112-120 stitches with short circular needle size 4.5 mm, 1 strand DROPS Flora and 1 strand DROPS Kid-Silk. Change to short circular needle size 3.5 mm and work rib (knit 2, purl 2) for 5 cm. Insert a marker at the beginning of the round. YOKE: Insert 4 marker-threads without working the stitches, each thread inserted between 2 knitted stitches as follows: Count 13-13-13-17-17-17 stitches, insert marker-thread 1 before the next stitch (approx. half back piece), count 24 stitches, insert marker-thread 2 before the next stitch (sleeve), count 24-28-28-32-32-36 stitches, insert marker-thread 3 before the next stitch (front piece), count 24 stitches, insert marker-thread 4 before the next stitch (sleeve), 11-15-15-15-15-19 stitches left (rest of back piece). You now work an elevation at the back of the neck. Cut the strands. Change to circular needle size 4.5 mm. Start from the right side, 3 stitches before marker-thread 3. Work back and forth as follows: ROW 1 (right side): Knit to 1 stitch before marker-thread 3, make 1 yarn over, knit 2 (marker-thread sits between these 2 stitches), 1 yarn over, knit to 1 stitch before marker-thread 4, make 1 yarn over, knit 2 (marker-thread sits between these 2 stitches), 1 yarn over, knit to 1 stitch before marker-thread 1, make 1 yarn over, knit 2 (marker-thread sits between these 2 stitches), 1 yarn over, knit to 1 stitch before marker-thread 2, make 1 yarn over, knit 2 (marker-thread sits between these 2 stitches), 1 yarn over, knit 2. 8 increased stitches = 104-112-112-120-120-128 stitches. Turn. ROW 2 (wrong side): * Purl to the yarn over (before the marker-thread), purl the back loop, purl 2 (marker-thread sits between these 2 stitches), slip the next yarn over and replace it on the left needle the other way around (insert the left needle from the back when replacing it), purl the front loop. Purl to the next marker-thread *, work from *-* 2 more times. Purl to the yarn over (before marker-thread 3), purl the back loop, purl 2 (marker-thread sits between these 2 stitches), slip the next yarn over and replace it on the left needle the other way around, purl the front loop. Purl to 2 stitches past the beginning of the previous row. Turn. ROW 3 (right side): Knit to 1 stitch before marker-thread 3, make 1 yarn over, knit 2 (marker-thread sits between these 2 stitches), 1 yarn over, knit to 1 stitch before marker-thread 4, make 1 yarn over, knit 2, (marker-thread sits between these 2 stitches), 1 yarn over, knit to 1 stitch before marker-thread 1, make 1 yarn over, knit 2 (marker-thread sits between these 2 stitches), 1 yarn over, knit to 1 stitch before marker-thread 2, make 1 yarn over, knit 2 (marker-thread sits between these 2 stitches), 1 yarn over, knit to 2 stitches past the beginning of the previous row. 8 increased stitches = 112-120-120-128-128-136 stitches. Turn. ROW 4 (wrong side): As row 2. ROW 5 (right side): Knit to 1 stitch before marker-thread 3, make 1 yarn over, knit 2 (marker-thread sits between these 2 stitches), 1 yarn over, knit to 1 stitch before marker-thread 4, make 1 yarn over, knit 2, (marker-thread sits between these 2 stitches), 1 yarn over, knit to 1 stitch before marker-thread 1, make 1 yarn over, knit 2 (marker-thread sits between these 2 stitches), 1 yarn over, knit to 1 stitch before marker-thread 2, make 1 yarn over, knit 2 (marker-thread sits between these 2 stitches), 1 yarn over, knit to 2 stitches past the beginning of the previous row. 8 increased stitches = 120-128-128-136-136-144 stitches. Turn. ROW 6 (wrong side): As row 2. The elevation is finished. Cut the strands. READ THE REST OF THE YOKE SECTION BEFORE CONTINUING. Start by the marker. Continue stocking stitch in the round and increase for raglan as follows: REMEMBER THE KNITTING TENSION! NOTE: Extra stitches are increased on the front and back pieces, therefore raglan-2 is worked at regular intervals in addition to raglan-1. Read RAGLAN-1 and RAGLAN-2 above and begin both increases on the next round. Increase for raglan-1 on each side of all 4 marker-threads every 2nd round 3-4-7-14-14-12 more times (a total of 6-7-10-17-17-15 times including the increases on the elevation). AT THE SAME TIME increase for RAGLAN-2 on the front and back pieces – (raglan-2 is worked in addition to raglan-1) every 6th-8th-8th-6th-4th-4th round 6-5-6-8-10-11 times in total. Continue to increase for raglan-1 every 2nd round but every 2nd increase is only on the front and back pieces (4 increased stitches), i.e., increase on the front and back pieces every 2nd round and on the sleeves every 4th round. Increase like this 14-16-14-8-10-14 times on the front and back pieces (7-8-7-4-5-7 times on the sleeves) – remember raglan-2. After all the increases for raglan-1 and raglan-2 there are 252-276-292-328-348-368 stitches. You have increased a total of 13-15-17-21-22-22 times on the sleeves and 26-28-30-33-37-40 times on the front and back pieces (20-23-24-25-27-29 times for raglan-1 and 6-5-6-8-10-11 times for raglan-2). There are 50-54-58-66-68-68 stitches on the sleeves and 76-84-88-98-106-116 stitches on the front and back pieces). Continue working without further increases until the yoke measures 20-22-23-24-26-28 cm, measured after the rib on the neck mid-back. Now divide for the body and sleeves (from mid-back): Knit to marker-thread 1 (belongs to the back piece) = 39-41-43-50-54-57 stitches, place the next 50-54-58-66-68-68 stitches on a thread for the sleeve, cast on 10-10-12-12-14-16 stitches under the sleeve, knit to marker-thread 3 (front piece = 76-84-88-98-106-116 stitches), place the next 50-54-58-66-68-68 stitches on a thread for the sleeve, cast on 10-10-12-12-14-16 stitches under the sleeve, knit to the end of the round (rest of back piece = 37-43-45-48-52-59 stitches). The body and sleeves are finished separately. BODY: = 172-188-200-220-240-264 stitches. Insert a marker-thread in the middle of the cast-on stitches under each sleeve and allow them to follow your work onwards (used for the split in each side). Start the round at one marker-thread and work stocking stitch in the round. When the body measures 21-21-22-23-23-23 cm from the division, place the last 86-94-100-110-120-132 stitches on a thread and work the first 86-94-100-110-120-132 stitches, creating a split in each side, as follows: Work 4 GARTER STITCHES – read description above, work stocking stitch over the next 78-86-92-102-112-124 stitches and increase 12-12-14-12-18-14 stitches evenly over these stitches (increase with yarn overs which are worked twisted on the next row) and 4 garter stitches = 98-106-114-122-138-146 stitches. Change to circular needle size 3.5 mm and work rib from the wrong side as follows: 4 garter stitches, * purl 2, knit 2 *, work from *-* until there are 6 stitches left, purl 2 and 4 garter stitches. Continue this rib back and forth for 3 cm, with the next row from the right side. Cast off with knit over knit and purl over purl. Place the stitches from the thread on circular needle size 4.5 mm and work in the same way. The jumper measures approx. 50-52-54-56-58-60 cm from the shoulder. SLEEVES: Place the 50-54-58-66-68-68 stitches from the thread on the one side of the piece on short circular needle/double pointed needles size 4.5 mm and knit up 1 stitch in each of the 10-10-12-12-14-16 stitches cast on under the sleeve = 60-64-70-78-82-84 stitches. Insert a marker-thread in the middle of the new stitches under the sleeve and allow it to follow your work onwards (used when decreasing). Work stocking stitch in the round. When the sleeve measures 4 cm, decrease 1 stitch on each side of the marker-thread – read DECREASE TIP. Decrease like this every 2-2-2½-1½-1½-1 cm a total of 4-4-3-4-3-3 times = 52-56-64-70-76-78 stitches. Continue working until the sleeve measures 14-12-12-11-10-8 cm from the division. Knit 1 round and increase 4-4-4-6-8-10 stitches evenly spaced = 56-60-68-76-84-88 stitches. Change to double pointed needles size 3.5 mm and work rib (knit 2, purl 2) for 3 cm. Loosely cast off with knit over knit and purl over purl. The sleeve measures approx. 17-15-15-14-13-11 cm from the division. Work the other sleeve in the same way. ASSEMBLY: Fasten the strands and sew a small stitch at the top of each split so they stay together. |
|

|
|
|
Have you made this or any other of our designs? Tag your pictures in social media with #dropsdesign so we can see them! Do you need help with this pattern?You'll find tutorial videos, a Comments/Questions area and more by visiting the pattern on garnstudio.com. © 1982-2024 DROPS Design A/S. We reserve all rights. This document, including all its sub-sections, has copyrights. Read more about what you can do with our patterns at the bottom of each pattern on our site. |
|


With over 40 years in knitting and crochet design, DROPS Design offers one of the most extensive collections of free patterns on the internet - translated to 17 languages. As of today we count 304 catalogues and 11422 patterns - 11422 of which are translated into English (UK/cm).
We work hard to bring you the best knitting and crochet have to offer, inspiration and advice as well as great quality yarns at incredible prices! Would you like to use our patterns for other than personal use? You can read what you are allowed to do in the Copyright text at the bottom of all our patterns. Happy crafting!
Comments / Questions (38)
Hej! Jag har delat arbetet för fram- och bakstycke resp ärmar, lagt upp för ärmarna och stickat fram till början av varvet = mitt bak. Varför skall jag nu börja från mitt under ärmen (och förmodar jag, klippa garnet), varför kan jag inte bara fortsätta sticka runt?
06.04.2024 - 17:02DROPS Design answered:
Hej Maria, det får helt fint at starte omgangen ved den mærketråd du allerede har :)
09.04.2024 - 10:33Vilken storlek är modellens tröja stickad i?
26.03.2024 - 20:56Continue to increase for raglan-1 every 2nd round but every 2nd increase is only on the front and back pieces (4 increased stitches), i.e., increase on the front and back pieces every 2nd round and on the sleeves every 4th round. Increase like this 14-16-14-8-10-14 times on the front and back pieces (7-8-7-4-5-7 times on the sleeves) – remember raglan-2. this is the part i meant in my previous question, i forgot to add it. does this come before or after the 14 increases on both sides?
20.03.2024 - 16:04DROPS Design answered:
Dear Destiny, you first increase 8 sts a total of 14 times for the raglan (raglan-1) ie 2 sts on each sleeve, 2 sts on front and 2 sts on back piece (+ Raglan-2 when needed); then afterwards start increasing alternately only on front and back piece (on every 2nd rond) and on both front/back pieces and sleeves (+ Raglan-2). Happy knitting!
21.03.2024 - 08:33Hello, i’m having trouble understanding when to do raglan-1 on just the back and front every 2nd increase. do i do that before or after the other 17 increases on all sides (including the short rows).
20.03.2024 - 15:15DROPS Design answered:
Dear Destiny, you first increase for short rows a total of 3 times (every row from RS) as explained under Row 1 to 6 then you work in the round and increase 14 times (size XL and XXL) as explained under RAGLAN-1: on both front/back pieces and sleeves, this means you will increase 14 times on both sides of the 2 stocking stitches for raglan lines just as you worked before on rows from RS, at the same time, increase for body only, see RAGLAN-2. Happy knitting!
20.03.2024 - 15:37Thank you for the response. I think my webpage may have been glitched because i reopened it and now the pattern is there. thank you!
23.02.2024 - 18:20There is no pattern for the back elevation starting after the 2x2 rib. all the tutorials i can find made by you have no explanation on stitch count or anything. this is my first time working an elevation with no direction.
22.02.2024 - 19:08DROPS Design answered:
Dear Destiny, to make this elevation you will have to first cut the yarn and slip all stitches until 3rd marker (in the placement position = beg of front piece, seen from RS) without working them, then start the rows here. In this video we show how to work such short rows, but remember to follow the instructions for the pattern as the raglan increases are worked another way (K2 on each marker instead of K1 in the video). Happy knitting!
23.02.2024 - 08:16Hi - finding it difficult to understand which marker is which for the body-only increases. Does front piece lie between marker 3 and marker 4 and the back piece between marker 1 and marker 2? Confused because you say marker 1 is at 'half back'. Hope you can help me! Thanks.....
22.02.2024 - 18:37DROPS Design answered:
Dear Mrs Davidson, beg of the round is on mid back, then stitches from beg of round to 1st marker are for half back piece, stitches between 1st and 2nd marker are for left sleeve; stitches between 2nd and 3rd marker are for front piece; stitches between 3rd and 4th marker are for right sleeve and stitches after 4th marker to the end of the round are for the 2nd half of back piece. Happy knitting!
23.02.2024 - 08:09Hola, como se hace la elevacion despues de tejer el cuello?
08.02.2024 - 18:04DROPS Design answered:
Hola Marta, la elevación se explica en la sección del canesú: son 6 filas acortadas trabajadas en la parte del cuello de la espalda para que la espalda quede ligeramente más elevada que en el delantero. Puedes ver un ejemplo en el siguiente video: https://www.garnstudio.com/video.php?id=894&lang=es
11.02.2024 - 21:06Hallo, kann ich statt Flora auch Alpaca nehmen und statt kid silk das Garn brushed alpaca silk? Das entspräche A+A :)
04.02.2024 - 21:33DROPS Design answered:
Lieber Herbert, also Brushed Alpaca Silk gehört Garngruppe C so können Sie anstatt Flora + Kid-Silk (A+A) mit 1 Faden Brushed Alpaca Silk (C) stricken. Viel Spaß beim stricken!
05.02.2024 - 09:43Je fais la taille M. :)
19.01.2024 - 09:42DROPS Design answered:
Bonjour Iris, donc en taille M, après les rangs raccourcis augmentez 3 fois tous les 2 tours, raglan-1 puis la fois suivante, augmentez 1 fois pour le raglan-1 + pour le raglan-2; continuez ensuite à augmenter pour les manches tous les 4 tours puis tous les 2 tours pour le dos/le devant et continuez au même rythme: tous les 2 tours pour le dos/devant, raglan-1 mais tous les 8 tours pour le raglan-2 (= 4 fois (1 tour avec augm raglan-1, 1 tour sans augm) x 3, puis (1 tour avec augm raglan-1 + raglan-2) x 1 fois) jusqu'à ce que toutes les augmentations du raglan-2 (5 fois au totla) aient été faites, ensuite, vous n'augmentez que pour le raglan-1. Bon tricot!
19.01.2024 - 15:44