
Popular categories
Looking for a yarn?


|
|
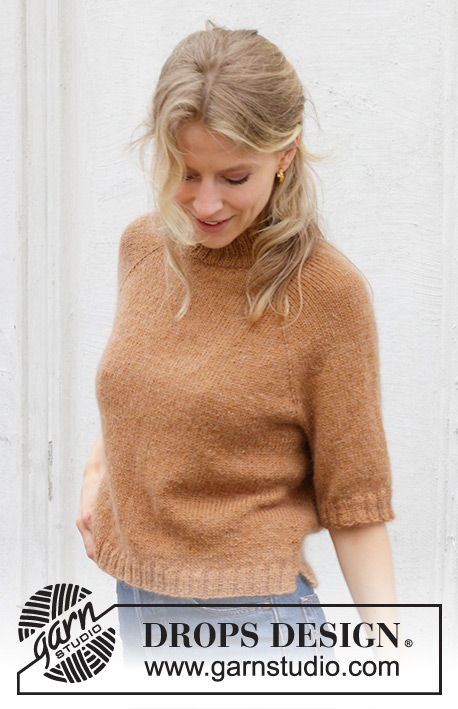
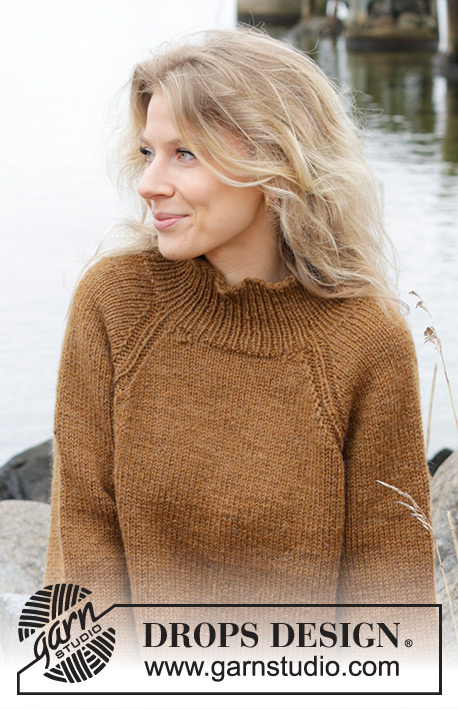
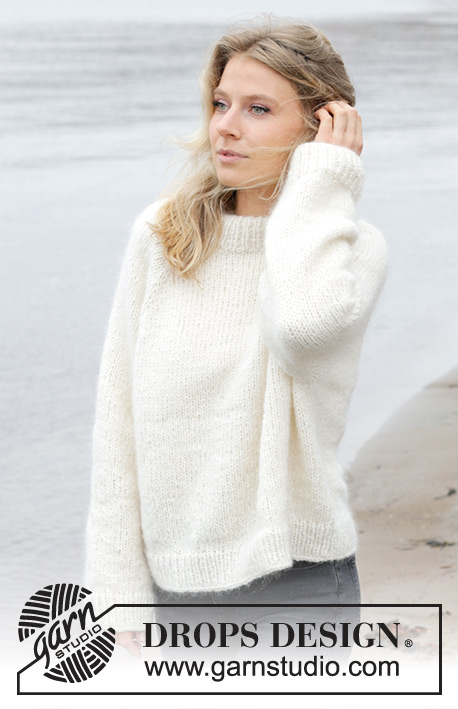
Sweet November |
|
 |
 |
Knitted sweater in DROPS Air and DROPS Kid-Silk. The piece is worked top down with raglan. Sizes XS - XXL.
DROPS 243-13 |
|
|
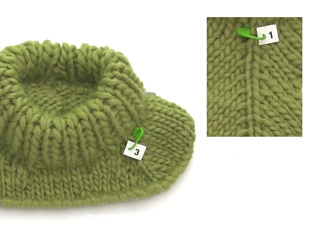
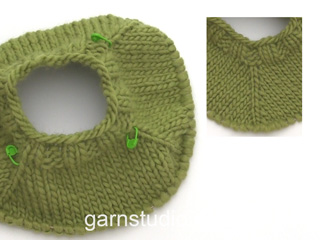
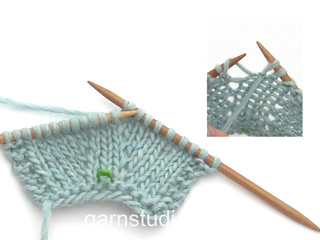
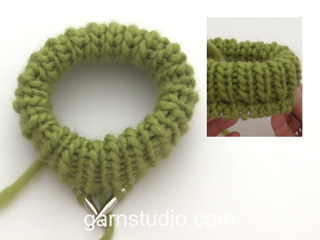
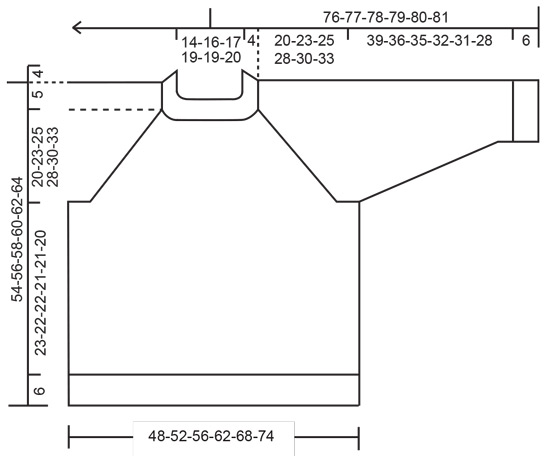
------------------------------------------------------- EXPLANATIONS FOR THE PATTERN: ------------------------------------------------------- RAGLAN: Increase 1 stitch before/after the marker-stitch, in each transition between the body and sleeves, by making 1 yarn over. When working back and forth the yarn overs are worked as follows from the wrong side: BEFORE MARKER: Purl the back loop = no hole. AFTER MARKER: Slip the yarn over and place it back on the left needle the other way round (insert the left needle through the back when replacing it). Purl the front loop = no hole. When working in the round the yarn overs are worked as follows on the next round: BEFORE MARKER: Slip the yarn over and place it back on the left needle the other way round (insert the left needle through the back when replacing it). Knit the front loop (stitch twists to the right) = no hole. AFTER MARKER: Knit the back loop (stitch twists to the left) = no hole. DECREASE TIP (for sleeves): Start 3 stitches before the marker-thread, knit 2 together, knit 2 (marker-thread sits between these 2 stitches), slip 1 stitch knit-wise, knit 1 and pass the slipped stitch over the knitted stitch. ------------------------------------------------------- START THE PIECE HERE: ------------------------------------------------------- SWEATER – SHORT OVERVIEW OF THE PIECE: The neck and yoke are worked in the round with circular needle, top down. The yoke is divided for body and sleeves and the body is continued in the round with circular needle. The sleeves are worked with short circular needle/double pointed needles. DOUBLE NECK: Cast on 68-72-76-80-80-84 stitches with 1 strand DROPS Air and 1 strand DROPS Kid-Silk using short circular needles size 4.5 and 6 MM = US 10 held together. Remove the needle size 6 MM = US 10 keeping the stitches on needle size 4.5 MM = US 7 (this gives you an elastic cast-on edge). Work rib in the round (knit 1, purl 1) for 9 cm = 3½". Fold the neck double to the inside and work 1 more round of rib, working every 2nd stitch together with its corresponding stitch on the cast-on edge. You now have a double neck. Insert 4 markers without working the stitches and each marker being inserted in a knitted stitch (not between stitches). The markers are used when increasing for raglan. Insert 1 marker-thread at the beginning of the round = approx. mid-back. Count 10-10-12-12-12-14 stitches (approx. half back piece), insert marker-1 in the next stitch, count 15 stitches (sleeve), insert marker-2 in the next stitch, count 17-19-21-23-23-25 stitches (front piece), insert marker-3 in the next stitch, count 15 stitches (sleeve), insert marker-4 in the next stitch, count 7-9-9-11-11-11 stitches (approx. half back piece) NECKLINE: Change to circular needle size 6 MM = US 10 and work short rows from mid-back as follows: ROW 1 (right side): Knit and increase for RAGLAN – read description above, on each side of the first 2 marker-stitches (4 stitches increased), turn when you have knitted 3 stitches past marker-stitch 2. ROW 2 (wrong side): Purl and turn when you have worked 3 stitches past the last marker-stitch. ROW 3 (right side): Knit and increase for raglan on each side of the all marker-stitches (8 stitches increased), turn when you have knitted 2 stitches past the previous turn. ROW 4 (wrong side): Purl and turn when you have purled 2 stitches past the previous turn. ROW 5 (right side): Knit and increase for raglan on each side of the first 2 marker-stitches (4 stitches increased), knit to mid-back. The short rows are finished and you have increased 2 times for raglan by each marker-stitch = 84-88-92-96-96-100 stitches. Knit 1 round. YOKE: Start mid-back and continue with stockinette stitch in the round over all stitches. AT THE SAME TIME continue increasing for raglan every 2nd round a total of 8-10-12-14-20-22 times (including the increases on the short rows) = 132-152-172-192-240-260 stitches. Then continue increasing for raglan but every 2nd increase is only on the body (4 increased stitches) i.e., increase on the body every 2nd round and on the sleeves every 4th round. Increase like this 8-8-8-8-4-4 times on the body (4-4-4-4-2-2 times on the sleeves). You have increased a total of 16-18-20-22-24-26 times on the body and 12-14-16-18-22-24 times on the sleeves. There are 180-200-220-240-264-284 stitches and the yoke measures approx. 20-23-25-28-30-33 cm = 8"-9"-9¾"-11"-11¾"-13" from mid-back (after neck edge). Continue working, if necessary, to the correct length. On the next round divide for the body and sleeves as follows: Knit 29-31-35-37-41-45 (approx. half back piece), place the next 35-39-43-47-51-55 stitches on a thread for the sleeve, cast on 12-12-12-14-14-16 stitches (in side under sleeve), knit 55-61-67-73-81-87 (front piece), place the next 35-39-43-47-51-55 stitches on a thread for the sleeve, cast on 12-12-12-14-14-16 stitches (in side under sleeve), knit the last 26-30-32-36-40-42 stitches (approx. half back piece). The body and sleeves are finished separately. The piece is now measured from here! BODY: = 134-146-158-174-190-206 stitches. Continue with stockinette stitch in the round for a further 23-22-22-21-21-20 cm = 9"-8¾"-8¾"-8¼"-8¼"-8". Knit 1 round and increase 30-30-32-36-42-46 stitches evenly spaced = 164-176-190-210-232-252 stitches. Change to circular needle size 4.5 MM = US 7. Work rib (knit 1, purl 1) for 6 cm = 2⅜". Bind off. The sweater measures approx. 54-56-58-60-62-64 cm = 21¼"-22"-22¾"-23⅝"-24⅜"-25¼" from the shoulder down. SLEEVES: Place the 35-39-43-47-51-55 stitches from the thread on the one side of the piece on short circular needle/double pointed needles size 6 MM = US 10 and knit up 1 stitch in each of the new stitches cast on under the sleeve = 47-51-55-61-65-71 stitches. Insert a marker-thread in the middle of the 12-12-12-14-14-16 stitches under the sleeve. Allow the thread to follow your work onwards, it is used when decreasing under the sleeve. Start at the marker-thread and work stockinette stitch in the round. When the sleeve measures 4 cm = 1½" from division, decrease 2 stitches mid under sleeve – read DECREASE TIP. Decrease like this every 15-7-5½-3-2½-2 cm = 6"-2¾"-2⅛"-1⅛"-1"-¾" a total of 3-5-6-9-10-12 times = 41-41-43-43-45-47 stitches. Continue working until the sleeve measures 39-36-35-32-31-28 cm = 15¼"-14¼"-13¾"-12½"-12¼"-11" from the division. Knit 1 round and increase 7-7-7-9-9-9 stitches evenly spaced = 48-48-50-52-54-56 stitches. Change to double pointed needles size 4.5 MM = US 7 and work rib (knit 1, purl 1) for 6 cm = 2⅜". Bind off. The sleeve measures approx. 45-42-41-38-37-34 cm = 17¾"-16½"-16⅛"-15"-14½"-13⅜" from the division. Work the other sleeve in the same way. |
|
|
|
|
Have you made this or any other of our designs? Tag your pictures in social media with #dropsdesign so we can see them! Do you need help with this pattern?You'll find tutorial videos, a Comments/Questions area and more by visiting the pattern on garnstudio.com. © 1982-2024 DROPS Design A/S. We reserve all rights. This document, including all its sub-sections, has copyrights. Read more about what you can do with our patterns at the bottom of each pattern on our site. |
|


With over 40 years in knitting and crochet design, DROPS Design offers one of the most extensive collections of free patterns on the internet - translated to 17 languages. As of today we count 304 catalogs and 11422 patterns - 11417 of which are translated into English (US/in).
We work hard to bring you the best knitting and crochet have to offer, inspiration and advice as well as great quality yarns at incredible prices! Would you like to use our patterns for other than personal use? You can read what you are allowed to do in the Copyright text at the bottom of all our patterns. Happy crafting!
Comments / Questions (57)
When starting for sleeve at 15 st, increasing 22 times, that would mean 59 st. Pattern says 51 st. I’m confused, help!
16.04.2024 - 16:41DROPS Design answered:
Dear Valerie, the division is not made at the markers but the stitch with the marker + the first/last 3 sts on each sleeve are for the body (back piece/front piece). So if your number of stitches is right at the end of raglan increases, just follow the division to get the correct width on body. Happy knitting!
17.04.2024 - 08:15Bardzo dziękuję! Pozdrawia!!!
25.03.2024 - 13:59DROPS Design answered:
Trzymam kciuki i pozdrawiam!
25.03.2024 - 18:10Hej, co powinnam zrobić, aby w rozm. M pacha zaczynała się niżej tj. żeby rękaw był szerszy i ze ściągaczem na dole rękawa, aby tworzył bufiasty rękaw (przy mankiecie).
25.03.2024 - 12:32DROPS Design answered:
Witaj Aniu, jak dodasz oczka na reglan, dalej przerabiaj karczek na długość, która ci odpowiada (wtedy podkrój rękawa będzie dłuższy). Co do samego rękawa: nie zamykaj oczek wzdłuż spodu rękawa jak w opisie, wtedy rękaw będzie szerszy. Wykonaj wąski ściągacz na dole rękawa, aby trzymał się nadgarstka. Powodzenia!
25.03.2024 - 13:51Bardzo dziękuję za pomoc! Wszystko jasne :))) Pozdrawiam serdecznie!
20.03.2024 - 08:39DROPS Design answered:
Powodzenia :))
20.03.2024 - 11:13Tak, dokładnie. Pierwszy rząd dekoltu nie wiem gdzie zaczynam - w połowie tyłu i przerabiam oczka w kierunku markera-1 i tu dodaje oczka przed i za i przerabiam do mark-2 i tez dodaje o. przed i za ? Czy jak na filmie, przerzucam oczka do mark-3 i 3 o. za nim zaczynam przerabiać oczka?
19.03.2024 - 14:22DROPS Design answered:
Witaj Aniu, film pokazuje tylko technikę, ale w poszczególnych wzorach może być nieco inaczej, ważny jest opis. Tutaj zaczynasz w połowie tyłu i przerabiasz oczka w kierunku markera-1 i tu dodajesz oczka przed i za i dalej przerabiasz do mark-2 i tez dodajesz o. przed i za i przerabiasz jeszcze 3 oczka. Obracasz robótkę i teraz przerabiasz na lewo zgodnie z opisem i obracasz robótkę, gdy zostaną przerobione 3 oczka za ostatnim oczkiem z markerem (marker-3). Dalej kieruj się opisem. Pozdrawiamy!
20.03.2024 - 08:32Dzień dobry, nie mogę zrozumieć opisu dot dekoltu, I rząd. Obejrzałam filmik i mi to nie pasuje :(
18.03.2024 - 20:33DROPS Design answered:
Witaj Aniu, czy chodzi Ci o pierwszy rząd /okrążenie ściągacza wykończenia dekoltu. Mogłabyś bardziej sprecyzować swoje pytanie?
19.03.2024 - 13:09Hej kan denne model strikkes med kun 1 tråd air- altså uden også at bruge en tråd kids silk?
10.03.2024 - 13:08DROPS Design answered:
Hei Britt. Nei, da vil ikke strikkefastheten stemme. mvh DROPS Design
11.03.2024 - 14:28Hei. Kan man bare bruke Drops Air, eller må man bruke Drops Air + Drops Kid-Silk?
03.03.2024 - 16:40DROPS Design answered:
Hei Ragna, Du kan bruke kun Drops Air, men da må du øke pinnestørrelse for å få til riktige strikkefasthet. God fornøyelse!
04.03.2024 - 11:11I’m struggling with: Then continue increasing for raglan but every 2nd increase is only on the body (4 increased stitches) i.e., increase on the body every 2nd round and on the sleeves every 4th round. So do I do one full row with increases (8), and then one row with increase only on the body (4), one full row of increases (8) and then one row only on the sleeves (4), etc.? Also, is there no stocking stitch in between the increasing rounds?
17.02.2024 - 09:10DROPS Design answered:
Dear Britt, it means that you work as follows: 1 row with no increases (stocking stitch), 1 row with increases on the body, 1 row with no increases (stocking stitch), 1 row with increases both in the body and sleeves. Repeat these 4 rows as many times as necessary. Happy knitting!
18.02.2024 - 22:42Hello, first time knitting a sweater. For the yoke (size M), following the instructions, I cannot get from 96 (neck line) to 172 stitches. What does it mean increase every 2nd round a total of 12 times? I interpreted 12 times all markers increased, which would mean 8 stitches 12 times. Also for the continuation, from the 20 cm, I interpreted: 2nd round I increase all markers (8 stitches) and the 4th round only markers 2 and 4. Is this right? Thanks a lot!
13.02.2024 - 15:28DROPS Design answered:
Dear Laia, in size M there are 92 sts (not 96) at the end of neckline and you have increased 2 times for the raglan. Then you work in the round increasing 10 more times 8 sts for raglan (12 sts in total from the beginning), so that you will have: 92 sts + (8 sts x 10 ) = 172 sts. Increase on ever other round, ie work 1 round with increases, 1 round without, repeat these 2 rounds a total of 10 times. Happy knitting!
14.02.2024 - 07:57