DROPS Brushed Alpaca Silk
77% Alpaca, 23% Silk
from 3.95 $ /25g
DROPS Flora
DROPS Flora
65% Wool, 35% Alpaca
from 3.30 $ /50g
Get the yarn to make this pattern from 51.40$.

The yarn cost is calculated from the pattern’s smallest size and the yarn’s cheapest product type. Looking for an even better price? You might find it on the DROPS Deals!

DROPS SS24

Chestnut Bay

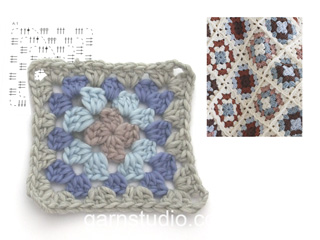
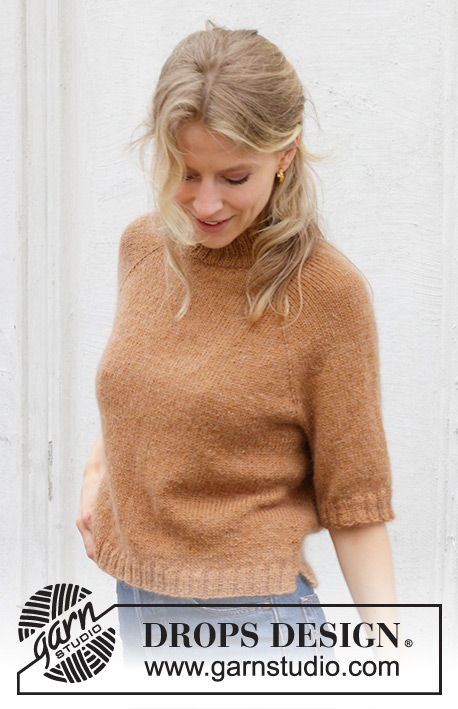
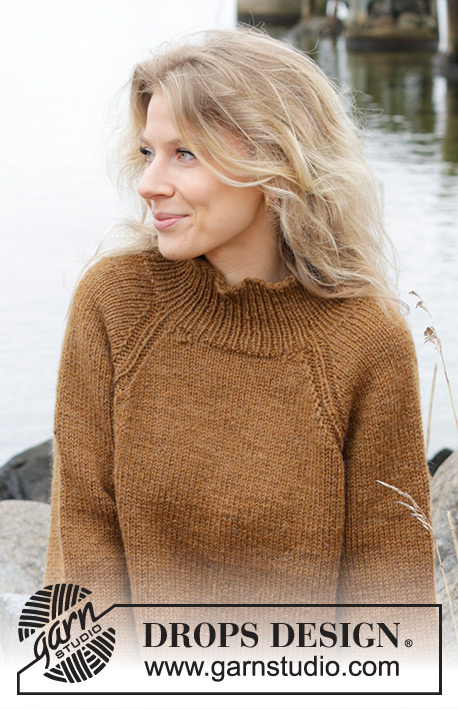
Crocheted sweater in DROPS Brushed Alpaca Silk and DROPS Flora. The piece is worked from the middle outwards, in squares. Sizes S - XXXL.

DROPS 244-14
DROPS Design: Pattern as-184
Yarn group C + A or D
-------------------------------------------------------

SIZES:
S - M - L - XL - XXL – XXXL

Finished measurements:
Chest measurements: 106-120-122-136-148-162 cm = 41¾"-47¼"-48"-53½"-58⅜"-63"
Full length: 62-64-66-68-70-72 cm = 24⅜"-25¼"-26"-26¾"-27½"-28⅜"
All measurements in charts are in cm.

YARN:
DROPS BRUSHED ALPACA SILK from Garnstudio (belongs to yarn group C)
200-225-250-275-300-325 g color 05, beige
And use:
DROPS FLORA from Garnstudio (belongs to yarn group A)
300-300-350-350-400-450 g color 08, brown

CROCHET HOOK:
DROPS CROCHET HOOK SIZE 4.5 MM = US 7.

CROCHET GAUGE:
15 double crochets in width and 8 rows in height with 1 strand of each quality = 10 x 10 cm = 4" x 4".
Hook size is only a guide. If you get too many stitches on 10 cm = 4", change to a larger hook size. If you get too few stitches on 10 cm = 4", change to a smaller hook size.

-------------------------------------------------------

Alternative Yarn – See how to change yarns here
Yarn Groups A to F – Use the same pattern and change the yarn here
Yarn usage using an alternative yarn – Use our yarn converter here

-------------------------------------------------------

DROPS Brushed Alpaca Silk
77% Alpaca, 23% Silk
from 3.95 $ /25g
DROPS Flora
DROPS Flora
65% Wool, 35% Alpaca
from 3.30 $ /50g
Get the yarn to make this pattern from 51.40$.

The yarn cost is calculated from the pattern’s smallest size and the yarn’s cheapest product type. Looking for an even better price? You might find it on the DROPS Deals!

Pattern instructions

NOTE: This pattern is written in American English. All measurements in charts are in cm. For conversion from inches to cm - click here. There are different terms for crocheting in American and British English. If this pattern includes crochet, click for "crochet terms" here. For this pattern in British English, please click here.

-------------------------------------------------------

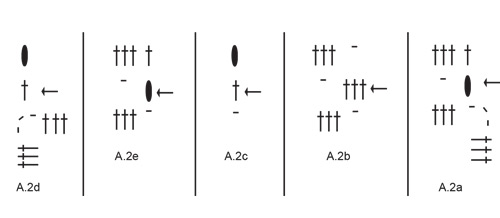
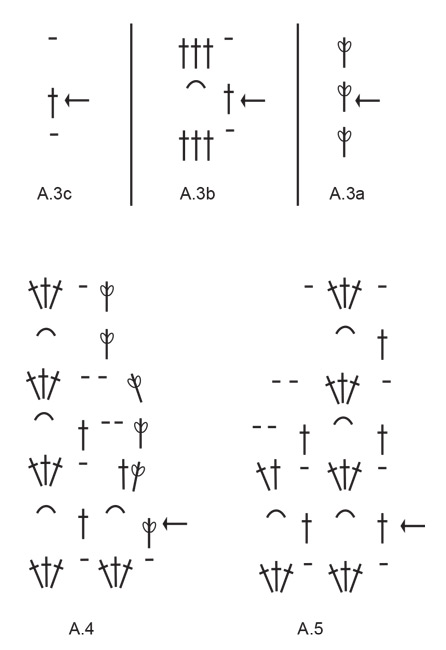
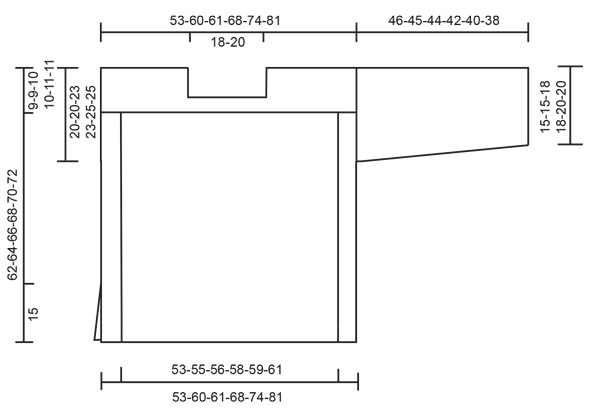
EXPLANATIONS FOR THE PATTERN:
-------------------------------------------------------

CHAIN STITCH:
If you work outermost on the hook the chain stitch will often be too tight; 1 chain stitch should be as long as 1 double crochet is wide.

PATTERN:
See diagrams A.1 to A.5.
A.4 and A.5 show decreases under the sleeve.

CROCHET INFORMATION:
At the beginning of each round/row of double crochets work 3 chain stitches which replace the first double crochet.
The round finishes with 1 slip stitch in the third chain stitch at the beginning of the round when working in the round.
The row finishes with 1 slip stitch in the third chain stitch at the beginning of the previous row when working back and forth.

-------------------------------------------------------

START THE PIECE HERE:

-------------------------------------------------------

SWEATER - SHORT OVERVIEW OF THE PIECE:
The front and back pieces are worked separately, in the round, from the middle outwards and in a square. The sides are worked back and forth to get the correct body-width. The shoulders are worked back and forth. The piece is sewn together and the sleeves are worked in the round, top down. The neck is worked to finish.

FRONT PIECE:
Square:
Use crochet hook size 4.5 MM = US 7, 1 strand DROPS Brushed Alpaca Silk and 1 strand DROPS Flora (2 strands). Work diagram A.1 in the round. When A.1 is finished, continue the increases as shown in A.1 until the square measures approx. 53-55-56-58-59-61 cm x 53-55-56-58-59-61 cm = 21"-21⅝"-22"-22¾"-23¼"-24" x 21"-21⅝"-22"-22¾"-23¼"-24" (after every round worked, there is 1 more double-crochet group between each corner). REMEMBER THE CROCHET GAUGE.
The square in size S is now finished. Continue the sides in the other sizes as described below.

SIDES - SIZES M - L - XL - XXL - XXXL:
Crochet on each side as follows:
Start from the right side with 1 slip stitch in one corner of the square and continue as follows: Work A.2a, A.2b to the next corner, A.2d around the chain-space in the corner. Turn and work like this back and forth until 2-2-4-6-8 rows have been worked from the square. Cut and fasten the strands. Work the other side of the square in the same way.

SHOULDERS AND NECK – ALL SIZES:
Start from the right side and work 2 rows across the top of the square as follows: 1 slip stitch in the corner, A.2a (NOTE: in sizes M, L, XL, XXL and XXXL work around the last row in the corner), work 0-1-1-2-3-4 repeats of A.2b around the 0-2-2-4-6-8 rows on the side, continue A.2b to the other side of the square and work 0-1-1-2-3-4 repeats of A.2b around the 0-2-2-4-6-8 rows, finish with A.2d in the corner. Work back from the wrong side.

Insert 1 marker-thread on each side of the middle 7 or 8 double-crochet groups on the row (= neck). If you have an even number of double-crochet groups, insert the marker-threads around the chain stitches on each side of the middle 8 double-crochet groups, if you have an odd number of double-crochet groups, insert the marker-threads around the chain stitch on each side of the middle 7 double-crochet groups.
Start from the right side and work the right shoulder as follows: Work 1 slip stitch in the corner, A.2e, continue A.2b as far as the first chain stitch with the marker-thread, work A.2c around this chain stitch. Turn and work next row from the wrong side. Continue back and forth for a total of 5-5-6-6-7-7 rows (the shoulder measures approx. 9-9-10-10-11-11 cm = 3½"-3½"-4"-4"-4⅜"-4⅜" from the square). Cut and fasten the strands.
Skip the 7/8 double-crochet groups for neck and work the left shoulder from the right side as follows: Work 1 slip stitch around the chain stitch with the marker-thread, A.2e, A.2b to the corner of the square and A.2c in the corner. Turn and work back and forth a total of 5-5-6-6-7-7 rows (the shoulder should match the right shoulder.

BACK PIECE:
Work the square and the sides in the same way as the front piece. Then work shoulders and neck in the same way as the front piece, but first work 4-4-4-4-6-6 rows back and forth across all stitches (instead of 2 rows – the first row is worked from the right side).
Insert 1 marker-thread on each side of the middle 7 or 8 double-crochet groups in the same way as on the front piece, working the shoulders in the same way but finishing after 3-3-4-4-3-3 rows on the shoulders (=7-7-8-8-9-9 rows after the square).

ASSEMBLY:
Sew the shoulder seams together, edge to edge.
Insert a marker-thread around 1 chain stitch, 8-8-9-9-10-10 rows/double-crochet groups down from the shoulder seams on both the front and back pieces = approx. 20-20-23-23-25-25 cm = 8"-8"-9"-9"-9¾"-9¾" armholes.
Crochet the side seams together, working through both layers and from the wrong side as follows: Start at the marker-thread and work 1 single crochet around the chain stitch, * work 4 chain stitches, skip 3 double crochets, 1 single crochet around the next chain stitch *, work from *-* until there is 15 cm = 6" left = split. Repeat on the other side.

SLEEVES:
The sleeve is worked in the round. Start at the bottom of the armhole by the marker-threads and work from the round with an arrow in each diagram as follows: Work A.4, 6-6-7-7-8-8 repeats of A.3b up to the shoulder seam, work the first double crochet in A.3b in the seam, work 6-6-7-7-8-8 repeats of A.3b from the shoulder seam and finish with A.5. Continue this pattern. When A.4 and A.5 are finished, 2 double-crochet groups have been decreased under the sleeve = 14-14-16-16-18-18 double-crochet groups. Repeat this decrease 1 more time = 12-12-14-14-16-16 double-crochet groups. Continue as follows: Work A.3a (shows how the round starts), A.3b to the last chain stitch on the round, finish with A.3c. Continue this pattern until the sleeve measures 46-45-44-42-40-38 cm = 18"-17¾"-17¼"-16½"-15¾"-15", cut and fasten the strands. Work the other sleeve in the same way.

NECK:
Use crochet hook size 4.5 MM = US 7 and 1 strand of each quality (2 strands). Fasten the strands with 1 slip stitch in the shoulder seam, work 1 chain stitch, * 3 chain stitches, skip 1 double-crochet group, 1 single crochet around the next double crochet/chain stitch *, work from *-* around the neck, finish with 1 slip stitch in the first chain stitch on the round = 30 to 36 chain-spaces. Work as follows:
ROUND 1:
Work 3 double crochets around each chain-space = 90 to 108 double crochets.
ROUND 2:
Work 1 double crochet in each double crochet but decrease evenly by working every 8th and 9th double crochet together (work 1 double crochet but wait with the last yarn over and pull-through, work 1 more double crochet and pull the last yarn over through all 3 loops on the hook) = 80-96 double crochets.
ROUND 3:
Work 1 double crochet in each double crochet but decrease evenly by working every 7th and 8th double crochet together = 70-84 double crochets.
ROUND 4:
Work 1 double crochet in each double crochet. Cut and fasten the strands.

Diagram

All measurements in charts are in cm.

symbols = work 4 chain stitches and form them into a ring with 1 slip stitch in the first chain stitch. Start with the symbol above the point on the circle and work to the left.
symbols = 1 chain stitch
symbols = 4 chain stitches
symbols = double crochet around chain stitch/chain-space
symbols = at beginning of row work 3 chain stitches
symbols = at beginning of round work 3 chain stitches. Finish the round with 1 slip stitch in 3rd chain stitch at beginning of round.
symbols = start on this round/row, previous round/row already worked
diagram
diagram
diagram
diagram
Do you have a question? See a list of frequently asked questions (FAQ)

Knitting tension is what determines the final measurements of your work, and is usually measured per 10 x 10 cm. It is provided like so: number of stitches in width x number of rows in height - eg: 19 stitches x 26 rows = 10 x 10 cm.

The knitting tension is very individual; some people knit/crochet loosely while others work tightly. You adjust the knitting tension with the needle size, which is why the suggested needle size only serve as a guide! You need to adjust this (up or down) to ensure that YOUR knitting tension matches the knitting tension provided in the pattern. If you work with a different knitting tension than provided you will have a different yarn consumption, and your work will have different measurements than what the pattern suggests.

The knitting tension also determines which yarns can replace each other. As long as you achieve the same knitting tension you can replace one yarn with another.

See DROPS lesson: How to measure your tension/gauge

See DROPS video: How to make a gauge tension swatch

The required amount of yarn is provided in grams, eg: 450 g. To calculate how many balls you’ll need you first need to know how many grams are in 1 ball (25g, 50g or 100g). This information is available if you click on the individual yarn quality on our pages. Divide the amount required with the amount of each ball. For example, if each ball is 50g (the most common amount), the calculation will be as follows: 450 / 50 = 9 balls.

The important thing when changing from one yarn to another is that the knitting/crochet tension remains the same. This is so that the measurements of the finished piece will be the same as on the sketch provided. It is easier to achieve the same knitting tension using yarns from the same yarn group. It is also possible to work with multiple strands of a thinner yarn to achieve the knitting tension of a thicker one. Please try our yarn converter. We recommend you to always work a test swatch.

Please NOTE: when changing yarn the garment might have a different look and feel to the garment in the photo, due to individual properties and qualities of each yarn.

See DROPS lesson: Can I use a different yarn than the one mentioned in the pattern?

All our yarns are categorised into yarn groups (from A to F) according to thickness and knitting tension – group A contains the thinnest yarns and group F the thickest. This makes it easier for you to find alternative yarns to our patterns, should you wish to switch yarn. All yarns within the same group have a similar knitting tension and can easily replace each other. However, different yarn qualities have different structures and properties which will give the finished work a unique look and feel.

Click here for an overview of the yarns in each yarn group

At the top of all our patterns you’ll find a link to our yarn converter, which is a helpful tool should you wish to use a different yarn than suggested. By filling in the yarn quality you wish to replace, the amount (in your size) and number of strands, the converter will present good alternative yarns with the same knitting tension. Additionally it will tell you how much you’ll require in the new qualities and whether you’ll need to work with multiple strands. Most skeins are 50g (some are 25g or 100g).

If the pattern is worked with multiple colours, every colour will have to be converted separately. Similarly, if the pattern is worked with several strands of different yarns (for example 1 strand Alpaca and 1 strand Kid-Silk) you will have to find alternatives for each, individually.

Click here to see our yarn converter

Since different yarns have different qualities and textures we have chosen to keep the original yarn in our patterns. However, you can easily find options among our available qualities by using our yarn converter, or simply pick a yarn from the same yarn group.

It is possible that some retailers still have discontinued yarns in stock, or that someone has a few skeins at home that they would like to find patterns for.

The yarn converter will provide both alternative yarn as well as required amount in the new quality.

If you think it's hard to decide what size to make, it can be a good idea to measure a garment you own already and like the size of. Then you can pick the size by comparing those measures with the ones available in the pattern's size chart.

You'll find the size chart at the bottom of the pattern.

See DROPS lesson: How to read size chart

The needle size provided in the pattern serves only as a guide, the important thing is to follow the knitting tension. And since knitting tension is very individual, you will have to adjust the needle size to ensure that YOUR tension is the same as in the pattern – maybe you’ll have to adjust 1, or even 2 needle sizes, up or down to achieve the correct tension. For this, we recommend that you work test swatches.

Should you work with a different knitting tension than the one provided, the measurements of the finished garment might deviate from the measurement sketch.

See DROPS lesson: How to measure your tension/gauge

See DROPS video: How to make a gauge tension swatch

Working a garment top-down provides more flexibility and room for personal adjustment. For example it is easier to try the garment on while working, as well as making adjustments to length of yoke and shoulder caps.

The instructions are carefully explaining every step, in the correct order. Diagrams are adjusted to the knitting direction and are worked as usual.

The diagram depicts all rows/rounds, and every stitch seen from the right side. It is read from bottom to top, from right to left. 1 square = 1 stitch.

When working back and forth, every other row is worked from the right side and every other row is worked from the wrong side. When working from the wrong side, the diagram will have to be worked reversed: from left to right, knit stitches are purled, purl stitches are knit etc.

When working in the round every round is worked from the right side and the diagram are worked from right to left on all rounds.

See DROPS lesson: How to read knitting diagrams

The diagram depicts all rows/rounds, and every stitch seen from the right side. It is worked from bottom to top, from right to left.

When working back and forth every other row is worked from the right side: from right to left and every other row is worked from the wrong side: from left to right.

When working in the round, every row in the diagram are worked from the right side, from right to left.

When working a circular diagram you start in the middle and work your way outwards, counter clockwise, row by row.

The rows usually start with a given number of chain stitches (equivalent to the height of the following stitch), this will either be depicted in the diagram or explained in the pattern.

See DROPS lesson: How to read crochet diagrams

Instructions for working several diagrams after each other on the same row/round, will often be written like so: “work A.1, A.2, A.3 a total of 0-0-2-3-4 times". This means you work A.1 once, then A.2 is worked once, and A.3 is repeated (in width) the number of times provided for your size – in this case like so: S = 0 times, M = 0 times, L=2 times, XL= 3 times and XXL = 4 times.

The diagrams are worked as usual: begin with the first row in A.1, then work the first row in A.2 etc.

See DROPS lesson: How to read knitting diagrams

See DROPS lesson: How to read crochet diagrams

The total width of the garment (from wrist-to-wrist) will be larger in the larger sizes, despite the actual sleeves being shorter. The larger sizes have longer sleeve caps and wider shoulders, so there will be a good fit in all sizes.

The measurement sketch/schematic drawing provides information regarding the full length of the garment. If it’s a jumper or a jacket the length is measured from the highest point on the shoulder (usually closest to the neckline), and straight down to the bottom of the garment. It is NOT measured from the tip of shoulder. Similarly, the length of yoke is measured from the highest point on the shoulder and down to where yoke is split into body and sleeves.

See DROPS lesson: How to read a schematic drawing

Diagrams are often repeated on the round or in height. 1 repeat is the diagram the way it appears in the pattern. If it says to work 5 repeats of A.1 in the round, then you work A.1 a total of 5 times after/next to each other in the round. If it says to work 2 repeats of A.1 vertically/in height you work the entire diagram once, then begin again at the start and work the entire diagram one more time.

Chain stitches are slightly narrower than other stitches and to avoid working the cast-on edge too tight, we simply chain more stitches to begin with. The stitch count will be adjusted on the following row to fit the pattern and measurement sketch.

The rib edge is more elastic and will contract slightly compared to, for example, stocking stitch. By increasing before the rib edge, you avoid a visible difference in width between the rib edge and the rest of the body.

It’s very easy to cast off too tightly, and by making yarn overs while casting off (and simultaneously casting these off) you avoid a too tight cast off edge.

See DROPS video: How to bind off with yarn overs (yo)

To achieve an even increase (or decrease) you can increase on, for example: every 3rd and 4th row alternately, like so: work 2 rows and increase on the 3rd row, work 3 rows and increase on the 4th. Repeat this until the increase is complete.

See DROPS lesson: Increase or decrease 1 st on every 3rd and 4th row alternately

Should you prefer to work in the round instead of back and forth, you may of course adjust the pattern. You’ll need to add steeks mid-front (usually 5 stitches), and follow the instructions. When you would normally turn and work from the wrong side, simply work across the steek and continue in the round. At the end you’ll cut the piece open, pick up stitches to work bands, and cover the cut edges.

See DROPS video: How to knit steeks and cut open

Should you prefer to work back and forth instead of in the round, you may of course adjust the pattern so you work the pieces separately and then assemble them at the end. Divide the stitches for the body in 2, add 1 edge stitch in each side (for sewing) and work the front and back pieces separately.

See DROPS lesson: Can I adapt a pattern for circular needles into straight needles?

Pattern repeats can vary slightly in the different sizes, in order to get the correct proportions. If you’re not working the exact same size as the garment in the photo, yours might deviate slightly. This has been carefully developed and adjusted so that the complete impression of the garment is the same in all sizes.

Make sure to follow instructions and diagrams for your size!

If you have found a pattern you like which is available in women’s size it’s not very difficult to convert it to men’s size. The biggest difference will be the length of sleeves and body. Start working on the women size that you think would fit across the chest. The additional length will be worked right before you cast off for the armhole/sleeve cap. If the pattern is worked top-down you can add the length right after the armhole or before the first decrease on sleeve.

Regarding additional yarn amount, this will depend on how much length you add, but it is better with a skein too many than too few.

All yarns will have excess fibres (from production) that might come off as lint or shedding. Brushed yarns (ie hairier yarns) have more of these loose, excess fibres, causing more shedding.

Shedding also depends on what is worn under or over the garment, and whether this pulls at the yarn fibres. It’s therefore not possible to guarantee that there will be no shedding

Below are some tips on how to get the best result when working with hairier yarns:

1. When the garment is finished (before you wash it) shake it vigorously so the looser hairs come off. NOTE: do NOT use a lint roller, brush or any method that pulls at the yarn.

2. Place the garment in a plastic bag and put it in your freezer - the temperature will cause the fibres to become less attached to each other, and excess fibres will come off easier.

3. Leave in the freezer for a few hours before taking it out and shaking it again.

4. Wash the garment according to the instructions on the yarn label.

Pilling is a natural process that happens to even the most exclusive of fibers. It's a natural sign of wear and tear that is hard to avoid, and that is most visible in high friction areas of your garment like a sweater's arms and cuffs.

You can make your garment look as new by removing the pilling, using a fabric comb or a pill/lint remover.

Still can't find the answer you need? Then scroll down and leave your question so one of our experts can try to help you. This will be done normally within 5 to 10 working days.
In the meantime, you can read the questions and answers that others have left to this pattern or join the DROPS Workshop on Facebook to get help from fellow knitters/crocheters!

You might also like...

Post a comment to pattern DROPS 244-14

We would love to hear what you have to say about this pattern!

If you want to leave a question, please make sure you select the correct category in the form below, to speed up the answering process. Required fields are marked *.

Comments / Questions (9)

country flag Fernanda Martins wrote:

Ola bom dia. Nao consigo perceber a parte do decote e ombros, onde diz: crochetar a2b a volta de 2 carreiras do lado do quadrado. Qual lado? Se o quadrado tem 4? Nao consigo perceber esta parte . Depois de aumentar 2 carreiras de cada lado o que fazer a seguir. Podem por video? Onde esta o diagrama a2. Obrigada

09.03.2024 - 15:34

DROPS Design answered:

Boa tarde, O ombros crochetam-se no rebordo superior do quadrado e desce-se para um lado, depois, volta-se para o outro lado, "Começando pelo direito, crochetar 2 carreiras ao longo da parte de cima do quadrado da seguinte maneira: Crochetar 1 ponto baixíssimo no canto, A.2a..." Bons crochés!

11.03.2024 - 15:09

country flag Joanne wrote:

I am reading through the pattern before beginning, and the body shaping (for sizes above S) calls for following diagrams A.2, A.2b, and so on. But I can't see any A.2's on the diagram- am I not seeing them, or are they on another page? I looked at the Norwegian page, but it is the same. Thanks very much!

20.09.2023 - 19:47

DROPS Design answered:

Dear Joanne, thanks for noticing, diagrams have been now upload again - please refresh the page to be able to see them. Happy crocheting!

21.09.2023 - 11:09

country flag Suzy58 wrote:

Honeycomb

07.08.2023 - 12:03

country flag María Jesús Ojeda Ruiz wrote:

Chocolate

06.08.2023 - 21:25

country flag NWhilton wrote:

Mantle

05.08.2023 - 13:02

country flag Jocelyne Tautil wrote:

Détente

04.08.2023 - 14:28

country flag Jeannine wrote:

Sweater weather

04.08.2023 - 09:00

country flag Hannele Gabrielsson wrote:

Ilahduttavan persoonallinen eli yksilöllisempi neule😍

03.08.2023 - 19:45

country flag Andrea Ævarsdóttir wrote:

Holey chocolate

03.08.2023 - 19:22