
Categorías populares
¿Buscas un hilo?


Comentarios / Preguntas (6)
![]() Jackie escribió:
Jackie escribió:
Make sure you have the stitch markers in place. Think of M1a chart as the 1st stitch, then repeat M1b 3 times, so you reach the 2nd stitch marker or the half way point. Now M1a becomes your next stitch and then repeat M1b another 3 times. When you come to the 6th row of the pattern remember to put in that stitch from M1a after each stitch marker. The M1a chart is the line of stitches you will use to crochet into when you make the border. Good luck. Jackie
14.11.2023 - 17:54
![]() Kelly Robertson escribió:
Kelly Robertson escribió:
I would call myself an intermediate knitter. I understood the pattern right away. I am not putting anyone down in anyway, I just want to help. I am taking pictures as I progress if they are any use to you. I think people just need to see the start of it in picture form. And then they will say ahhhh now I get it!!! So easy and cute. I want others to be able to whip these up :)
10.01.2023 - 23:42
![]() Paula escribió:
Paula escribió:
I have tried all ways to use this pattern but cannot make any sense. I have even tried to mark out on a graph.
14.12.2019 - 18:34DROPS Design respondió:
Dear Paula, should you need any individual assistance, you are welcome to contact the store where you bought the yarn, even per mail or telephone. Happy knitting!
16.12.2019 - 09:40
![]() Patti escribió:
Patti escribió:
I am an experienced knitter, but this pattern does not make sense. I understand that it is double side, but it does work woth the diagram. Is there just a written pattern for row to row and you could just sew both sides together or crochet them together with the crochet edging?
11.12.2019 - 03:02DROPS Design respondió:
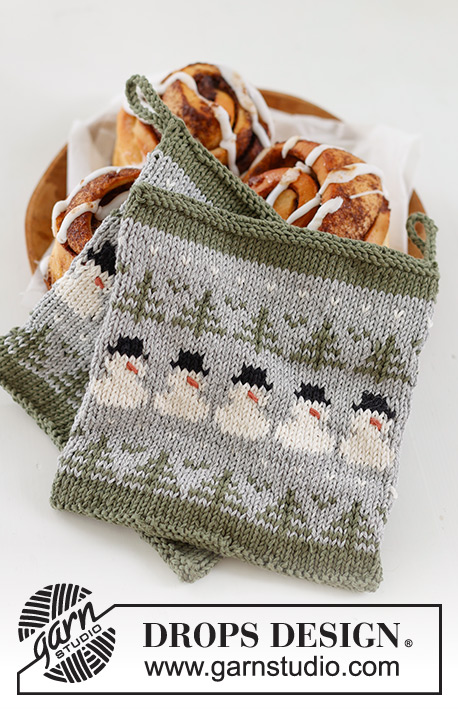
Dear Patti, you will work the potholder in the round, ie cast on 74 stitches and then work the diagrams in the round as follows: M.1A (= first stitch at beg of each round = side of piece), repeat M.1B a total of 3 times (= snowmenn) = 1 st + 3x 12 sts= 37 sts. Then repeat one more time M.1A (= 38th stitch = other side of potholder) and M.1B. When piece is knitted, just crochet the 2 rounds for the edge around whole potholder (working in cast-on edge, sides and cast off edge). But you can just sew bottom and top without crochet edge if your rather. Happy knitting!
11.12.2019 - 08:45
![]() Salli Bordfeld escribió:
Salli Bordfeld escribió:
Is there a tutorial for this pattern? I am an experienced knitter but can’t figure out the pattern whatsoever! How can you knit a circular way for a flat cloth? Also casting on 74 stitches doesn’t seem To work out w the graph of stitches!
07.09.2019 - 06:24DROPS Design respondió:
Dear Sali, this is a double-side pot holder, so you'll knit it in the round, then fold it and work a crochet finishing border through both layers. Happy crafting!
08.09.2019 - 10:47
![]() Marit Haug escribió:
Marit Haug escribió:
Jeg forsøker å strikke disse grytelappene, men jeg sliter med å forstå mønsteret.Jeg får det ikke til å stemme.For det første , er det " snømenn" på begge sider av grytekluter? For det andre, skal både mønster M1A og M1B fortsette rundt det hele.For hvis jeg starter på M1A på 6 omgang blir det fire hvite masker først.Er det riktig? Gjentar jeg dette omgangen rundt ,stemmer det ikke på neste omgang. Jeg er ingen dreven strikker.😄
05.01.2019 - 15:37DROPS Design respondió:
Hei Marit. Ja, det er snømenn på begge sider: Du strikker M.1A (=1 m) og så gjentas M.1B 3 ganger = 37 m (den ene siden av grytekluten). Så gjentar du dette mønsteret 1 gang til. Du fortsetter slik oppover, med M.1A over maskene med merker i. På 6 omgang vil du få 4 m med hvit etter hverandre akkurat i overgangen mellom A.1A og A.1B (starten og midten av omgangen). Du vil avslutte 6 omgang med 3 hvite og 1 rød m, og videre starte 7 omgang med 1 hvit, 1 rød, 1 hvit, 3 rød osv. mønsteret vil derfor «brytes» i overgangen mellom A.1A og A.1B. Husk at du skal brette arbeidet ved merkene så dette vil ikke synes like godt når det er ferdig. God fornøyelse.
07.01.2019 - 09:56
|
||||||||||||||||
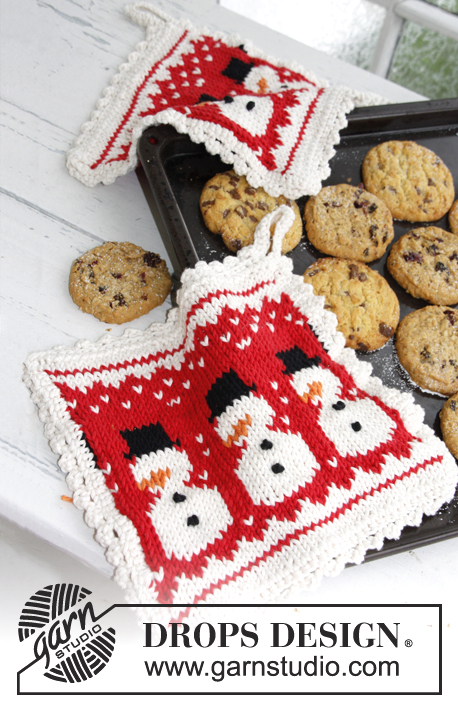
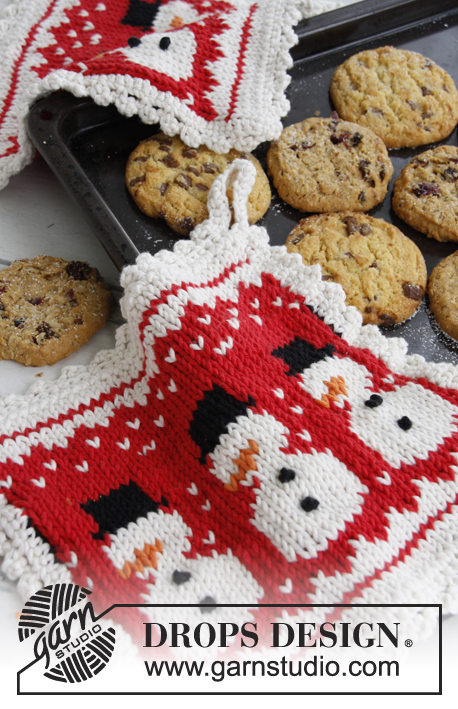
3 Little Snowmen#3littlesnowmenpotholders |
||||||||||||||||
 |
 |
|||||||||||||||
Agarradores de ollas DROPS, de punto, con patrón de Navidad en “Paris”.
DROPS Extra 0-792 |
||||||||||||||||
|
PATRÓN: Ver diagramas M.1A y M.1B. NUDO FRANCÉS: Traer la aguja enhebrada desde el LR hacia el LD en el pt donde debe quedar el nudo. Colocar la punta de la ag contra la pieza y envolver el hilo dos veces firmemente alrededor de la punta de la aguja. Tirar de la aguja a través de estos bucles, de manera que tengamos un doble nudo en el hilo. Insertar la aguja lo más cercano posible al pt donde el hilo emergió inicialmente (no en el lugar exacto, pues simplemente se desharía) y asegurar en la parte de atrás – ver Fig. 1. ------------------------------------------------------ AGARRADOR DE OLLAS: Tejido en redondo, en ag circular. Mon 74 pts en ag circular tamaño 4 mm con blanco hueso. Insertar 1 marcapuntos (MP) en el 1er pt al inicio de la vta y 1 MP en el 38º pt (= orillas laterales). Continuar tejiendo de la manera sig: * 1 vez diagrama M.1A, 3 veces diagrama M.1B *, repetir de *a* un total de 2 veces. Continuar hasta que el diagrama M.1A y M.1B han sido tejidos 1 vez verticalmente. Rem con blanco hueso. Bordar nudos franceses con negro donde se localiza una estrella en el diagrama. Doblar el agarrador de ollas de manera que los pts con MP estén en los laterales. ORILLA EN GANCHILLO: Trabajar toda la orilla con blanco hueso en ag de ganchillo tamaño 4 mm. Trabajar por el LD a través de ambas partes. Empezar en la parte de arriba de la esquina izquierda y trabajar alrededor de la orilla del agarrador de ollas, de la manera sig: VUELTA 1: Hacer 1 p.b. en la esquina, después hacer 1 p.b. en cada pt alrededor de toda la orilla y terminar con 14 cad para la argolla. Asegurar la argolla con 1 p.bjs en el p.b. en la esquina del inicio de la vta. VUELTA 2: Hacer * 3 cad, 1 p.b. en la primera de las 3 cad (= 1 picot), saltar 2 p.b., 1 p.b. en el p.b. sig *, repetir de *a* y terminar con 14 p.b. alrededor de la argolla y 1 p.bjs en el p.bjs de la vta anterior. Cortar y asegurar el hilo. |
||||||||||||||||
Explicaciones del diagrama |
||||||||||||||||
|
||||||||||||||||
 |
||||||||||||||||
¿Terminaste este patrón?Entonces, etiqueta tus fotos con #dropspattern #3littlesnowmenpotholders o envíalas a la galería #dropsfan. ¿Necesitas ayuda con este patrón?Encontrarás 13 videos tutoriales, un espacio para comentarios/preguntas y más visitando la página del patrón en garnstudio.com © 1982-2026 DROPS Design A/S. Todos los derechos reservados. Este documento, incluyendo todas sus sub-secciones, está protegido por los derechos de autor (copyright). Lee más acerca de lo que puedes hacer con nuestros patrones en la parte de abajo de cada patrón de nuestro sitio. |
||||||||||||||||


Con más de 40 años en el diseño de modelos de punto y de ganchillo, DROPS Design ofrece una de las más vastas colecciones de patrones gratuitos en el internet - traducidos en 17 idiomas. Al día de hoy, contamos con 325 catálogos y 12298 patrones - de los cuales 11726 están traducidos en español.
Nosotros trabajamos con mucho esmero para brindarte lo mejor que las labores de punto y ganchillo tienen para ofrecer,inspiración y consejos, así como hilos de magnífica calidad a precios increíbles! Te gustaría usar nuestros patrones para otro fin además del uso personal? Puedes leer acerca de lo que estás permitida a hacer en el texto de Copyright en la parte de abajo de todos nuestros patrones. Felices labores!
Escribe un comentario sobre DROPS Extra 0-792
¡Nos encantaría saber qué piensas acerca de este patrón!
Si quieres escribir una pregunta referente al patrón, por favor asegúrate de elegir la categoría correcta en el formulario debajo, para acelerar el proceso de respuesta. Los campos obligatorios están marcados con un *.