
Popular categories
Looking for a yarn?


|
|
Nautilus |
|
|
|
|
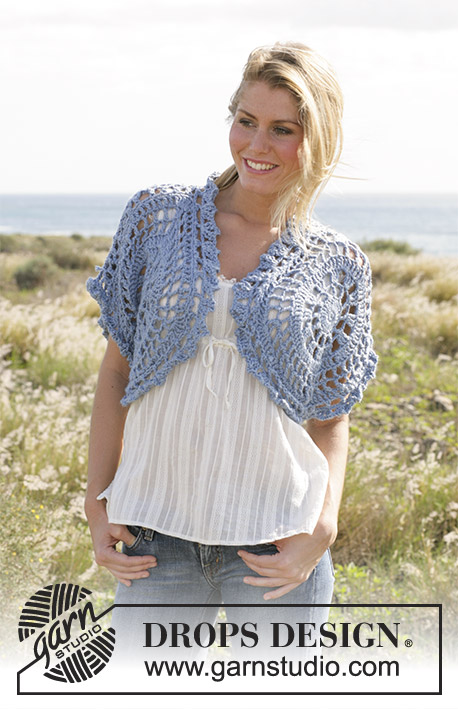
DROPS crochet top in ”Silke-Alpaca”
DROPS 99-21 |
|
|
Crochet gauge: 3 rounds of the crochet square measures 6.5 cm [2½"] and 11 tr x 3 rounds of texture pattern = 10 x 10 cm [4" x 4"] Crochet info: Substitute first tr on each row/round with 4 ch. Substitute first sc on round with 1 ch. Finish round with 1 sl st in beginning of round. Picot: 1 picot = 3 ch, 1 sl st in 3rd ch from crochet hook. Texture pattern: 1st row: 1 sc in each tr. 2nd row: 1 tr in each sc. 1st and 2nd row = 1 pattern repeat of texture pattern. Binding off tip (applies to neckline): Bind off at beginning of row as follows: Crochet 3 sl st over 3 first sc. Bind off at end of row as follows: Turn piece when 3 sc are left. First crochet 2 squares that are put tog = bottom part of top. In Size S/M crochet to 7th round, inclusive. In Size L crochet to 8th round, inclusive. In Size XL crochet to 9th round, inclusive. Then crochet a border around the squares and at last crochet the top part of the top onto the 2 squares. BOTTOM PART: Crochet panel: Crochet 4 ch create a ring with 1 sl st in first ch. 1st round: Read Crochet tip! Crochet 8 sc around ring. 2nd round: Crochet 3 tr in each sc = 24 tr. 3rd round: Crochet 1 tr, *3 ch, skip 1 tr, 1 tr in next tr*, repeat from*-* and finish with 3 ch and 1 sl st in beginning of round = 12 tr. 4th round: Crochet 3 tr in first tr, *3 ch, skip 3 ch, 3 tr in next tr*, repeat from*-* and finish with 3 ch skip 1 tr and 1 sl st in beginning of round = 36 tr. 5th round: Crochet 1 tr in each tr and 3 tr in each ch loop = 72 tr. Square now measures 20 cm [8"] in diameter. 6th round: Crochet 1 tr in first tr, *3 ch, skip 1 tr, 1 tr in next tr*, repeat from*-* and finish with 3 ch, skip 1 tr and 1 sl st in beginning of round = 36 tr. 7th round: *1 tr and 3 ch in each of 8 first tr, 1 tr in next tr, 3 ch, 1 tr in same tr, (= edge), 3 ch *, repeat from *-* 4 times in total and finish with 1 sl st in beginning of round = 40 tr. Finish size S/M here. 8th round: *1 tr and 3 ch in each of 8 first tr, 2 tr in next tr, 3 ch, 2 tr in next tr, (= edge), 3 ch *, repeat from *-* 4 times in total and finish with 1 sl st in beginning of round = 48 tr. Finish size L here. 9th round: *1 tr and 3 ch in each of 8 first tr , 2 tr in next tr, 1 tr in next tr, 3 ch, 1 tr in next tr, 2 tr in next tr (= corner), 3 ch*, repeat from *-* 4 times in total and finish with 1 sl st in beginning of round = 56 tr. Finish size XL here. Last round (crochet to complete all sizes): 1 tr in each tr and 1 tr in each ch loop . Crochet each corner as follows: 2 tr in each of 1-2-3 first tr, 3-5-7 tr in ch loop, 2 tr in each of next 1-2-3 tr = 96-120-144 tr. Crochet 1 square more. Picot edge: Crochet a picot edge on 2 sides opposite each other on each square – see figure 1. Begin mid corner. Crochet as follows: 1 sc around first tr, *1 picot – see explanation above, skip 1 tr, 1 sc around next tr *. Repeat from *-* 12-15-18 times in total = 12-15-18 picots. Turn piece and crochet back as follows: Crochet sl st until 2nd ch on last picot, *6 ch, 1 sc around 2nd ch on next picot*, repeat from *-*. Cut and sew thread. Panel measures approx 39-43-47 cm [15¼"-17"-18½"] in diameter. Crocheting together: Place squares together and crochet tog – see Figure 1. Crochet squares tog on both sides with picot edges – so a cylinder is formed. Crochet 1 sc in first loop on the one square, 2 ch, 1 sc in first loop on second square, *3 ch, 1 sc in next loop on the one square, 2 ch, 1 sc in next loop on second square* repeat from *-* until squares are crochet tog on side. TOP PART: Crochet the top part now: Crochet around top edge as follows: 1st round: Crochet 1 tr in first tr, *3 ch, skip 1 tr, 1 tr in next tr*, repeat from*-* and finish with 3 ch. Crochet as follows between squares: 1 tr, *3 ch, skip approx 1 cm [3/8"], 1 tr *, repeat from *-* 4 times in total, finish off with 3 ch = 34-40-46 tr with 3 ch between each. 2nd round: Crochet 1 sc in first tr, *1 picot, skip 3 ch, 1 sc in next tr * repeat from *-* on entire round = 34-40-46 picots. 3rd round: sl st to ch loop on first picot, 2 tr in 2nd ch in each picot, finish off with 1 sl st in first tr = 68-80-92 tr. 4th round: *1sc in first tr, 2 sc in next tr*, repeat from *-* and finish with 1 sl st in first tr = 102-120-138 sc. Split piece and crochet back and front pieces separately back and forth. Front piece: = 51-60-69 dc. Place where 2 squares are crochet tog mid front and mid back on the top part. Middle of squares are placed on side of top part. Crochet next round from WS. Crochet tr in each of middle 41-48-55 sc (do not crochet over 5-6-7 sc on each side = armhole) = 41-48-55 tr. Now crochet texture pattern –see explanation above. Crochet 3-4-5 pattern repeats, then split piece. Left front piece: On 1st row on 4th-5th-6th pattern repeat crochet sc but only over first 17-19-22 tr. Turn piece. Now bind off 3 tr for neckline towards mid front (i.e. in beginning of row of tr) – read binding off tip - 2 times in total = 11-13-16 tr/sc left on shoulder. Cut and sew thread after 7-8-9 pattern repeats. Right front piece: On 1st row on 4th-5th-6th pattern repeat crochet sc but only over first 17-19-22 tr (crochet from middle towards sides.) Turn piece. Now bind off 3 tr for neckline towards mid front (i.e. in beginning of row with tr) – read binding off tip - 2 times in total = 11-13-16 tr/sc left on shoulder. Cut and sew thread after 7-8-9 pattern repeats. Top part measures approx 21-24-27 cm [8 ¼"-9½"-10⅝"]. Back piece: = 51-60-69 sc. Crochet 1 tr in each of middle 41-48-55 sc (do not crochet over 5-6-7 sc on each side = armhole) = 41-48-55 tr. Crochet 6-7-8 pattern repeats with texture pattern, now crochet 1 last pattern repeat over 11-13-16 sc/tr only on each side (do not crochet middle 19-22-23 sc/tr = neckline.) Cut and sew thread after 7-8-9 pattern repeats. Assembly: Sew shoulder seams. Crochet edges: Crochet around bottom edge of top as follows: 1st round: Crochet 1 tr in first tr, *2 ch, skip 3 tr, 1 tr in next tr*, repeat from*-* and finish with 2 ch and 1 sl st in first tr. 2nd round: 2 tr in first tr, *4 ch, 2 tr in same tr, 1 ch, 2 tr in next tr *, repeat from *-* and finish with 4 ch, 2 tr in same tr, 1 ch and 1 sl st in first tr. Crochet around neckline as follows: 1 sc , *4 ch, skip approx 2 cm [3/8"], 1 sc*, repeat from *-* finish off with 4 ch and 1 sl st in first sc. |
|

|
|
|
Have you made this or any other of our designs? Tag your pictures in social media with #dropsdesign so we can see them! Do you need help with this pattern?You'll find tutorial videos, a Comments/Questions area and more by visiting the pattern on garnstudio.com. © 1982-2024 DROPS Design A/S. We reserve all rights. This document, including all its sub-sections, has copyrights. Read more about what you can do with our patterns at the bottom of each pattern on our site. |


With over 40 years in knitting and crochet design, DROPS Design offers one of the most extensive collections of free patterns on the internet - translated to 17 languages. As of today we count 304 catalogs and 11422 patterns - 11417 of which are translated into English (US/in).
We work hard to bring you the best knitting and crochet have to offer, inspiration and advice as well as great quality yarns at incredible prices! Would you like to use our patterns for other than personal use? You can read what you are allowed to do in the Copyright text at the bottom of all our patterns. Happy crafting!
Comments / Questions (50)
Ich verstehe nicht, wie die Maschenprobe anzufertigen ist. Könntet ihr mir das bitte einmal ausführlicher erklären? Dankeschön.
12.02.2013 - 16:29DROPS Design answered:
Liebe Cathy, Sie häkeln die ersten 3 Rd des in der Anleitung beschriebenen Vierecks, diese 3 R sollen dann 6,5 cm sein. Die zweite Maschenprobe soll im Strukturmuster gehäkelt werden: wenn 11 Doppel-Stb 10 cm breit sind, ist Ihre Maschenprobe in Ordnung.
16.02.2013 - 19:12Beste lezer,hartelijk dank voor de antwoorden.de trui heb ik klaar is echt mooi geworden in zwart.soms vond ik de beschrijving ingewikkeld,kan eenvoudiger beschreven worden.Maar toch mijn dank voor jullie hulp vriendelijke groet Maria
06.07.2012 - 05:04Beste,helaas bgrijp ik niet wat jullie bedoelen bij picot rand.de picotsteek begrijp ik maardan er staat keer het werk en dan met hv.tot aan de 2e picot rand 6lmet hv,dus dit zijn boogjes over de picot rand? en dit alleen bij 2picotranden?? of gaan hv.over de picotrandgehaakt worden??bvd
28.06.2012 - 13:23DROPS Design answered:
Er staat in het patroon: Keer het werk en haak terug als volgt: Haak hv tot de 2e l van de laatste picot, *6 l, 1 v in de 2e l van de volgende picot*, herhaal van *-*. Hecht af. Je haakt dus hv tot de 2e van de laatst gehaakte picot. Dan herhaal je de beschrijving tussen de sterretjes langs de net gehaakte picotrand. Dit doe je aan beide picotranden (zie ook figuur 1).
29.06.2012 - 12:02Bij vierkant klaar 39 cm.krijg maar 29 cm.dezelfde dikte haaknaald en garen?bovenstuk haken aan de twee vierkanten is duidelijk maar wat bedoelt u tussen de vierkanten is dit de zijnaad .hartelijk dank
19.06.2012 - 12:56DROPS Design answered:
Zie ook mijn antwoord hieronder. Is uw vierkant kleiner dan moet u met een dikkere haaknld haken. Het is altijd belangrijk om de juiste verhoudingen te krijgen: DROPS Haaknld 6mm OF de haaknld, die u nodig heeft om de volgende steekverhouding te krijgen. Met een verkeerde verhouding wordt het model te klein/te groot of kan gaan lubberen en zo voort.
20.06.2012 - 10:36Sorry vergeten het staat bij de beschrijving van picotrand haken,nadat je het vierkant gehaakt hebt.en structuur patroon is dat ook vd picotrand?het lijkt mij niet mooi/goed om op de picotrant hv.te haken bvhdank maria
18.06.2012 - 12:13DROPS Design answered:
Bovenaan staat algemene informatie over picot en structuurpatroon. In het patroon verderop staat beschreven wanneer u dit haakt. Deze picots worden inderdaad met halve vasten gehaakt. Met tussen de vierkanten wordt precies dat bedoelt: de overgang van het ene vierkant naar het andere waar de vierkanten aan elkaar zijn gehaakt.
20.06.2012 - 10:34Beste lezer,wat bedoeld men bij de picot keren en dan hv erover haken,of is het de kant waar geen picot steek komt groetjes maria
18.06.2012 - 09:37DROPS Design answered:
Beste. Zou u willen aangeven waar in het patroon u dit tegenkomt. Alvast bedankt.
18.06.2012 - 11:45Beste Aline. Je hebt helemaal gelijk. Het patroon is nu gewijzigd. Bedankt en veel haakplezier. Gr. Tine
20.02.2009 - 13:55Beste Aline. Je hebt helemaal gelijk. Het patroon is nu gewijzigd. Bedankt en veel haakplezier. Gr. Tine
20.02.2009 - 13:52In de nederlandstalige versie staat er dat je 4 vierkanten moet haken maar het zijn er toch maar 2?
19.02.2009 - 21:29Robin, double dc is tr, now corrected. Diagram is just an illustration, not showing the exact numbers of loops, each size has different numbers.
13.02.2009 - 03:14