
Popular categories
Looking for a yarn?


|
|
Lake Erie |
|
|
|
|
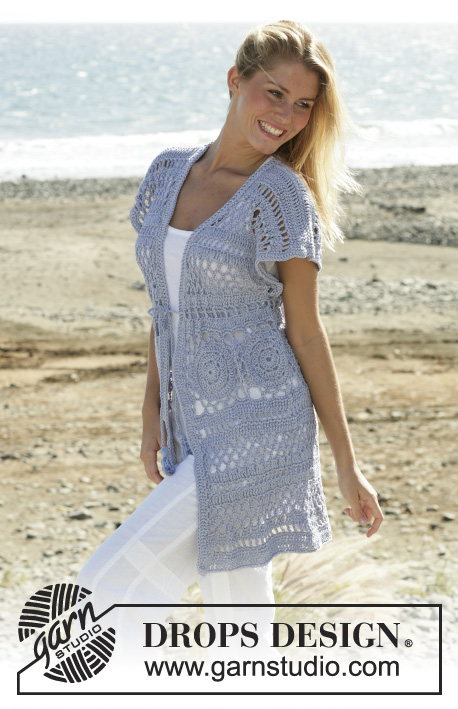
DROPS shoulder piece with crochet edges in ”Silke-Alpaca”. Sizes S - XXL
DROPS 99-20 |
|
|
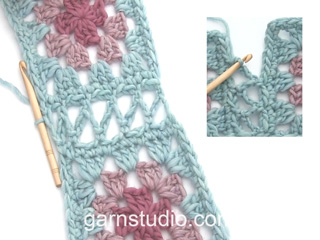
Crochet info: Substitute first tr on round with ch 4. Substitute first sc on round with 1 ch. Finish round with 1 sl st in beginning of round. Size S/M crochet to 8th round, inclusive, For Size L to 9th round, inclusive and for size XL/XXL to 10th round, inclusive. Crochet rounds: Crochet 4 ch create a ring with 1 sl st in first ch. 1st round: Crochet 8 sc around ring – read Crochet info. 2nd round: Crochet 3 tr in each sc = 24 tr. 3rd round: Crochet 1 tr, *3 ch, skip 1 tr, 1 tr in next tr*, repeat from*-* and finish with 3 ch and 1 sl st in beginning of round = 12 tr. 4th round: Crochet 3 tr in first tr, *3 ch, skip 3 ch, 3 tr in next tr*, repeat from*-* and finish with 3 ch and 1 sl st in beginning of round = 36 tr. 5th round: Crochet 1 tr in each tr and 3 tr in each ch loop = 72 tr. Square now measures 18 cm [7"] in diameter. 6th round: Crochet 1 tr in first tr, *3 ch, skip 1 tr, 1 tr in next tr*, repeat from*-* and finish with 3 ch and 1 sl st in beginning of round = 36 tr. 7th round: *1 tr and 3 ch in each of 8 first tr, 1 tr in next tr, 3 ch, 1 tr in same tr, (= corner), 3 ch *, repeat from *-* 4 times in total and finish with 1 sl st in beginning of round = 40 tr. 8th round: *1 tr in each of 8 first tr and each of 8 first ch loops, 2 tr in next tr, 3 tr in ch loop, 2 tr in next tr (= corner), 1 tr in next ch loop*, repeat from *-* 4 times in total and finish with 1 sl st in beginning of round = 96 tr. Size S/M finish here – round measures approx 31 cm [12¼"] in diameter. 9th round: Crochet 1 tr in each tr. Crochet as follows in the 7 tr at the corners: 2 tr in each of 3 first tr, 3 tr in next tr, 2 tr in each of 3 next tr = 128 tr. Size L finish here – square measures approx 35 cm [13¾"] across. 10th round: Crochet 1 tr in each tr. Crochet as follows in the 15 tr at the corners: 2 tr in each of 7 first tr, 3 tr in next tr, 2 tr in each of 7 next tr = 192 tr. Size XL/XXL finish here – square measures approx 39 cm [15¼"] across. Crochet 3 squares more. Picot edge: Crochet picot edge on 2 of the squares along 2 sides – on the other 2 squares crochet picot edge along 1 side - see Measurement chart. Crochet as follows (begin mid corner): 1 sc around first tr, *1 picot (= 3 ch,1 sl st in 3rd ch from crochet hook), skip 1 tr, 1 sc around next tr*, repeat from *-* 12-15-21 times in total = 12-15-21 picots. Turn piece and crochet back as follows: Crochet sl st until 2nd ch on last picot, *6 ch, 1 sc around 2nd ch on next picot*, repeat from *-*. Cut and sew thread. Crocheting together: Place squares on top of each other and crochet tog – see Measuring chart. Crochet in ch loop from picot edge as follows: 1 sc in first ch loop on the one square, 2 ch, 1 sc in first ch loop on second square, *3 ch, 1 sc in next ch loop on the one square, 2 ch, 1 sc in next ch loop on second square* repeat from*-* until panels are crochet tog on side. Crochet edge: Crochet an edge round entire shoulder piece with crochet hook size 5 mm [H/8] as follows: 1st round: Crochet 1 tr in first tr, *2 ch, skip 3 tr, 1 tr in next tr*, repeat from*-* and finish with 3 ch and 1 sl st in beginning of round. 2nd round: 2 tr in first tr, *4 ch, 2 tr in same tr, 1 ch, 2 tr in next tr *, repeat from *-* and finish with 4 ch, 2 tr in same tr, 1 ch and 1 sl st in first tr. Fold shoulder piece double and sew 1 st on each side to keep tog. |
|

|
|
|
Have you made this or any other of our designs? Tag your pictures in social media with #dropsdesign so we can see them! Do you need help with this pattern?You'll find tutorial videos, a Comments/Questions area and more by visiting the pattern on garnstudio.com. © 1982-2024 DROPS Design A/S. We reserve all rights. This document, including all its sub-sections, has copyrights. Read more about what you can do with our patterns at the bottom of each pattern on our site. |


With over 40 years in knitting and crochet design, DROPS Design offers one of the most extensive collections of free patterns on the internet - translated to 17 languages. As of today we count 304 catalogs and 11422 patterns - 11417 of which are translated into English (US/in).
We work hard to bring you the best knitting and crochet have to offer, inspiration and advice as well as great quality yarns at incredible prices! Would you like to use our patterns for other than personal use? You can read what you are allowed to do in the Copyright text at the bottom of all our patterns. Happy crafting!
Comments / Questions (65)
Denise; The "shoulder piece" is the whole item. Joining the squares, I did my own thing. I made the picot every other tr and Then I joined the back rt to the front rt and back lft, starting at the back rt corner and sc in picot, ch 2, sc in next 2 ch of joining piece, ch 2, skip one picot, sc in next picot, repeat until front right an back left are joined to right back. Join the lft front to the lft back the same way
07.03.2015 - 19:07Joining squares, I did my own thing. I made the picot every other tr and did my (sc,ch6) in every other picot. I completed the front rt and the back lft squares. I stopped at the picot row for the back rt and front lft squares.
07.03.2015 - 19:06Denise; The "shoulder piece" is the whole item, the shrug, bolero, ... whatever you call it.
07.03.2015 - 19:01Bonjour; je bloque au rang 8 :comment faire avec les mailles en l'air ? comment respecter l'espace entre les DB par rapport au rang 7 ? Dois-je continuer a faire des ml entre les DB ? J'ai essayé sans ml cela retrecit tres fort l'ouvrage. J'ai mis des DB mais j'obtiens alors +- 200 DB . Je suis complètement bloquée ! Merci d'avance pour votre aide
20.04.2014 - 01:57DROPS Design answered:
Bonjour Sophie, au rang 8, on fait 1 DB dans chacune des 8 m suivantes (= 1 DB dans les DB et 1 DB dans les ml), pour former le coin, on fait 2 DB dans la 9ème DB, 3DB dans l'arceau et 2 DB dans la DB suiv. On doit avoir 96 DB à la fin de ce tour. Bon crochet!
22.04.2014 - 11:38Silvia wrote:
Por favor si pudieran enviarme el esquema..ya que la forma de esxplicar escrita es muy complicada..y para una persona que hace 40 anios que teje crochet...inentendible...
01.04.2014 - 17:43DROPS Design answered:
Hola Silvia. Me temo que no es posible mandar los diagramas adicionales. A tu disposición tienes los videos tutoriales (en el apartado Videos de cada modelo) y el Glosario (en el apartado Tips y Ayuda).
03.04.2014 - 12:05I'm having a problem getting rnd 8 right. I'm not getting a square so I know I'm messed up with the corners. Could someone e-mail me and help me through it?
13.02.2014 - 23:24DROPS Design answered:
Dear Janis, corners are created on round 7 when you work (1 tr in next tr, 3 ch, 1 tr in same tr), then on round 8, you will have (2 tr in next tr, 3 tr in ch loop, 2 tr in next tr) in each corner. Happy crocheting!
14.02.2014 - 09:15I'm having a problem on rnd 8. I have the right number in 7 but my square isn't a square.Could someone please help me through it. I had hoped to find it on video.
13.02.2014 - 23:21K Dixon wrote:
I also end up with 24 picots with 192 dtr divided by4=48 48dtr per side divided by 2=24 so I believe that is correct.
12.02.2014 - 00:29To begin the picot edge, it states to begin mid corner. What stitch to you consider to be mid corner? I started in the middle of the 3 tr in the corner, but after 21 picots, I am about 7 tr away from the next corner. The diagram makes it look as if the picots and loops go from corner to corner. If I go from corner to corner I end up with 24 picots.
29.07.2013 - 20:20Bonjour J'ai un souci au rang 8. Si on ne fait qu'1 db ca rétrécie le cercle et on obtient 40 db au lieu de 96. Ce souci a déjà du etre signalé. Pouvez vous me donner les modifs Avec mes remerciements
24.07.2013 - 13:03Josiane answered:
Annulez ma question précédente envoyée ce matin, c'est moi qui me suis trompée. 1000 excuses, je me suis trop précipitée. J'ai noté les corrections pour les rangs suivants Bonne fin de journée
24.07.2013 - 13:30