DROPS Merino Extra Fine
100% Wool
from 4.55 $ /50g
Get the yarn to make this pattern from 36.40$.

The yarn cost is calculated from the pattern’s smallest size and the yarn’s cheapest product type. Looking for an even better price? You might find it on the DROPS Deals!

DROPS SS24

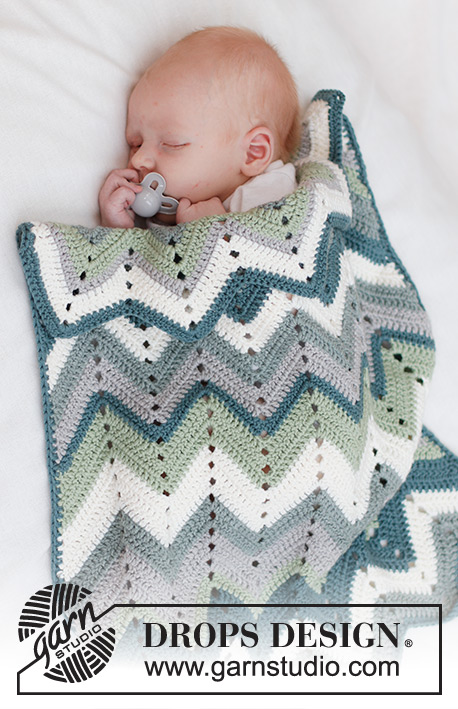
Green Spring Blanket

Crocheted baby blanket in DROPS Merino Extra Fine. Piece is worked with zig-zag pattern.

DROPS Baby 46-15
DROPS design: Pattern me-083-by
Yarn group B
----------------------------------------------------------

SIZE:
Piece measures approx. Width = 41-57 cm = 16⅛"-22½" Length = 60-70 cm = 23⅝"-27½".

YARN:
DROPS MERINO EXTRA FINE from Garnstudio (belongs to yarn group B)
100-150 g color 01, off white
100-150 g color 37, misty forest
100-150 g color 47, sage green
50-100 g color 07, light taupe
50-100 g color 26, pistachio

CROCHET HOOK:
DROPS CROCHET HOOK SIZE 4 MM = US 6.

CROCHET GAUGE:
18 double crochets in width and 9 rows vertically = 10 x 10 cm = 4" x 4".
1 repetition of A.2 measures approx. 8 cm = 3⅛" in width.
NOTE! Remember that crochet hook size is only a suggestion. If you have too many stitches on 10 cm = 4" switch to larger hook. If you have too few stitches on 10 cm = 4" switch to smaller hook.

-------------------------------------------------------

Alternative Yarn – See how to change yarns here
Yarn Groups A to F – Use the same pattern and change the yarn here
Yarn usage using an alternative yarn – Use our yarn converter here

-------------------------------------------------------

DROPS Merino Extra Fine
100% Wool
from 4.55 $ /50g
Get the yarn to make this pattern from 36.40$.

The yarn cost is calculated from the pattern’s smallest size and the yarn’s cheapest product type. Looking for an even better price? You might find it on the DROPS Deals!

Pattern instructions

NOTE: This pattern is written in American English. All measurements in charts are in cm. For conversion from inches to cm - click here. There are different terms for crocheting in American and British English. If this pattern includes crochet, click for "crochet terms" here. For this pattern in British English, please click here.
----------------------------------------------------------

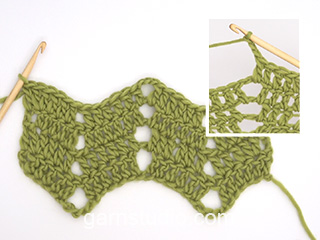
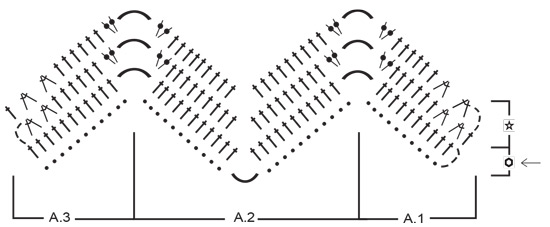
EXPLANATION FOR THE PATTERN:

----------------------------------------------------------

PATTERN:
See diagrams A.1 to A.3.

CHAIN STITCH:
If you work at the end of crochet hook the chain stitch will often be too tight.
1 chain stitch should be just as long as 1 double crochet is wide.

STRIPES:
Work stripes as follows:
2 rows with color 47, sage green
2 rows with color 01, off white
3 rows with color 37, misty forest
1 row with color 26, pistachio
3 rows with color 07, light taupe
2 rows with color 47, sage green
3 rows with color 01, off white
3 rows with color 26, pistachio
1 row with color 37, misty forest
2 rows with color 07, light taupe
2 rows with color 47, sage green
2 rows with color 01, off white
2 rows with color 37, misty forest
3 rows with color 47, sage green
2 rows with color 26, pistachio
1 row with color 07, light taupe
2 rows with color 01, off white
1 row with color 37, misty forest

If the stripes are done before measurements, work from the beginning again.

COLOR CHANGE:
When changing color work as follows: Work last double crochet with first color but wait with last yarn over and pull through, switch to next color and work last yarn over and pull through.
To avoid sewing many strands after color change work the first 2 double crochets at beginning of every row with new color with double yarn (in the same color). This is done as follows: Work yarn end together with strand from ball. Then place yarn end along stitches from previous row and work around it so that the yarn end is hidden inside the stitches.

----------------------------------------------------------

START THE PIECE HERE:

----------------------------------------------------------

BLANKET – SHORT OVERVIEW OF THE PIECE:
Blanket is worked back and forth with zig-zag pattern. Finally work an edge around the entire blanket.

BLANKET:
Use hook size 4 MM = US 6 and DROPS Merino Extra Fine in color misty forest. Work 128-180 chain stitches - read CHAIN STITCHES and STRIPES in explanations above. Work diagrams A.1, A.2 and A.3 as follows:
ROW 1: Turn and work 3 chain stitches, 1 double crochet in 4th chain stitch from hook, work 1 double crochet in each of the next 9 chain stitches (A.1), * work 4 chain stitches, work 1 double crochet in each of the next 11 chain stitches, skip 4 chain stitches, work 1 double crochet in each of the next 11 chain stitches *, work from *-* ( A.2) 4-6 times in total, then work 4 chain stitches, and 1 double crochet in each of the last 11 chain stitches (A.3). Turn piece.
ROW 2: Work A.3, work A.2 4-6 times in total, finish with A.1. Turn piece. REMEMBER THE CROCHET GAUGE!
ROW 3: Work A.1. Then work A.2 4-6 times in total. Finish row with A.3.

Repeat rows 2 and 3, at the same time change color as explained in stripes above. When all stripes have been worked 1 times, repeat stripes from the beginning. Continue until piece measures approx. 59-69 cm = 23¼"-27⅛" vertically, measured along an eyelet row or to desired length. Fasten off.

EDGE AROUND BLANKET:
Use hook size 4 MM = US 6 and color misty forest. Work single crochets along the edge on blanket. Work as follows in every chain space: Work * 1 single crochet, 1 chain stitch * repeat from *-* until there are 3 single crochet around chain space in total. Continue like this around the entire blanket, make sure to avoid a tight edge. Fasten off.

Diagram

All measurements in charts are in cm.

symbols = 1 CHAIN STITCH - read explanation in pattern. This row has already been worked, begin at the arrow
symbols = Begin here
symbols = 1st row (explained in pattern). This row is only worked 1 time and is not repeated upwards
symbols = 1 chain stitch
symbols = 1 double crochet in chain stitch below or 1 double crochet in double crochet below
symbols = 4 chain stitches
symbols = *Make 1 yarn over, insert hook in next stitch, get yarn, make 1 yarn over and pull yarn through the 2 first loops on hook *, repeat from *-* 2 times in total, make 1 yarn over and pull yarn through all 3 loops on hook (= 1 stitch decreased).
symbols = 1 double crochet around chain space
symbols = 2nd and 3rd row (explained in pattern)
diagram
Do you have a question? See a list of frequently asked questions (FAQ)

Knitting tension is what determines the final measurements of your work, and is usually measured per 10 x 10 cm. It is provided like so: number of stitches in width x number of rows in height - eg: 19 stitches x 26 rows = 10 x 10 cm.

The knitting tension is very individual; some people knit/crochet loosely while others work tightly. You adjust the knitting tension with the needle size, which is why the suggested needle size only serve as a guide! You need to adjust this (up or down) to ensure that YOUR knitting tension matches the knitting tension provided in the pattern. If you work with a different knitting tension than provided you will have a different yarn consumption, and your work will have different measurements than what the pattern suggests.

The knitting tension also determines which yarns can replace each other. As long as you achieve the same knitting tension you can replace one yarn with another.

See DROPS lesson: How to measure your tension/gauge

See DROPS video: How to make a gauge tension swatch

The required amount of yarn is provided in grams, eg: 450 g. To calculate how many balls you’ll need you first need to know how many grams are in 1 ball (25g, 50g or 100g). This information is available if you click on the individual yarn quality on our pages. Divide the amount required with the amount of each ball. For example, if each ball is 50g (the most common amount), the calculation will be as follows: 450 / 50 = 9 balls.

The important thing when changing from one yarn to another is that the knitting/crochet tension remains the same. This is so that the measurements of the finished piece will be the same as on the sketch provided. It is easier to achieve the same knitting tension using yarns from the same yarn group. It is also possible to work with multiple strands of a thinner yarn to achieve the knitting tension of a thicker one. Please try our yarn converter. We recommend you to always work a test swatch.

Please NOTE: when changing yarn the garment might have a different look and feel to the garment in the photo, due to individual properties and qualities of each yarn.

See DROPS lesson: Can I use a different yarn than the one mentioned in the pattern?

All our yarns are categorised into yarn groups (from A to F) according to thickness and knitting tension – group A contains the thinnest yarns and group F the thickest. This makes it easier for you to find alternative yarns to our patterns, should you wish to switch yarn. All yarns within the same group have a similar knitting tension and can easily replace each other. However, different yarn qualities have different structures and properties which will give the finished work a unique look and feel.

Click here for an overview of the yarns in each yarn group

At the top of all our patterns you’ll find a link to our yarn converter, which is a helpful tool should you wish to use a different yarn than suggested. By filling in the yarn quality you wish to replace, the amount (in your size) and number of strands, the converter will present good alternative yarns with the same knitting tension. Additionally it will tell you how much you’ll require in the new qualities and whether you’ll need to work with multiple strands. Most skeins are 50g (some are 25g or 100g).

If the pattern is worked with multiple colours, every colour will have to be converted separately. Similarly, if the pattern is worked with several strands of different yarns (for example 1 strand Alpaca and 1 strand Kid-Silk) you will have to find alternatives for each, individually.

Click here to see our yarn converter

Since different yarns have different qualities and textures we have chosen to keep the original yarn in our patterns. However, you can easily find options among our available qualities by using our yarn converter, or simply pick a yarn from the same yarn group.

It is possible that some retailers still have discontinued yarns in stock, or that someone has a few skeins at home that they would like to find patterns for.

The yarn converter will provide both alternative yarn as well as required amount in the new quality.

If you think it's hard to decide what size to make, it can be a good idea to measure a garment you own already and like the size of. Then you can pick the size by comparing those measures with the ones available in the pattern's size chart.

You'll find the size chart at the bottom of the pattern.

See DROPS lesson: How to read size chart

The needle size provided in the pattern serves only as a guide, the important thing is to follow the knitting tension. And since knitting tension is very individual, you will have to adjust the needle size to ensure that YOUR tension is the same as in the pattern – maybe you’ll have to adjust 1, or even 2 needle sizes, up or down to achieve the correct tension. For this, we recommend that you work test swatches.

Should you work with a different knitting tension than the one provided, the measurements of the finished garment might deviate from the measurement sketch.

See DROPS lesson: How to measure your tension/gauge

See DROPS video: How to make a gauge tension swatch

Working a garment top-down provides more flexibility and room for personal adjustment. For example it is easier to try the garment on while working, as well as making adjustments to length of yoke and shoulder caps.

The instructions are carefully explaining every step, in the correct order. Diagrams are adjusted to the knitting direction and are worked as usual.

The diagram depicts all rows/rounds, and every stitch seen from the right side. It is read from bottom to top, from right to left. 1 square = 1 stitch.

When working back and forth, every other row is worked from the right side and every other row is worked from the wrong side. When working from the wrong side, the diagram will have to be worked reversed: from left to right, knit stitches are purled, purl stitches are knit etc.

When working in the round every round is worked from the right side and the diagram are worked from right to left on all rounds.

See DROPS lesson: How to read knitting diagrams

The diagram depicts all rows/rounds, and every stitch seen from the right side. It is worked from bottom to top, from right to left.

When working back and forth every other row is worked from the right side: from right to left and every other row is worked from the wrong side: from left to right.

When working in the round, every row in the diagram are worked from the right side, from right to left.

When working a circular diagram you start in the middle and work your way outwards, counter clockwise, row by row.

The rows usually start with a given number of chain stitches (equivalent to the height of the following stitch), this will either be depicted in the diagram or explained in the pattern.

See DROPS lesson: How to read crochet diagrams

Instructions for working several diagrams after each other on the same row/round, will often be written like so: “work A.1, A.2, A.3 a total of 0-0-2-3-4 times". This means you work A.1 once, then A.2 is worked once, and A.3 is repeated (in width) the number of times provided for your size – in this case like so: S = 0 times, M = 0 times, L=2 times, XL= 3 times and XXL = 4 times.

The diagrams are worked as usual: begin with the first row in A.1, then work the first row in A.2 etc.

See DROPS lesson: How to read knitting diagrams

See DROPS lesson: How to read crochet diagrams

The total width of the garment (from wrist-to-wrist) will be larger in the larger sizes, despite the actual sleeves being shorter. The larger sizes have longer sleeve caps and wider shoulders, so there will be a good fit in all sizes.

The measurement sketch/schematic drawing provides information regarding the full length of the garment. If it’s a jumper or a jacket the length is measured from the highest point on the shoulder (usually closest to the neckline), and straight down to the bottom of the garment. It is NOT measured from the tip of shoulder. Similarly, the length of yoke is measured from the highest point on the shoulder and down to where yoke is split into body and sleeves.

See DROPS lesson: How to read a schematic drawing

Diagrams are often repeated on the round or in height. 1 repeat is the diagram the way it appears in the pattern. If it says to work 5 repeats of A.1 in the round, then you work A.1 a total of 5 times after/next to each other in the round. If it says to work 2 repeats of A.1 vertically/in height you work the entire diagram once, then begin again at the start and work the entire diagram one more time.

Chain stitches are slightly narrower than other stitches and to avoid working the cast-on edge too tight, we simply chain more stitches to begin with. The stitch count will be adjusted on the following row to fit the pattern and measurement sketch.

The rib edge is more elastic and will contract slightly compared to, for example, stocking stitch. By increasing before the rib edge, you avoid a visible difference in width between the rib edge and the rest of the body.

It’s very easy to cast off too tightly, and by making yarn overs while casting off (and simultaneously casting these off) you avoid a too tight cast off edge.

See DROPS video: How to bind off with yarn overs (yo)

To achieve an even increase (or decrease) you can increase on, for example: every 3rd and 4th row alternately, like so: work 2 rows and increase on the 3rd row, work 3 rows and increase on the 4th. Repeat this until the increase is complete.

See DROPS lesson: Increase or decrease 1 st on every 3rd and 4th row alternately

Should you prefer to work in the round instead of back and forth, you may of course adjust the pattern. You’ll need to add steeks mid-front (usually 5 stitches), and follow the instructions. When you would normally turn and work from the wrong side, simply work across the steek and continue in the round. At the end you’ll cut the piece open, pick up stitches to work bands, and cover the cut edges.

See DROPS video: How to knit steeks and cut open

Should you prefer to work back and forth instead of in the round, you may of course adjust the pattern so you work the pieces separately and then assemble them at the end. Divide the stitches for the body in 2, add 1 edge stitch in each side (for sewing) and work the front and back pieces separately.

See DROPS lesson: Can I adapt a pattern for circular needles into straight needles?

Pattern repeats can vary slightly in the different sizes, in order to get the correct proportions. If you’re not working the exact same size as the garment in the photo, yours might deviate slightly. This has been carefully developed and adjusted so that the complete impression of the garment is the same in all sizes.

Make sure to follow instructions and diagrams for your size!

If you have found a pattern you like which is available in women’s size it’s not very difficult to convert it to men’s size. The biggest difference will be the length of sleeves and body. Start working on the women size that you think would fit across the chest. The additional length will be worked right before you cast off for the armhole/sleeve cap. If the pattern is worked top-down you can add the length right after the armhole or before the first decrease on sleeve.

Regarding additional yarn amount, this will depend on how much length you add, but it is better with a skein too many than too few.

All yarns will have excess fibres (from production) that might come off as lint or shedding. Brushed yarns (ie hairier yarns) have more of these loose, excess fibres, causing more shedding.

Shedding also depends on what is worn under or over the garment, and whether this pulls at the yarn fibres. It’s therefore not possible to guarantee that there will be no shedding

Below are some tips on how to get the best result when working with hairier yarns:

1. When the garment is finished (before you wash it) shake it vigorously so the looser hairs come off. NOTE: do NOT use a lint roller, brush or any method that pulls at the yarn.

2. Place the garment in a plastic bag and put it in your freezer - the temperature will cause the fibres to become less attached to each other, and excess fibres will come off easier.

3. Leave in the freezer for a few hours before taking it out and shaking it again.

4. Wash the garment according to the instructions on the yarn label.

Pilling is a natural process that happens to even the most exclusive of fibers. It's a natural sign of wear and tear that is hard to avoid, and that is most visible in high friction areas of your garment like a sweater's arms and cuffs.

You can make your garment look as new by removing the pilling, using a fabric comb or a pill/lint remover.

Still can't find the answer you need? Then scroll down and leave your question so one of our experts can try to help you. This will be done normally within 5 to 10 working days.
In the meantime, you can read the questions and answers that others have left to this pattern or join the DROPS Workshop on Facebook to get help from fellow knitters/crocheters!

Post a comment to pattern DROPS Baby 46-15

We would love to hear what you have to say about this pattern!

If you want to leave a question, please make sure you select the correct category in the form below, to speed up the answering process. Required fields are marked *.

Comments / Questions (3)

country flag Elise wrote:

Hei! I oppskriften står det man skal legge opp med tåkeskog, så står rad 1 og 2 forklart før det står man skal hekle striper. I striper står salviegrønn først. Skal man da hekle 2 rader med tåkeskog først, eller starte rett på salviegrønn etter oppleggsraden? Det står også at man skal hekle 128 masker på oppleggsraden, snu og hekle 3 ytterligere luftmasker. Det tror jeg er feil, for jeg endte da opp med 3 luftmasker for mye.

20.04.2024 - 00:26

DROPS Design answered:

Hei Elisa. Her skulle det nok ha stått: Bruk heklenål 4 og DROPS Merino Extra Fine i fargen salviegrønn. Dette er da stripe 1 og 2 (rad 1 og 2). Kanten rundt teppet som hekles tilslutt, hekles i fargen tåkeskog. Oppskriften er oversendt Design avd slik at de kan komme med en oppdatering, samt å ta en sjekk om det skal være 128 masker eller 125 masker man starter med. mvh DROPS Design

22.04.2024 - 13:46

country flag Kalina wrote:

Liebes DROPS-Team, danke für die schöne Anleitung. Ich finde sie soweit gut verständlich, nur eine Sache ist mir unklar: Es werden 128-180 Luftmaschen angeschlagen (ich lese das als "von...bis") - in der 1. Reihe müssen aber die Maschen aufgehen. D.h., es darf ja keine beliebige Anzahl Maschen verwendet werden, sondern sie muss durch eine bestimmte Zahl teilbar sein, oder?

18.04.2024 - 18:44

DROPS Design answered:

Liebe Kalina, wenn ich richtig zähle, sollten die ersten 3 Luftmaschen nicht extra gehäkelt, die sind in die Luftmaschenanzahl vom Beginn eingeschlosse, so häkeln Sie A.1 über 10 Luftmaschen (, dann wiederholen Sie A.2 über 26 Luftmaschen und enden Sie mit A.3 über 11 Luftmaschen. Dies wird unser Design team weitergeleitet, danke für den Hinweis. Viel Spaß beim Häkeln!

19.04.2024 - 08:31

country flag Ursula Schreiber wrote:

Hallo Drops-Team, ich bin noch Anfänger und habe Probleme mit der Anleitung. Vielleicht lese ich die Anleitung und die Zeichnung dazu falsch. Im Diagramm Abschnitt A2 sind nur in der 1. Reihe 4 Luftmaschen zum Auslassen. In der 2. und 3. Reihe nicht. In der Anleitung steht bei A2, dass man 4 Luftmaschen häkeln soll. Ich bin der Meinung, dass es im Diagramm nicht passt. Eine einfachere Zeichnung wäre wohl hilfreicher (Stäbchen um Luftmaschen...) Freu mich auf Hilfe LG Ursula

04.03.2024 - 09:24

DROPS Design answered:

Liebe Frau Schreiber, bei der 1. Reihe wird man 4 Luftmaschen überspringen, dann werden 4 Stäbchen übersprungen (siehe ind er Mitte A.2, 2. Reihe z.B.: 2 Stäbchen um den Luftmaschenbogen, dann 1 Stäbchen in je die nächsten 9 Stäbchen, 4 Stäbchen überspringen, 1 Stäbchen in je die nächsten 9 Stäbchen, 2 Stäbhcen um den Luftmaschenbogen. Viel Spaß beim Häkeln!

04.03.2024 - 10:14