
Suositut kategoriat
Etsitkö tiettyä lankaa?


Kommentit / Kysymykset (27)
![]() Della kirjoitti:
Della kirjoitti:
Hi. I’m wondering how I am going to fit 154 stitches at the end of A1 on a 15mm x 80cm circular needle. I’ve just started this garment and I’m doing the neck on the 12mm x 80cm and 44 stitches just fit 😳
22.08.2021 - 16:21DROPS Design vastasi:
Dear Della, our knitters didn't really had problems fitting the stitches on the needles, but you can always use a longer circular, or even two circs, if you feel they are too crowded. Happy Stitching!
22.08.2021 - 17:33
![]() Emmanuelle kirjoitti:
Emmanuelle kirjoitti:
Merci pour votre réponse ultra rapide. C\'est parti, je me lance ! Bonne journée, Emmanuelle
02.08.2021 - 08:01
![]() Emmanuelle kirjoitti:
Emmanuelle kirjoitti:
Bonjour, très joli modèle. Une question toutefois avant de me lancer : je n'ai pas d'aiguille double pointe en 12. Peut-on commencer à tricoter dès le début (col) en rond avec les aiguilles circulaires 12 ? Merci par avance de votre réponse.
01.08.2021 - 10:45DROPS Design vastasi:
Bonjour Emmanuelle et merci. Effectivement, vous pouvez tricoter le col sur une aiguille circulaire de 80 cm en utilisant la technique dite du magic loop jusqu'à ce que vous ayez augmenté suffisamment de mailles pour continuer sur une 60 ou sur la 80 mais en rond "normalement". Bon tricot!
02.08.2021 - 07:23
![]() Alica kirjoitti:
Alica kirjoitti:
Dear Drops, I have a problem with the yarn. Wanted to buy it, but I do not know which color is that colour 05, tan. When I choose colour 05 it is more brown. What does it mean tan? I would like to have the same colour as on the picture here. Pls help:)
04.05.2021 - 07:09DROPS Design vastasi:
Hei Alica, The name of Polaris no 5 is Taupe (not tan) and is the colour you see in the picture - a dark mauve/grey. Happy knitting!
04.05.2021 - 07:42
![]() Madou kirjoitti:
Madou kirjoitti:
Merci pour les explications et les précisions ! Mon pull est à présent terminé et mon chat me le pique déjà... Le pull tient vraiment chaud et est très confortable à porter ! Conseil : ne pas hésiter à bien serrer l'encolure ! J'ai réalisé le modèle en taille Medium et je tiens juste à préciser qu'il me reste encore à peu près 150 g de laine, donc 1000 g vont bien pour cette taille, alors même que j'ai rallongé un peu les manches. Très beau pull, merci !
10.04.2021 - 16:09
![]() Madou kirjoitti:
Madou kirjoitti:
Bonjour, J'adore ce modèle et je viens de finir l'empiècement devant et dos, il ne me reste donc plus que les manches à tricoter. J'ai repris mes 24 mailles pour tricoter la première manche, et dois monter 2 mailles sous la manche. Dois-je les monter sur l'aiguille gauche ou droite ? Aussi, pourquoi suis-je censée avoir 28 mailles après avoir monter 24 + 2 mailles sous la manche ? Je vous remercie d'avance. Madou
08.04.2021 - 16:12DROPS Design vastasi:
Bonjour Madou, montez 2 m de chaque côté des mailles en attente, par ex: montez 2 m, tricotez les 24 m de la manche et montez 2 m. La correction a été faite, merci. Bon tricot!
09.04.2021 - 07:11
![]() Laura Z Rhodes kirjoitti:
Laura Z Rhodes kirjoitti:
Hello, wonderfully patient DROPS design team. I have another sleeve question, regarding decreases. Are the decreases over 24 rows (one stitch decrease right side, one row no decreases, one row decrease left side, one row no decreases, for a total of 2 stitches decreased over 4 rows), or are the decreases over 12 rows (one stitch decrease start of knit row, one stitch decrease start of purl row, for a total of 2 stitches decreased over 2 rows)? Thank you.
17.02.2021 - 19:14DROPS Design vastasi:
Dear Mrs Rhodes, the decreases will be worked over 24 rows, (1 row decreasing 1 st on the right side, 1 row without decreasing, 1 row decreasing on the left side, 1 row without decreasing), repeat from (to) a total of 6 times = 6 sts have been decreased on each side and 24 rows have been worked, 16 sts remain - decrease either at the beginning or at the end of a row from RS. Happy knitting!
18.02.2021 - 09:12
![]() Laura Rhodes kirjoitti:
Laura Rhodes kirjoitti:
Thank you so much for clearing up my question about the end of row marker. I am now ready to do the sleeves, but I don’t understand what you mean by casting on stitches mid under sleeve? I am to cast on 2 stitches (I am making the M), but twice, for a total of 28 stitches? Where is mid under sleeve? Thanks so much. The knitting is going super and I am excited to finish. :-)
15.02.2021 - 03:26DROPS Design vastasi:
Hi Laura, The sleeve is worked over the stitches from the one thread as well as 2 stitches cast on, on each side = 4 new stitches (these stitches are used when the sleeve is sewn to the body when it is finished). You work back and forth until the sleeve is finished, then the sleeve seam and the opening under the sleeve are sewn together. Mid under the sleeve will be the underside of the sleeve, where the seam is. Hope this helps and happy knitting!
15.02.2021 - 07:54
![]() Laura Z Rhodes kirjoitti:
Laura Z Rhodes kirjoitti:
Thanks for your reply, but I am still confused about where the pattern starts in each row. At the start of A.1, I placed the marker before the first P. I understand increasing, but rnd7 seems to begin with a K placed BEFORE the marker. Is this the last K on rnd6? Then marker, then P1, K1, P1, K1 pattern? Rnd11 pattern is P1, P1 incr, P1, K1? Rnd12 is P1, K2, P1, K1? Rnd14 is P1, K2, P1, P incr? Or do you want the first incr on the last K of rnd13? Rnd15-18 is P1, K2? All start at EOR marker.
11.02.2021 - 17:30DROPS Design vastasi:
Dear Mrs Rhodes, you increase on row 6 and the stitch before the P stitch on row 7 is the new stitch that will be worked K, this means the marker on beg of round stays here and over P1, K1 (= increase on row 6), K1, you will now work: K1, P1, K1, P1. On row 11 work K1, P1, inc, P1 and row 12: K1, P1, K2, P1 etc... ie just work the stitches as they are shown in diagram. Hope this helps. Happy knitting!
12.02.2021 - 06:49
![]() Laura Z Rhodes kirjoitti:
Laura Z Rhodes kirjoitti:
Hello! I am following along the pattern chart, working from lower right to upper left, and I am at the row (row 7) where it looks like the pattern begins one stitch *before* the end-of-round marker. Is this correct? And then, in row 15, it again looks like I am adding stitches before the end-of-round marker. This would keep the purl stitches in line, which I assume you want? Thanks so much.
11.02.2021 - 02:44DROPS Design vastasi:
Dear Mrs Rhodes, yes that's correct, you increased one stitch in each repeat on previous round, and now you work K1, P1, K1, P1 over the (P1, K1 worked with the increase, P1). On row 15, you will start with K2 since you increased on previous row 1 stitch in the first stitch of the repeat. Hope this helps. Happy knitting!
11.02.2021 - 06:52
|
||||||||||
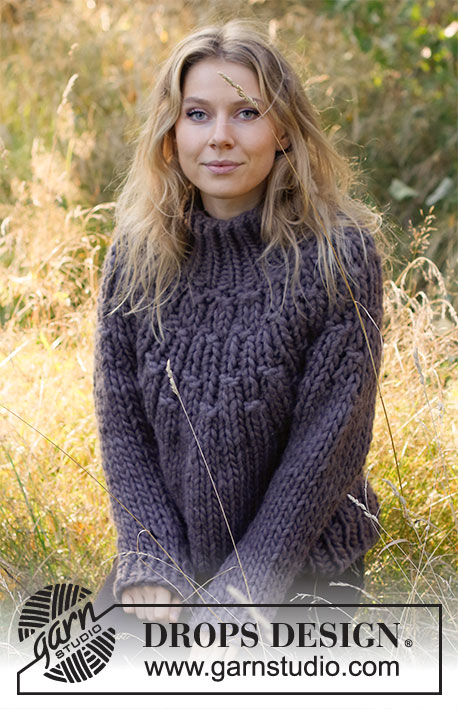
November Woodland#novemberwoodlandsweater |
||||||||||
 |
 |
|||||||||
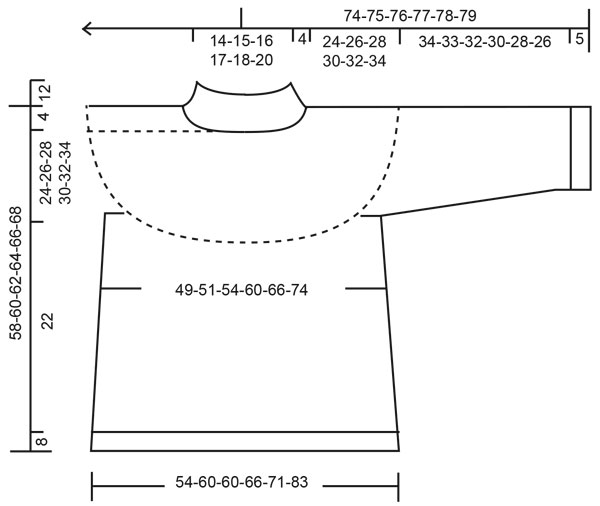
Ylhäältä alas neulottu pusero DROPS Polaris-langasta. Työssä on korkea kaulus ja kaarroke. Koot S-XXXL.
DROPS 216-24 |
||||||||||
|
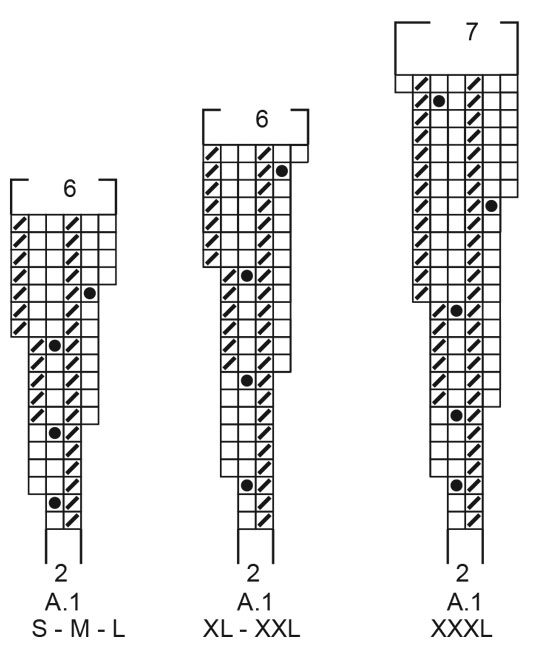
OHJE: ------------------------------------------------------- MALLINEULE: Katso ruutupiirros A.1 Katso halutun koon piirros. MAGIC LOOP -TEKNIIKKA: Mikäli pyöröpuikko on liian pitkä ja et voi neuloa sillä suljettua neuletta, neulo työ magic loop -tekniikalla seuraavasti: Työnnä silmukat pyöröpuikon keskelle (kaapelin keskelle). Jaa silmukat n. keskeltä ja vedä kaapeli 2 silmukan välistä läpi. Työnnä silmukat neulottavan puolen puikon kärkeen ja neulo kohtaan, josta vedit kaapelin työn läpi. Vedä työn vastakkaisella puolella kaapelin keskiosa 2 uuden silmukan välistä läpi ja neulo sitten samalla tavalla kuin aiemmin. Jatka neulomista tähän tapaan, kunnes työssä on riittävästi silmukoita suljettua neuletta varten. LISÄYSVINKKI (etu- ja takakappale): Lisää 1 silmukka tekemällä 1 langankierto puikolle. Seuraavalla kerroksella langankierrot neulotaan kiertäen oikein, jottei muodostuisi reikiä. KAVENNUSVINKKI (hihat): HUOM: Kavennukset tehdään vuorotellen työn oikeassa ja vasemmassa reunassa. Tee kavennukset vuorotellen kavennuskerrosten alussa ja lopussa. Kavenna seuraavasti: Työn oikealla puolella: Neulo 2 silmukkaa oikein yhteen. Työn nurjalla puolella: Neulo 2 silmukkaa nurin yhteen. ------------------------------------------------------- ALOITA TYÖ TÄSTÄ: ------------------------------------------------------- PUSERO: LYHYT YLEISKATSAUS TYÖSTÄ: Työ neulotaan suljettuna neuleena sukkapuikoilla/pyöröpuikolla, ylhäältä alas. Hihat neulotaan tasona pyöröpuikolla ja ommellaan lopuksi yhteen. PÄÄNTIEN REUNUS: Luo 34-36-38-40-42-44 silmukkaa sukkapuikoille nro 12 Polaris-langalla. Neulo 12 cm joustinneuletta suljettuna neuleena (1 silmukka oikein / 1 silmukka nurin). KAARROKE: Lue MAGIC LOOP -TEKNIIKKA yllä. Kiinnitä 1 merkki työhön. KAIKKI MITAT OTETAAN JATKOSSA TÄSTÄ! Vaihda pyöröpuikkoon nro 15 ja neulo mallineuletta suljettuna neuleena piirroksen A.1 mukaisesti (katso halutun koon piirros). TARKISTA NEULETIHEYS! Kun olet neulonut piirroksen A.1 loppuun, työssä on 102-108-114-120-126-154 silmukkaa. Neulo 1 kerros oikein ja lisää tasavälein 0-4-2-8-10-2 silmukkaa (lue LISÄYSVINKKI yllä) = 102-112-116-128-136-156 silmukkaa. Jatka sileää neuletta, kunnes työn pituus merkistä mitattuna on 24-26-28-30-32-34 cm. Seuraava kerros neulotaan näin: Neulo ensimmäiset 15-16-17-19-20-23 silmukkaa (= puolikas takakappale), siirrä seuraavat 21-24-24-26-28-32 silmukkaa apulangalle hihaa varten ja luo apulangan silmukoiden tilalle 4-4-4-4-6-6 silmukkaa (= sivussa hihan alla), neulo seuraavat 30-32-34-38-40-46 silmukkaa (= etukappale), siirrä seuraavat 21-24-24-26-28-32 silmukkaa apulangalle hihaa varten ja luo apulangan silmukoiden tilalle 4-4-4-4-6-6 silmukkaa (= sivussa hihan alla), neulo seuraavat 15-16-17-19-20-23 silmukkaa (= puolikas takakappale). Neulo sitten etu-/takakappale ja hihat erikseen. KAIKKI MITAT OTETAAN JATKOSSA TÄSTÄ. ETU- JA TAKAKAPPALE: = 68-72-76-84-92-104 silmukkaa. Neulo sileää neuletta suljettuna neuleena, kunnes työn pituus jakokohdasta mitattuna on kaikissa koissa 22 cm. Vaihda pyöröpuikkoon nro 12 ja neulo kaikissa koissa 8 cm joustinneuletta suljettuna neuleena (1 silmukka oikein / 1 silmukka nurin). Päätä silmukat löyhästi joustinneuletta neuloen. Puseron pituus olalta alaspäin mitattuna on n. 58-60-62-64-66-68 cm. HIHA: Neulotaan tasona pyöröpuikolla ja ommellaan lopuksi yhteen. Ota toisen sivun apulangalla odottavat 21-24-24-26-28-32 silmukkaa pyöröpuikolle nro 15 ja luo kumpaankin reunaan 2-2-2-2-3-3 silmukkaa = 25-28-28-30-34-38 silmukkaa. Neulo tasona sileää neuletta ja kavenna seuraavalla oikean puolen kerroksella 1-0-0-0-0-0 silmukka (kavennus tehdään vain koossa S) neulomalla työn vasemman reunan reunimmaiset 2 silmukkaa oikein yhteen = 24-28-28-30-34-38 silmukkaa. Kun työn pituus on 4-2-2-4-4-2 cm, kavenna työn oikeassa reunassa 1 silmukka (lue KAVENNUSVINKKI). Toista tällaiset kavennukset vuorotellen työn vasemmassa ja oikeassa reunassa joka 2.-2.-2.-1.-1.-1.kerros yhteensä 8-12-12-14-14-18 kertaa (= 4-6-6-7-7-9 kertaa kummassakin reunassa) = 16-16-16-16-20-20 silmukkaa. Neulo kunnes työn pituus jakokohdasta mitattuna on 34-33-32-30-28-26 cm. (HUOM: Suurimmissa koissa on lyhyemmät mitat, koska niissä on leveämmät olat). Vaihda pyöröpuikkoon nro 12. Neulo tasona 5 cm joustinneuletta (1 silmukka oikein / 1 silmukka nurin). Päätä silmukat löyhästi joustinneuletta neuloen. Neulo toinen hiha samoin. VIIMEISTELY: Ompele hihasaumat uloimmista silmukanreunoista, jottei saumasta tulisi liian paksu (voit jakaa langan, jotta siitä tulisi ohuempi). Ompele kainalosaumat. |
||||||||||
Ruutupiirroksen selitykset |
||||||||||
|
||||||||||
 |
||||||||||
 |
||||||||||
Oletko tehnyt tämän mallin?Tägää tällöin kuviasi #dropspattern #novemberwoodlandsweater tai lähetä kuvat #dropsfan galleriaan. Tarvitsetko apua tämän ohjeen kanssa?Löydät 24 ohjevideota, kommentteja/kysymyksiä ja muuta osoitteessa www.garnstudio.com © 1982-2026 DROPS Design A/S. Pidätämme kaikki oikeudet. Tämä tiedosto ja kaikki sen alatiedostot on suojattu tekijänoikeuslailla. Lue lisää siitä, mitä voit tehdä ohjeillamme, verkkosivujemme jokaisen ohjeen alaosasta. |
||||||||||


DROPS Design on toiminut neule- ja virkkausalalla yli 40 vuotta ja meillä on yksi kaikkein laajin valikoima ilmaisia ohjeita verkossa - käännettynä 17 kielelle. Tänään meiltä löytyy 325 lehteä ja 12298 ohjetta - joista 11733 ohjetta on käännetty suomeksi.
Työskentelemme ahkerasti, jotta voisimme antaa teille kaikkein parhaimpia neule- ja virkkausohjeita, inspiraatiota ja neuvoja sekä korkealaatuisia lankoja todella edulliseen hintaan! Haluaisitko käyttää ohjeitamme muuhun kuin henkilökohtaiseen käyttöön? Voit lukea säännöistä ohjeiden Tekijänoikeus -tekstissä, joka löytyy kaikkien ohjeidemme alapuolelta. Hauskoja hetkiä käsitöiden parissa!
Lisää kommentti ohjeeseen DROPS 216-24
Haluamme mielellämme kuulla mielipiteesi tästä ohjeesta!
Mikäli haluat esittää kysymyksen, valitse oikea kategoria alla olevasta valikosta - tällä tavoin saat vastauksen nopeammin. Pakolliset kentät on merkitty tähdellä *.