
Suositut kategoriat
Etsitkö tiettyä lankaa?


Kommentit / Kysymykset (102)
Carol kirjoitti:
Why do you not have a video for the complete pattern.so we can look at the video like on youtube. Thank you.
26.07.2015 - 10:48DROPS Design vastasi:
Dear Carol. It's not possible for us to publish videos of a complete pattern, we only make on techniques, stitches and pattern diagrams. If you need help with a specific part of the pattern, we will take a look at it.
27.07.2015 - 15:34
![]() Studer Brigitta kirjoitti:
Studer Brigitta kirjoitti:
Hallo, das Abnehmen auf der linken Seite ist nicht beschrieben! Wie muss das gemacht werden mit den Luftmaschen? Diese Anleitung ist recht spärlich beschrieben, könnte eine Auffrischung brauchen.
21.07.2015 - 06:54DROPS Design vastasi:
Die Abnahmen werden beidseitig gemacht, d.h. immer am Anfang jeder R. Die Anleitung wurde neu übersetzt und ist nun hoffentlich etwas deutlicher, ansonsten fragen Sie gerne noch einmal nach. Gutes Gelingen!
28.07.2015 - 16:56
![]() Summer kirjoitti:
Summer kirjoitti:
How would you instead of having a button connect it in the back?
04.07.2015 - 04:56DROPS Design vastasi:
Dear Summer, you can make 2 twisted strings or a ch and sew them at each end of piece then cross them and tie them with a knot. A button may be a good idea to hold both pieces tog. Happy crocheting!
04.07.2015 - 09:27
![]() Tam kirjoitti:
Tam kirjoitti:
I don't understand the part that inc 1 dc on each side every row 8 times . That mean I'm do inc 8 times the hold row 1 from beginning 1 the end and another 6 during the row ????
24.06.2015 - 18:27DROPS Design vastasi:
Dear Tam, you inc 1 st at the beg + 1 st at the end of row (= 2 sts inc per row) for 8 rows (1st size) = you have a total of 145 sts on row 9. Happy crocheting!
25.06.2015 - 10:24
![]() Stephanie kirjoitti:
Stephanie kirjoitti:
After reading pattern and looking at the diagram for drops 65-13 pattern I don't understand the instructions right above the chart
04.06.2015 - 16:46DROPS Design vastasi:
Dear Stephanie, you will find above measurement chart all diagram text, 1 symbol represent 1 st / 1 group of st - read more about diagrams here. Happy crocheting!
05.06.2015 - 09:48
![]() Pam kirjoitti:
Pam kirjoitti:
I have just got rolling with no problem.Rows 2 through 9-10-11-12: 1 dc in each dc from the previous row--at the same time, inc 1 dc on each side every row 8-9-10-11 times. What does 8-9-10-11 times mean. It doesn't make sense to me. Does it mean to increase row 3 through row 12 ? Maybe if you clear up if I am understanding this part I will be able to get through the decreasing also.
09.04.2015 - 07:50DROPS Design vastasi:
Dear Pam, this refers to the size, eg in 1st size, you work rows 2 through row 9, inc every row 8 times (in 2nd size through row 10, inc 9 times etc..). Happy crocheting!
09.04.2015 - 09:56
![]() Kathy kirjoitti:
Kathy kirjoitti:
Hi, this is a beautiful pattern, I've been trying to do the math of the pattern in my head after reading through the comments below. From my understanding, to dec on both sides takes 2 rows (so for example: dec 4 dc, size S = 6 rows in total). But with that, there would be a total of 38 rows of dec yet the chart only shows 25 rows. What am doing wrong?
03.04.2015 - 04:32DROPS Design vastasi:
Dear Kathy, you decrease at the beg and at the end of every row, ie to dec 4dc, work as stated under crocheting tip, (skip first 4 dc at beg of row ...) and at the end of same row, turn when 4 dc remain before the end of row = you have decreased 4 dc each side on the same row. Happy crocheting!
03.04.2015 - 09:22
![]() Maria kirjoitti:
Maria kirjoitti:
Thanks for you reply but I need further clarification. I'm crocheting size small, have completed the 145 dc's. According to the instructions I'm supposed to start decreasing on both sides on every row, meaning that I have to start decreasing 4 dc's at the beginning of the row by chaining 6 and starting working on the 5th chain, how do I decrease the 4 dc's at the end of the same row? If I do what you suggest in your answer I'll be only decreasing 4 dc's at only one end of the row.
24.03.2015 - 21:38DROPS Design vastasi:
Dear Maria, (answer edited) to dec 4 dc work 1 row as stated: turn at the end of row, ch 6, skip 4 dc and work in 5th dc on row and work remaining sts on row until 4 sts remain (= you have decreased 4 dc each side), turn and work next decrease. Repeat how many times required in pattern (and continue same way (see crocheting tip) when dec 3 dc and 2 dc each side. Happy crocheting!
25.03.2015 - 09:01
![]() Maria kirjoitti:
Maria kirjoitti:
Beautiful pattern but need help to continue working on it. Would you please clarify the decreasing (dec) instructions. The pattern calls for dec on both sides of every row, but the directions under Crocheting tip refer only to the end of the row. The same doesn't work for the beginning of the row. Thanking you in advance, María
23.03.2015 - 23:27DROPS Design vastasi:
Dear Maria, (answer edited) when you have worked the row with dec at the end of the first row, turn work when the number of sts remain before end of row. Happy crocheting!
24.03.2015 - 09:31
![]() Rebecca kirjoitti:
Rebecca kirjoitti:
Hi! Question- do you design all of the patterns on your website? I look forward to hearing from you :)
22.03.2015 - 07:41DROPS Design vastasi:
Dear Rebecca, you are correct, we do. Happy crocheting!
23.03.2015 - 09:53
|
|||||||||||||
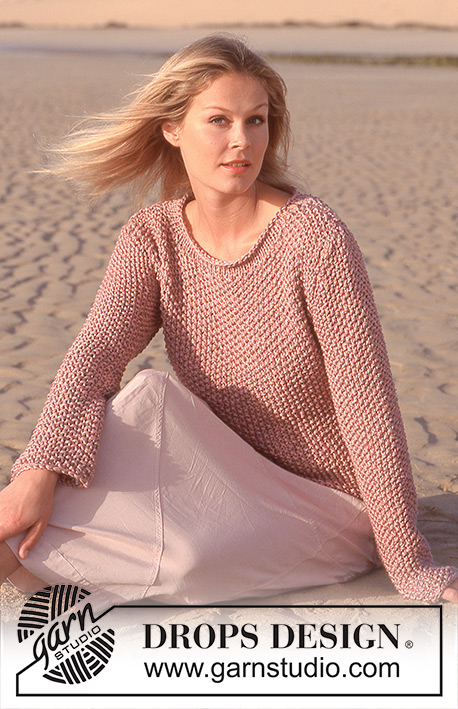
Mediterranean Love Top#mediterraneanlovetop |
|||||||||||||
 |
 |
||||||||||||
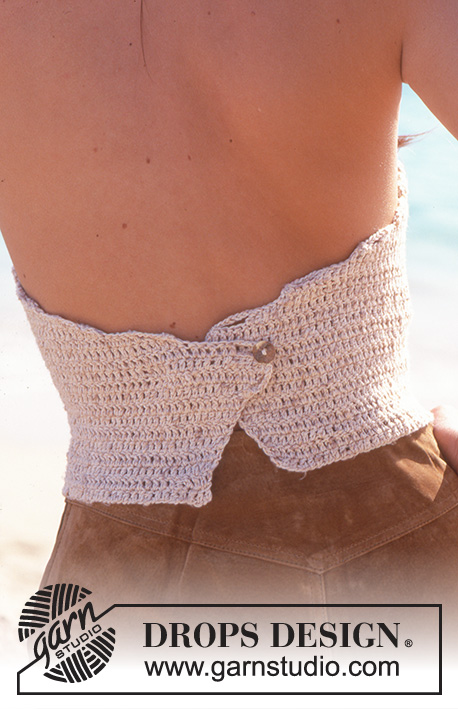
Virkattu toppi, joka jättää selän paljaaksi, DROPS Safran Mouliné- tai Safran -langasta.
DROPS 65-13 |
|||||||||||||
|
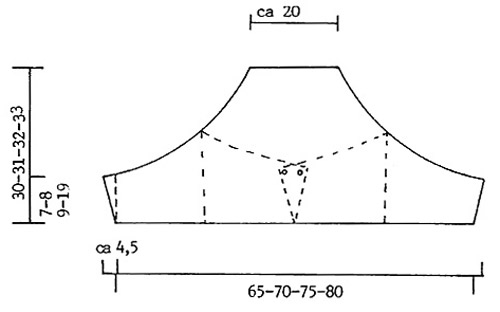
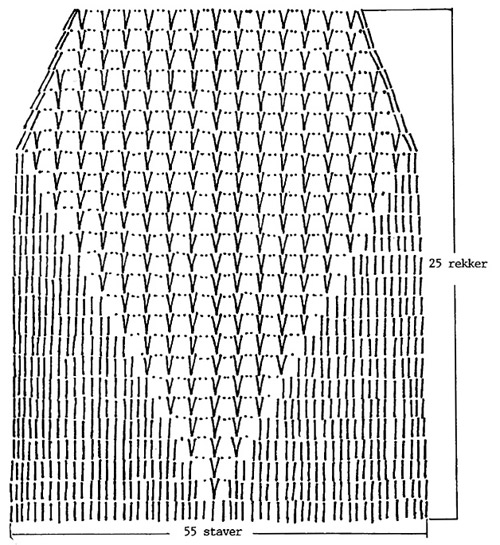
Mallivirkkaus: Katso piirros. Virkkaa piirros loppuun kaikissa koissa. Virkkausvinkki: Kun päätät 4 pylvästä: Virkkaa 6 kjs, jätä seuraavat 4 p väliin, virkkaa 5.p:seen, jatka virkkaamista, kunnes jäljellä on 4 p, käännä työ. Kun päätät 3 pylvästä: Virkkaa 5 kjs, jätä seuraavat 3 p väliin, virkkaa 1 p 4.p:seen, jatka virkkaamista, kunnes jäljellä on 3 p, käännä työ. Kun päätät 2 pylvästä: Virkkaa 4 kjs, jätä seuraavat 2 p väliin, virkkaa 1 p 3.p:seen, jatka virkkaamista, kunnes jäljellä on 2 p, käännä työ. Etu- ja takakappale: Virkkaa 170-183-196-210 kjs koukulla nro 3 ja beigekirjavalla langalla. Seuraava krs virkataan näin: 3 p (ensimmäinen p korvataan 3 kjs:lla), *jätä 1 kjs väliin, 3 p*, toista *-* (eli 4 kjs:n kohdalle virkataan aina 3 p), kunnes jäljellä on 0-1-2-0 kjs, virkkaa 1 p jokaiseen kjs:aan = 129-139-149-159 p. Tarkista virkkuutiheys (on hyvin tärkeää, että et virkkaa liian löyhästi, koska vaatteen tulee olla pieni ja niukkalinjainen). Jatka virkkaamalla pylväitä, eli virkkaa 1 p jokaiseen p:seen ja lisää samalla jokaisella krs:lla kumpaankin reunaan 1 p yht. 8-9-10-11 kertaa = 145-157-169-181 p. Työn pituus on nyt n. 7-8-9-10 cm. Päätä nyt kummastakin reunasta (ks. virkkausvinkki) jokaisella krs:lla seuraavasti: 2-3-6-8 x 4 p, 3-7-7-7 x 3 p ja 14-9-6-5 x 2 p. Jatka virkkaamalla mallivirkkausta piirroksen mukaisesti keskimmäisten 55 p:ään kohdalla. Kun olet virkannut piirroksen loppuun, työn pituus on n. 30-31-32-34 cm. Viimeistely: Virkkaa 1 napinläpisilmu kummankin takakappaleen yläreunaan koukulla nro 3 ja beigekirjavalla langalla näin: 1 ks, 2 kjs, jätä ½ cm väliin, 1 ks. Sovita toppia ja tarkista, mihin kohtiin napit tulee kiinnittää. Kiinnitä 1 nappi vasemman takakappaleen sisäpuolelle ja 1 nappi oikean etukappaleen ulkopuolelle. Virkkaa sitten 3 kpl n. 1 metrin pituista kjs-nauhaa. Palmikoi nauhat yhteen ja tee palmikon kumpaankin päähän solmu. Pujota nauha topin yläreunan reikäkerrokseen. |
|||||||||||||
Ruutupiirroksen selitykset |
|||||||||||||
|
|||||||||||||
 |
|||||||||||||
 |
|||||||||||||
Oletko tehnyt tämän mallin?Tägää tällöin kuviasi #dropspattern #mediterraneanlovetop tai lähetä kuvat #dropsfan galleriaan. Tarvitsetko apua tämän ohjeen kanssa?Löydät 4 ohjevideota, kommentteja/kysymyksiä ja muuta osoitteessa www.garnstudio.com © 1982-2026 DROPS Design A/S. Pidätämme kaikki oikeudet. Tämä tiedosto ja kaikki sen alatiedostot on suojattu tekijänoikeuslailla. Lue lisää siitä, mitä voit tehdä ohjeillamme, verkkosivujemme jokaisen ohjeen alaosasta. |
|||||||||||||


DROPS Design on toiminut neule- ja virkkausalalla yli 40 vuotta ja meillä on yksi kaikkein laajin valikoima ilmaisia ohjeita verkossa - käännettynä 17 kielelle. Tänään meiltä löytyy 324 lehteä ja 12290 ohjetta - joista 11706 ohjetta on käännetty suomeksi.
Työskentelemme ahkerasti, jotta voisimme antaa teille kaikkein parhaimpia neule- ja virkkausohjeita, inspiraatiota ja neuvoja sekä korkealaatuisia lankoja todella edulliseen hintaan! Haluaisitko käyttää ohjeitamme muuhun kuin henkilökohtaiseen käyttöön? Voit lukea säännöistä ohjeiden Tekijänoikeus -tekstissä, joka löytyy kaikkien ohjeidemme alapuolelta. Hauskoja hetkiä käsitöiden parissa!
Lisää kommentti ohjeeseen DROPS 65-13
Haluamme mielellämme kuulla mielipiteesi tästä ohjeesta!
Mikäli haluat esittää kysymyksen, valitse oikea kategoria alla olevasta valikosta - tällä tavoin saat vastauksen nopeammin. Pakolliset kentät on merkitty tähdellä *.