
Suositut kategoriat
Etsitkö tiettyä lankaa?


Kommentit / Kysymykset (9)
![]() Akuliina kirjoitti:
Akuliina kirjoitti:
I thank you for your answer, but things still don't add up. My work now has 8 or 9 chain spaces per side, and if I work the "arrow" row here, A2 and A3 only take up three of them, leaving me way too far from the middle of the shawl where A4 should sit. So how do I fill the chain spaces in between? I'm assuming I'm supposed to repeat A3 more than once here, to fill up the space, but is it so?
09.05.2024 - 18:59DROPS Design vastasi:
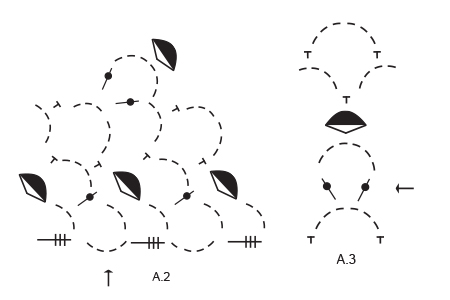
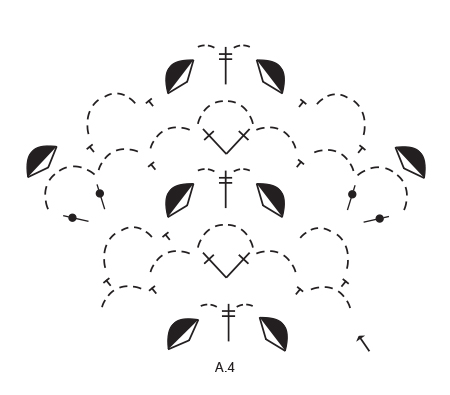
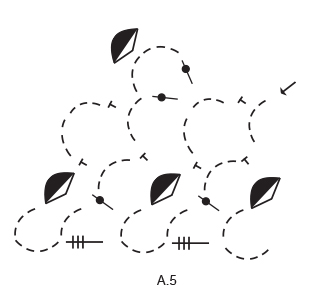
Dear Akuliina, starting with the row with an arrow repeat the diagrams just as before: start with A.2 at the beg of row, the repeat A.3 until you reach the middle stitch in shawl, then work the row with an arrow over this stitch (a total of 5 ch-spaces); then repeat A.3 to the end of the row ending with A.5 when 1 st-group + 1 ch-space remain. Happy crocheting!
10.05.2024 - 08:50
![]() Akuliina kirjoitti:
Akuliina kirjoitti:
I\'m asking the same as everyone else - how to continue after first completing A2-A5. I started following the chart exactly as before, but this way I wasn\'t anywhere near the middle of the shawl when it was time to start A4. Please explain in _detail_ where I should increase and how to keep the charts working. Do I need to repeat A3 more than once each side?
07.05.2024 - 13:27DROPS Design vastasi:
Dear Akuliina, just repeat the diagrams as before, following the last 4 rows, ie work A.2, repeat A.3, work A.4 in the middle (just as before), work A.3 and finish with A.5, see from WS, work A.5, repeat A.3, work A.4, repeat A.3 and finish with A.2. When the 4 rows are done, repeat from first to 4 again and continue like this until finished measurements. Happy crocheting!
07.05.2024 - 15:47
![]() Emma Hessfelt kirjoitti:
Emma Hessfelt kirjoitti:
Let me try to rephrase my question: After I have completed all diagrams once, what is it that I am supposed to repeat? Am I supposed to repeat the complete diagrams again or is it just the LAST row from each diagram that I should repeat?
09.04.2023 - 06:53DROPS Design vastasi:
Dear Emma, you should repeat ALL FOUR rows of the chart (excluding the very start), not just the last row. Happy crochetting!
09.04.2023 - 12:47
![]() Emma Hessfelt kirjoitti:
Emma Hessfelt kirjoitti:
Thank you for answering my question, but I still don't understand. Can you explain in detail exactly where in the diagrams A2, A4 and A5 I can find the increase and how the increase works?
09.04.2023 - 06:11DROPS Design vastasi:
Dear Emma, the increases are done at the start of A.2, at the end of A.5 and near the central stitch in A.4. You have more increases in these charts because you will increase the amount of chain spaces in them. Happy crochetting!
09.04.2023 - 12:53
![]() Emma Hessfelt kirjoitti:
Emma Hessfelt kirjoitti:
Please help! I don't understand how to continue after completing A2-A5. Your instructions says to repeat the last 4 rows in each diagram (which means doing the same thing all over again). But this doesn't add up. Each diagram just has 4 rows! There needs to be an increase for each row if it's going to work. Can you please explain in another way?
08.04.2023 - 19:28DROPS Design vastasi:
Dear Emma, yes, you need to work exactly as before. Remember that A.2, A.4 and A.5 include increases in their charts, so you will be increasing as you work, just as before. Happy crochetting!
08.04.2023 - 23:01
![]() Paz Juan Gutiérrez kirjoitti:
Paz Juan Gutiérrez kirjoitti:
"Después de completar los diagramas A.2 - A.5 en vertical, repetir la 4 últimas filas de cada diagrama con los aumentos a cada lado del centro del chal como antes." No entiendo cómo seguir. Porque si repito de nuevo los patrones A2 a A5 no sé dónde van los aumentos.
31.05.2019 - 18:00DROPS Design vastasi:
Hola Paz. Los aumentos siguen en los mismos sitios ( a cada esquina y en el centro). Solo que no repetimos los diagramas enteros, sino que solo las 4 últimas filas de cada diagrama. El resto se trabaja como antes.
13.06.2019 - 23:21
![]() Liana kirjoitti:
Liana kirjoitti:
Buoongiorno, sto lavorando questo modello e mi sono bloccata in questo punto: "Dopo aver lavorato i diagrammi da A.2 a A.5 una volta in verticale, ripetere le ultime 4 righe di ogni diagramma per continuare ad aumentare da ciascun lato e al centro dello scialle come prima". che vuol dire? gli aumenti li devo continuare a fare sin dalla prima riga delle 4 da ripetere o no? non capisco bene come continuare gli aumenti.
09.04.2019 - 11:50DROPS Design vastasi:
Buongiorno Liana, deve semplicemente continuare a lavorare sulle ultime 4 righe dei diagrammi, gli aumenti sono già inclusi in quelle righe. Buon lavoro!
09.04.2019 - 15:14
![]() Michelle kirjoitti:
Michelle kirjoitti:
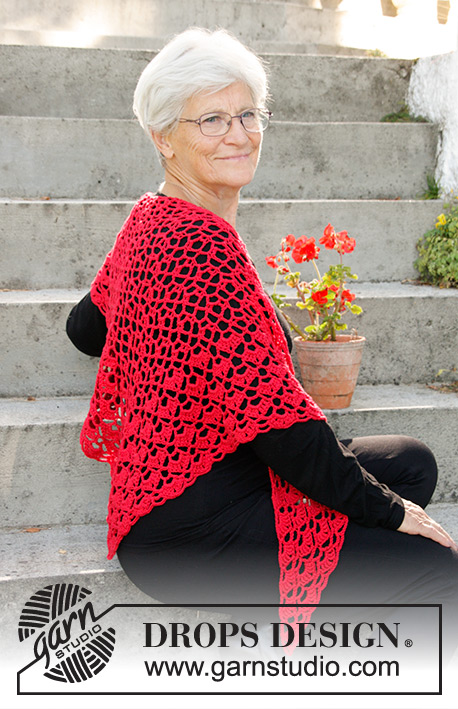
Merci à Drops d'avoir l'audace d'introduire parmi ses modèles de très jolies mamies aux cheveux blancs !
18.02.2018 - 10:58
![]() Mary kirjoitti:
Mary kirjoitti:
Hooray for an elegant white haired model!
08.12.2016 - 18:20
|
|||||||||||||||||||||||||||||||
Christmas Charm |
|||||||||||||||||||||||||||||||
 |
 |
||||||||||||||||||||||||||||||
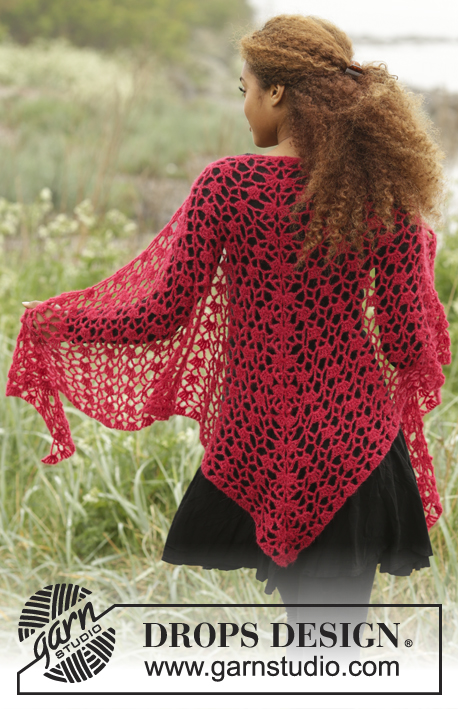
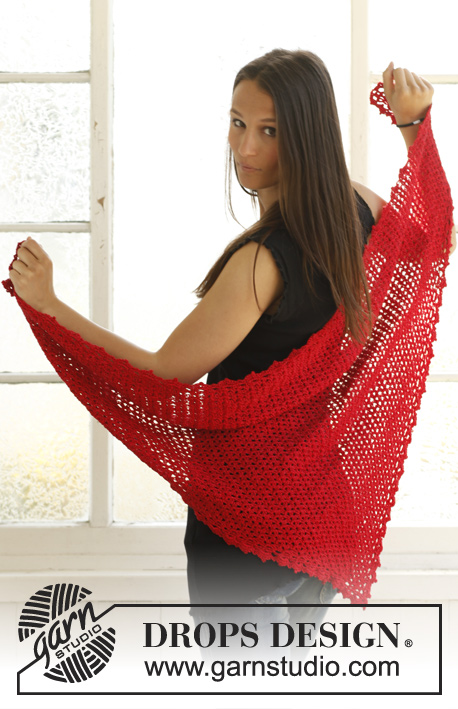
Virkattu viuhkakuvioinen pitsihuivi jouluksi DROPS Cotton Merino -langasta.
DROPS Extra 0-1333 |
|||||||||||||||||||||||||||||||
|
MALLIVIRKKAUS: Katso piirrokset A.1-A.5. ---------------------------------------------------------- HUIVI: Virkataan tasona keskeltä takaa niskasta alaspäin. Virkkaa Cotton Merino -langalla ja koukulla nro 4,5 mallivirkkausta piirroksen A.1 mukaisesti. TARKISTA VIRKKUUTIHEYS! Kun olet virkannut piirroksen A.1 loppuun, jatka mallivirkkausta piirrokseen nuolella merkityltä krs:lta alkaen (= 2. krs) seuraavasti: Virkkaa piirroksen A.2 mallikerta (sivulisäys), A.3, A.4 (= keskikohdan lisäys), A.3, A.5 (sivulisäys). Jatka mallivirkkausta tähän tapaan. Kun olet virkannut piirrokset A.2-A.5 loppuun, toista jokaisen piirroksen viimeiset 4 krs:ta siten, että sivulisäykset ja keskikohdan lisäykset jatkuvat kuten aiemmin. Kun työn pituus huivin keskikohdan lisäysten kohdalta mitattuna on n. 40 cm ja olet viimeksi virkannut 1. tai 3. krs:n, jatka virkkaamista kuten aiemmin, mutta korvaa nyt merkki (1 kp + 6 kjs + 1 kp) virkkaamalla (3 kp + 2 kjs + 3 kp). Jatka virkkaamista tähän tapaan, kunnes huivin pituus keskeltä mitattuna on yht. 65 cm ja olet viimeksi virkannut piirrosten A.2-A.5 2. tai 4. krs:n. Katkaise lanka ja päättele langanpäät. Laita huivi haaleaan veteen ja odota, kunnes se on läpimärkä. Purista varovasti vesi pois (älä väännä). Laita sitten huivi pyyheliinan sisään ja rullaa pyyheliinaa. Purista lisää vettä pois, kunnes huivi on vain hieman kostea. Aseta neule mittoihinsa (kts. mitat ohjeesta) sopivalle alustalle ja kiinnitä nuppineuloin. Anna kuivua. Toista tämä menettelytapa jokaisen pesun jälkeen. |
|||||||||||||||||||||||||||||||
Ruutupiirroksen selitykset |
|||||||||||||||||||||||||||||||
|
|||||||||||||||||||||||||||||||
 |
|||||||||||||||||||||||||||||||
 |
|||||||||||||||||||||||||||||||
 |
|||||||||||||||||||||||||||||||
 |
|||||||||||||||||||||||||||||||
Oletko tehnyt tämän mallin?Tägää tällöin kuviasi #dropspattern tai lähetä kuvat #dropsfan galleriaan. Tarvitsetko apua tämän ohjeen kanssa?Löydät 8 ohjevideota, kommentteja/kysymyksiä ja muuta osoitteessa www.garnstudio.com © 1982-2026 DROPS Design A/S. Pidätämme kaikki oikeudet. Tämä tiedosto ja kaikki sen alatiedostot on suojattu tekijänoikeuslailla. Lue lisää siitä, mitä voit tehdä ohjeillamme, verkkosivujemme jokaisen ohjeen alaosasta. |
|||||||||||||||||||||||||||||||


DROPS Design on toiminut neule- ja virkkausalalla yli 40 vuotta ja meillä on yksi kaikkein laajin valikoima ilmaisia ohjeita verkossa - käännettynä 17 kielelle. Tänään meiltä löytyy 325 lehteä ja 12298 ohjetta - joista 11743 ohjetta on käännetty suomeksi.
Työskentelemme ahkerasti, jotta voisimme antaa teille kaikkein parhaimpia neule- ja virkkausohjeita, inspiraatiota ja neuvoja sekä korkealaatuisia lankoja todella edulliseen hintaan! Haluaisitko käyttää ohjeitamme muuhun kuin henkilökohtaiseen käyttöön? Voit lukea säännöistä ohjeiden Tekijänoikeus -tekstissä, joka löytyy kaikkien ohjeidemme alapuolelta. Hauskoja hetkiä käsitöiden parissa!
Lisää kommentti ohjeeseen DROPS Extra 0-1333
Haluamme mielellämme kuulla mielipiteesi tästä ohjeesta!
Mikäli haluat esittää kysymyksen, valitse oikea kategoria alla olevasta valikosta - tällä tavoin saat vastauksen nopeammin. Pakolliset kentät on merkitty tähdellä *.