
Suositut kategoriat
Etsitkö tiettyä lankaa?


Kommentit / Kysymykset (91)
![]() Knitting Well Done kirjoitti:
Knitting Well Done kirjoitti:
Hello , I don't understand how to centered the diagram even if I follow the lesson... do you have a video that show exactly what to do to center it and make the sleeve? Thank you 👱🏻♀️
13.03.2022 - 11:29
![]() Vale kirjoitti:
Vale kirjoitti:
I'm so sorry to have to ask again but I don't understand: how can I decrease every 2,5 cm if there's a pattern? With 2 tog decrease, it will be deformed the pattern motif... I'm so confused .. I'm referring to this "When A.2 has been worked, continue with A.3. NOTE: Adjust pattern so that the middle st in diagram (see arrow) is one of the 2 middle sts on sleeve, AT THE SAME TIME beg dec under sleeve - remember DECREASE TIP" The decrease tip mean to knit just 2 stitches together?
20.02.2022 - 00:33DROPS Design vastasi:
Dear Vale, if your tension is right in height, you should decrease approx. on every 7th round in size M = ca on every 2,5 cm; decrease as explained under DECREASE TIP , ie work until 3 sts remain before marker and decrease as shown in this video - the pattern will not match anymore at the transitions between rounds, that's just okay. Happy knitting!
21.02.2022 - 09:58
![]() Vale kirjoitti:
Vale kirjoitti:
I'm sorry to ask but: I don't understand how to decrease every 2,5 cm, if I have a pattern? If I decrease, the pattern will be deformed... also, what decrease I should do? (2 tog?) how? This is the pattern I'm referring: "When A.2 has been worked, continue with A.3. NOTE: Adjust pattern so that the middle st in diagram (see arrow) is one of the 2 middle sts on sleeve, AT THE SAME TIME beg dec under sleeve - remember DECREASE TIP" Thank you...seems difficult without a chart.
20.02.2022 - 00:29
![]() Vale kirjoitti:
Vale kirjoitti:
Sorry, I have problems again in the instructions " When A.2 has been worked, continue with A.3. NOTE: Adjust pattern so that the middle st in diagram (see arrow) is one of the 2 middle sts on sleeve, AT THE SAME TIME beg dec under sleeve - remember DECREASE TIP. Repeat dec every 3-2½-2½-2½-2½-2½ cm / 1 1/8"-7/8"-7/8"-7/8"-7/8"-7/8" 9-12-12" etc . I don't also understand how to adjust "pattern so that the middle st in diagram is one of the 2 middle". what mean? Please..help...
19.02.2022 - 15:30DROPS Design vastasi:
Dear Vale, this lesson will explain you how to center a diagram. Happy knitting!
21.02.2022 - 09:17
![]() Pattern kirjoitti:
Pattern kirjoitti:
Sorry again but I don't understand the previously answer, in your comment says "you should increase a total of 60 sts in size L and get so 228", but I don't know what increase of 60 stitches is it exactly? Thank you again....
01.02.2022 - 17:29DROPS Design vastasi:
Oops sorry, I mistyped, I meant you have 204 sts on the needle in size L - you now increase 24 sts evenly (this lesson explains how to increase evenly on a round), there are now 228 sts and you will repeat K2, P2 all the round - US-pattern will be edited asap. Happy knitting!
02.02.2022 - 07:34
![]() Patterns Difficult kirjoitti:
Patterns Difficult kirjoitti:
Hello, this pattern have a mistake in the Body instructions. Yesterday I had to try and try. I have 230 stitches and it says to "Continue to work rib as follows: * K 2, P 2 *, repeat from *-* until 2 sts remain, K 2. When rib has been worked for 4 cm / 1½'', bind off with K over K and P over P." But with 230 stitches, it will end with 2Kand start with 2K so I will have 4 K between the others 2k p2 2k p2 etc. What happened? Why 230 stitches?It's not an Even number to do ribbing...Thanks..
01.02.2022 - 12:22DROPS Design vastasi:
Hi, it looks like there is a mistake in the US-English pattern, you should increase a total of 60 sts in size L and get so 228 sts and work K2 P2 over these 228 sts (= 57 times (K2,P2). thanks for noticing. Happy knitting!
01.02.2022 - 16:13
![]() Karine kirjoitti:
Karine kirjoitti:
Koon L suurust. Siis kui on vaja kududa varrukale mustrit A4 (5silmust) on silmuseid 48 3 simust jääb üle kuidas neid kududa?
03.01.2022 - 19:49DROPS Design vastasi:
Tere Karine! Koo nii palju silmuseid mustrisse, kui mahub, ülejäänud nii, kuidas ilusam jääb. Head kudumist!
07.01.2022 - 21:55
![]() Val kirjoitti:
Val kirjoitti:
Sorry , I have to ask again, is it sure that decrease is "work until 3 sts remain before the marker this: K2 tog, K1, slip marker, K1, slip 1 as if to K, K1, psso, and work until 3 sts remain before next marker on the other side of the jumper and repeat the decrease.”" I see that in the psso passage, Should not be simply : slip marker, K1, slip 1 as if to K , and psso? Why K1 is repeated 2 times? the video tutorial says this only (not 2 times k2) : K1, slip 1 psso
14.12.2021 - 18:16DROPS Design vastasi:
Dear Val, when working body you will decrease a total of 4 stitches on the round (= 2 sts decreased at each marker) / when working sleeve you will decrease that way only 2 sts (only 1 marker, mid under sleeve). Happy knitting!
15.12.2021 - 08:25
![]() Val kirjoitti:
Val kirjoitti:
Sorry >
14.12.2021 - 18:13
![]() Val kirjoitti:
Val kirjoitti:
Hello,I was able to adjust everything.I'm now again the beginning of the round, before start the dec tip. So, I hope this time I 've understood well: So I have to: knit the first 12 stitches, but before reach the first stitch marker of the round, 3 stitches before, I have to “work until 3 sts remain before the marker, K2 tog, K1, slip marker, K1, slip 1 as if to K, K1, psso, and work until 3 sts remain before next marker on the other side of the jumper and repeat. Right? Thank you again!
14.12.2021 - 17:43DROPS Design vastasi:
Dear Val, looks right, I'm just wondering about the first 12 stitches, rounds were worked on yoke from mid back, so that you continue from mid back towards the side, and then work until 3 sts remain before 1st marker on the side and decrease etc.. But if you could find the sides of the jumper, it looks then fine, as the decreases are worked on each side (below sleeves). Happy knitting!
15.12.2021 - 07:55
|
||||||||||
Silver Stag#silverstagsweater |
||||||||||
 |
 |
|||||||||
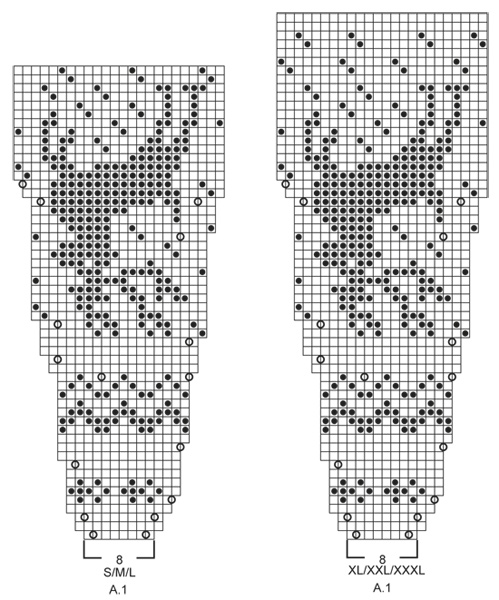
Ylhäältä alas neulottu porokuvioinen kaarrokepusero / joulupusero DROPS Karisma-langasta. Koot S-XXXL.
DROPS 157-23 |
||||||||||
|
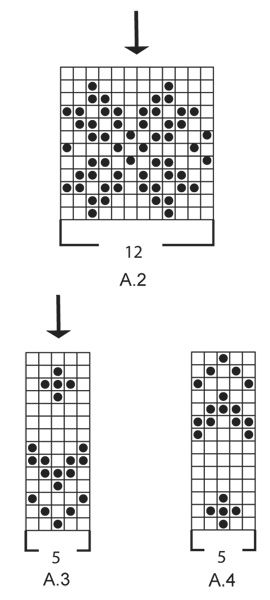
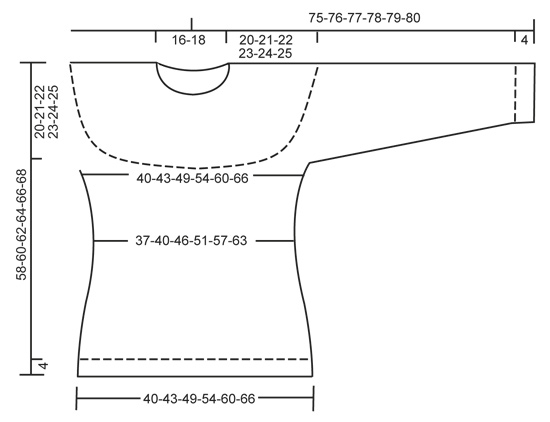
MALLINEULE: Katso ruutupiirrokset A.1- A.4. Piirrokset näyttävät mallineuletta oikealta puolelta katsottuna. Koko mallineule neulotaan sileänä neuleena. KAVENNUSVINKKI (sivut ja hihat): Kavenna merkkilangan molemmin puolin seuraavasti: Ennen merkkilankaa ja 1 oikeaa s: 2 s oikein yhteen. Merkkilangan ja 1 oikean s:n jälkeen: Nosta 1 s oikein neulomatta, 1 o, vedä nostettu s neulotun yli. LISÄYSVINKKI (sivut): Työhön lisätään jokaisella lisäyskerroksella 4 s. Neulo kunnes merkkiä edeltää 1 s, 1 langankierto, 2 s sileää neuletta, 1 langankierto (työhön lisättiin 2 s). Seuraavalla kerroksella langankierto neulotaan kiertäen oikein (eli neulo langankierto takakautta), jottei muodostuisi reikää. ---------------------------------------------------------- PUSERO: Neulotaan suljettuna neuleena pyöröpuikolla, ylhäältä alas. Hihat neulotaan suljettuna neuleena sukkapuikoilla. KAARROKE: Luo 88-92-96-100-104-108 s pyöröpuikolle nro 3 keskiharmaalla langalla. Neulo 2 n/2 o -joustinneuletta, kunnes työn pituus on 3 cm. Vaihda pyöröpuikkoon nro 4. Neulo 1 krs sileää neuletta ja lisää SAMALLA tasavälein 0-4-8-20-24-28 s = 88-96-104-120-128-136 s. Jatka neulomalla mallineuletta seuraavasti: Toista piirroksen A.1 mallikertaa (= 8 s) 11-12-13-15-16-17 kertaa leveyssuunnassa. Jatka mallineuletta tähän tapaan. TARKISTA NEULETIHEYS! Kun olet neulonut piirroksen A.1 loppuun, työssä on 264-288-312-360-384-408 s. Neulo sitten 3-5-9-5-7-11 krs sileää neuletta keskiharmaalla langalla. HUOM: Koissa S, L, XL, XXXL neulominen lopetetaan 24 s (= 1 mallikerta) ennen kuin viimeinen krs on valmis. Kerroksen vaihtumiskohta on jatkossa tässä! Mallineule sijoittuu nyt oikealle kohdalle, kun työ jaetaan hihoja ja miehustaa varten. Seuraava krs neulotaan näin: Neulo ensimmäiset 37-40-46-52-58-64 s (= takakappaleen ensimmäinen puolikas), siirrä seuraavat 58-64-64-76-76-76 s apulangalle (= hiha), luo apulangan silmukoiden tilalle 10 s, kiinnitä 1 merkki näiden 10 s:n keskelle, neulo seuraavat 74-80-92-104-116-128 s (= etukappale), siirrä seuraavat 58-64-64-76-76-76 s apulangalle (= hiha), luo apulangan silmukoiden tilalle 10 s, kiinnitä 1 merkki näiden 10 s:n keskelle, neulo loput 37-40-46-52-58-64 s (= takakappaleen toinen puolikas). ETU- JA TAKAKAPPALE: Etu- ja takakappaleessa on nyt 168-180-204-228-252-276 s. Neulo nyt kaikilla silmukoilla mallineuletta piirroksen A.2 (= 12 s) mukaisesti. Kun olet neulonut piirroksen A.2 loppuun, jatka sileää neuletta keskiharmaalla langalla ja kavenna seuraavalla krs:lla kummankin sivun merkin molemmin puolin 1 s (LUE KAVENNUSVINKKI). Toista tällaiset kavennukset 2 cm välein vielä 2 kertaa = 156-168-192-216-240-264 s. Kun työn pituus hihan alla olevasta merkistä mitattuna on 12-13-14-15-16-17 cm, lisää kummankin sivun merkin molemmin puolin 1 s (LUE LISÄYSVINKKI). Toista tällaiset lisäykset 2 cm välein vielä 2 kertaa = 168-180-204-228-252-276 s. Kun työn pituus on 56-58-60-62-64-66 cm, vaihda pyöröpuikkoon nro 3 ja lisää tasavälein 20-24-24-28-28-32 s = 188-204-228-256-280-308 s. Jatka neulomalla joustinneuletta seuraavasti: *2 o, 2 n*, toista *-*. Kun olet neulonut 4 cm joustinneuletta, päätä s:t joustinneuletta neuloen. HIHAT: Neulo aluksi mallineuletta, jatka sitten neulomista keskiharmaalla langalla. Ota toisella apulangalla odottavat s:t sukkapuikoille nro 4. Hihassa on nyt 58-64-64-76-76-76 s. Neulo 1 krs sileää neuletta. Luo sitten keskelle hihan alle 10 s = 68-74-74-86-86-86 s. Kiinnitä 1 merkki näiden 10 s:n keskelle. Neulo sitten suljettua neuletta. Neulo mallineuletta piirroksen A.2 mukaisesti. HUOM: Piirrokseen on nuolella merkitty hihan keskimmäiset 2 s, laske siitä kuvion alku. Kun olet neulonut piirroksen A.2 loppuun, jatka neulomalla mallineuletta piirroksen A.3 mukaisesti. HUOM: Piirrokseen on nuolella merkitty hihan toinen keski-s, laske siitä kuvion alku. Aloita SAMALLA keskellä hihan alla kavennukset (muista KAVENNUSVINKKI). Toista tällaiset kavennukset 3-2½-2½-2½-2½-2½ cm välein vielä 9-12-12-12-12-12 kertaa = 48-48-48-60-60-60 s. Kun hihan pituus on 38 cm, neulo mallineuletta piirroksen A.4 mukaisesti. HUOM: Piirrokseen on nuolella merkitty hihan toinen keski-s, laske siitä kuvion alku. Kun olet neulonut piirroksen A.4 loppuun, vaihda sukkapuikkoihin nro 3 ja lisää tasavälein 4-8-8-0-4-4 s = 52-56-56-60-64-64 s. Neulo sitten 3 cm 2 o/2 n -joustinneuletta. Päätä s:t joustinneuletta neuloen. VIIMEISTELY: Ompele kainalosaumat. |
||||||||||
Ruutupiirroksen selitykset |
||||||||||
|
||||||||||
 |
||||||||||
 |
||||||||||
 |
||||||||||
Oletko tehnyt tämän mallin?Tägää tällöin kuviasi #dropspattern #silverstagsweater tai lähetä kuvat #dropsfan galleriaan. Tarvitsetko apua tämän ohjeen kanssa?Löydät 25 ohjevideota, kommentteja/kysymyksiä ja muuta osoitteessa www.garnstudio.com © 1982-2026 DROPS Design A/S. Pidätämme kaikki oikeudet. Tämä tiedosto ja kaikki sen alatiedostot on suojattu tekijänoikeuslailla. Lue lisää siitä, mitä voit tehdä ohjeillamme, verkkosivujemme jokaisen ohjeen alaosasta. |
||||||||||


DROPS Design on toiminut neule- ja virkkausalalla yli 40 vuotta ja meillä on yksi kaikkein laajin valikoima ilmaisia ohjeita verkossa - käännettynä 17 kielelle. Tänään meiltä löytyy 324 lehteä ja 12290 ohjetta - joista 11712 ohjetta on käännetty suomeksi.
Työskentelemme ahkerasti, jotta voisimme antaa teille kaikkein parhaimpia neule- ja virkkausohjeita, inspiraatiota ja neuvoja sekä korkealaatuisia lankoja todella edulliseen hintaan! Haluaisitko käyttää ohjeitamme muuhun kuin henkilökohtaiseen käyttöön? Voit lukea säännöistä ohjeiden Tekijänoikeus -tekstissä, joka löytyy kaikkien ohjeidemme alapuolelta. Hauskoja hetkiä käsitöiden parissa!
Lisää kommentti ohjeeseen DROPS 157-23
Haluamme mielellämme kuulla mielipiteesi tästä ohjeesta!
Mikäli haluat esittää kysymyksen, valitse oikea kategoria alla olevasta valikosta - tällä tavoin saat vastauksen nopeammin. Pakolliset kentät on merkitty tähdellä *.