
Suositut kategoriat
Etsitkö tiettyä lankaa?


Kommentit / Kysymykset (162)
![]() Yvonne Duckstein kirjoitti:
Yvonne Duckstein kirjoitti:
Hallo, das Häkeln des Reglan bedeutet nur das oberste Teil über der Brust? Man häkelt das Musterbild nur 1x ?! Und dann kommen in den letzten beiden Reihen die Zunahmen? Habe ich das so richtig verstanden? Danke und Beste Grüße Yvonne Duckstein
30.03.2026 - 14:32DROPS Design vastasi:
Liebe Frau Duckstein, das Diagram A.z wird insgesamt 2 Mal in der Höhe gehäkelt. Die Zunahmen werden bei den 2 letzten Reihen vom 1. Rapport in der Höhe gehäkelt, dann bei den 2 letzten Reihen vom 2. Rapport in der Höhe (4 Reihen mit Zunahmen). Viel Spaß beim Häkeln!
07.04.2026 - 14:06
![]() Rebours kirjoitti:
Rebours kirjoitti:
Encolure beaucoup trop importante comment la diminuer Merci si vous avez une obtion0
19.12.2025 - 17:50
![]() Barre kirjoitti:
Barre kirjoitti:
Je me retrouve avec 12 A2
15.12.2025 - 17:50DROPS Design vastasi:
Bonjour Mme Barre, vérifiez bien votre nombre de mailles et le décompte donné hier (on commence par A.1, on répète 10 fois A.2 et on termine par A.3, on aura ainsi 12 groupes de double-brides au total pour la manche. Bon crochet!
16.12.2025 - 08:57
![]() Barre kirjoitti:
Barre kirjoitti:
Sur les ms ont continu toujours en ms si non on a plus de 10 A1 MERCI
15.12.2025 - 17:27DROPS Design vastasi:
Bonjour Mme Barre, en taille S/M vous avez sauté 40 m de l'empiècement pour la manche, vous allez crocheter ces 40 m dans le point fantaisie A.1-A.2-A.3 exactement comme avant + dans les 9 mailles crochetées sous la manche; si vous avez davantage de mailles, vous pouvez probablement ajuster en fonction de votre nombre; attention à ce que vous ayez suffisamment de mailles pour crocheter le point fantaisie. Bon crochet!
16.12.2025 - 08:56
![]() Barre kirjoitti:
Barre kirjoitti:
Je suis arrivée à la manche mais j'ai un problème j'ai mais 49 ms mais pourquoi après vous dites de continuer sur les 40 mailles sur les 9 mailles on fait quoi Merci
14.12.2025 - 19:40DROPS Design vastasi:
Bonjour Mme Barre, on crochète le tout 1er rang des manches en mailles serrées: 1 ms dans la 1ère des 8 ml et 1 ms dans les 40 ms de l'empiècement = 49 ms. Crochetez ensuite: A.1 (= 6 m), répétez 10 fois A.2 (= 8 m x 10 = 40) et terminez par A.3 (= 3 m) = 6+40+3=49 m. Commencez les tours par 4 ml pour remplacer 1 double-bride / 1 ml pour remplacer 1 ms et terminez les tours par 1 mc dans la 4ème/la 1ère ml du début du tour. Bon crochet!
15.12.2025 - 15:17
![]() Barre kirjoitti:
Barre kirjoitti:
À la fin du 1er rang du dos quand on a crocheter les 60 mailles que fait on Merci
02.12.2025 - 18:59DROPS Design vastasi:
Bonjour Mme Barre, lorsque vous divisez l'ouvrage, vous sautez les mailles des manches que vous remplacez par 8 mailles en l'air, et, au 2ème rang, vous crochetez les diagrammes comme avant en sautant les 8 mailles en l'air des emmanchures. Crochetez ainsi toutes les mailles comme avant: on va avoir ainsi, A.4, A.1 puis A.2 pour la fin du devant, tout le long du dos, au début de l'autre devant et on termine par A.4 et A.4 (vu sur l'endroit). Bon crochet!
03.12.2025 - 08:15
![]() Rebours kirjoitti:
Rebours kirjoitti:
Lorsque l'on a terminé le 1er A2il faut bien piquer dans 1maille il y a quelque chose qui m'échappe à ce moment la
12.11.2025 - 15:21DROPS Design vastasi:
Bonjour Mem Rebours, à la fin du dernier A.2 (sur les 24 mailles), vous terminez A.2 par 3 ml, vous crochetez les 8 ml et vous sautez les mailles de la manche, puis vous reprenez A.2 dans le motif suivant (1 ml, vous sautez 1 ms, les double-brides, etc...). Quand vous crochèterez le rang suivant, crochetez les 5 double-brides dans l'arceau d'1 ml comme avant et tout le rang (donc rien dans les 8 mailles en l'air de chaque côté sous les manches. Bon crochet!
12.11.2025 - 16:52
![]() Rebours kirjoitti:
Rebours kirjoitti:
Lorsqu'on arrive à la 24 ème maille du devant l'on fait une maille serrée ou une double bride Merci
10.11.2025 - 11:59DROPS Design vastasi:
Bonjour Mme Rebours, terminez le dernier A.2 en largeur par 3 mailles en l'air, sautez les 2 ms suivantes, puis crochetez 8 mailles en l'air, sautez les mailles indiquées pour la manche et commencez le A.2 du dos dans la maille suivante; au tour suivant, rappelez-vous que les 8 mailles en l'air ne seront pas crochetées. Bon crochet!
11.11.2025 - 15:59
![]() Barre kirjoitti:
Barre kirjoitti:
Excusez moi mais je ne comprend pas comment faire avec les 8 mailles en l'air
04.11.2025 - 08:31DROPS Design vastasi:
Bonjour Mme Barre, lorsque vous crochetez le rang de division manches/dos et devants, vous les crochetez à la place des manches, et au rang suivant, vous sautez ces 8 mailles en l'air, vous ne les crochetez pas pour le bas du gilet, vous les crochèterez seulement quand vous ferez les manches. Bon crochet!
04.11.2025 - 17:12
![]() Barre kirjoitti:
Barre kirjoitti:
Les 8 mailles en l'air ne font pas 40 mailles
01.11.2025 - 19:35DROPS Design vastasi:
Bonjour Mme Barre, les 8 mailles en l'air sont faites quand on saute les 40 mailles des manches, elles seront crochetées ensuite lorsque l'on termine les manches. Bon crochet!
03.11.2025 - 07:38
|
|||||||||||||||||||
Nevertheless#neverthelesscardigan |
|||||||||||||||||||
|
|
|||||||||||||||||||
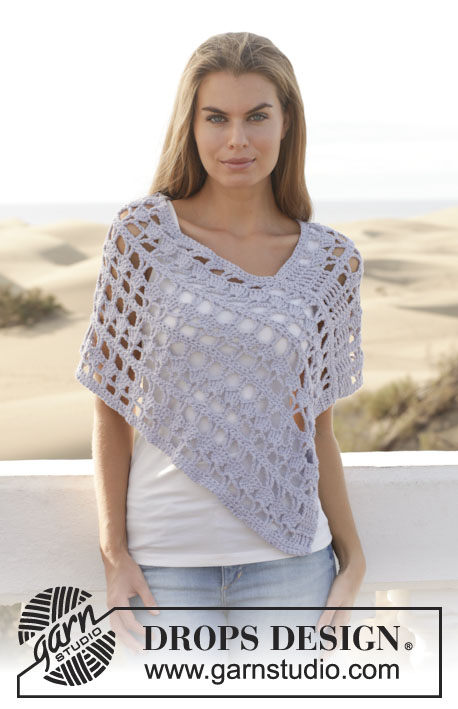
Virkattu DROPS jakku ”Paris”-langasta. Koot S-XXXL.
DROPS 153-10 |
|||||||||||||||||||
|
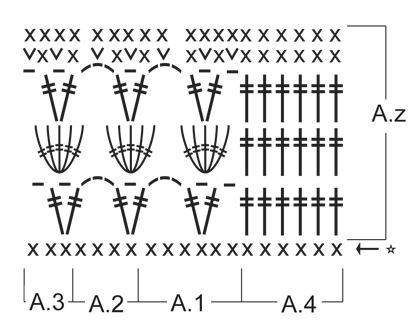
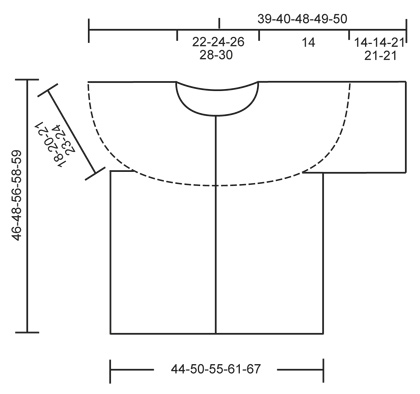
MALLIVIRKKAUS: Katso piirrokset A.1-A.4. VIRKKAUSINFO: Jokaisen ks-kerroksen ensimmäinen ks korvataan 1 kjs:lla. Jokaisen kp-kerroksen ensimmäinen kp korvataan 4 kjs:lla. LISÄYSVINKKI: Lisää virkkaamalla 2 ks samaan ks:aan. ---------------------------------------------------------- JAKKU: Virkataan ylhäältä alas. Työ virkataan tasona keskeltä edestä alkaen. KAARROKE: Virkkaa 156-166-177-188-198 löyhää kjs (sis. 1 kjs kääntymiseen) koukulla nro 5 ja Paris-langalla. 1.krs virkataan näin: Virkkaa 1 ks 2. kjs:aan koukusta laskien, *1 ks jokaiseen 3 seuraavaan kjs:aan, jätä 1 kjs väliin*, toista *-* ja virkkaa lopuksi 1 ks jokaiseen 2-4-3-2-4 viimeiseen kjs:aan = 117-125-133-141-149 ks (= piirroksen ensimmäinen krs). LUE VIRKKAUSINFO. Jatka virkkaamalla seuraavasti: A.4 (= etureuna), A.1, virkkaa seuraaviin 96-104-112-120-128 ks:aan mallivirkkausta piirroksen A.2 mukaisesti (= 24-26-28-30-32 mallikertaa krs:lla), virkkaa lopuksi piirros A.3 ja A.4 (= etureuna). Virkkaa 1 mallikerta piirroksen A.z mukaisesti ja lisää SAMALLA kummallakin 2 viimeisellä krs:lla tasavälein 24-28-32-36-40 s (työhön lisättiin yht. 48-56-64-72-80 s). LUE LISÄYSVINKKI YLLÄ. HUOM: Älä tee lisäyksiä piirroksen A.4 silmukoiden kohdalla = 165-181-197-213-229 s. Virkkaa sitten vielä 1 mallikerta piirroksen A.z mukaisesti (piirroksen A.2 mallikertaa toistetaan nyt 36-40-44-48-52 kertaa leveyssuunnassa) ja lisää SAMALLA kummallakin 2 viimeisellä krs:lla tasavälein 22-26-30-34-38 s (työhön lisättiin yht. 44-52-60-68-76 s). HUOM: Älä tee lisäyksiä piirroksen A.4 silmukoiden kohdalla = 209-233-257-281-305 s. ETU- JA TAKAKAPPALE: KAIKKI MITAT OTETAAN JATKOSSA TÄSTÄ. Virkkaa nyt seuraavasti: A.4, A.1, virkkaa seuraaviin 24-28-32-36-40 ks:aan piirroksen A.2 mallivirkkausta (= 6-7-8-9-10 mallikertaa) (etukappale), 8 kjs (hihan alareuna), jätä 40-44-48-52-56 ks väliin (kädentie, hiha virkataan myöhemmin tähän), virkkaa seuraaviin 60-68-76-84-92 ks:aan piirroksen A.2 mallivirkkausta (takakappale), 8 kjs (hihan alareuna), jätä 40-44-48-52-56 ks väliin (kädentie, hiha virkataan myöhemmin tähän), virkkaa seuraaviin 24-28-32-36-40 ks:aan piirroksen A.2 mallivirkkausta (etukappale), virkkaa lopuksi piirros A.3 ja A.4. Virkkaa sitten näin: Virkkaa piirros A.4, A.1, virkkaa seuraaviin 24-28-32-36-40 ks:aan piirroksen A.2 mallivirkkausta (= 6-7-8-9-10 mallikertaa) (etukappale), jätä 8 kjs väliin (hihan alareuna), virkkaa seuraaviin 60-68-76-84-92 ks:aan piirroksen A.2 mallivirkkausta (takakappale), jätä 8 kjs väliin (hihan alareuna), virkkaa seuraaviin 24-28-32-36-40 ks:aan piirroksen A.2 mallivirkkausta (etukappale), virkkaa lopuksi piirros A.3 ja A.4. Jatka virkkaamista piirroksen A.z mukaisesti, kunnes työn pituus on n. 28-28-35-35-35 cm ja olet virkannut kokonaisen piirroksen A.z mallikerran loppuun. Katkaise lanka ja päättele langanpäät. Työn pituus olalta mitattuna on nyt 46-48-56-58-59 cm. HIHA: Virkataan suljettuna virkkauksena. KAIKKI MITAT OTETAAN JATKOSSA TÄSTÄ. Hiha virkataan ylhäältä alas. Aloita virkkaaminen keskeltä hihan alta seuraavasti: Virkkaa 2 ks 8 kjs:n ketjun ensimmäiseen kjs:aan, 1 ks jokaiseen 7 seuraavaan kjs:aan ja 1 ks kaarrokkeen jokaiseen 40-44-48-52-56 ks:aan = 49-53-57-61-65 ks. Virkkaa sitten näin: 4 kjs, A.1, virkkaa seuraaviin 40-44-48-52-56 s:aan piirroksen A.2 mallivirkkausta (= 10-11-12-13-14 mallikertaa), virkkaa lopuksi piirros A.3 ja 1 ps neljänteen kjs:aan. Jatka virkkaamista tähän tapaan, kunnes työn pituus on n. 14-14-21-21-21 cm ja olet virkannut kokonaisen piirroksen A.z mallikerran loppuun. Katkaise lanka ja päättele langanpäät. VIIMEISTELY: Virkkaa pääntien reunaan ks-reunus (jotta pääntiestä tulisi tasaisempi) seuraavasti: Virkkaa *1 ks jokaiseen 3 seuraavaan kjs:aan, jätä 1 kjs väliin*, toista *-* ja virkkaa lopuksi 1 ks jokaiseen 4-6-5-4-6 viimeiseen kjs:aan = 118-126-134-142-150 ks. Kiinnitä napit n. 7 cm:n välein vasempaan etureunaan. |
|||||||||||||||||||
Ruutupiirroksen selitykset |
|||||||||||||||||||
|
|||||||||||||||||||
 |
|||||||||||||||||||
 |
|||||||||||||||||||
Oletko tehnyt tämän mallin?Tägää tällöin kuviasi #dropspattern #neverthelesscardigan tai lähetä kuvat #dropsfan galleriaan. Tarvitsetko apua tämän ohjeen kanssa?Löydät 6 ohjevideota, kommentteja/kysymyksiä ja muuta osoitteessa www.garnstudio.com © 1982-2026 DROPS Design A/S. Pidätämme kaikki oikeudet. Tämä tiedosto ja kaikki sen alatiedostot on suojattu tekijänoikeuslailla. Lue lisää siitä, mitä voit tehdä ohjeillamme, verkkosivujemme jokaisen ohjeen alaosasta. |
|||||||||||||||||||


DROPS Design on toiminut neule- ja virkkausalalla yli 40 vuotta ja meillä on yksi kaikkein laajin valikoima ilmaisia ohjeita verkossa - käännettynä 17 kielelle. Tänään meiltä löytyy 324 lehteä ja 12290 ohjetta - joista 11709 ohjetta on käännetty suomeksi.
Työskentelemme ahkerasti, jotta voisimme antaa teille kaikkein parhaimpia neule- ja virkkausohjeita, inspiraatiota ja neuvoja sekä korkealaatuisia lankoja todella edulliseen hintaan! Haluaisitko käyttää ohjeitamme muuhun kuin henkilökohtaiseen käyttöön? Voit lukea säännöistä ohjeiden Tekijänoikeus -tekstissä, joka löytyy kaikkien ohjeidemme alapuolelta. Hauskoja hetkiä käsitöiden parissa!
Lisää kommentti ohjeeseen DROPS 153-10
Haluamme mielellämme kuulla mielipiteesi tästä ohjeesta!
Mikäli haluat esittää kysymyksen, valitse oikea kategoria alla olevasta valikosta - tällä tavoin saat vastauksen nopeammin. Pakolliset kentät on merkitty tähdellä *.