
Suositut kategoriat
Etsitkö tiettyä lankaa?


Kommentit / Kysymykset (101)
![]() Lisbet Holze Jespersen kirjoitti:
Lisbet Holze Jespersen kirjoitti:
Hej igen. Den 11.1.2016 havde jeg nogle spørgsmål til opskrift 151-02. Da jeg p.t. sidder og strikker denne poncho må I gerne svare hurtigste muligt.
16.01.2016 - 23:58
![]() Lisbet Holze Jespersen kirjoitti:
Lisbet Holze Jespersen kirjoitti:
Sign.forklaring: 2 skrå op 1 skrå ned. Sæt 2 m på hj.pind bag arb. 1 ret og 1 vr. + 1 ret fra hj.p.. selvom der er sat 2 m på hj.pind. Der må være noget galt??? Sign.forklaring med at hente masker op bagfra. 3 m ialt. På næste pind strikkes således:1 løs af 2 r sammen. Løs m over 2 r sammen. Iflg. sign. skal der strikkes 1 vr ???
11.01.2016 - 15:01DROPS Design vastasi:
= sæt 2 m på h.j.p bag arb, 1 ret, 1 vr + 1 ret fra hj.p. Det er de 2 sidste masker du strikker fra hjælpepinden. God fornøjelse!
26.01.2016 - 15:04
![]() M.boer kirjoitti:
M.boer kirjoitti:
In het patroon van deze poncho moet je in een naald 2 steken samenbreien/ of een overhaling. In de volgende naald kom je dus steken tekort , je kan dan niet 1 recht 1 averecht breien boven de b.v samengebreide steken want die heb je nergens toegevoegd. Graag uitleg / reactie. B.v.d. Vr.groet, Marja Boer.
05.05.2015 - 21:32DROPS Design vastasi:
Hoi Marja. Je maakt ook 1 omslag bij elke 2 samenbreien/overhaling. Zoals ik het lees kom je dan uit met een gelijk aantal steken.
06.05.2015 - 17:38
![]() Sue kirjoitti:
Sue kirjoitti:
Have you produced a video tutorial for the3/6 stitch because I have no idea where or how to even start with that? Thank you.
27.01.2015 - 22:37DROPS Design vastasi:
Dear Sue, there is no video available yet, but to work this st, *insert your needle 3/6 rows below, get yarn from WS and go back through that st with the yarn from RS (you have 1 more st on the right needle)*, then work next st and repeat from *-* once again in the same st below, you have now 3 sts on the right needle, on next round, work these 3 sts: Slip 1 as if to K, K2 tog, psso (1 st remains). Happy knitting!
28.01.2015 - 10:57
![]() Françoise Bastin kirjoitti:
Françoise Bastin kirjoitti:
Bonjour, J'ai réalisé ce poncho en rouge, il est magnifique. J'ai repris la base mais changé les deux panneaux de dessin. En fait j'ai repris presque l'entièreté d'un diagramme d'un pull pour homme (n°135-3). Je le trouve aussi magnifique. Je vais procéder de la même manière pour une autre personne et cela donnera 3 ponchos différents. Françoise.
21.01.2015 - 10:32RHS kirjoitti:
Hi Is the circumference of the neck 42cm or 84cm?
08.01.2015 - 12:25DROPS Design vastasi:
Dear RHS, measurements in chart are taken flat, from side to side, circumference of the neck will be then approx. 84 cm (neck will be 42 cm from side to side when lying flat). Happy knitting!
08.01.2015 - 13:40
![]() Sandra kirjoitti:
Sandra kirjoitti:
Hallo an Alle, weiß denn jemand wieviel Wolle für Größe S/M benötigt wird :-) ? Dankeschön
25.12.2014 - 18:56DROPS Design vastasi:
Den Garnverbrauch finden Sie neben dem Foto unter der gestrichelten Linie, dort ist das Material samt Verbrauch angegeben.
29.12.2014 - 10:11Renée kirjoitti:
Thank you for your help!
04.12.2014 - 15:26Renée kirjoitti:
Thanks for confirming. Just one final aspect I am a little unsure of regarding the insert needle 3/6 rows down, when you create the 2nd loop (the 3rd of the 3 sts), you stick the needle through the same stitch as you stuck it through to create the first loop. Is that correct? i.e. both loops/strands of yarn are pulled through the same stitch.
04.12.2014 - 13:37DROPS Design vastasi:
Dear Renée, that's correct, you will then have 3 sts instead of 1 on this place (1st st picked below + K1 + 2nd st picked below) that you will dec to 1 st on next round. Happy knitting!
04.12.2014 - 15:05Renée kirjoitti:
I already looked at the images you are directing me to and I did not find them particularly helpful. Can you please check my post from 29/11/14 at 15:06 where I have described what I think is required for the stitch 3/6 rows down and then confirm that this is correct or not. The description provided in the pattern is too vague and should be rewritten as it is quite misleading.
03.12.2014 - 17:02DROPS Design vastasi:
Dear Renée, you are correct, *you insert needle some rows below, get the yarn from WS and pull it through the st (= towards RS) = you will have an extra st "loop" on right needle* - work 1 st and repeat again from *-* = 3 st on right needle - on next round, work these 3 sts: Slip 1 as if to K, K2 tog, psso. Happy knitting!
03.12.2014 - 17:34
|
||||||||||||||||||||||||||||||||||||||||||||||||||||
Frozen Ivy#frozenivyponcho |
||||||||||||||||||||||||||||||||||||||||||||||||||||
|
|
||||||||||||||||||||||||||||||||||||||||||||||||||||
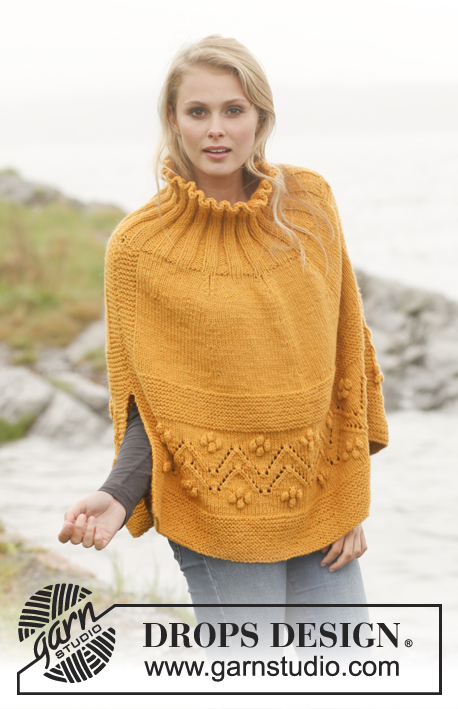
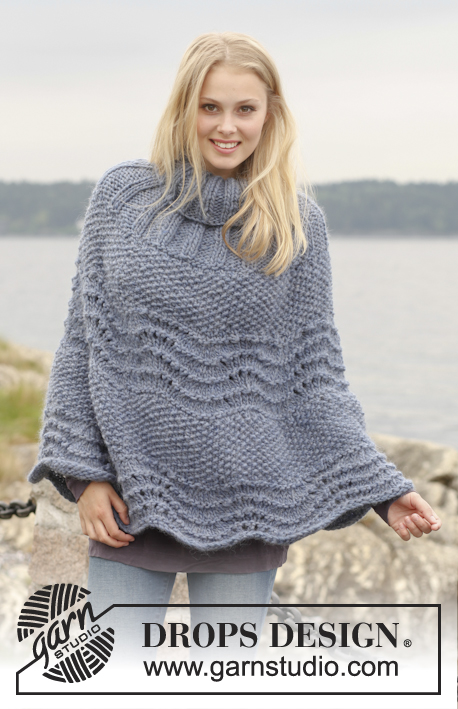
Lehtikuvioinen DROPS palmikkoponcho ”Karisma” -langasta. Koot S-XXXL.
DROPS 151-2 |
||||||||||||||||||||||||||||||||||||||||||||||||||||
|
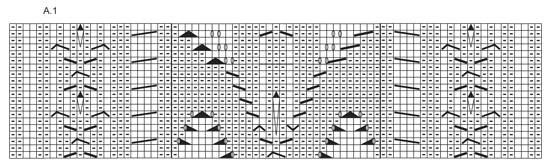
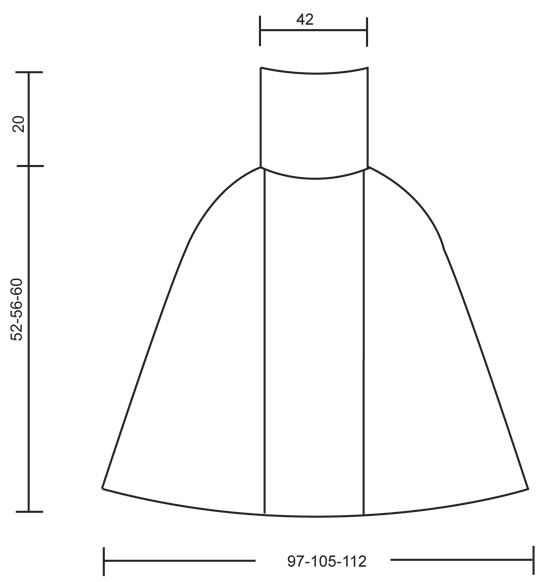
MALLINEULE: Katso ruutupiirros A.1. KAVENNUSVINKKI: Aloita 6 s:n päässä merkkilangasta ja neulo seuraavasti: 2 s oikein yhteen, 1 o, 2 n, 2 o (merkkilanka on näiden 2 s:n keskellä), 2 n, 1 o, nosta 1 s oikein neulomatta, 1 o, vedä nostettu s neulotun yli. ---------------------------------------------------------- PONCHO: Luo 408-440-472 s pyöröpuikolle nro 3,5 Karisma-langalla. Neulo 8 cm 2 n/2 o -joustinneuletta. Vaihda pyöröpuikkoon nro 4. Jatka neulomalla seuraavasti: Neulo ensimmäisillä 82 s:lla piirroksen A.1 mallineuletta ja kavenna SAMALLA näiden silmukoiden kohdalla tasavälein 3 s (= 79 s), *neulo seuraavilla 26-30-34 s:lla sileää neuletta, neulo seuraavat 6 s näin: 2 n, 2 o, 2 n (eli jatka joustinneuletta kuten aiemmin)*, toista *-* vielä 2 kertaa, neulo seuraavilla 26-30-34 s:lla sileää neuletta, neulo seuraavilla 82 s:lla piirroksen A.1 mallineuletta ja kavenna SAMALLA näiden silmukoiden kohdalla tasavälein 3 s (= 79 s), *neulo seuraavilla 26-30-34 s:lla sileää neuletta, neulo seuraavat 6 s näin: 2 n, 2 o, 2 n (eli jatka joustinneuletta kuten aiemmin)*, toista *-* vielä 2 kertaa, neulo seuraavilla 26-30-34 s:lla sileää neuletta = 402-434-466 s. Kiinnitä 4 merkkilankaa työhön seuraavasti: Kiinnitä ensimmäinen merkkilanka 108-112-116 s:n jälkeen (joustinneuleen ensimmäisen raidan 2 oikean silmukan väliin), kiinnitä toinen merkkilanka 172-184-196 s:n jälkeen (joustinneuleen kolmannen raidan 2 oikean silmukan väliin), kiinnitä kolmas merkkilanka 309-329-349 s:n jälkeen (joustinneuleen neljännen raidan 2 oikean silmukan väliin), ja kiinnitä neljäs merkkilanka 373-401-429 s:n jälkeen (joustinneuleen kuudennen raidan 2 oikean silmukan väliin). Jatka mallineuletta tähän tapaan. SAMANAIKAISESTI kun työn pituus on 10 cm, kavenna jokaisen merkkilangan molemmin puolin 1 s (LUE KAVENNUSVINKKI). Toista tällaiset kavennukset 2 cm välein 19-19-19 kertaa, sitten 1 cm välein 5-9-13 kertaa = 210 s jäljellä työssä (kaikissa koissa). Työn pituus on n. 52-56-60 cm. Vaihda pyöröpuikkoon nro 3,5. Neulo 1 krs oikein ja kavenna samalla tasavälein 42 s = 168 s. Neulo 1 krs nurin. Neulo sitten 20 cm 2 o/2 n -joustinneuletta. Päätä s:t joustinneuletta neuloen. |
||||||||||||||||||||||||||||||||||||||||||||||||||||
Ruutupiirroksen selitykset |
||||||||||||||||||||||||||||||||||||||||||||||||||||
|
||||||||||||||||||||||||||||||||||||||||||||||||||||
 |
||||||||||||||||||||||||||||||||||||||||||||||||||||
 |
||||||||||||||||||||||||||||||||||||||||||||||||||||
Oletko tehnyt tämän mallin?Tägää tällöin kuviasi #dropspattern #frozenivyponcho tai lähetä kuvat #dropsfan galleriaan. Tarvitsetko apua tämän ohjeen kanssa?Löydät 15 ohjevideota, kommentteja/kysymyksiä ja muuta osoitteessa www.garnstudio.com © 1982-2026 DROPS Design A/S. Pidätämme kaikki oikeudet. Tämä tiedosto ja kaikki sen alatiedostot on suojattu tekijänoikeuslailla. Lue lisää siitä, mitä voit tehdä ohjeillamme, verkkosivujemme jokaisen ohjeen alaosasta. |
||||||||||||||||||||||||||||||||||||||||||||||||||||


DROPS Design on toiminut neule- ja virkkausalalla yli 40 vuotta ja meillä on yksi kaikkein laajin valikoima ilmaisia ohjeita verkossa - käännettynä 17 kielelle. Tänään meiltä löytyy 325 lehteä ja 12298 ohjetta - joista 11792 ohjetta on käännetty suomeksi.
Työskentelemme ahkerasti, jotta voisimme antaa teille kaikkein parhaimpia neule- ja virkkausohjeita, inspiraatiota ja neuvoja sekä korkealaatuisia lankoja todella edulliseen hintaan! Haluaisitko käyttää ohjeitamme muuhun kuin henkilökohtaiseen käyttöön? Voit lukea säännöistä ohjeiden Tekijänoikeus -tekstissä, joka löytyy kaikkien ohjeidemme alapuolelta. Hauskoja hetkiä käsitöiden parissa!
Lisää kommentti ohjeeseen DROPS 151-2
Haluamme mielellämme kuulla mielipiteesi tästä ohjeesta!
Mikäli haluat esittää kysymyksen, valitse oikea kategoria alla olevasta valikosta - tällä tavoin saat vastauksen nopeammin. Pakolliset kentät on merkitty tähdellä *.