
Suositut kategoriat
Etsitkö tiettyä lankaa?


Kommentit / Kysymykset (59)
![]() Gilardi Claudette kirjoitti:
Gilardi Claudette kirjoitti:
Je ne comprends pas l'explication des manches.que veut dire "avec les rangs raccourcis comme avant,aux mêmes endroits" Merci
31.01.2022 - 09:02DROPS Design vastasi:
Bonjour Mme Gilardi, vous avez auparavant tricoté des rangs raccourcis sur toute la longueur, lorsque vous tricotez les manches, vous allez tourner aux mêmes endroit qu'avant (moins de fois car moins de marqueurs), et continuer ainsi les rangs raccourcis comme avant. Bon tricot!
31.01.2022 - 10:23
![]() Martens kirjoitti:
Martens kirjoitti:
Ik ben deze Eden vest aan het breien. Ik ben nu de libkermouw aan het breien. Deze moeten in verkorte toeren gebreid worden. De eerste en de tweede toer van de verkorte toeren moeten gewoon volledig heen en terug gebreid worden. Blijft dit ook gelden in de mouw? Want er zijn maar 2 verkorte toeren in de mouw ipv 3. Ik begrijp tevens niet hoe je 35 cm meet (aan de onderkant op het breedste deel) in de uitleg van de linkermouw. Kan u mij daarmee helpen, please?
09.01.2021 - 20:24DROPS Design vastasi:
Dag Martens,
De lengte van de mouw meet je aan de onderkant van de mouw op het breedste deel. Als je verkorte toeren maakt op de mouw, keer je het werk op het zelfde punt als bij de panden, dus het aantal steken vanaf de hals tot het keerpunt voor de verkorte toeren moet hetzelfde zijn. Hoe de verkorte toeren herhaald worden is verder precies hetzelfde als op de panden.
10.01.2021 - 12:15
![]() Bobby Garland kirjoitti:
Bobby Garland kirjoitti:
OK, I think I get it. I need to do 1 more row on the LF (row 1 for me) in order to end at the top. Then, I need to attach a new yarn to stitch #64 on the WS and knit the side piece. Then I will end up with the last row on the RS. Then I will cut that yarn. Then I will go back to the top edge on the LF and pick up yarn and turn to the WS to start the sleeve on those 51 sts. It would have been nice if the instructions had been more specific, instead of saying "work approximately..."
08.01.2021 - 19:57
![]() Bobby Garland kirjoitti:
Bobby Garland kirjoitti:
I get what you are saying, but I am not asking about the sleeve, as I am not there yet. I need to know if I am to cut the yarn at the lower edge of the left front piece and reattach it to the WS at stitch #64 to start the first row of the side piece so as to end on the RS of the side piece as instructed. There is no other way to end up on the RS unless you start the side piece on the WS in the middle of the work.
08.01.2021 - 17:21DROPS Design vastasi:
Dear Mrs Garland, after left front piece measures 23 cm, adjust so that next row will be worked from RS and now work this 1 cm starting from RS = from the bottom edge over the first 64 cm - adjust this 1 cm so that last row is worked from RS, then cut the yarn and join it to work sleeve (starting from RS) over the 51 sts left unworked on needle (starting from RS). Happy knitting!
11.01.2021 - 06:57
![]() Bobby Garland kirjoitti:
Bobby Garland kirjoitti:
OK, so you also cut the yarn at the end of the left front, which for me is at the lower edge, and reattach to stitch # 64 (for small size) in order to start the side piece on the WS, so as to finish last row of side piece on the RS?
08.01.2021 - 15:15DROPS Design vastasi:
Dear Mrs Garland, the last row on left front piece is worked from RS, but when you turn and work sleeve, first row on sleve is worked from WS = this means you don't need to cut the yarn between left front piece and sleeve, then after sleeve, just work the 64 sts on side at the end of a WS row. - no need to cut the yarn neither between sleeve and back piece. Happy knitting!
08.01.2021 - 16:19
![]() Bobby Garland kirjoitti:
Bobby Garland kirjoitti:
Thank you for your response. Another question....I finished the left front and ended on row 8 of short row sequence, which means the next row would be a right side row. In order to finish the side piece on the RS as instructed and have the side pieces be the same number of rows and have a marker in the middle, I would have to start the side piece on the WS. Do I cut the yarn and start at stitch number 64 at the other end from the WS?
08.01.2021 - 14:08DROPS Design vastasi:
Dear Mrs Garland, last row worked for side on front piece is worked from the right side, then cut the yarn and work sleeve. Last row worked on sleeve is from WS, after you have worked this last row on sleeve, work the stitches of the side at the end of this row = from WS, all stitches are now back on needle, turn and start short rows at the beg of next row from RS. Happy knitting!
08.01.2021 - 15:02
![]() Bobby Garland kirjoitti:
Bobby Garland kirjoitti:
For short rows, when moving from left front to sleeve to back to sleeve to right front, do you continue in the same numerical sequence from the previous section, or do you start again at row 1 or do you reverse the short row sequence, work rows 8-1? You start with row 1 at the left front border and end up with row 8 at the right front....the pieces would not be "mirrored." Even if you have the same number of rows, the short rows would not be in the same place. Does it matter?
04.01.2021 - 14:50DROPS Design vastasi:
Dear Mrs Garland, after you have worked the sleeve, work the short rows on back piece starting from row 1 of short rows. Happy knitting!
05.01.2021 - 10:43
![]() LISA RENBARGER kirjoitti:
LISA RENBARGER kirjoitti:
A friend and I are about to cast on Eden to knit at the same time. My bust measurement is between size M & L. Is there positive ease built in to the pattern?
13.01.2020 - 16:49DROPS Design vastasi:
Dear Mrs Renbarger, measure a similar garment you have and like the shape and compare these measurements to the one in the measurement chart (taken flat from side to side, in cm) to find out the matching size. You can then either decide if you want it rather tight or rather loose (with negative or positive ease). Read more here. Happy knitting!
14.01.2020 - 07:17
![]() Kironieke kirjoitti:
Kironieke kirjoitti:
If i cast on 120 stitches for size M with 23st/cm (tension) how do i get to the total height of 75cm? It only adds up to the 52cm of the body, not the yoke/sleeve part.
21.05.2019 - 20:53DROPS Design vastasi:
Dear Kironieke, the 120 stitches will measure 52 cm = whole length of jacket as shown in measurement chart (= 23 cm yoke + 29 cm body). Happy knitting!
22.05.2019 - 09:14
![]() Rosie FRANCIS kirjoitti:
Rosie FRANCIS kirjoitti:
When knitting the left sleeve, you will have between 51 and 62 stitches, how many do you work before turning on the short rows? The short row instructions work for the whole garment (between 115 and 138 stitches)
06.08.2018 - 22:35DROPS Design vastasi:
Dear Mrs Francis, you should work the short rows on the left sleeve on the same places you worked the short rows on the top of front piece before, ithe "turns" should continue and be aligned from the beg of piece. Happy knitting!
07.08.2018 - 09:38
|
||||
Eden#edencardigan |
||||
|
|
||||
Poikittain neulottu DROPS liivi ”Fabel”-langasta. Koot S-XXXL.
DROPS 134-4 |
||||
|
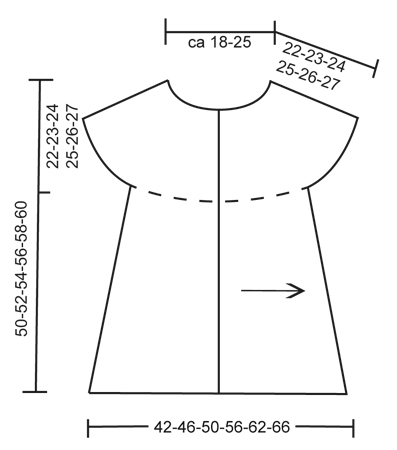
NEULOMISVINKKI: Aina kun olet kääntynyt työn keskellä, nosta ensimmäinen s oikein neulomatta, kiristä lanka ja neulo takaisin. Tällä tavoin kääntymiskohtiin ei muodostu reikää. LYHENNETYT KERROKSET: Työn keskellä neulotaan lyhennettyjä kerroksia, jotta neuleesta tulisi A-muotoinen. Lyhennetyt kerrokset neulotaan alareunasta alkaen, ylöspäin kohti pääntietä. *Neulo kaikki s:t, käännä työ ja neulo takaisin. Neulo 103-108-112-115-119-122 s, käännä työ ja neulo takaisin. LUE NEULOMISVINKKI! Neulo 89-94-97-99-103-105 s, käännä työ ja neulo takaisin. Neulo 71-75-77-79-81-83 s, käännä työ ja neulo takaisin*. Toista *-*, eli 1 mallikerta = 2 krs yläreunassa ja 8 krs alareunassa. MITTAUSVINKKI: Kaikki mitat otetaan kun työ makaa litteänä tasaisella alustalla. Työtä ei saa venyttää mitattaessa. -------------------------------------------------------- LIIVI: Liivi neulotaan tasona poikittain. Työ neulotaan vasemman etukappaleen keskiedusta alkaen ja lopetetaan oikean etukappaleen keskiedun kohdalla. HUOM: Kuvan liivi näkyy peilikuvana. VASEN ETUKAPPALE: Koko työ neulotaan ainaoikein -neuleena, eli kaikki kerrokset neulotaan oikein. Luo löyhästi 115-120-125-129-134-138 s puikoille nro 3,5 ocean view värisellä Fabel-langalla. Ensimmäinen krs (= oikea puoli) neulotaan alareunasta alkaen. Neulo kaikilla silmukoilla 3 cm (= etureuna), etureunan viimeinen krs neulotaan nurjalta puolelta. TARKISTA NEULETIHEYS! Jatka neulomalla LYHENNETTYJÄ KERROKSIA (ks. selitys yllä). Kun työn leveimmän kohdan leveys luomisreunasta mitattuna on n. 23-25-27-30-33-35 cm (LUE MITTAUSVINKKI), tee sivukappale seuraavasti: Neulo 1 cm vain alareunan reunimmaisilla 64-67-70-72-74-76 s:lla. Kiinnitä 1 merkkilanka työhön (= sivun keskikohta). Neulo näillä samoilla silmukoilla vielä 1 cm, siirrä sitten nämä s:t apulangalle takakappaletta varten (sivukappaleen viimeinen krs neulotaan oikealta puolelta). Neulo sitten hiha. VASEN HIHA: = 51-53-55-57-60-62 s työssä. Neulo tasona lyhennettyjä kerroksia kuten aiemmin, kunnes hihan leveimmän kohdan leveys on n. 30-31-32-33-34-35 cm (viimeinen krs neulotaan nurjalta puolelta). TAKAKAPPALE: Ota apulangalla odottavat 64-67-70-72-74-76 s työhön (nurjalta puolelta) = 115-120-125-129-134-138 s. Neulo lyhennettyjä kerroksia kuten aiemmin. Kun työn leveimmän kohdan leveys sivun merkkilangasta mitattuna on n. 21-23-25-28-31-33 cm, kiinnitä uusi merkkilanka työhön (= keskitaka). Jatka lyhennettyjä kerroksia, kunnes työn leveimmän kohdan leveys keskellä takana olevasta merkkilangasta mitattuna on n. 20-22-24-27-30-32 cm. Tee sitten sivukappale seuraavasti: Neulo 1 cm vain alareunan reunimmaisilla 64-67-70-72-74-76 s:lla. Kiinnitä uusi merkkilanka työhön (= sivun keskikohta). Neulo näillä samoilla silmukoilla vielä 1 cm, siirrä sitten nämä s:t apulangalle (sivukappaleen viimeinen krs neulotaan oikealta puolelta). Neulo oikea hiha. OIKEA HIHA: Neulo kuten vasen hiha. OIKEA ETUKAPPALE: Ota apulangalla odottavat 64-67-70-72-74-76 s takaisin työhön (nurjalta puolelta) = 115-120-125-129-134-138 s. Neulo lyhennettyjä kerroksia kuten takana. Kun oikeassa etukappaleessa on yhtä monta krs kuin vasemmassa (miinus etureunan 3 cm), neulo etureuna näin: Neulo kaikilla silmukoilla 1½ cm. Tee seuraavalla krs:lla (= oikea puoli) napinlävet: Neulo kaikissa koissa 12 s, päätä seuraavat 2 s, *neulo 12-13-14-14-15-15 s, päätä seuraavat 2 s*, toista *-* yht. 4 kertaa, neulo krs loppuun. Luo seuraavalla krs:lla päätettyjen silmukoiden tilalle 2 s. Jatka neulomista kaikilla silmukoilla, kunnes etureunan leveys on yht. 3 cm. Päätä s:t löyhästi. VIIMEISTELY: Virkkaa reunus oikean etukappaleen reunaan, kauluksen reunoihin, takakappaleen pääntien reunaan ja vasemman etukappaleen reunaan. Virkkaa kaksinkertaisella ruskealla langalla ja koukulla nro 4 näin: Virkkaa 1 ks oikean etukappaleen alareunaan, *2 kjs, jätä n. 1 cm väliin, 1 ks*, toista *-*. Katkaise langat ja päättele langanpäät. Kiinnitä napit. |
||||
Ruutupiirroksen selitykset |
||||
|
||||
 |
||||
Oletko tehnyt tämän mallin?Tägää tällöin kuviasi #dropspattern #edencardigan tai lähetä kuvat #dropsfan galleriaan. Tarvitsetko apua tämän ohjeen kanssa?Löydät 6 ohjevideota, kommentteja/kysymyksiä ja muuta osoitteessa www.garnstudio.com © 1982-2026 DROPS Design A/S. Pidätämme kaikki oikeudet. Tämä tiedosto ja kaikki sen alatiedostot on suojattu tekijänoikeuslailla. Lue lisää siitä, mitä voit tehdä ohjeillamme, verkkosivujemme jokaisen ohjeen alaosasta. |
||||


DROPS Design on toiminut neule- ja virkkausalalla yli 40 vuotta ja meillä on yksi kaikkein laajin valikoima ilmaisia ohjeita verkossa - käännettynä 17 kielelle. Tänään meiltä löytyy 324 lehteä ja 12290 ohjetta - joista 11712 ohjetta on käännetty suomeksi.
Työskentelemme ahkerasti, jotta voisimme antaa teille kaikkein parhaimpia neule- ja virkkausohjeita, inspiraatiota ja neuvoja sekä korkealaatuisia lankoja todella edulliseen hintaan! Haluaisitko käyttää ohjeitamme muuhun kuin henkilökohtaiseen käyttöön? Voit lukea säännöistä ohjeiden Tekijänoikeus -tekstissä, joka löytyy kaikkien ohjeidemme alapuolelta. Hauskoja hetkiä käsitöiden parissa!
Lisää kommentti ohjeeseen DROPS 134-4
Haluamme mielellämme kuulla mielipiteesi tästä ohjeesta!
Mikäli haluat esittää kysymyksen, valitse oikea kategoria alla olevasta valikosta - tällä tavoin saat vastauksen nopeammin. Pakolliset kentät on merkitty tähdellä *.