
Suositut kategoriat
Etsitkö tiettyä lankaa?


Kommentit / Kysymykset (59)
![]() Camilla kirjoitti:
Camilla kirjoitti:
Jeg er ved at lave pandebåndet. I diagrammet står der man skal strikke ret over ret og vrang over vrang. Når jeg har slået de 12 masker op er 1. pind på vrang-siden, den næste pind på ret-siden. Dvs. snoninger bliver lavet fra vrang siden? Hvorfor skal jeg så strikke ret på hjælpepinden og de resterende masker?
02.11.2014 - 23:31DROPS Design vastasi:
Hej Camilla. 1. pind er retsiden. Snoningerne laves paa retsiden.
06.11.2014 - 13:42
![]() Carla kirjoitti:
Carla kirjoitti:
Il modello è bellissimo, ma devo mettere il doppio dei punti. Come costruire lo schema? Devo farlo speculare? Grazie per la risposta
07.09.2014 - 10:29DROPS Design vastasi:
Deve mettere il doppio dei punti perché utilizza un filato più sottile? Nel caso in cui dovesse fare così potrebbe lavorare la treccia più larga (con più maglie ogni fascia della treccia) per esempio. Se deve fare la fascia deve fare prima un campione per capire quanto rende con il filato che utilizzerà.
11.09.2014 - 16:31
![]() Klára S kirjoitti:
Klára S kirjoitti:
Dobrý den, v českém návodu neodpovídá popis vzorku originálu. Hezký den Klára S
01.02.2014 - 20:23DROPS Design vastasi:
Dobrý den, děkuji za upozornění - opraveno!
08.02.2014 - 01:06
![]() Isabel kirjoitti:
Isabel kirjoitti:
Hallo, Maakt het nog uit wat voor maat kabelnaald ik gebruik voor de hoofdband? Bedankt
26.10.2013 - 14:06DROPS Design vastasi:
Hoi Isabel. De kabelnld moet niet te dun zijn. Heb je niet een hele dikke kabelnld, dan kan je eventueel een sokkenbreinld gebruiken.
28.10.2013 - 19:13
![]() Jan kirjoitti:
Jan kirjoitti:
Got it - thank you - sorry to be so dense :)
30.01.2013 - 00:43
![]() Jan kirjoitti:
Jan kirjoitti:
Yes, I have checked your video which is great for a cable stitch in the middle of a row, not as the first stitch in the row. The difference is that the skein side of the wrapping yarn is on the cable needle not the right hand needle so i am not sure if that yarn should go behind the cable needle or infront of the cable needle prior to knitting the next/6th stitch.
29.01.2013 - 18:49DROPS Design vastasi:
In front, because stitches you have to knit next are in front of slipped sts.
29.01.2013 - 21:49
![]() Jan kirjoitti:
Jan kirjoitti:
Another source of my confustion -the wrap over yarn is on the cable needle since it is the first 5 stiches being slipped, when a cable is worked in the middle of a piece, the wrap over yarn is on the right hand knitting needle. Thank you again.
29.01.2013 - 13:41DROPS Design vastasi:
Have you checked out our Video tutorials for cable knitting?
29.01.2013 - 14:58
![]() Jan kirjoitti:
Jan kirjoitti:
Thank you for your response and clarification. One more question - does the wrapping yarn for the 11th row go behind the cable needle and slipped stiches or in front? Thank you
29.01.2013 - 13:35DROPS Design vastasi:
The yarn should not run over stitches in front and should not be visible. When you slip first 5 sts to cable needle behind piece, keep yarn front to knit next st from left needle.
29.01.2013 - 14:48
![]() Jan kirjoitti:
Jan kirjoitti:
I am making the neckwarmer and have a question regarding the 11th row. If I read the pattern correctly, this row starts with the 5 stitches slipped off to the cable needle. I find this awkward since the first stitch has the wrapping yarn (for lack of a better term). Am I reading the pattern correctly? I hope I am explaining myself properly.
28.01.2013 - 23:43DROPS Design vastasi:
Dear Jan, you are correct, on row 11 the first 5 sts are slipped on cable needle behind piece for the cable. Happy knitting!
29.01.2013 - 09:02
![]() Isabel Hicks kirjoitti:
Isabel Hicks kirjoitti:
Would be grateful for some help! Am doing this lovely headband but- cast on 12 stitches K1 then cabled 4 back knitted 4 . Three stitches left - please tell me how do I get the braiding as no stitches left to do the other half of the chart - where am I going wrong?.. Many thanks
20.01.2013 - 00:32DROPS Design vastasi:
Dear Mrs Hicks, diagram is read from bottom right towards the left (RS) and left towards right side (WS), and M1 =12 sts, row 3 is : K4, cable on the next 8 sts. R7 : cable on the first 8 sts, K4. Happy knitting!
21.01.2013 - 18:21
|
||||||||||||||||
Braidy#braidyset |
||||||||||||||||
 |
 |
|||||||||||||||
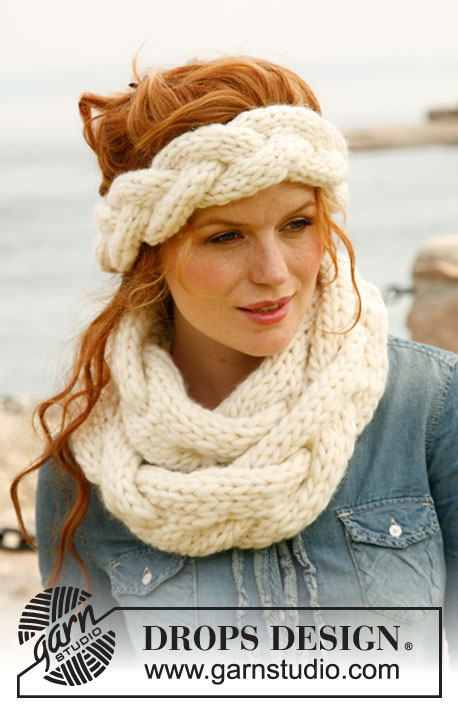
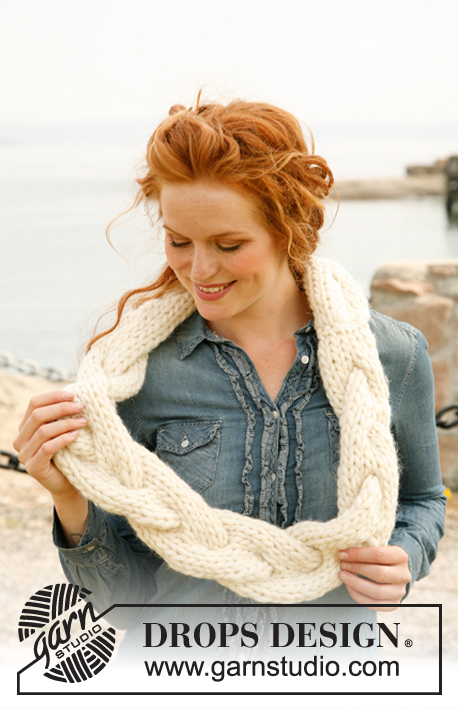
Palmikolliset DROPS otsanauha ja kauluri ”Polaris”-langasta.
DROPS 134-7 |
||||||||||||||||
|
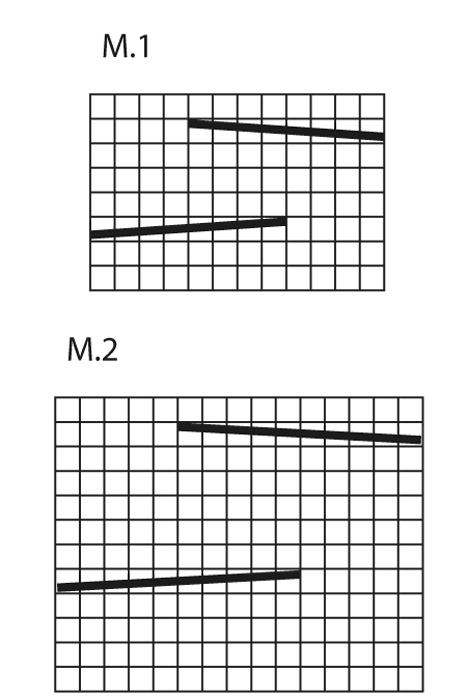
MALLINEULE: Katso ruutupiirrokset M.1 (otsanauha) ja M.2 (kauluri). Piirrokset näyttävät mallineuletta oikealta puolelta katsottuna. LANGANVAIHTOVINKKI: Kun vaihdat uuteen Polaris-kerään, jaa edellisen kerän langan viimeiset 15 cm kahteen osaan ja katkaise toinen osa. Tee samoin uuden kerän langalla. Aseta ensimmäiset ja viimeiset 15 cm päällekkäin (lanka on nyt normaalipaksuinen) ja jatka neulomista. Tällä tavoin liitoskohdasta tulee huomaamaton. -------------------------------------------------------- -------------------------------------------------------- OTSANAUHA: Neulotaan tasona ja ommellaan lopuksi yhteen. Luo 12 s puikoille nro 12 Polaris-langalla. Neulo mallineuletta piirroksen M.1 mukaisesti, kunnes työn pituus on n. 50 cm ja olet neulonut kokonaisen mallikerran loppuun. Neulo vielä 1 krs sileää neuletta. Päätä s:t. Ompele luomisreuna ja päätösreuna yhteen (ompele reunat vastakkain, jottei saumasta tulisi paksu). -------------------------------------------------------- KAULURI: Neulotaan tasona ja ommellaan lopuksi yhteen. Luo 15 s puikoille nro 15 Polaris-langalla. Neulo mallineuletta piirroksen M.2 mukaisesti, kunnes työn pituus on n. 120 cm ja olet neulonut kokonaisen mallikerran loppuun. Neulo vielä 4 krs sileää neuletta. Päätä s:t. Ompele luomisreuna ja päätösreuna yhteen (ompele reunat vastakkain, jottei saumasta tulisi paksu). Taita kauluri kaksinkerroin (kahdeksikon muotoiseksi) ennen kuin puet sen päällesi. |
||||||||||||||||
Ruutupiirroksen selitykset |
||||||||||||||||
|
||||||||||||||||
 |
||||||||||||||||
Oletko tehnyt tämän mallin?Tägää tällöin kuviasi #dropspattern #braidyset tai lähetä kuvat #dropsfan galleriaan. Tarvitsetko apua tämän ohjeen kanssa?Löydät 5 ohjevideota, kommentteja/kysymyksiä ja muuta osoitteessa www.garnstudio.com © 1982-2026 DROPS Design A/S. Pidätämme kaikki oikeudet. Tämä tiedosto ja kaikki sen alatiedostot on suojattu tekijänoikeuslailla. Lue lisää siitä, mitä voit tehdä ohjeillamme, verkkosivujemme jokaisen ohjeen alaosasta. |
||||||||||||||||


DROPS Design on toiminut neule- ja virkkausalalla yli 40 vuotta ja meillä on yksi kaikkein laajin valikoima ilmaisia ohjeita verkossa - käännettynä 17 kielelle. Tänään meiltä löytyy 324 lehteä ja 12290 ohjetta - joista 11712 ohjetta on käännetty suomeksi.
Työskentelemme ahkerasti, jotta voisimme antaa teille kaikkein parhaimpia neule- ja virkkausohjeita, inspiraatiota ja neuvoja sekä korkealaatuisia lankoja todella edulliseen hintaan! Haluaisitko käyttää ohjeitamme muuhun kuin henkilökohtaiseen käyttöön? Voit lukea säännöistä ohjeiden Tekijänoikeus -tekstissä, joka löytyy kaikkien ohjeidemme alapuolelta. Hauskoja hetkiä käsitöiden parissa!
Lisää kommentti ohjeeseen DROPS 134-7
Haluamme mielellämme kuulla mielipiteesi tästä ohjeesta!
Mikäli haluat esittää kysymyksen, valitse oikea kategoria alla olevasta valikosta - tällä tavoin saat vastauksen nopeammin. Pakolliset kentät on merkitty tähdellä *.