
Suositut kategoriat
Etsitkö tiettyä lankaa?


Kommentit / Kysymykset (65)
![]() Annick Mercier kirjoitti:
Annick Mercier kirjoitti:
Bonjour, je me demandais quel type de laine utiliser puisque la laine n'est pas disponible ici au Canada. Merci, Annick
02.09.2019 - 16:01DROPS Design vastasi:
Bonjour Mme Mercier, je suis heureuse de vous informer que vous pouvez trouver notre laine au Canada - plus d'infos ici. Bon tricot!
02.09.2019 - 16:47
![]() Patricia Olivia Fuchs kirjoitti:
Patricia Olivia Fuchs kirjoitti:
Hallo, liebes Drops-Team. Wenn ich KEIN umgeknicktes Bündchen möchte, kann ich dann anstatt * 2 re., 3 li. * gleich mit Diagrammm M1 beginnen und der weiteren Anleitung folgen, oder muss ich dafür noch etwas anderes beachten?
24.06.2019 - 14:52DROPS Design vastasi:
Liebe Frau Fuchs, also wahrscheinlich können Sie dann mit Zöpfen über die gewünschte Höhe stricken, dann setzt man eine Markierung und der Socken wird ab Markierer gemessen (nicht von der Anschlagskante). Viel Spaß beim stricken!
24.06.2019 - 17:00
![]() Mathilde kirjoitti:
Mathilde kirjoitti:
Bonjour, Je souhaiterais savoir ce que veux dire retourner le tricot ? Je ne comprends pas .... J'ai retourner mon ouvrage mais je tricote toujours dans le même sens ... Je vous remercie de bien vouloir l'éclairer Mathilde
14.01.2019 - 19:09DROPS Design vastasi:
Bonjour Mathilde, après les côtes, retournez l'ouvrage sur l'envers = les premiers rangs de côtes seront retournés sur l'endroit à la fin et ont donc été tricotés sur l'envers. Au premier tour après avoir retourné votre ouvrage, vous allez tricoter la dernière maille du tour précédent pour terminer par la première maille, continuez ensuite toujours ainsi, c'est maintenant l'endroit de la chaussette. Bon tricot!
15.01.2019 - 09:02Nicola Stuart kirjoitti:
Would love to knit these but would have to make them longer and bigger. How would I go about changing size?
11.11.2018 - 22:41DROPS Design vastasi:
Dear Nicola, the pattern goes up to size 44. If you need even bigger by using a slightly bigger needle. Conversly, you can use the yarn Lima isntead of the Karisma =with bgger needles). If you only want it somewhat higher, you can continue knitting straight for a couple more cm-s, and6 or you can increase a stitch on both ides of this middle stitch. You can find the videos, related to this pattern at the left of the page, below the pictures. Also there are detailed explanation of the symbos of the pattern chart. If you need further help you can also ask for it in person in the store where you bought your DROPS yarn from. Happy Crafting!
12.11.2018 - 01:56
![]() Nicole kirjoitti:
Nicole kirjoitti:
Vielen Dank für diese tolle Anleitung. Die Strümpfe sehen im Original schöner aus wie auf Eurem Foto und war für mich als Anfänger leicht verständlich nach zu stricken. Inzwischen habe ich schon 3 Paar gestricht und es macht immer wieder Spaß.
08.08.2018 - 17:26
![]() Alexandra kirjoitti:
Alexandra kirjoitti:
When i get to this part in the M2 chart do I pearl the 6 after i pearl the first 18 or do i knit them I'm not sure how to determine if I am working on the right side or wrong side now? Knit following round like this: P the first 15-18-21 sts, chart M.2 (= 36 sts), P the last 15-18-21 sts. I hope you understand my question thank you , Alex
08.06.2016 - 21:34DROPS Design vastasi:
Dear Alexandra, when working M.2 you are now working from RS and WS of M.1 is facing you (will be folded at the very end). M.2 is 36 sts in width, work rounds like this: P the first 15-18-21 sts from beg of round, then work the 36 sts in M.2 starting to read at the bottom corner on the right side towards the left and P the last 15-18-21 sts on round. Happy knitting!
09.06.2016 - 08:49
![]() Alexandra kirjoitti:
Alexandra kirjoitti:
I'm talking about the Drops long Sock pattern their is M,M2, M3 Diagram it's just a little harder to understand . Thanks, Alex
18.05.2016 - 16:05DROPS Design vastasi:
Dear Alexandra, then follow the legend to diagram, and start reading diagram from the bottom corner on the right side towards the left every round. 1 square = 1 st x 1 round. Read more here. Happy knitting!
18.05.2016 - 17:11
![]() Alexandra kirjoitti:
Alexandra kirjoitti:
Okay What about the empty space at the bottom of the diagrams? What is that about? I'm sorry I'm new and to doING and reading diagrams. Thank you, Alexandra
18.05.2016 - 04:38DROPS Design vastasi:
Dear Alexandra, an empty space can be added at the bottom of a diagram when there are less sts on some rows before you inc and get then more sts than on previous rows. Maybe you could ask your question on the pattern you are thinking about, it might help to make an accurate answer. Happy knitting!
18.05.2016 - 09:23
![]() Alexandra Dick kirjoitti:
Alexandra Dick kirjoitti:
I am wondering about the pattern for 103-10 are you to read the diagram from top to bottom or bottom to top? And is it read right to left or left to right? And what are the empty space at the bottom of diagram ment for? And are you to repeat pattern like the M1 it was p1,k4,p1,k4 do you continue doing that for a whole round? I tried finding a video to help but was unable to . Thank you
29.04.2016 - 05:27DROPS Design vastasi:
Dear Mrs Dick, diagrams are read from bottom up starting on the corner on the right side, every round from the right towards the left (see here) 1st round in M1 will be workd; (K4, P1,K4, P1) repeat from (to) over all sts on round. Happy knitting!
29.04.2016 - 09:09
![]() Birgitt kirjoitti:
Birgitt kirjoitti:
Hallo, danke für die schnelle Antwort. Genau so habe ich die Anleitung auch verstanden, hatte schon bedenken, ich hätte es nicht kapiert. Meinem Mann ist das aber -zu langweilig- (OTon). Da ich für ihn die Maschenzahl ohnehin ändern muss, bekommt er auf der Rückseite M3 gestrickt (bis FerseI und in den linken Maschen zw. beiden Mustern kann ich super die Abnahmen für die Wade vornehmen. Gruß Birgitt
14.03.2016 - 19:03
|
||||||||||||||||||||||
Hilde & Winter |
||||||||||||||||||||||
|
|
||||||||||||||||||||||
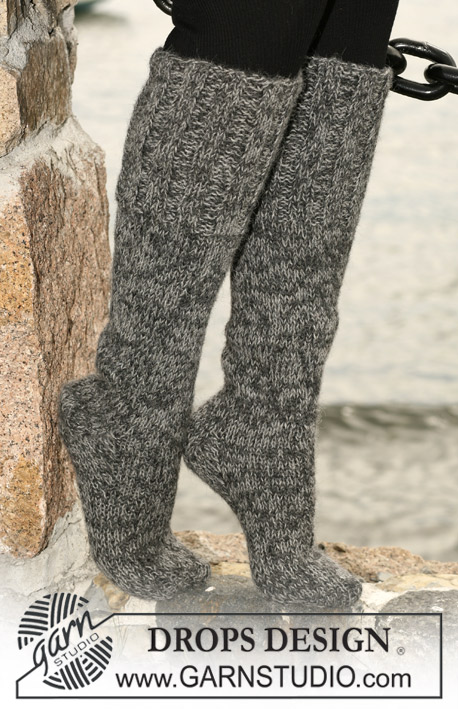
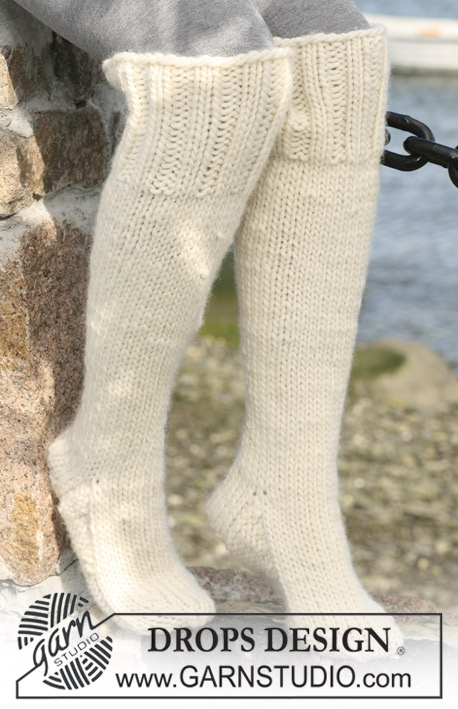
Pitkät DROPS sukat joissa palmikoita ja alaspäin taitetut reunat ”Karisma Superwash”-langasta.
DROPS 103-10 |
||||||||||||||||||||||
|
Joustinneule: * 2 o, 3 n *, toista *-*. Mallineule: Katso ruutupiirrokset M.1, M.2 ja M.3. Piirrokset näyttävät mallineuletta oikealta puolelta katsottuna. Kantapääkavennukset: 1. krs (= oikea puoli): Neulo kunnes jäljellä on 7-8-9 s, nosta 1 s oikein neulomatta, neulo 1 o, vedä nostettu s neulotun yli. 2. krs (= nurja puoli): Neulo kunnes jäljellä on 7-8-9 s, nosta 1 s oikein neulomatta, neulo 1 n, vedä nostettu s neulotun yli. 3. krs (= oikea puoli): Neulo kunnes jäljellä on 6-7-8 s, nosta 1 s oikein neulomatta, neulo 1 o, vedä nostettu s neulotun yli. 4. krs (= nurja puoli): Neulo kunnes jäljellä on 6-7-8 s, nosta 1 s oikein neulomatta, neulo 1 n, vedä nostettu s neulotun yli. 5. krs (= oikea puoli): Neulo kunnes jäljellä on 5-6-7 s, nosta 1 s oikein neulomatta, neulo 1 o, vedä nostettu s neulotun yli. 6. krs (= nurja puoli): Neulo kunnes jäljellä on 5-6-7 s, nosta 1 s oikein neulomatta, neulo 1 n, vedä nostettu s neulotun yli. Jatka kavennuksia samalla tavalla ja neulo aina kunnes jäljellä on 1 s vähemmän ennen kuin nostat s. Jatka kavennuksia kunnes puikolla on 8-10-12 s jäljellä. Sukat: Työ neulotaan suljettuna neuleena keskeltä takaa lähtien. Luo sukkapuikoille nro 3,5 Karisma-langalla 80-90-100 s ja neulo joustinta - kts. selitys yllä. Kun joustimen korkeus on 2 cm, jatka neulomalla M.1:n mukaan. Kun työn korkeus on 20 cm, käännä työ - ts. jatka neulomista nurjalta puolelta (nämä 20 cm taitetaan alas kun sukka on valmis). Neulo 1 krs oikein ja kavenna samalla tasavälein 14-18-22 s = 66-72-78 s. Neulo 1 krs nurin. Kiinnitä 1 merkkilanka työhön. Kaikki mitat otetaan nyt tästä. Seuraava krs neulotaan näin: 15-18-21 n, M.2 (= 36 s) ja 15-18-21 n. Kun työn korkeus on 5 cm, kavenna M.2:n molemmin puolin 1 s joka 2. cm yht. 11-12-13 kertaa (kavenna neulomalla 2 s nurin yhteen) = 44-48-52 s. Kun työn korkeus on 33-36-39 cm, siirrä keskimmäiset 24 s jalan päällä apulangalle. Neulo sitten jäljellä olevilla 20-24-28 s:lla takana (= kantapää) 5-5½-6 cm sileää neuletta. Tee sitten kantapääkavennukset - kts. Kantapääkavennukset yllä. Poimi tämän jälkeen kantalapun kummastakin reunasta 11-13-15 s. Jaa kaikki s:t sukkapuikoille = 54-60-66 s. Neulo nyt keskimmäisillä 24 s:lla jalan päällä M.3:n mukaan (muilla s:illa neulotaan sileää neuletta). Kavenna samalla joka 2. krs näin: neulo 2 viimeistä s ennen M.3:n mallineuletta oikein yhteen ja neulo ensimmäiset 2 s M.3:n mallineuleen jälkeen kiertäen oikein yhteen (ts. neulo s:t takareunoistaan yhteen, eikä etureunoista) yht. 6 kertaa = 42-48-54 s. Neulo kunnes jalan pituus kantalapun reunasta (ts. kohdasta jossa kantapääkavennukset alkavat) mitattuna on n. 18-20-22 cm. Jatka sitten neulomalla kaikilla s:illa sileää neuletta. Kiinnitä merkkilanka jalan kumpaankin sivuun, ts. 22-24-26 s jalan päällä ja 20-24-28 s jalan alla. Tee nyt kärkikavennukset kummankin merkkilangan molemmin puolin näin: neulo 2 viimeistä s ennen merkkilankaa oikein yhteen ja neulo 2 ensimmäistä s merkkilangan jälkeen kiertäen oikein yhteen. Toista kavennukset joka 2. krs yht. 3 kertaa = 30-36-42 s. Kavenna sitten vielä jokaisella krs:lla yht. 6-7-9 kertaa = 6-8-6 s. Vedä lanka jäljellä olevien s:iden läpi ja päättele huolellisesti. |
||||||||||||||||||||||
Ruutupiirroksen selitykset |
||||||||||||||||||||||
|
||||||||||||||||||||||
 |
||||||||||||||||||||||
Oletko tehnyt tämän mallin?Tägää tällöin kuviasi #dropspattern tai lähetä kuvat #dropsfan galleriaan. Tarvitsetko apua tämän ohjeen kanssa?Löydät 15 ohjevideota, kommentteja/kysymyksiä ja muuta osoitteessa www.garnstudio.com © 1982-2026 DROPS Design A/S. Pidätämme kaikki oikeudet. Tämä tiedosto ja kaikki sen alatiedostot on suojattu tekijänoikeuslailla. Lue lisää siitä, mitä voit tehdä ohjeillamme, verkkosivujemme jokaisen ohjeen alaosasta. |
||||||||||||||||||||||


DROPS Design on toiminut neule- ja virkkausalalla yli 40 vuotta ja meillä on yksi kaikkein laajin valikoima ilmaisia ohjeita verkossa - käännettynä 17 kielelle. Tänään meiltä löytyy 325 lehteä ja 12298 ohjetta - joista 11747 ohjetta on käännetty suomeksi.
Työskentelemme ahkerasti, jotta voisimme antaa teille kaikkein parhaimpia neule- ja virkkausohjeita, inspiraatiota ja neuvoja sekä korkealaatuisia lankoja todella edulliseen hintaan! Haluaisitko käyttää ohjeitamme muuhun kuin henkilökohtaiseen käyttöön? Voit lukea säännöistä ohjeiden Tekijänoikeus -tekstissä, joka löytyy kaikkien ohjeidemme alapuolelta. Hauskoja hetkiä käsitöiden parissa!
Lisää kommentti ohjeeseen DROPS 103-10
Haluamme mielellämme kuulla mielipiteesi tästä ohjeesta!
Mikäli haluat esittää kysymyksen, valitse oikea kategoria alla olevasta valikosta - tällä tavoin saat vastauksen nopeammin. Pakolliset kentät on merkitty tähdellä *.