
Suositut kategoriat
Etsitkö tiettyä lankaa?


Kommentit / Kysymykset (12)
![]() Clare kirjoitti:
Clare kirjoitti:
Hi, can you please let me know if this pattern can be updated to include larger sizes ? Like up to XXXL
21.01.2024 - 19:26
![]() Lynne Randall Caloggero kirjoitti:
Lynne Randall Caloggero kirjoitti:
I haven't begun to knit the project yet, but as I read through the instructions I'm wondering why it's necessary to shift M.1 half a pattern repeat to the right on every other row?
01.07.2020 - 15:30DROPS Design vastasi:
Dear Mrs Randall Caloggero, you will displace the diagrams so that the flowers are note the one over each other but one flower will come over 2 from previous diagram. Happy knitting!
01.07.2020 - 15:43
![]() Debra kirjoitti:
Debra kirjoitti:
Hi, I have another question about the directions. I am working on the sleeve and am almost finished. I have cast off 10 sts mid underarm, ready to work back and forth on the needles. It says to decrease 6 sts 3 times on every other row. Where do I place these decreases- at the beginning, middle, end of row or equally spaced out across the row? Please clarify for me. Thanks for all your help so far.
20.06.2020 - 01:38DROPS Design vastasi:
Dear Debra, after you have cast off 10 sts on mid under arm, you continue back and forth casting off (you don't decrease, pattern will be updated) 6 sts at the begining of every row on each side a total of 3 times (= 6 sts at the beg of next 6 rows). Happy knitting!
22.06.2020 - 07:37
![]() Debra kirjoitti:
Debra kirjoitti:
I am working on the sleeve and am questioning the instructions. Do I work M1 just once and then change to M2 as soon as it's completed or do I continue with M1 repeated several times until I have 122 sts and then switch to M2 once all 122 sts are made?
17.06.2020 - 19:41DROPS Design vastasi:
Dear Debra, diagram M.1 is worked only one time in height (but around all stitches in the round - make sure to center a diagram mid on top of sleeve), then you work M.2 (both in width and height) to the end of sleeve. Happy knitting!
18.06.2020 - 09:37
![]() Debra kirjoitti:
Debra kirjoitti:
Thanks for your answer but I am still unsure about the meaning of decreasing 2 sts 2 times and 1 st 2 times. Is that all in one row and consecutively cast off. Why doesn't it just say cast off 6 stitches? Maybe I'm not understanding and making it more complicated than it is. Please help clear this up for me.
05.06.2020 - 18:08DROPS Design vastasi:
Dear Debra, you don't cast off 6 sts 1 time to make the neck line somewhat rounded. You have to cast off the sts for neckline at the beg of row from neck towards armhole, then work row to the end, turn and work next row and repeat this 2 rows until all sts are cast off (you repeat these 2 rows 2 times casting off 2 sts at the beg of row then repeat 2 times castinf off 1 st at the beg of row). Happy knitting!
08.06.2020 - 07:35
![]() Debra kirjoitti:
Debra kirjoitti:
Can you give me more explicit details on how to shape the front neckline? I don't know what you mean by decrease 2 sts 2 times , 1 st 2 times. Are these all in the same row?How many stitches will I be decreasing in total? I assume I will be using the knit 2 together technique to do these decreases.
05.06.2020 - 02:08DROPS Design vastasi:
Dear Debra, you first cast off the middle 41 sts for neck and finish each shoulder separately, at the beginning of every row from neck towards armhole (from RS on one shoulder, from WS on the other shoulder), you will cast off (will looks nicer than decrease): 2 sts 2 times and 1 stitch 2 times = you have cast off a total of 6 sts towards neck. Happy knitting!
05.06.2020 - 07:41
![]() Debra kirjoitti:
Debra kirjoitti:
Ughhh, I have already knitted one complete diagram as before the edits. Do you know if I can continue on pearling as the original pattern and just turn the garment inside out when finished so the knit side shows? Or is there a way to retread the stitches on the needle ? Or do I have to rip it all out and begin again? Please tell me what you think.
25.05.2020 - 23:14DROPS Design vastasi:
Dear Debra, you could turn your work inside outside so that the knit side will be now towards outside (= from RS) and the purl side inside (from WS) - just do this at at the beg of the round - you might also continue working with purled sts outside and then just turn inside outside when dividing piece for armholes; Happy knitting!
26.05.2020 - 08:47
![]() Debra kirjoitti:
Debra kirjoitti:
Hi, Can you please give me some details as to how to shift the diagram half a pattern repeat to the right. Would I begin the rows on stitch 13 ? Thanks for your help.
24.05.2020 - 16:07DROPS Design vastasi:
Dear Debra, when working the 2nd M.1 in height, you can start the round with the 13rd stitch and then repeat M.1 and finish round with the 12th stitch. On 3rd repeat, start again as before and continue like this. Happy knitting!
25.05.2020 - 09:53
![]() Debra kirjoitti:
Debra kirjoitti:
This pattern diagram is starting with a pearl row and the rose is done in knit stitch. Will this mean the right side of the sweater has the pearl side facing out? in the sweater photo, it looks like the main body is stocking stitch with the knitted side showing and the rose in pearls. Can you please help? Did I do something wrong to have the right side out showing pearl stitch?
23.05.2020 - 19:36DROPS Design vastasi:
Dear Debra, diagram text has been reversed - it has been edited now, thanks for your feedback - a white square should be a K stitch and a small black square a P - Happy knitting!
25.05.2020 - 09:06
![]() Debra Briere kirjoitti:
Debra Briere kirjoitti:
I am confused with the instructions for the moss stitch pattern. It says to repeat second row but I am thinking it should say repeat these 2 rows of K1P1 over P1K1. Can you please clarify this for me?
22.05.2020 - 05:35DROPS Design vastasi:
Hi Debra, Row 2 says to knit over purl and purl over knit, which is then repeated in the following rows - so all rows consist of knit over the previous row's purl and purl over the previous row's knit. I hope this helps and happy knitting!
22.05.2020 - 07:49
|
||||||||||
DROPS 29-22 |
||||||||||
|
|
||||||||||
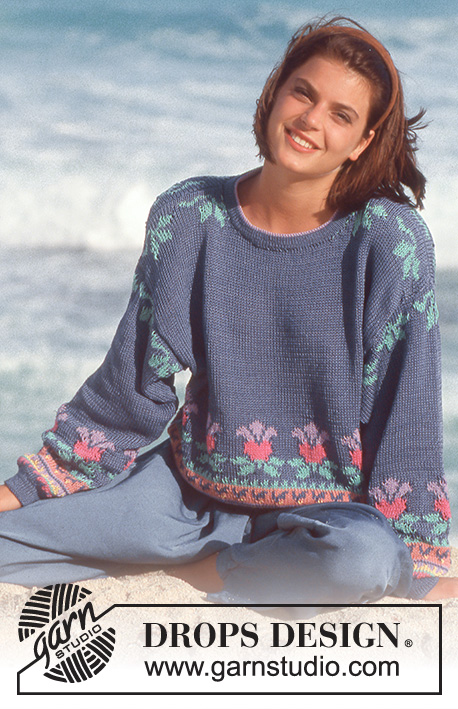
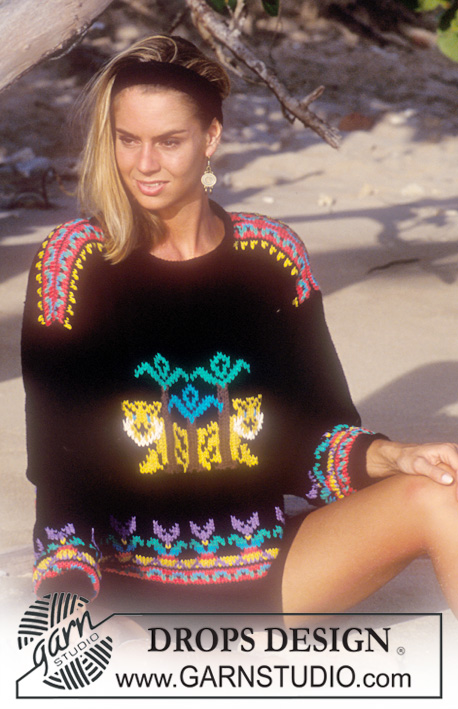
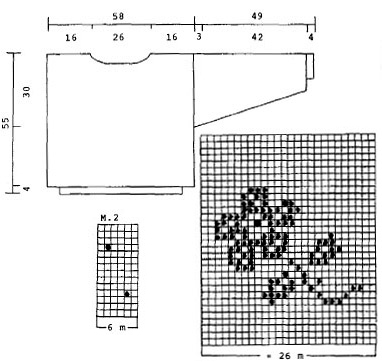
Kohoneulepusero DROPS Muskat Soft -langasta
DROPS 29-22 |
||||||||||
|
PITKÄ MALLI: Lisää langanmenekkiin 100 grammaa lankaa. Lisää etu- ja takakappaleen kaikkiin mittoihin 14 cm (= 69 cm). HELMINEULE: 1. krs: *1 o, 1 n*, toista *-*. 2. krs: Neulo nurjat s:t oikein ja oikeat s:t nurin. Toista 2. krs:ta. ETU- JA TAKAKAPPALE: Mikäli haluat neuloa pidemmän mallin, kts. selitys yllä. Luo 188 s pyöröpuikolle nro 2,5 korallin värisellä langalla ja neulo 4 cm helmineuletta. Vaihda pyöröpuikkoon nro 4 ja lisää SAMALLA 1. krs:lla tasavälein 46 s = 234 s. Neulo mallineuletta piirroksen M.1 mukaisesti, mutta siirrä joka toisella rivillä piirroksen M.1 mallikertaa puolen mallikerran verran kohti reunaa, jotta kukkakuviot tulevat limittäin. Tarkista neuletiheys! Kun työn pituus on 25 cm, jaa työ kädenteitä varten ja neulo etu- ja takakappale erikseen (tarkista, että mallineuleen nypyt neulotaan jatkossakin oikealta puolelta). ETUKAPPALE: = 117 s. Kun työn pituus on 50 cm, päätä keskimmäiset 41 s pääntietä varten ja neulo molemmat puolet erikseen. Päätä vielä pääntien reunasta joka 2. krs: 2 x 2 s ja 2 x 1 s. Päätä loput s:t kerralla, kun työn pituus on 55 cm. Neulo pääntien toinen puoli vastaavasti. TAKAKAPPALE: = 117 s. Kun työn pituus on 53 cm, päätä keskimmäiset 49 s pääntietä varten ja neulo molemmat puolet erikseen. Päätä seuraavalla krs:lla vielä 2 s pääntien reunasta. Päätä loput s:t kerralla, kun työn pituus on 55 cm. Neulo pääntien toinen puoli vastaavasti. HIHA: Luo 46 s sukkapuikoille nro 2,5 korallin värisellä langalla ja neulo 4 cm helmineuletta. Vaihda pyöröpuikkoon nro 4 ja lisää SAMALLA 1. krs:lla tasavälein 14 s = 60 s. Neulo mallineuletta piirroksen M.1 mukaisesti (tarkista, että keskelle hihan päälle tulee 1 mallikerta). Lisää SAMALLA keskellä hihan alla olevan s:n molemmin puolin joka 3. krs: 31 x 1 s = 122 s. Lisätyillä silmukoilla neulotaan myös mallineuletta. Kun olet neulonut piirroksen M.1 loppuun, jatka neulomalla mallineuletta piirroksen M.2 mukaisesti. Kun työn pituus on 46 cm, päätä keskeltä hihan alta 10 s ja jatka neulomista tasona. Päätä nyt kummastakin reunasta hihanpyöriötä varten joka 2. krs: 3 x 6 s. Päätä loput s:t kerralla, kun työn pituus on 49 cm. Neulo toinen hiha samoin. VIIMEISTELY: Ompele olkasaumat. Poimi pääntien reunasta 102 s sukkapuikoille nro 2,5 korallin värisellä langalla ja neulo 4 krs helmineuletta. Päätä s:t. Virkkaa reunus pääntien reunaan koukulla nro 3 seuraavasti: 1 ks, *3 kjs, 1 p ensimmäiseen näistä 3 kjs, jätä 2 s väliin ja virkkaa 1 ks*, toista *-*. Kiinnitä hihat paikoilleen uloimmista silmukanreunoista, jottei saumasta tulisi paksu. |
||||||||||
Ruutupiirroksen selitykset |
||||||||||
|
||||||||||
 |
||||||||||
Oletko tehnyt tämän mallin?Tägää tällöin kuviasi #dropspattern tai lähetä kuvat #dropsfan galleriaan. Tarvitsetko apua tämän ohjeen kanssa?Löydät 26 ohjevideota, kommentteja/kysymyksiä ja muuta osoitteessa www.garnstudio.com © 1982-2026 DROPS Design A/S. Pidätämme kaikki oikeudet. Tämä tiedosto ja kaikki sen alatiedostot on suojattu tekijänoikeuslailla. Lue lisää siitä, mitä voit tehdä ohjeillamme, verkkosivujemme jokaisen ohjeen alaosasta. |
||||||||||


DROPS Design on toiminut neule- ja virkkausalalla yli 40 vuotta ja meillä on yksi kaikkein laajin valikoima ilmaisia ohjeita verkossa - käännettynä 17 kielelle. Tänään meiltä löytyy 324 lehteä ja 12290 ohjetta - joista 11712 ohjetta on käännetty suomeksi.
Työskentelemme ahkerasti, jotta voisimme antaa teille kaikkein parhaimpia neule- ja virkkausohjeita, inspiraatiota ja neuvoja sekä korkealaatuisia lankoja todella edulliseen hintaan! Haluaisitko käyttää ohjeitamme muuhun kuin henkilökohtaiseen käyttöön? Voit lukea säännöistä ohjeiden Tekijänoikeus -tekstissä, joka löytyy kaikkien ohjeidemme alapuolelta. Hauskoja hetkiä käsitöiden parissa!
Lisää kommentti ohjeeseen DROPS 29-22
Haluamme mielellämme kuulla mielipiteesi tästä ohjeesta!
Mikäli haluat esittää kysymyksen, valitse oikea kategoria alla olevasta valikosta - tällä tavoin saat vastauksen nopeammin. Pakolliset kentät on merkitty tähdellä *.