
Suositut kategoriat
Etsitkö tiettyä lankaa?




























Kommentit / Kysymykset (18)
 Kim kirjoitti:
This pattern needs updated clear instructions! Please!
22.09.2026 - 00:26
Kim Butchko kirjoitti:
My question is the numbers. If you add 12 on each side to the hundred that makes 124 then if you add 34 on the right side where you are working the 62 stitches that gives you 158 not 186 so I’m a little confused on this.
21.09.2026 - 21:33DROPS Design vastasi:
Hi Kim, There is a sentence missing from the US instructions (after increasing stitches each side): "Now divide the piece mid-back, i.e., turn and work across one half of the row as far as the face opening. Cast on 28 stitches (= under chin), continue across the other half of the stitches (other side of the opening) to mid-back = 152 stitches (the seam will then be worked mid-back). The piece is now measured from here". You now continue as described in your text. Regards, Drops Team.
22.09.2026 - 07:04
Kim Butchko kirjoitti:
I finished the increase of 12 on each side and not sure what to do next. I love the look of this hood but the instructions are not very clear. Help lol
20.09.2026 - 00:34DROPS Design vastasi:
Hi Kim, After finishing the increases (12 stitches each side), you then work each side of the row separately. So on the next row after the last increase, work to the middle of the row and turn (either keeping the other stitches on the needle un-worked or placing them on a stitch holder). Then continue back and forth across the first half as described in the text. Regards, Drops Team.
20.09.2026 - 07:28
 Sharron kirjoitti:
I am totally cannot make out how to continue after completing the 22cm. Does on increase 1 st at each end on alternate rows, then increase 2 st at each of alternate row 5 times. a total of 14 rows knitted ? Also which part is centre back?
28.06.2026 - 21:10DROPS Design vastasi:
Dear Sharron, you increase 1 stitch at the beginning and end of 1 row, work back without increases, increase 1 stitch at the beginning and end of the previous row. Work back without increases and now increase 2 stitches at the beginning and end of the previous row. Repeat this last section 4 more times (you should have increased 12 stitches in total on each side). Now you find the center of the back section of the hood, which should match with the center of the whole hood, approx. the 62nd stitch after the increases. Now you start on this stitch, work the row towards the opening at the front, cast on stitches over the front opening, work over the other side of the front opening towards the back, until you reach the new beginning of the row, the mid-back stitch. Happy knitting!
29.06.2026 - 01:38
 Dale kirjoitti:
I'm stuck at this part:Now divide the work at the center back and knit all sts back and forth like so: work across sts on side of head towards the opening for face, cast on 28 stitches (= under chin), continue working across stitches on the other side of opening for face until you get to mid-back = 152 sts (you do this so that you will sew together at the center back). I don't understand this. Do I knit 122 stitches and then cast on 28 stitches and do I join in the round?
16.01.2026 - 20:04DROPS Design vastasi:
Dear Dale, when you have cast off the 28 sts for mid under face, you will have 152 sts on needle. Now you will continue back and forth but from mid back (so that the seam will not be visible on front of piece), so slip the stitches from left needle onto right needle until the mid back of piece, then join yarn and work back and forth from here. Happy knitting!
19.01.2026 - 08:02
Collin Ng kirjoitti:
I want to ask a question about the hook. When I finished to increase to 212 stitches, how long I need to knit before the next right side row to increase 26 stitches?
02.02.2025 - 22:11DROPS Design vastasi:
Dear Mrs Collin, just work 1 row from RS increasing evenly 26 stitches on the next row from RS (just as you did before to increase from 152 to 212). Find how to increase evenly here. Happy knitting!
03.02.2025 - 14:07
 Isabelle Crespy kirjoitti:
Bonjour, Est il possible de connaître les dimensions de l'ouvrage fini, il n'y a pas de schéma. Merci
27.02.2024 - 21:14DROPS Design vastasi:
Bonjour Mme Crespy, il n'y a pas de schéma pour ce modèle, toutefois, si votre échantillon est conforme et que vous conservez bien la bonne tension, vous aurez un résultat similaire à celui de la photo Bon tricot!
28.02.2024 - 09:21
Jadwiga Zerda kirjoitti:
By following instructions I cannot visualize how the balaclava is being made. Could you draw a picture.
22.02.2024 - 18:39DROPS Design vastasi:
Dear Mrs Zerda, balaclava is worked top down first in rows, the cast on edge will be later folded double and sewn, that's on top of head; after you have worked the height for face opening, you cast on new stitches under chin to close face opening and then continue in the round from mid back (- from the middle of previous rows). Hope it can help. Happy knitting!
23.02.2024 - 08:11
 Celine kirjoitti:
Hei. Nå har jeg strikket sånn at jeg har 124 masker. Skjønner ikke helt oppskriften. Skal jeg strikke tilbake 62 masker (i midten), også legge opp 28 masker? For å så strikke videre igjen?
25.10.2023 - 23:35DROPS Design vastasi:
Hej Celine, ja du vender efter de 62 masker i midten (det bliver bagpå), strikker 62 masker, legger op 28 masker (foran) og strikker 62 masker i den anden side. Vend og strik frem og tilbage :)
26.10.2023 - 14:16
Agnes Mesnier kirjoitti:
Puis-je avoir des explications plu détaillées après : 124 m. Diviser maintenant l'ouvrage au milieu dos et tricoter...je necomprends pas ce que je dois faire..... les 12 mailles augmentées de chaque côté se retrouvent elles devant ou au dos de la cagoule ? Merci de votre réponse rapide. Cordialement
28.02.2022 - 12:29DROPS Design vastasi:
Bonjour Mme Mesnier, auparavant, le début des rangs se trouvait côté ouverture du visage; maintenant le début des rangs doit être au milieu dos: glissez la moitié des mailles sur l'aiguille droite pour commencer au milieu du rang, tricotez la 1ère moitié des mailles, montez 28 mailles (dessous du visage), et tricotez la 2ème moitié des mailles, tournez et continuez ainsi en allers et retours à partir du milieu dos. Bon tricot!
28.02.2022 - 13:37
|
|
Snow Bound |
|
|
|
|
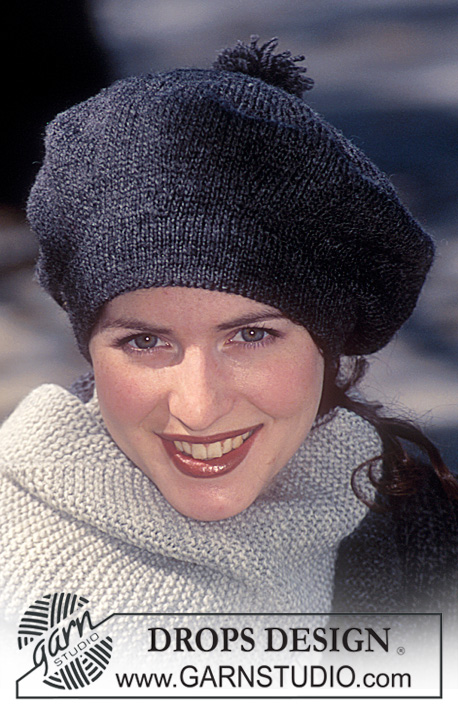
DROPS myssy ja käsineet Karisma-langasta.
DROPS 58-22 |
|
|
MYSSY: NEULETIHEYS: 23 s x 48 krs ainaoikeaa puikoilla nro 3 = 10 x 10 cm. AINAOIKEINNEULE: Neulo kaikki kerrokset oikein. MYSSY: Neulotaan tasona pyöröpuikolla. Aloita päälaelta. Luo 100 s pyöröpuikolle nro 3 ja neulo tasona ainaoikeaa keskeltä edestä alkaen. Kun työn korkeus on 22 cm, lisää kumpaankin etureunaan joka 2. krs: 2 x 1 s ja 5 x 2 s = 124 s. Luo sitten keskelle eteen 28 s = 152 s. Jaa sitten työ keskeltä takaa ja jatka neulomista tasona, keskeltä takaa alkaen (tällä tavoin sauma tulee keskelle taakse!). KAIKKI MITAT OTETAAN JATKOSSA TÄSTÄ! Neulo 10 cm ainaoikeaa. Lisää seuraavalla oikean puolen krs:lla tasavälein 34 s = 186 s. Neulo 7 cm. Lisää seuraavalla oikean puolen krs:lla tasavälein 26 s = 212 s. Neulo 7 cm. Lisää seuraavalla oikean puolen krs:lla tasavälein 26 s = 238 s. Neulo 7 cm. Päätä s:t 2-kertaisella langalla. VIIMEISTELY: Poimi kasvoaukon reunoista n. 150 s lyhyelle pyöröpuikolle nro 2,5. Neulo 1 krs nurin, 1 krs sileää neuletta, 1 krs nurin, 1 krs sileää neuletta, 6 cm 1 o/1 n -joustinneuletta. Päätä s:t löyhästi joustinneuletta neuloen. Taita ja kiinnitä reunus kaksinkerroin työn nurjalle puolelle. Ompele sauma keskeltä takaa. Tee tiheä tupsu, jonka halkaisija on n. 8-10 cm. Kiinnitä tupsu keskellä takana olevaan kärkeen. KÄSINEET: NEULETIHEYS: 22 s x 30 krs sileää neuletta puikoilla nro 3,5 = 10 x 10 cm. JOUSTINNEULE: *2 o, 2 n*, toista *-*. AINAOIKEINNEULE: Neulo vuorotellen 1 krs oikein ja 1 krs nurin. KÄSINEET: Luo 52 (56) s sukkapuikoille nro 3 luonnonvalkoisella langalla ja neulo 4 krs ainaoikeaa. Neulo sitten 15 cm joustinneuletta ja lisää SAMALLA viimeisellä krs:lla tasavälein 8 (8) s = 44 (48) s. Vaihda sukkapuikkoihin nro 3,5. Jatka neulomalla sileää neuletta ja kiinnitä 1 merkkilanka krs:n 23. (25.) s:aan = käden päällä. Tee peukalokiilan lisäykset tämän s:n molemmin puolin, loput 21 (23) s = kämmenpuoli. Kaikki mitat otetaan jatkossa tästä! Kun työn pituus on 1 cm, lisää merkityn s:n molemmin puolin joka 4. (3.) krs: 5 (6) x 1 s = 54 (60) s. Kun kaikki peukalokiilan lisäykset on tehty, siirrä peukalokiilan keskimmäiset 11 s apulangalle. Luo apulangan silmukoiden tilalle 1 s = 44 (50) s. Neulo kunnes työn pituus on 10 (11) cm. Tee sitten sormet seuraavasti: PIKKUSORMI: Poimi käden päältä 4 (6) s ja poimi kämmenpuolelta 4 (5) s, luo sitten pikkusormen ja nimettömän väliin 3 s = 11 (14) s. Neulo 5 (6) cm. Neulo sitten kaikki s:t pareittain yhteen. Vedä lanka 2 kertaa loppujen silmukoiden läpi. Neulo 3 krs käsineen lopuilla silmukoilla. Tee sitten muut sormet seuraavasti: NIMETÖN. Poimi käden päältä 6 (6) s ja poimi kämmenpuolelta 6 (7) s, luo nimettömän ja pikkusormen väliin 1 s ja luo nimettömän ja keskisormen väliin 1 s = 14 (15) s. Neulo 6 (7) cm. Neulo sitten kaikki s:t pareittain yhteen. Vedä lanka 2 kertaa loppujen silmukoiden läpi. KESKISORMI: Neulo kuten nimetön, mutta neulo nyt 7 (8) cm ennen kuin neulot s:t yhteen. ETUSORMI: Poimi käden päältä 6 (6) s ja poimi kämmenpuolelta 6 (7) s, luo etusormen ja keskisormen väliin 1 s = 13 (14) s. Neulo kuten nimetön. PEUKALO: Ota apulangalla odottavat 11 s + 3 (5) s kädeltä työhön. Neulo 6 (6,5) cm. Tee kavennukset kuten aiemmin. Ompele muutama pisto sormien väliin. Neulo toinen käsine samoin, mutta tee nyt peukalo työn vastakkaiseen sivuun. |
|
Oletko tehnyt tämän mallin?Tägää tällöin kuviasi #dropspattern tai lähetä kuvat #dropsfan galleriaan. Tarvitsetko apua tämän ohjeen kanssa?Löydät 15 ohjevideota, kommentteja/kysymyksiä ja muuta osoitteessa www.garnstudio.com © 1982-2026 DROPS Design A/S. Pidätämme kaikki oikeudet. Tämä tiedosto ja kaikki sen alatiedostot on suojattu tekijänoikeuslailla. Lue lisää siitä, mitä voit tehdä ohjeillamme, verkkosivujemme jokaisen ohjeen alaosasta. |






DROPS Design on toiminut neule- ja virkkausalalla yli 40 vuotta ja meillä on yksi kaikkein laajin valikoima ilmaisia ohjeita verkossa - käännettynä 17 kielelle. Tänään meiltä löytyy 333 lehteä ja 12525 ohjetta - joista 12020 ohjetta on käännetty suomeksi.
Työskentelemme ahkerasti, jotta voisimme antaa teille kaikkein parhaimpia neule- ja virkkausohjeita, inspiraatiota ja neuvoja sekä korkealaatuisia lankoja todella edulliseen hintaan! Haluaisitko käyttää ohjeitamme muuhun kuin henkilökohtaiseen käyttöön? Voit lukea säännöistä ohjeiden Tekijänoikeus -tekstissä, joka löytyy kaikkien ohjeidemme alapuolelta. Hauskoja hetkiä käsitöiden parissa!
Lisää kommentti ohjeeseen DROPS 58-22
Haluamme mielellämme kuulla mielipiteesi tästä ohjeesta!
Mikäli haluat esittää kysymyksen, valitse oikea kategoria alla olevasta valikosta - tällä tavoin saat vastauksen nopeammin. Pakolliset kentät on merkitty tähdellä *.