
Suositut kategoriat
Etsitkö tiettyä lankaa?


Kommentit / Kysymykset (9)
![]() Greet kirjoitti:
Greet kirjoitti:
Ik zou niet in het rond breien. Dus alles met 2 naalden. Hoe brei ik dan de even naalden?
11.03.2026 - 09:49DROPS Design vastasi:
Dag Greet,
Naald 1 en alle andere oneven naalden in het telpatroon brei je aan de goede kant, alle even naalden in het telpatroon brei je aan de verkeerde kant. De steken die je recht aan de goede kant breit brei je averecht aan de verkeerde kant en de steken die je averecht aan de goede kant breit brei je recht aan de verkeerde kant. Je breit de omslag en afgehaalde steek averecht samen (in plaats van recht).
11.03.2026 - 19:38
![]() Anuka kirjoitti:
Anuka kirjoitti:
Hi, thanks so much for answering my question! I am doing exactly as suggested [from WS then work (P1, K2, Purl together YO + slipped stitch (so that they look as K tog as before), K2, P5, K2, Purl together YO + slipped stitch, K2, P1] but still where I P5 it looks flatter - when knitting in the round and instead doing K5 the stitches look more horizontal, now they are more like V's. Maybe I need to somehow twist them?
19.05.2022 - 16:54DROPS Design vastasi:
Dear Anuka, it might be a matter of difference in the tension, when working in the round or flat - show your work to your store (send them a picture per mail for ex.) or show it in a forum such as our DROPS Workshop, it might be easier for other knitters to help you seing your work. Hope it can help. Happy knitting!
20.05.2022 - 07:57
![]() Anuka kirjoitti:
Anuka kirjoitti:
Hi, I'm making this at the moment and have reached the point where I switch from in the round to flat. So from the right side I'm following the chart (odd number rows) and on the wrong side I am purling instead of knitting, and so forth. However, my middle section is looking a little flatter than when I did it in the round. [Slip 1 st as if to knit, K1, psso, yo, knit1, yo, K2 tog] - this looks wrong. What should I do differently? I'm purling this on the WS.
19.05.2022 - 15:21DROPS Design vastasi:
Dear Anuka, make sure that the odd rows will be worked from RS - from WS then work (P1, K2, Purl together YO + slipped stitch (so that they look as K tog as before), K2, P5, K2, Purl together YO + slipped stitch, K2, P1). Happy knitting!
19.05.2022 - 16:38
![]() Lies kirjoitti:
Lies kirjoitti:
Hallo......vraagje...als ik rondbrei snap ik dat je het patroon moet volgen.....als je bij het gedeelte komt dat je het voor en achterkant apart verder moet breien dan brei je dus niet in de rondte maar heen en weer.....hoe brei je dan de teruggaande naalden....want daar is dan geen teltekening voor.....gr lies
30.06.2020 - 13:00DROPS Design vastasi:
Dag Lies,
Bij de teruggaande naalden brei je dan averecht waar je recht op de goede kant breit, en recht waar je averecht op de goede kant breit. Zorg ervoor dat je steeds de even naalden van het patroon aan de verkeerde kant breit.
30.06.2020 - 15:56
![]() Anne Loveday kirjoitti:
Anne Loveday kirjoitti:
Can you explain the decrease for armhole on front/back? is this worked in the round? only 8 stitches are involved and these seem to end up all being on one armhole (right or left). Thank you
07.08.2017 - 19:14DROPS Design vastasi:
Dear Mrs Loveday, you are casting off for armhole at the beginning of each row in each side 2 sts 1-2 times and 1 st 1 time, so that you will cast off 3-5 sts on each side = 6-10 sts in total. Happy knitting!
08.08.2017 - 08:42
![]() Carmella kirjoitti:
Carmella kirjoitti:
Bedankt voor de snelle reactie. Super!
13.01.2017 - 11:31
![]() Carmella kirjoitti:
Carmella kirjoitti:
Is het mogelijk om de telpatroon en het patroon toe te voegen ze staan er niet op.
11.01.2017 - 19:00DROPS Design vastasi:
Hoi Carmella. Probeer opnieuw nu, het telpatroon is aangepast.
12.01.2017 - 14:49
![]() T.Melchior kirjoitti:
T.Melchior kirjoitti:
De teltekening wordt bij dit patroon niet aangegeven. Staat alleen een klein vierkantje
30.01.2015 - 17:32
![]() Heidrun Bitsch kirjoitti:
Heidrun Bitsch kirjoitti:
Wie werden die abnahmen bei Modell 46 -19 gegen das armloch die 4 Maschen beidseitig abgenommen?bitte dringend um Antwort lg
01.10.2014 - 14:40DROPS Design vastasi:
Liebe Heidrun, die Anleitung ist etwas älteren Datums und wird gleich noch mal sprachlich überarbeitet, dann wird es hoffentlich klar, wie es gemeint ist. Sie können dann natürlich gerne noch mal fragen, falls noch etwas unklar geblieben ist.
01.10.2014 - 17:04
|
||||||||||||||||||||||
Pink Profusion |
||||||||||||||||||||||
|
|
||||||||||||||||||||||
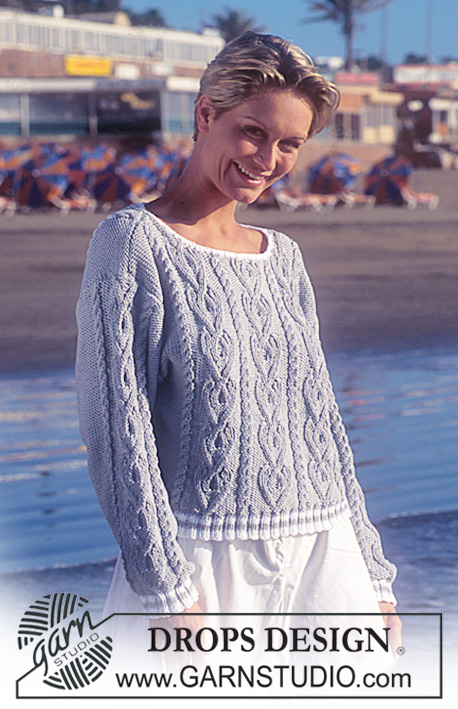
DROPS kohoneulepusero ”Muskat”-langasta
DROPS 46-19 |
||||||||||||||||||||||
|
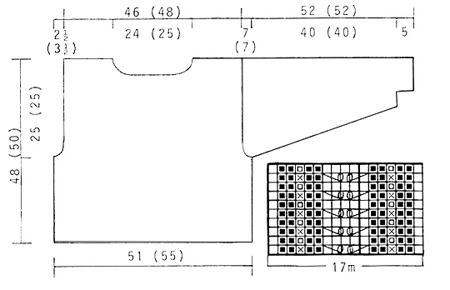
MALLINEULE: Katso ruutupiirros (1 piirros = 1 mallikerta). Piirros näyttää mallineuletta oikealta puolelta katsottuna. AINAOIKEINNEULE suljettuna neuleena: Neulo vuorotellen 1 krs oikein ja 1 krs nurin. ETU- JA TAKAKAPPALE: Luo 204 (221) s pyöröpuikolle nro 4 roosalla langalla ja neulo mallineuletta. Tarkista neuletiheys. Kun työn pituus on 23 (25) cm, päätä kummankin sivun keskimmäiset 4 s kädenteitä varten = 98 (106) s etukappaleessa ja 98 (107) s takakappaleessa (tarkista, että keskelle eteen tulee 2 oikeaa s). Neulo etu- ja takakappale erikseen. ETUKAPPALE: = 98 (106) s. Päätä nyt kummastakin reunasta kädenteitä varten joka 2. krs: 1 (2) x 2 s ja 1 x 1 s = 92 (96) s. Kun työn pituus on 42 (44) cm, päätä keskimmäiset 26 (28) s pääntietä varten ja neulo molemmat puolet erikseen. Päätä vielä pääntien reunasta joka 2. krs: 1 x 4 s, 1 x 3 s, 1 x 2 s ja 2 x 1 s. Päätä loput s:t kerralla, kun työn pituus on 48 (50) cm. Neulo pääntien toinen puoli vastaavasti. TAKAKAPPALE: = 98 (107) s. Päätä nyt kummastakin reunasta kädenteitä varten kuten edessä = 92 (97) s. Kun työn pituus on 46 (48) cm, päätä keskimmäiset 44 (47) s pääntietä varten ja neulo molemmat puolet erikseen. Päätä seuraavalla krs:lla vielä 2 s pääntien reunasta. Päätä loput s:t kerralla, kun työn pituus on 48 (50) cm. Neulo pääntien toinen puoli vastaavasti. HIHA: Luo 43 (43) s sukkapuikoille nro 4 roosalla langalla ja neulo mallineuletta (tarkista, että keskelle hihan päälle tulee 1 kokonainen mallikerta). Kun työn pituus on 5 (5-5) cm, lisää keskelle hihan alle 2 s. Toista tällaiset lisäykset joka 3. krs yht. 29 (29) kertaa = 101 (101) s. Kun työn pituus on 45 (45) cm, päätä keskeltä hihan alta 4 s ja jatka neulomista tasona. Päätä vielä kummastakin reunasta hihanpyöriötä varten joka 2. krs: 8 x 4 s. Päätä loput s:t kerralla. Työn pituus on n. 52 (52) cm. VIIMEISTELY: Ompele olkasaumat. Poimi pääntien reunasta n. 100-106 s sukkapuikoille nro 3 roosalla langalla ja neulo 2 krs ainaoikeaa. Päätä s:t. Kiinnitä hihat paikoilleen. |
||||||||||||||||||||||
Ruutupiirroksen selitykset |
||||||||||||||||||||||
|
||||||||||||||||||||||
 |
||||||||||||||||||||||
Oletko tehnyt tämän mallin?Tägää tällöin kuviasi #dropspattern tai lähetä kuvat #dropsfan galleriaan. Tarvitsetko apua tämän ohjeen kanssa?Löydät 20 ohjevideota, kommentteja/kysymyksiä ja muuta osoitteessa www.garnstudio.com © 1982-2026 DROPS Design A/S. Pidätämme kaikki oikeudet. Tämä tiedosto ja kaikki sen alatiedostot on suojattu tekijänoikeuslailla. Lue lisää siitä, mitä voit tehdä ohjeillamme, verkkosivujemme jokaisen ohjeen alaosasta. |
||||||||||||||||||||||


DROPS Design on toiminut neule- ja virkkausalalla yli 40 vuotta ja meillä on yksi kaikkein laajin valikoima ilmaisia ohjeita verkossa - käännettynä 17 kielelle. Tänään meiltä löytyy 324 lehteä ja 12290 ohjetta - joista 11709 ohjetta on käännetty suomeksi.
Työskentelemme ahkerasti, jotta voisimme antaa teille kaikkein parhaimpia neule- ja virkkausohjeita, inspiraatiota ja neuvoja sekä korkealaatuisia lankoja todella edulliseen hintaan! Haluaisitko käyttää ohjeitamme muuhun kuin henkilökohtaiseen käyttöön? Voit lukea säännöistä ohjeiden Tekijänoikeus -tekstissä, joka löytyy kaikkien ohjeidemme alapuolelta. Hauskoja hetkiä käsitöiden parissa!
Lisää kommentti ohjeeseen DROPS 46-19
Haluamme mielellämme kuulla mielipiteesi tästä ohjeesta!
Mikäli haluat esittää kysymyksen, valitse oikea kategoria alla olevasta valikosta - tällä tavoin saat vastauksen nopeammin. Pakolliset kentät on merkitty tähdellä *.