DROPS Karisma
DROPS Karisma
100% Wool
from 3.00 $ /50g
Get the yarn to make this pattern from 12.00$.

The yarn cost is calculated from the pattern’s smallest size and the yarn’s cheapest product type. Looking for an even better price? You might find it on the DROPS Deals!

DROPS SS24

Little Darcy

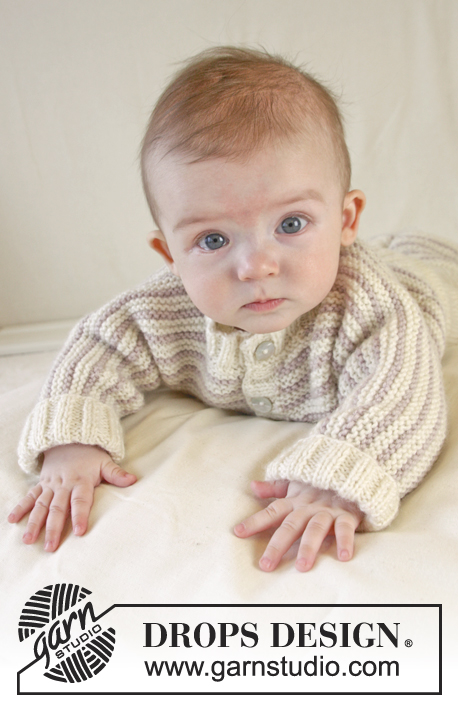
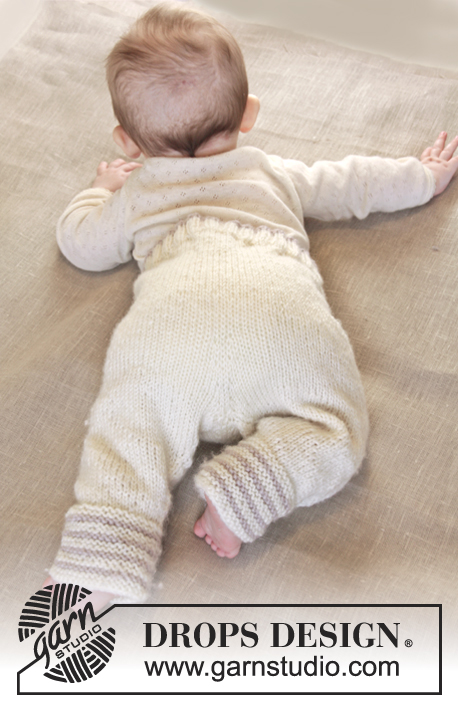
Knitted baby jacket in garter st with stripes and rib edges in DROPS Karisma. Size 0 – 4 years

DROPS Baby 25-18
DROPS design: Pattern no u-063-by
Yarn group B
-----------------------------------------------------------
Size: 0/1 - 1/3 - 6/9 - 12/18 months (2 - 3/4) years
Finished measurements:
Bust: 44-48-52-56 (60-64) cm / 17 1/4"-19"-20½"-22" (23½"-25 1/4")
Full length: 24-28-30-33 (36-40) cm / 9½"-11"-11 3/4"-13" (14 1/4"-15 3/4")
All measurements in chart in cm. Conversion to inch - see page 4.

Materials:
DROPS KARISMA from Garnstudio
150-150-200-200 (200-250) g color no 01, off white
50-100-100-100 (100-100) g color no 71, light beige

DROPS CIRCULAR NEEDLE (60 or 80 cm / 24'' or 32'') SIZE 4 mm/ US 6 - or size needed to get 21 sts x 42 rows in garter st = 4'' x 4'' (10 x 10 cm).
DROPS DOUBLE POINTED NEEDLES and CIRCULAR NEEDLE (60 cm / 24'') SIZE 3 mm / US 2.5 - for rib.

DROPS MOTHER-OF-PEARL BUTTON NO 521: 5-5-5-6 (6-6) pieces

-------------------------------------------------------

Alternative Yarn – See how to change yarns here
Yarn Groups A to F – Use the same pattern and change the yarn here
Yarn usage using an alternative yarn – Use our yarn converter here

-------------------------------------------------------

DROPS Karisma
DROPS Karisma
100% Wool
from 3.00 $ /50g
Get the yarn to make this pattern from 12.00$.

The yarn cost is calculated from the pattern’s smallest size and the yarn’s cheapest product type. Looking for an even better price? You might find it on the DROPS Deals!

Pattern instructions

NOTE: This pattern is written in American English. All measurements in charts are in cm. For conversion from inches to cm - click here. There are different terms for crocheting in American and British English. If this pattern includes crochet, click for "crochet terms" here. For this pattern in British English, please click here.
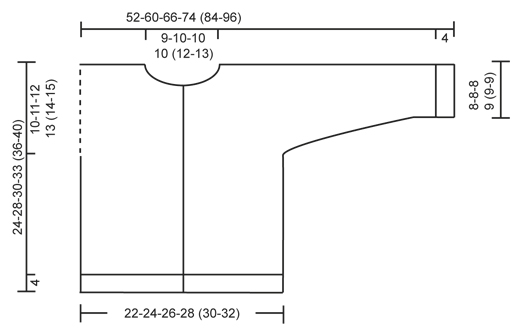
GARTER ST (back and forth on circular needle):
K all rows. 1 ridge = K2 rows.

STRIPES:
* 1 ridge off white, 1 ridge light beige, 1 ridge off white *, repeat from *-* (i.e. when repeating there will be 2 ridges in off white between every ridge with light beige).
----------------------------------------------------------

JACKET:
Worked back and forth on circular needle. Beg on front piece, cast on new sts for sleeve and work up to the shoulder. Put piece aside and work the other front piece. Then place both front pieces tog and work down the back piece.

RIGHT FRONT PIECE:
Cast on 34-38-38-42 (42-46) sts (includes 1 edge st in each side) on circular needle size 3 mm / US 2.5 with off white.
P 1 row from WS. Then work next row as follows from RS: 1 edge st in GARTER ST - see explanation above - * K 2, P 2 *, repeat from *-* until 1 st remains and finish with 1 edge st in GARTER ST. Continue rib like this.
When piece measures 4 cm / 1½'', K 1 row from RS while AT THE SAME TIME dec 9-11-9-11 (9-10) sts evenly = 25-27-29-31 (33-36) sts. Switch to circular needle size 4 mm / US 6 and K 1 row from WS.
Then work in GARTER ST – see explanation above while AT THE SAME TIME working STRIPES – see explanation above. REMEMBER THE GAUGE!
When piece measures 14-17-18-20 (22-25) cm / 5½"-6 3/4"-7"-8" (8 3/4"-9 3/4"), cast on new sts for sleeve at the end of every row from RS as follows: Cast on 5 sts 3-5-0-0 (4-5) times in total, 4 sts 0-0-7-8 (5-7) times in total and then 7-4-5-7 (8-4) sts 1 time = 47-56-62-70 (81-93) sts.
After last inc continue in garter st and stripes until piece measures 20-24-26-28 (31-35) cm / 8"-9½"-10 1/4"-11" (12 1/4"-13 3/4"). Now slip the first 4-5-6-6 (7-8) sts at beg of row from RS on 1 stitch holder for neck (work sts before slipping them on holder to avoid cutting the yarn).
Then bind off at beg of every row from RS as follows: bind off 2 sts 2 times and then 1 st 2-2-2-2 (3-3) times = 37-45-50-58 (67-78) sts.
Continue to work until piece measures 24-28-30-33 (36-40) cm / 9½"-11"-11 3/4"-13" (14 1/4"-15 3/4").
Insert 1 marker (= mid on top of shoulder) – NOW MEASURE PIECE FROM HERE!
Continue in garter st and with stripes as before until 1 cm / ½'' has been worked from marker but on last row from WS cast on 2 new sts at the end of row towards the neck. Slip 39-47-52-60 (69-80) sts on 1 stitch holder.

LEFT FRONT PIECE:
Cast on and work as right but reversed, i.e. rib beg with 2 P after 1 edge st in the side and ends with 2 K before 1 edge st towards mid front.
When casting on new sts for sleeve at the end of every row from WS, dec for neck at beg of every row from WS and when casting on 2 new sts towards the neck, this is done at the end of last row from RS, then K 1 row from WS so that both front pieces end after 1 row K from WS.

BACK PIECE:
Work the 39-47-52-60 (69-80) sts from left front piece (1st row = K from RS and continue stripes as before), cast on 14-16-18-18 (22-24) new sts on needle (= neckline in the back of neck) and work the 39-47-52-60 (69-80) sts from right front piece on to same circular needle = 92-110-122-138 (160-184) sts.
Continue in garter st and with stripes.
When piece measures 8-8-8-9 (9-9) cm / 3"-3"-3"-3½" (3½"-3½") from marker on shoulder (make sure that no of rows and stripes is the same on front piece according to marker on shoulder), now bind off at beg of every row in each side as follows: bind off 7-4-5-7 (8-4) sts 1 time, 4 sts 0-0-7-8 (5-7) times in total and 5 sts 3-5-0-0 (4-5) times in total = 48-52-56-60 (64-70) sts remain on back piece.
Work until piece measures 20-24-26-29 (32-36) cm / 8"-9½"-10 1/4"-11½" (12½"-14 1/4") from marker on shoulder – adjust according to front piece and make sure to finish stripes the way they started on front piece.
Switch to circular needle size 3 mm / US 2.5 and off white and K 1 row from RS AT THE SAME TIME inc 20-20-20-20 (20-22) sts evenly = 68-72-76-80 (84-92) sts. Work next row as follows from WS: 1 edge st in garter st, * P 2, K 2 *, repeat from *-* until 3 sts remain and finish with P 2 and 1 edge st in garter st (from RS there are 2 K sts in each side inside edge st). Continue rib like this.
When rib measures 4 cm / 1½'' (piece measures approx. 24-28-30-33 (36-40) cm / 9½"-11"-11 3/4"-13" (14 1/4"-15 3/4") from marker on shoulder), K 1 row (from RS) over all sts before loosely binding off.

RIGHT BAND:
Pick up from RS approx. 42 to 74 sts along right front piece inside 1 edge st in garter st on circular needle size 3 mm / US 2.5 with off white. K 1 row from WS.
K 1 row from RS while AT THE SAME TIME inc evenly to 53-61-65-73 (81-89) sts.
Work next row as follows from WS: 1 edge st in garter st, * P 2, K 2 *, repeat from *-* until 4 sts remain and finish with P 2 and 2 edge sts in garter st. Continue rib like this.
When band measures 1 cm / ½'', dec on next row from RS for 4-4-4-5 (5-5) buttonholes evenly. 1 buttonhole = P 2 tog and make 1 YO (dec in a P-section seen from RS will look more pretty).
Upper buttonhole should be approx. 4 cm / 1½'' from neck edge, and bottom buttonhole approx. 2 cm / 3/4'' from bottom edge.
Continue to work until band measures 2½-2½-2½-3 (3-3) cm / 3/4"-3/4"-3/4"-1" (1"-1") and loosely bind off with K over K and P over P.

LEFT BAND:
Work as right band but do not dec for buttonholes on left band.

NECK EDGE:
Pick up from RS approx. 56 to 78 sts (incl sts on stitch holders) around the neck (also over bands) on circular needle size 3 mm / US 2.5 with off white. K 1 row from WS. K 1 row from RS while AT THE SAME TIME inc evenly to 68-72-76-80 (88-92) sts.
Work next row as follows from WS: 1 edge st in garter st, * P 2, K 2 *, repeat from *-* until 3 sts remain and finish with P 2 and 1 edge sts in garter st. Continue rib like this.
When neck edge measures 1 cm / ½'', dec for 1 buttonhole over the other holes on right band.
Continue to work until neck edge measures 2½-2½-2½-3 (3-3) cm / 3/4"-3/4"-3/4"-1" (1"-1") and loosely bind off with K over K and P over P.

ASSEMBLY:
Sew side and underarm seams in one inside 1 edge st.
Sew on buttons.

SLEEVE EDGE:
Pick up from RS approx. 34 to 38 sts at the bottom around the sleeve on double pointed needles size 3 mm / US 2.5 with off white. P 1 round. K 1 round while AT THE SAME TIME inc evenly to 40-40-40-44 (48-48) sts. Then work rib = K 2/P 2.
When sleeve edge measures 4 cm / 1½'', loosely bind off with K over K and P over P.
Repeat at the bottom around the other sleeve.

Diagram

All measurements in charts are in cm.

diagram measurements
Do you have a question? See a list of frequently asked questions (FAQ)

Knitting tension is what determines the final measurements of your work, and is usually measured per 10 x 10 cm. It is provided like so: number of stitches in width x number of rows in height - eg: 19 stitches x 26 rows = 10 x 10 cm.

The knitting tension is very individual; some people knit/crochet loosely while others work tightly. You adjust the knitting tension with the needle size, which is why the suggested needle size only serve as a guide! You need to adjust this (up or down) to ensure that YOUR knitting tension matches the knitting tension provided in the pattern. If you work with a different knitting tension than provided you will have a different yarn consumption, and your work will have different measurements than what the pattern suggests.

The knitting tension also determines which yarns can replace each other. As long as you achieve the same knitting tension you can replace one yarn with another.

See DROPS lesson: How to measure your tension/gauge

See DROPS video: How to make a gauge tension swatch

The required amount of yarn is provided in grams, eg: 450 g. To calculate how many balls you’ll need you first need to know how many grams are in 1 ball (25g, 50g or 100g). This information is available if you click on the individual yarn quality on our pages. Divide the amount required with the amount of each ball. For example, if each ball is 50g (the most common amount), the calculation will be as follows: 450 / 50 = 9 balls.

The important thing when changing from one yarn to another is that the knitting/crochet tension remains the same. This is so that the measurements of the finished piece will be the same as on the sketch provided. It is easier to achieve the same knitting tension using yarns from the same yarn group. It is also possible to work with multiple strands of a thinner yarn to achieve the knitting tension of a thicker one. Please try our yarn converter. We recommend you to always work a test swatch.

Please NOTE: when changing yarn the garment might have a different look and feel to the garment in the photo, due to individual properties and qualities of each yarn.

See DROPS lesson: Can I use a different yarn than the one mentioned in the pattern?

All our yarns are categorised into yarn groups (from A to F) according to thickness and knitting tension – group A contains the thinnest yarns and group F the thickest. This makes it easier for you to find alternative yarns to our patterns, should you wish to switch yarn. All yarns within the same group have a similar knitting tension and can easily replace each other. However, different yarn qualities have different structures and properties which will give the finished work a unique look and feel.

Click here for an overview of the yarns in each yarn group

At the top of all our patterns you’ll find a link to our yarn converter, which is a helpful tool should you wish to use a different yarn than suggested. By filling in the yarn quality you wish to replace, the amount (in your size) and number of strands, the converter will present good alternative yarns with the same knitting tension. Additionally it will tell you how much you’ll require in the new qualities and whether you’ll need to work with multiple strands. Most skeins are 50g (some are 25g or 100g).

If the pattern is worked with multiple colours, every colour will have to be converted separately. Similarly, if the pattern is worked with several strands of different yarns (for example 1 strand Alpaca and 1 strand Kid-Silk) you will have to find alternatives for each, individually.

Click here to see our yarn converter

Since different yarns have different qualities and textures we have chosen to keep the original yarn in our patterns. However, you can easily find options among our available qualities by using our yarn converter, or simply pick a yarn from the same yarn group.

It is possible that some retailers still have discontinued yarns in stock, or that someone has a few skeins at home that they would like to find patterns for.

The yarn converter will provide both alternative yarn as well as required amount in the new quality.

If you think it's hard to decide what size to make, it can be a good idea to measure a garment you own already and like the size of. Then you can pick the size by comparing those measures with the ones available in the pattern's size chart.

You'll find the size chart at the bottom of the pattern.

See DROPS lesson: How to read size chart

The needle size provided in the pattern serves only as a guide, the important thing is to follow the knitting tension. And since knitting tension is very individual, you will have to adjust the needle size to ensure that YOUR tension is the same as in the pattern – maybe you’ll have to adjust 1, or even 2 needle sizes, up or down to achieve the correct tension. For this, we recommend that you work test swatches.

Should you work with a different knitting tension than the one provided, the measurements of the finished garment might deviate from the measurement sketch.

See DROPS lesson: How to measure your tension/gauge

See DROPS video: How to make a gauge tension swatch

Working a garment top-down provides more flexibility and room for personal adjustment. For example it is easier to try the garment on while working, as well as making adjustments to length of yoke and shoulder caps.

The instructions are carefully explaining every step, in the correct order. Diagrams are adjusted to the knitting direction and are worked as usual.

The diagram depicts all rows/rounds, and every stitch seen from the right side. It is read from bottom to top, from right to left. 1 square = 1 stitch.

When working back and forth, every other row is worked from the right side and every other row is worked from the wrong side. When working from the wrong side, the diagram will have to be worked reversed: from left to right, knit stitches are purled, purl stitches are knit etc.

When working in the round every round is worked from the right side and the diagram are worked from right to left on all rounds.

See DROPS lesson: How to read knitting diagrams

The diagram depicts all rows/rounds, and every stitch seen from the right side. It is worked from bottom to top, from right to left.

When working back and forth every other row is worked from the right side: from right to left and every other row is worked from the wrong side: from left to right.

When working in the round, every row in the diagram are worked from the right side, from right to left.

When working a circular diagram you start in the middle and work your way outwards, counter clockwise, row by row.

The rows usually start with a given number of chain stitches (equivalent to the height of the following stitch), this will either be depicted in the diagram or explained in the pattern.

See DROPS lesson: How to read crochet diagrams

Instructions for working several diagrams after each other on the same row/round, will often be written like so: “work A.1, A.2, A.3 a total of 0-0-2-3-4 times". This means you work A.1 once, then A.2 is worked once, and A.3 is repeated (in width) the number of times provided for your size – in this case like so: S = 0 times, M = 0 times, L=2 times, XL= 3 times and XXL = 4 times.

The diagrams are worked as usual: begin with the first row in A.1, then work the first row in A.2 etc.

See DROPS lesson: How to read knitting diagrams

See DROPS lesson: How to read crochet diagrams

The total width of the garment (from wrist-to-wrist) will be larger in the larger sizes, despite the actual sleeves being shorter. The larger sizes have longer sleeve caps and wider shoulders, so there will be a good fit in all sizes.

The measurement sketch/schematic drawing provides information regarding the full length of the garment. If it’s a jumper or a jacket the length is measured from the highest point on the shoulder (usually closest to the neckline), and straight down to the bottom of the garment. It is NOT measured from the tip of shoulder. Similarly, the length of yoke is measured from the highest point on the shoulder and down to where yoke is split into body and sleeves.

See DROPS lesson: How to read a schematic drawing

Diagrams are often repeated on the round or in height. 1 repeat is the diagram the way it appears in the pattern. If it says to work 5 repeats of A.1 in the round, then you work A.1 a total of 5 times after/next to each other in the round. If it says to work 2 repeats of A.1 vertically/in height you work the entire diagram once, then begin again at the start and work the entire diagram one more time.

Chain stitches are slightly narrower than other stitches and to avoid working the cast-on edge too tight, we simply chain more stitches to begin with. The stitch count will be adjusted on the following row to fit the pattern and measurement sketch.

The rib edge is more elastic and will contract slightly compared to, for example, stocking stitch. By increasing before the rib edge, you avoid a visible difference in width between the rib edge and the rest of the body.

It’s very easy to cast off too tightly, and by making yarn overs while casting off (and simultaneously casting these off) you avoid a too tight cast off edge.

See DROPS video: How to bind off with yarn overs (yo)

To achieve an even increase (or decrease) you can increase on, for example: every 3rd and 4th row alternately, like so: work 2 rows and increase on the 3rd row, work 3 rows and increase on the 4th. Repeat this until the increase is complete.

See DROPS lesson: Increase or decrease 1 st on every 3rd and 4th row alternately

Should you prefer to work in the round instead of back and forth, you may of course adjust the pattern. You’ll need to add steeks mid-front (usually 5 stitches), and follow the instructions. When you would normally turn and work from the wrong side, simply work across the steek and continue in the round. At the end you’ll cut the piece open, pick up stitches to work bands, and cover the cut edges.

See DROPS video: How to knit steeks and cut open

Should you prefer to work back and forth instead of in the round, you may of course adjust the pattern so you work the pieces separately and then assemble them at the end. Divide the stitches for the body in 2, add 1 edge stitch in each side (for sewing) and work the front and back pieces separately.

See DROPS lesson: Can I adapt a pattern for circular needles into straight needles?

Pattern repeats can vary slightly in the different sizes, in order to get the correct proportions. If you’re not working the exact same size as the garment in the photo, yours might deviate slightly. This has been carefully developed and adjusted so that the complete impression of the garment is the same in all sizes.

Make sure to follow instructions and diagrams for your size!

If you have found a pattern you like which is available in women’s size it’s not very difficult to convert it to men’s size. The biggest difference will be the length of sleeves and body. Start working on the women size that you think would fit across the chest. The additional length will be worked right before you cast off for the armhole/sleeve cap. If the pattern is worked top-down you can add the length right after the armhole or before the first decrease on sleeve.

Regarding additional yarn amount, this will depend on how much length you add, but it is better with a skein too many than too few.

All yarns will have excess fibres (from production) that might come off as lint or shedding. Brushed yarns (ie hairier yarns) have more of these loose, excess fibres, causing more shedding.

Shedding also depends on what is worn under or over the garment, and whether this pulls at the yarn fibres. It’s therefore not possible to guarantee that there will be no shedding

Below are some tips on how to get the best result when working with hairier yarns:

1. When the garment is finished (before you wash it) shake it vigorously so the looser hairs come off. NOTE: do NOT use a lint roller, brush or any method that pulls at the yarn.

2. Place the garment in a plastic bag and put it in your freezer - the temperature will cause the fibres to become less attached to each other, and excess fibres will come off easier.

3. Leave in the freezer for a few hours before taking it out and shaking it again.

4. Wash the garment according to the instructions on the yarn label.

Pilling is a natural process that happens to even the most exclusive of fibers. It's a natural sign of wear and tear that is hard to avoid, and that is most visible in high friction areas of your garment like a sweater's arms and cuffs.

You can make your garment look as new by removing the pilling, using a fabric comb or a pill/lint remover.

Still can't find the answer you need? Then scroll down and leave your question so one of our experts can try to help you. This will be done normally within 5 to 10 working days.
In the meantime, you can read the questions and answers that others have left to this pattern or join the DROPS Workshop on Facebook to get help from fellow knitters/crocheters!

You might also like...

Post a comment to pattern DROPS Baby 25-18

We would love to hear what you have to say about this pattern!

If you want to leave a question, please make sure you select the correct category in the form below, to speed up the answering process. Required fields are marked *.

Comments / Questions (36)

country flag Lønne wrote:

Kan det virkelig være rigtigt, at der står: 21 m x 42 p retstrik på 10 x 10 cm. - jeg kan da umuligt bruge 42 p. til 10 cm.

23.07.2015 - 17:06

DROPS Design answered:

Hej Lønne, Jo det stemmer, når du strikker retstrik går der ca dobbelt så mange pinde i højden som i bredden på 10 cm. God fornøjelse!

28.07.2015 - 15:09

country flag Nancy Powers wrote:

Ready to begin neck work on right front at 10 1/4" (3rd size). Worked and slipped 6 stitches to holder. "Then bind off at the beg of every row from RS as follows." My question is do I begin these bind offs on the same row as my 6 stitches on the holder or do I finish this row and begin bind offs the next time I do a right side row?

13.06.2015 - 06:14

DROPS Design answered:

Dear Mrs Powers, work the first 6 sts before putting them on a st holder, then finish row, turn and work next row; at the beg of next row (towards neckline) start binding off sts for neckline. Happy knitting!

13.06.2015 - 11:03

country flag Tara wrote:

Hej jag har köpt stickor enligt beskrivning . Jag sticker provsticket o får 21 m ×28 varv 10×10 cm. Vad rekommenderar ni ?

07.01.2015 - 19:36

country flag Inga Andreasen wrote:

Ikke garn nok i opskrift 25-18 til str.92. Jeg mangler en nøgle farvenr. 72 partinr. 5389 eller 5399-svært at se. jeg har en til at strikke og hvad gør jeg+

09.12.2014 - 23:26

DROPS Design answered:

Hej Inga. Det bedste du kan göre er at kontakte butikken du har köbt garnet i, de kan hjaelpe dig videre. Vi vil notere det her og rette om nödvendigt.

10.12.2014 - 12:02

country flag Louise wrote:

Eine wunderschöne Jacke. Da ich Strickneuling bin, verstehe ich die Anleitung nicht richtig. Wenn ich beim Vorderteil die Maschen für den Ärmel anschlage,stricke ich dann bei Gr. 80/86 eine zusätzliche Reihe und nehme in den folgenden 8 jeweils vier M auf oder beginne ich gleich mit der Aufnahme von 8x4M ? Vielen Dank!

02.11.2014 - 23:56

DROPS Design answered:

Liebe Louise, Sie schlagen immer am Ende jeder Hin-R die M neu zu den vorhandenen an. Also am Ende von 8 Hin-R immer 4 M. Wie Sie neue M am Ende einer R anschlagen, können Sie sich im Video "Seitliche neue Maschen anschlagen" unter "Videos" oben im Kopf neben dem Foto anschauen, in dem Video werden 2 Methoden gezeigt. Gutes Gelingen!

03.11.2014 - 09:08

Mazal Haitner wrote:

En las instrucciones de la derecha dice: "Ahora deslizar los primeros 4-5-6-6 (7-8) pts al inicio de la hilera, por el LD, a 1 gancho o seguro aux para el escote". Pero no hay mención de estos puntos más adelante en el patrón. Mi pregunta es ¿qué se supone que debo hacer con esos puntos. Muchas gracias. Mazal

15.07.2014 - 08:11

DROPS Design answered:

Hola Mazal. Ahora mismo estamos acabando la colección de invierno. Pasaré tu pregunta al departamento de diseño. Gracias.

22.07.2014 - 09:24