
Popular categories
Looking for a yarn?


|
|
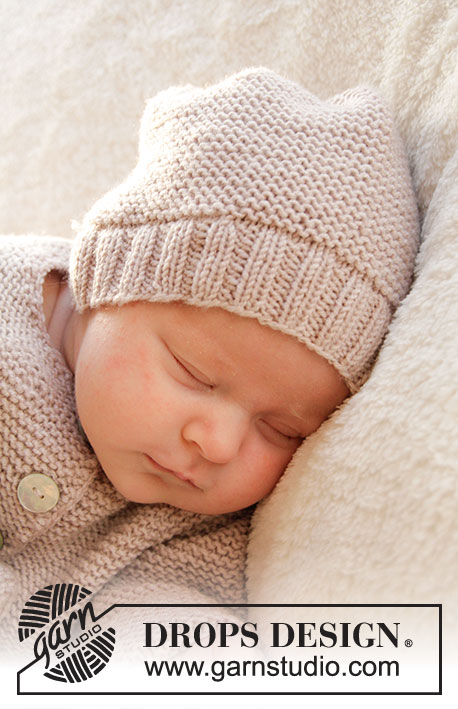
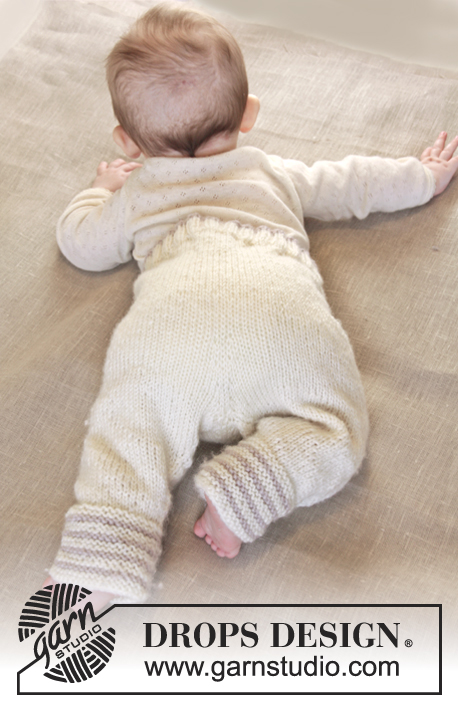
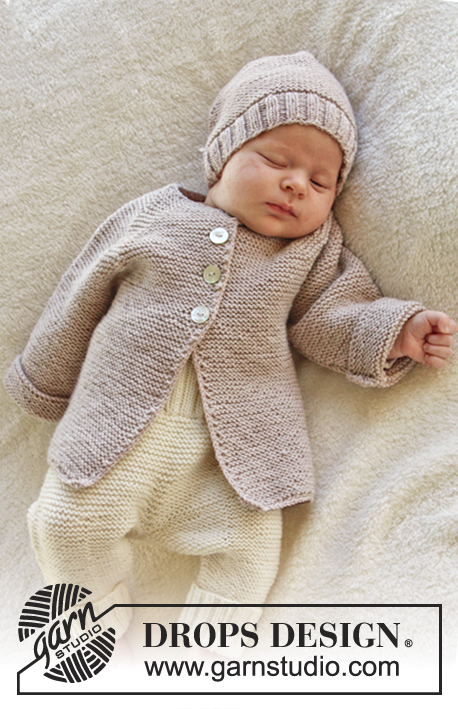
Little Darcy |
|
 |
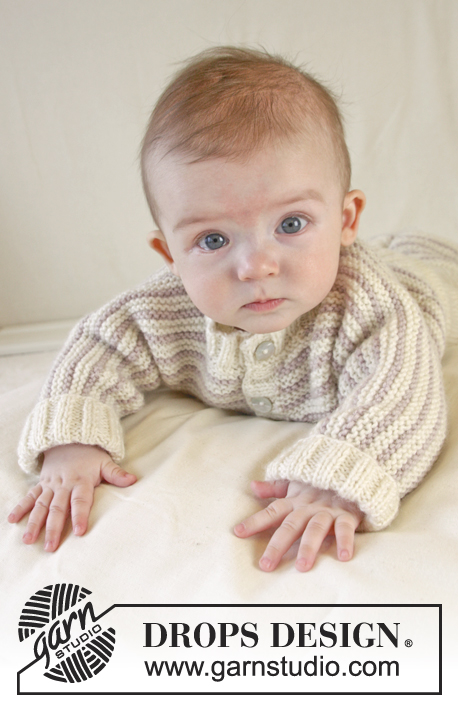 |
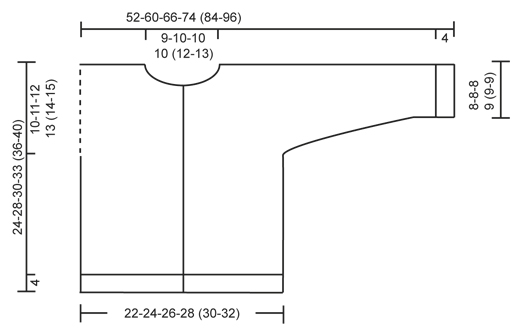
Knitted baby jacket in garter st with stripes and rib edges in DROPS Karisma. Size 0 – 4 years
DROPS Baby 25-18 |
|
|
GARTER ST (back and forth on circular needle): K all rows. 1 ridge = K2 rows. STRIPES: * 1 ridge off white, 1 ridge light beige, 1 ridge off white *, repeat from *-* (i.e. when repeating there will be 2 ridges in off white between every ridge with light beige). ---------------------------------------------------------- JACKET: Worked back and forth on circular needle. Beg on front piece, cast on new sts for sleeve and work up to the shoulder. Put piece aside and work the other front piece. Then place both front pieces tog and work down the back piece. RIGHT FRONT PIECE: Cast on 34-38-38-42 (42-46) sts (includes 1 edge st in each side) on circular needle size 3 mm / US 2.5 with off white. P 1 row from WS. Then work next row as follows from RS: 1 edge st in GARTER ST - see explanation above - * K 2, P 2 *, repeat from *-* until 1 st remains and finish with 1 edge st in GARTER ST. Continue rib like this. When piece measures 4 cm / 1½'', K 1 row from RS while AT THE SAME TIME dec 9-11-9-11 (9-10) sts evenly = 25-27-29-31 (33-36) sts. Switch to circular needle size 4 mm / US 6 and K 1 row from WS. Then work in GARTER ST – see explanation above while AT THE SAME TIME working STRIPES – see explanation above. REMEMBER THE GAUGE! When piece measures 14-17-18-20 (22-25) cm / 5½"-6 3/4"-7"-8" (8 3/4"-9 3/4"), cast on new sts for sleeve at the end of every row from RS as follows: Cast on 5 sts 3-5-0-0 (4-5) times in total, 4 sts 0-0-7-8 (5-7) times in total and then 7-4-5-7 (8-4) sts 1 time = 47-56-62-70 (81-93) sts. After last inc continue in garter st and stripes until piece measures 20-24-26-28 (31-35) cm / 8"-9½"-10 1/4"-11" (12 1/4"-13 3/4"). Now slip the first 4-5-6-6 (7-8) sts at beg of row from RS on 1 stitch holder for neck (work sts before slipping them on holder to avoid cutting the yarn). Then bind off at beg of every row from RS as follows: bind off 2 sts 2 times and then 1 st 2-2-2-2 (3-3) times = 37-45-50-58 (67-78) sts. Continue to work until piece measures 24-28-30-33 (36-40) cm / 9½"-11"-11 3/4"-13" (14 1/4"-15 3/4"). Insert 1 marker (= mid on top of shoulder) – NOW MEASURE PIECE FROM HERE! Continue in garter st and with stripes as before until 1 cm / ½'' has been worked from marker but on last row from WS cast on 2 new sts at the end of row towards the neck. Slip 39-47-52-60 (69-80) sts on 1 stitch holder. LEFT FRONT PIECE: Cast on and work as right but reversed, i.e. rib beg with 2 P after 1 edge st in the side and ends with 2 K before 1 edge st towards mid front. When casting on new sts for sleeve at the end of every row from WS, dec for neck at beg of every row from WS and when casting on 2 new sts towards the neck, this is done at the end of last row from RS, then K 1 row from WS so that both front pieces end after 1 row K from WS. BACK PIECE: Work the 39-47-52-60 (69-80) sts from left front piece (1st row = K from RS and continue stripes as before), cast on 14-16-18-18 (22-24) new sts on needle (= neckline in the back of neck) and work the 39-47-52-60 (69-80) sts from right front piece on to same circular needle = 92-110-122-138 (160-184) sts. Continue in garter st and with stripes. When piece measures 8-8-8-9 (9-9) cm / 3"-3"-3"-3½" (3½"-3½") from marker on shoulder (make sure that no of rows and stripes is the same on front piece according to marker on shoulder), now bind off at beg of every row in each side as follows: bind off 7-4-5-7 (8-4) sts 1 time, 4 sts 0-0-7-8 (5-7) times in total and 5 sts 3-5-0-0 (4-5) times in total = 48-52-56-60 (64-70) sts remain on back piece. Work until piece measures 20-24-26-29 (32-36) cm / 8"-9½"-10 1/4"-11½" (12½"-14 1/4") from marker on shoulder – adjust according to front piece and make sure to finish stripes the way they started on front piece. Switch to circular needle size 3 mm / US 2.5 and off white and K 1 row from RS AT THE SAME TIME inc 20-20-20-20 (20-22) sts evenly = 68-72-76-80 (84-92) sts. Work next row as follows from WS: 1 edge st in garter st, * P 2, K 2 *, repeat from *-* until 3 sts remain and finish with P 2 and 1 edge st in garter st (from RS there are 2 K sts in each side inside edge st). Continue rib like this. When rib measures 4 cm / 1½'' (piece measures approx. 24-28-30-33 (36-40) cm / 9½"-11"-11 3/4"-13" (14 1/4"-15 3/4") from marker on shoulder), K 1 row (from RS) over all sts before loosely binding off. RIGHT BAND: Pick up from RS approx. 42 to 74 sts along right front piece inside 1 edge st in garter st on circular needle size 3 mm / US 2.5 with off white. K 1 row from WS. K 1 row from RS while AT THE SAME TIME inc evenly to 53-61-65-73 (81-89) sts. Work next row as follows from WS: 1 edge st in garter st, * P 2, K 2 *, repeat from *-* until 4 sts remain and finish with P 2 and 2 edge sts in garter st. Continue rib like this. When band measures 1 cm / ½'', dec on next row from RS for 4-4-4-5 (5-5) buttonholes evenly. 1 buttonhole = P 2 tog and make 1 YO (dec in a P-section seen from RS will look more pretty). Upper buttonhole should be approx. 4 cm / 1½'' from neck edge, and bottom buttonhole approx. 2 cm / 3/4'' from bottom edge. Continue to work until band measures 2½-2½-2½-3 (3-3) cm / 3/4"-3/4"-3/4"-1" (1"-1") and loosely bind off with K over K and P over P. LEFT BAND: Work as right band but do not dec for buttonholes on left band. NECK EDGE: Pick up from RS approx. 56 to 78 sts (incl sts on stitch holders) around the neck (also over bands) on circular needle size 3 mm / US 2.5 with off white. K 1 row from WS. K 1 row from RS while AT THE SAME TIME inc evenly to 68-72-76-80 (88-92) sts. Work next row as follows from WS: 1 edge st in garter st, * P 2, K 2 *, repeat from *-* until 3 sts remain and finish with P 2 and 1 edge sts in garter st. Continue rib like this. When neck edge measures 1 cm / ½'', dec for 1 buttonhole over the other holes on right band. Continue to work until neck edge measures 2½-2½-2½-3 (3-3) cm / 3/4"-3/4"-3/4"-1" (1"-1") and loosely bind off with K over K and P over P. ASSEMBLY: Sew side and underarm seams in one inside 1 edge st. Sew on buttons. SLEEVE EDGE: Pick up from RS approx. 34 to 38 sts at the bottom around the sleeve on double pointed needles size 3 mm / US 2.5 with off white. P 1 round. K 1 round while AT THE SAME TIME inc evenly to 40-40-40-44 (48-48) sts. Then work rib = K 2/P 2. When sleeve edge measures 4 cm / 1½'', loosely bind off with K over K and P over P. Repeat at the bottom around the other sleeve. |
|
|
|
|
Have you made this or any other of our designs? Tag your pictures in social media with #dropsdesign so we can see them! Do you need help with this pattern?You'll find tutorial videos, a Comments/Questions area and more by visiting the pattern on garnstudio.com. © 1982-2024 DROPS Design A/S. We reserve all rights. This document, including all its sub-sections, has copyrights. Read more about what you can do with our patterns at the bottom of each pattern on our site. |
|


With over 40 years in knitting and crochet design, DROPS Design offers one of the most extensive collections of free patterns on the internet - translated to 17 languages. As of today we count 304 catalogs and 11422 patterns - 11417 of which are translated into English (US/in).
We work hard to bring you the best knitting and crochet have to offer, inspiration and advice as well as great quality yarns at incredible prices! Would you like to use our patterns for other than personal use? You can read what you are allowed to do in the Copyright text at the bottom of all our patterns. Happy crafting!
Comments / Questions (36)
Jeg vil gerne strikke denne lille trøje i den mindste str.Jeg har noget garn som jeg gerne vil bruge som hedder Perfect og er 22m =10.cm på p. 3 *3 1/2.jeg skal være oldemor og er nød til at bruge noget af det garn jeg har. Håber i kan hjælpe mig ?\r\nOpskriften .hedder Little Darcy,
10.08.2021 - 23:30Jeg har svært ved at forstå, på Venstre forstykke skal der slåes nye masker op til ærme i slutningen af vrangpinden, samtidigt skal der lukkes af til hals i begyndelsen af vrangpinden, hvorfor er det anderledes end højre forstykke?...
15.06.2021 - 11:05DROPS Design answered:
Hej Birgitte, det er lettere at tage ud i slutningen af pinden, derfor er du nødt til at tage ud fra vrangen på venstre forstykke (det der ligger til højre når det ligger foran dig) :)
16.06.2021 - 13:02Hallo! Beim Rückenteil soll man zuletzt gleichmäßig verteilt Maschen aufnehmen. Wie macht man das, ohne Löcher zu produzieren? Bisher habe ich die Maschen in der gleichen Weise aufgenommen, wie für die Ärmel - aber das ist vermutlich einfach ein Umschlag... Leider habe ich kein Tutorialvideo finden können. Viele Grüße Lotte
08.06.2021 - 15:23DROPS Design answered:
Liebe Lotte, Sie können mit 1 Umschlag zunehmen (bei der nächsten Reihe, den Umschlag verschränkt stricken, um ein Loch zu vermeiden) - siehe Video oder 2 Maschen aus einer Masche stricken - siehe Video - oder irgendeine andere Technik, die Sie bevorzugen. Viel Spaß beim stricken!
08.06.2021 - 16:28Bonjour, J\'ai une question quant aux coloris ... Le coloris n° 71 est indiqué comme étant du \"beige clair\" dans les explications, mais quand je veux commander le n° 71 est du \" rose argenté\" !! J\'aimerais vraiment garder l\'harmonie de la veste de la photo. Laquelle des deux dois-je commander ? Merci de votre réponse.
03.12.2020 - 17:23DROPS Design answered:
Bonjour Mme Gianferrari, il n'est pas rare que les couleurs soient renommées avec le temps, pour toute assistance au choix des couleurs, contactez votre magasin DROPS, c'est toujours la façon la plus simple de vous faire aider, même par mail ou téléphone. Bon tricot!
04.12.2020 - 08:10Hej Vart är mitt på axeln? Där axeln går över till ärm? Mvh C
30.10.2020 - 08:32DROPS Design answered:
Hej Carola, du sætter mærket for at du skal kunne måle bagstykket, så det bliver lige så lang som forstykket. God fornøjelse!
03.11.2020 - 15:41Hej Stickar den här koftan 3/4 år har lagt upp maskor till resår fram. Tycker att det ser väldigt litet ut. Har gjort provlapp så masktäthet stämmer. Min fråga är är det en liten storlek eller har jag gjort fel? Mvh C.
27.10.2020 - 13:27DROPS Design answered:
Hej Carola. Det ska inte vara en liten storlek om jag ser på andra liknande modeller vi har i detta garn. Se på måttskissen längst ner för att dubbelkolla att du får de mått som vi har uppgett där. Mvh DROPS Design
28.10.2020 - 07:37Jeg kunne godt savne en størrelse der hed 3-6 mdr. Skal til at strikke til mit oldebarn som er 3 mdr. enten er det for småt om 1 mdr. eller også svømmer hun i det, og det bliver lagt væk til hun kan passe det. Det er et gennemgående problem med mange opskrifter. Vh. Lajla
23.09.2020 - 13:15Der må være en fejl i opskriften! Når venstre forstykke skal strikkes, skal det være spejlvendt. Fint nok. Men opskriften siger, at man skal lukke af til hals, når der slås nye masker op til ærme! På højre forstk. sættes m. på tråd, når arb. måler 28 cm.
28.06.2020 - 13:25DROPS Design answered:
Hej Kirsten, nej du lukker af til hals samme sted som på højre forstykke og du slår nye masker op til ærme på samme sted som højre forstykke. (Men i modsat side) God fornøjelse!
30.06.2020 - 13:55Õpetuse järgi peaks nööpaugud olema paremal hõlmal ja nööbid vasakul hõlmal, aga pildi järgi on teistpidi. Kuidas siis õige peaks olema?
31.03.2020 - 16:20DROPS Design answered:
Tere Merli! Meeste/poiste rõivastel on nööpaugud vasakul hõlmal, naiste/tüdrukute rõivastel on nööpaugud paremal hõlmal. Valige omale sobiv variant! Head kudumist!
31.03.2020 - 16:34Hallo liebes Drops Team, ich möchte dieses und auch andere Baby Modelle nach arbeiten. Bei den Größen ist mir etwas unklar. Es heißt: Nr. 1 56/62 (1-3 Monate) Nr. 2 68/74 (6-9 Monate) Die Zwischengröße 63/68 (3-6 Monate) gibt es in sämtlichen Anleitungen nicht! Strick ich dann eher Nr. 1 oder Nr. 2 ?? Können sie mir helfen? Danke Yvonne
14.01.2019 - 21:22DROPS Design answered:
Liebe Frau Samhammer, die Anleitung ist nur in diese Größe erhältlich - Sie finden alle Massen in der Maßskizze, je nach Kind können Sie dann die Massen einer ähnlichen Kleidung vergleichen um die richtige Grösse zu finden - siehe auch die Größe in cm - hier lesen Sie mehr über die Masse. Viel Spaß beim stricken!
15.01.2019 - 09:26