DROPS Ice
DROPS Ice
55% Cotton, 45% Acrylic
Discontinued
find alternatives
DROPS Cotton Viscose
54% Cotton, 46% Viscose
Discontinued
find alternatives
DROPS Cotton Light
DROPS Cotton Light
50% Cotton, 50% Polyester
from 1.80 $ /50g
DROPS SS24

Summer Breeze

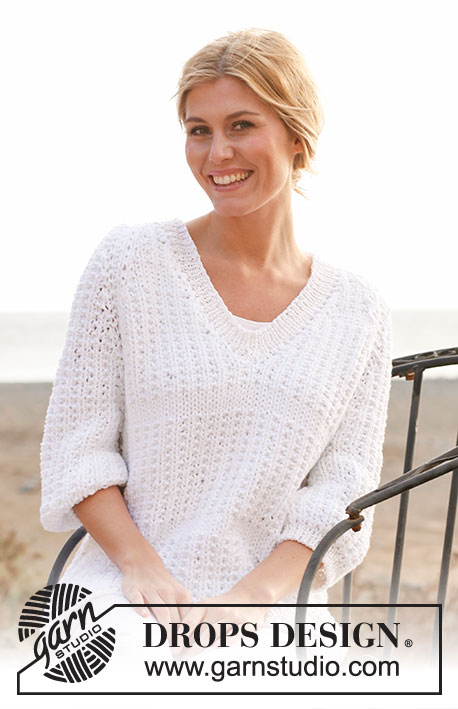
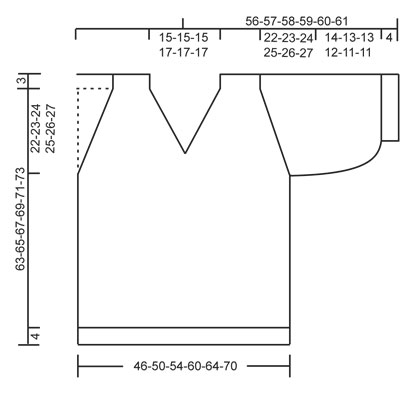
Knitted DROPS jumper with raglan in 1 strand “Ice” or 2 strands “Cotton Light” and V-neck and rib in 2 strands “Cotton Viscose”. Size: S - XXXL.

DROPS 136-22
DROPS design: Pattern no TT-049
Yarn group E or B and A.
---------------------------------------------------------
Size: S - M - L - XL - XXL - XXXL
Finished measurements:
Bust: 92-100-108-120-128-140 cm / 36¼"-39½"-42½"-47¼"-50½"-55"
Full length: 63-65-67-69-71-73 cm / 24¾"-25½"-26⅜"-27⅛"-28"-28¾"

Materials:
DROPS ICE from Garnstudio
650-700-750-850-900-1000 g color 01, white
Or use:
DROPS COTTON LIGHT from Garnstudio
550-600-650-700-750-850 g color no 02, white
And use:
DROPS COTTON VISCOSE from Garnstudio
100-100-150-150-150-150 g color no 01, white

DROPS DOUBLE POINTED NEEDLES and CIRCULAR NEEDLE (80 cm / 32") SIZE 8 mm/US 11 - or size needed to get 10 sts x 16 rows in textured pattern with 1 strand Ice or 2 strands Cotton Light = 10 x 10 cm / 4" x 4".
DROPS DOUBLE POINTED NEEDLES and CIRCULAR NEEDLE (60 cm / 24" and 80 cm / 32") SIZE 3.5 mm/US 4 - for rib

-------------------------------------------------------

Alternative Yarn – See how to change yarns here
Yarn Groups A to F – Use the same pattern and change the yarn here
Yarn usage using an alternative yarn – Use our yarn converter here

-------------------------------------------------------

DROPS Ice
DROPS Ice
55% Cotton, 45% Acrylic
Discontinued
find alternatives
DROPS Cotton Viscose
54% Cotton, 46% Viscose
Discontinued
find alternatives
DROPS Cotton Light
DROPS Cotton Light
50% Cotton, 50% Polyester
from 1.80 $ /50g

Pattern instructions

NOTE: This pattern is written in American English. All measurements in charts are in cm. For conversion from inches to cm - click here. There are different terms for crocheting in American and British English. If this pattern includes crochet, click for "crochet terms" here. For this pattern in British English, please click here.
TEXTURED PATTERN BODY:

In the round on needle:
ROUND 1: K all sts.
ROUND 2: * K 1, P 1 *, repeat from *-*.

Back and forth on needle:
ROW 1 (= RS): K all sts.
ROW 2 (= WS): * P 1, K 1 *, repeat from *-*.
** Repeat 1st and 2nd round/row for 15-16-16-17-17-17 cm / 6"-6¼"-6¼"-6¾"-6¾"-6¾", work 4-4-4-4-5-5 cm / 1½"-1½"-1½"-1½"-2"-2" in stockinette st **, repeat from **-** until finished measurements.


TEXTURED PATTERN SLEEVE:

In the round on needle:
ROUND 1: K all sts.
ROUND 2: * K 1, P 1 *, repeat from *-*.

Back and forth on needle:
ROW 1 (= RS): K all sts.
ROW 2 (= WS): * P 1, K 1 *, repeat from *-*.
Repeat 1st and 2nd round/row until finished measurements.

DECREASE TIP 1 (applies to raglan):
Work in stockinette st over the middle 4 sts in every raglan transition on every round/row (i.e. 2 sts in stockinette st on each side of all markers). All dec are done from RS!
Dec for raglan in every transition between sleeves and body as follows:
Before marker: K 2 tog.
After marker: Slip 1 st as if to K, K 1, psso.

DECREASE TIP 2 (applies to V-neck):
Dec for V-neck inside 1 edge st in garter st in each side towards mid front. All dec are done from RS.
Dec as follows before 1 edge st in garter st: K 2 tog.
Dec as follows after 1 edge st in garter st: Slip 1 st as if to K, K 1, psso.
---------------------------------------------------------

BODY:
Cast on 184-200-216-240-256-280 sts on circular needle size 3.5 mm / US 4 with 2 strands Cotton Viscose.
Work rib = K 1/P 1 for 4 cm / 1½". Switch to circular needle size 8 mm / US 11 and 1 strand Ice or 2 strands Cotton Light. K 1 round while AT THE SAME TIME K2 tog around = 92-100-108-120-128-140 sts.
Then work TEXTURED PATTERN BODY - see explanation above. REMEMBER THE GAUGE!
When piece measures 41-42-43-44-45-46 cm / 16⅛"-16½"-17"-17¼"-17¾"-18", work next round as follows: bind off 4 sts for armhole, work the next 39-43-47-53-57-63 sts as before (= front piece), bind off 7 sts for armhole, work the next 39-43-47-53-57-63 sts as before (= back piece) and bind off the last 3 sts.
Cut the yarn. Insert a marker in the middle st on front and back piece (= 19-21-23-26-28-31 sts on each side of markers).
Put piece aside and work the sleeves.

RIGHT SLEEVE:
Cast on 50-52-54-56-58-60 sts on double pointed needles size 3.5 mm / US 4 with 2 strands Cotton Viscose. Work rib = K 1/P 1 for 4 cm / 1½". Switch to double pointed needles size 8 mm / US 11 and 1 strand Ice or 2 strands Cotton Light.
K 1 round while AT THE SAME TIME dec 14-14-16-16-16-16 sts evenly = 36-38-38-40-42-44 sts.
Then work TEXTURED PATTERN SLEEVE - see explanation above. When piece measures 18-17-17-16-15-15 cm / 7"-6¾"-6¾"-6¼"-6"-6" (shorter measurements in the larger sizes because of longer sleeve cap and wider shoulders), bind off 7 sts mid under sleeve (i.e bind off the first 4 sts, work following sts as before until 3 sts remain on round, bind off these) = 29-31-31-33-35-37 sts remain on needle.
Cut the yarn. Put piece aside and knit another sleeve.

LEFT SLEEVE:
Work as right sleeve, but when piece measures 18-17-17-16-15-15 cm / 7"-6¾"-6¾"-6¼"-6"-6" bind off the first 3 sts and the 4 last sts on round.

YOKE:
Slip sleeves on to same circular needle as body where armholes were bind off = 136-148-156-172-184-200 sts. Insert a marker in all transitions between sleeves and body = 4 markers.
READ ALL OF THE FOLLOWING SECTION BEFORE CONTINUING!

Continue with textured pattern on body and sleeves while AT THE SAME TIME dec for raglan as follows - READ DECREASE TIP 1 - NOTE: The dec on body and sleeves are uneven:

SIZE S:
ON SLEEVE: Beg on 1st round and dec on every 4th round/row a total of 7 times, then on every other round/row a total of 5 times (= 5 sts remain on sleeve).
ON BODY: Work 4 rounds before starting dec, then dec every 10th round/row a total of 4 times.

SIZE M:
ON SLEEVE: Beg on 1st round and dec on every 4th round/row a total of 7 times, then on every other round/row a total of 6 times (= 5 sts remain on sleeve).
ON BODY: Work 4 rounds before starting dec, then dec every 8th round/row a total of 5 times.

SIZE L:
ON SLEEVE: Work 1 round before starting dec, then dec on every 4th round/row a total of 7 times, then on every other round/row a total of 6 times (= 5 sts remain on sleeve).
ON BODY: Work 1 round before starting dec, then dec every 6th round/row a total of 7 times.

SIZE XL:
ON SLEEVE: Work 1 round before starting dec, then dec on every 4th round/row a total of 7 times, then on every other round/row a total of 7 times (= 5 sts remain on sleeve).
ON BODY: Work 1 round before starting dec, then dec on every 6th round/row a total of 4 times, then on every 4th round/row a total of 5 times.

SIZE XXL:
ON SLEEVE: Beg on 1st round and dec on every 4th round/row a total of 7 times, then on every other round/row a total of 8 times (= 5 sts remain on sleeve).
ON BODY: Beg on 1st round and dec on every 4th round/row a total of 11 times.

SIZE XXXL:
ON SLEEVE: Beg on 1st round and dec on every 4th round/row a total of 7 times, then on every other round/row a total of 9 times (= 5 sts remain on sleeve).
ON BODY: Beg on 1st round and dec on every 4th round/row a total of 10 times, then on every other round/row a total of 3 times.

AT THE SAME TIME when piece measures 46-48-48-50-50-52 cm / 18"-19"-19"-19¾"-19¾"-20½", bind off the one st with marker on front piece for neck and then work back and forth on circular needle.
AT THE SAME TIME dec 1 st in each side towards mid front for V-neck – READ DECREASE TIP 2: Dec on every other row (i.e. on every row from RS) a total of 5 times in all sizes, then on every 4th row a total of 2-2-2-3-3-3 times.
After all dec for raglan and V-neck, 57-61-61-63-63-67 sts remain on needle.
Continue to work until piece measures 63-65-67-69-71-73 cm / 24¾"-25½"-26⅜"-27⅛"-28"-28¾". Now bind off the middle 13-13-13-15-15-15 sts on back piece for neck (i.e. st with marker and 6-6-6-7-7-7 sts on each side of this), finish each part separately. Continue to bind off 1 st on next row from neck at the back = 21-23-23-23-23-25 sts remain on needle.
Slip sts on a stitch holder and repeat on the other side of neck.

ASSEMBLY:
Sew the openings under the sleeves.

NECK EDGE:
Pick up approx. 110-114-118-122-126-130 sts around the neck on circular needle size 3.5 mm / US 4 with 2 strands Cotton Viscose. Work rib = K 1/P 1 – adjust so that 1 K st is mid front on V-neck.
AT THE SAME TIME dec 2 sts mid front as follows (i.e. at the bottom tip of V-neck): Beg 1 st before middle st, slip 2 sts as if to K tog, pass the first st of the two sts back on left needle, K 2 tog and pass the second slipped st on right needle over.
Repeat dec every other round 2 more times.
When rib measures 4 cm / 1½", bind off with K over K and P over P.

Diagram

All measurements in charts are in cm.

diagram measurements
Do you have a question? See a list of frequently asked questions (FAQ)

Knitting tension is what determines the final measurements of your work, and is usually measured per 10 x 10 cm. It is provided like so: number of stitches in width x number of rows in height - eg: 19 stitches x 26 rows = 10 x 10 cm.

The knitting tension is very individual; some people knit/crochet loosely while others work tightly. You adjust the knitting tension with the needle size, which is why the suggested needle size only serve as a guide! You need to adjust this (up or down) to ensure that YOUR knitting tension matches the knitting tension provided in the pattern. If you work with a different knitting tension than provided you will have a different yarn consumption, and your work will have different measurements than what the pattern suggests.

The knitting tension also determines which yarns can replace each other. As long as you achieve the same knitting tension you can replace one yarn with another.

See DROPS lesson: How to measure your tension/gauge

See DROPS video: How to make a gauge tension swatch

The required amount of yarn is provided in grams, eg: 450 g. To calculate how many balls you’ll need you first need to know how many grams are in 1 ball (25g, 50g or 100g). This information is available if you click on the individual yarn quality on our pages. Divide the amount required with the amount of each ball. For example, if each ball is 50g (the most common amount), the calculation will be as follows: 450 / 50 = 9 balls.

The important thing when changing from one yarn to another is that the knitting/crochet tension remains the same. This is so that the measurements of the finished piece will be the same as on the sketch provided. It is easier to achieve the same knitting tension using yarns from the same yarn group. It is also possible to work with multiple strands of a thinner yarn to achieve the knitting tension of a thicker one. Please try our yarn converter. We recommend you to always work a test swatch.

Please NOTE: when changing yarn the garment might have a different look and feel to the garment in the photo, due to individual properties and qualities of each yarn.

See DROPS lesson: Can I use a different yarn than the one mentioned in the pattern?

All our yarns are categorised into yarn groups (from A to F) according to thickness and knitting tension – group A contains the thinnest yarns and group F the thickest. This makes it easier for you to find alternative yarns to our patterns, should you wish to switch yarn. All yarns within the same group have a similar knitting tension and can easily replace each other. However, different yarn qualities have different structures and properties which will give the finished work a unique look and feel.

Click here for an overview of the yarns in each yarn group

At the top of all our patterns you’ll find a link to our yarn converter, which is a helpful tool should you wish to use a different yarn than suggested. By filling in the yarn quality you wish to replace, the amount (in your size) and number of strands, the converter will present good alternative yarns with the same knitting tension. Additionally it will tell you how much you’ll require in the new qualities and whether you’ll need to work with multiple strands. Most skeins are 50g (some are 25g or 100g).

If the pattern is worked with multiple colours, every colour will have to be converted separately. Similarly, if the pattern is worked with several strands of different yarns (for example 1 strand Alpaca and 1 strand Kid-Silk) you will have to find alternatives for each, individually.

Click here to see our yarn converter

Since different yarns have different qualities and textures we have chosen to keep the original yarn in our patterns. However, you can easily find options among our available qualities by using our yarn converter, or simply pick a yarn from the same yarn group.

It is possible that some retailers still have discontinued yarns in stock, or that someone has a few skeins at home that they would like to find patterns for.

The yarn converter will provide both alternative yarn as well as required amount in the new quality.

If you think it's hard to decide what size to make, it can be a good idea to measure a garment you own already and like the size of. Then you can pick the size by comparing those measures with the ones available in the pattern's size chart.

You'll find the size chart at the bottom of the pattern.

See DROPS lesson: How to read size chart

The needle size provided in the pattern serves only as a guide, the important thing is to follow the knitting tension. And since knitting tension is very individual, you will have to adjust the needle size to ensure that YOUR tension is the same as in the pattern – maybe you’ll have to adjust 1, or even 2 needle sizes, up or down to achieve the correct tension. For this, we recommend that you work test swatches.

Should you work with a different knitting tension than the one provided, the measurements of the finished garment might deviate from the measurement sketch.

See DROPS lesson: How to measure your tension/gauge

See DROPS video: How to make a gauge tension swatch

Working a garment top-down provides more flexibility and room for personal adjustment. For example it is easier to try the garment on while working, as well as making adjustments to length of yoke and shoulder caps.

The instructions are carefully explaining every step, in the correct order. Diagrams are adjusted to the knitting direction and are worked as usual.

The diagram depicts all rows/rounds, and every stitch seen from the right side. It is read from bottom to top, from right to left. 1 square = 1 stitch.

When working back and forth, every other row is worked from the right side and every other row is worked from the wrong side. When working from the wrong side, the diagram will have to be worked reversed: from left to right, knit stitches are purled, purl stitches are knit etc.

When working in the round every round is worked from the right side and the diagram are worked from right to left on all rounds.

See DROPS lesson: How to read knitting diagrams

The diagram depicts all rows/rounds, and every stitch seen from the right side. It is worked from bottom to top, from right to left.

When working back and forth every other row is worked from the right side: from right to left and every other row is worked from the wrong side: from left to right.

When working in the round, every row in the diagram are worked from the right side, from right to left.

When working a circular diagram you start in the middle and work your way outwards, counter clockwise, row by row.

The rows usually start with a given number of chain stitches (equivalent to the height of the following stitch), this will either be depicted in the diagram or explained in the pattern.

See DROPS lesson: How to read crochet diagrams

Instructions for working several diagrams after each other on the same row/round, will often be written like so: “work A.1, A.2, A.3 a total of 0-0-2-3-4 times". This means you work A.1 once, then A.2 is worked once, and A.3 is repeated (in width) the number of times provided for your size – in this case like so: S = 0 times, M = 0 times, L=2 times, XL= 3 times and XXL = 4 times.

The diagrams are worked as usual: begin with the first row in A.1, then work the first row in A.2 etc.

See DROPS lesson: How to read knitting diagrams

See DROPS lesson: How to read crochet diagrams

The total width of the garment (from wrist-to-wrist) will be larger in the larger sizes, despite the actual sleeves being shorter. The larger sizes have longer sleeve caps and wider shoulders, so there will be a good fit in all sizes.

The measurement sketch/schematic drawing provides information regarding the full length of the garment. If it’s a jumper or a jacket the length is measured from the highest point on the shoulder (usually closest to the neckline), and straight down to the bottom of the garment. It is NOT measured from the tip of shoulder. Similarly, the length of yoke is measured from the highest point on the shoulder and down to where yoke is split into body and sleeves.

See DROPS lesson: How to read a schematic drawing

Diagrams are often repeated on the round or in height. 1 repeat is the diagram the way it appears in the pattern. If it says to work 5 repeats of A.1 in the round, then you work A.1 a total of 5 times after/next to each other in the round. If it says to work 2 repeats of A.1 vertically/in height you work the entire diagram once, then begin again at the start and work the entire diagram one more time.

Chain stitches are slightly narrower than other stitches and to avoid working the cast-on edge too tight, we simply chain more stitches to begin with. The stitch count will be adjusted on the following row to fit the pattern and measurement sketch.

The rib edge is more elastic and will contract slightly compared to, for example, stocking stitch. By increasing before the rib edge, you avoid a visible difference in width between the rib edge and the rest of the body.

It’s very easy to cast off too tightly, and by making yarn overs while casting off (and simultaneously casting these off) you avoid a too tight cast off edge.

See DROPS video: How to bind off with yarn overs (yo)

To achieve an even increase (or decrease) you can increase on, for example: every 3rd and 4th row alternately, like so: work 2 rows and increase on the 3rd row, work 3 rows and increase on the 4th. Repeat this until the increase is complete.

See DROPS lesson: Increase or decrease 1 st on every 3rd and 4th row alternately

Should you prefer to work in the round instead of back and forth, you may of course adjust the pattern. You’ll need to add steeks mid-front (usually 5 stitches), and follow the instructions. When you would normally turn and work from the wrong side, simply work across the steek and continue in the round. At the end you’ll cut the piece open, pick up stitches to work bands, and cover the cut edges.

See DROPS video: How to knit steeks and cut open

Should you prefer to work back and forth instead of in the round, you may of course adjust the pattern so you work the pieces separately and then assemble them at the end. Divide the stitches for the body in 2, add 1 edge stitch in each side (for sewing) and work the front and back pieces separately.

See DROPS lesson: Can I adapt a pattern for circular needles into straight needles?

Pattern repeats can vary slightly in the different sizes, in order to get the correct proportions. If you’re not working the exact same size as the garment in the photo, yours might deviate slightly. This has been carefully developed and adjusted so that the complete impression of the garment is the same in all sizes.

Make sure to follow instructions and diagrams for your size!

If you have found a pattern you like which is available in women’s size it’s not very difficult to convert it to men’s size. The biggest difference will be the length of sleeves and body. Start working on the women size that you think would fit across the chest. The additional length will be worked right before you cast off for the armhole/sleeve cap. If the pattern is worked top-down you can add the length right after the armhole or before the first decrease on sleeve.

Regarding additional yarn amount, this will depend on how much length you add, but it is better with a skein too many than too few.

All yarns will have excess fibres (from production) that might come off as lint or shedding. Brushed yarns (ie hairier yarns) have more of these loose, excess fibres, causing more shedding.

Shedding also depends on what is worn under or over the garment, and whether this pulls at the yarn fibres. It’s therefore not possible to guarantee that there will be no shedding

Below are some tips on how to get the best result when working with hairier yarns:

1. When the garment is finished (before you wash it) shake it vigorously so the looser hairs come off. NOTE: do NOT use a lint roller, brush or any method that pulls at the yarn.

2. Place the garment in a plastic bag and put it in your freezer - the temperature will cause the fibres to become less attached to each other, and excess fibres will come off easier.

3. Leave in the freezer for a few hours before taking it out and shaking it again.

4. Wash the garment according to the instructions on the yarn label.

Pilling is a natural process that happens to even the most exclusive of fibers. It's a natural sign of wear and tear that is hard to avoid, and that is most visible in high friction areas of your garment like a sweater's arms and cuffs.

You can make your garment look as new by removing the pilling, using a fabric comb or a pill/lint remover.

Still can't find the answer you need? Then scroll down and leave your question so one of our experts can try to help you. This will be done normally within 5 to 10 working days.
In the meantime, you can read the questions and answers that others have left to this pattern or join the DROPS Workshop on Facebook to get help from fellow knitters/crocheters!

Post a comment to pattern DROPS 136-22

We would love to hear what you have to say about this pattern!

If you want to leave a question, please make sure you select the correct category in the form below, to speed up the answering process. Required fields are marked *.

Comments / Questions (47)

country flag Levêque wrote:

C’est la 2ème fois que je fais ce modèle (TT49) et je n’ai toujours pas compris ce qu’on doit faire des mailles mises sur un arrêt. Pour la taille XXXL c’est 25 mailles de chaque côté. En faisant un assemblage on obtient une pointe au niveau des épaules.

04.02.2023 - 15:50

DROPS Design answered:

Bonjour Mme Levêque, lorsque vous avez terminé les diminutions du raglan et celles de l'encolure, il vous reste 25 mailles que vous glissez en attente. Pour tricoter le col, relevez les mailles tout autour de l'encolure en reprenant en même temps les mailles mises en attente à la fin de l'empiècement et tricotez la bordure d'encolure V comme indiqué sur toutes ces mailles. Bon tricot!

06.02.2023 - 15:19

country flag Kristensen Marianne wrote:

Hej vil i hjælpe med en erstatning for cotton viscose to tråde til opskriften summer breeze, kan ikke finde en i jeres omregner. Mvh Marianne

13.08.2022 - 19:06

DROPS Design answered:

Hei Marianne. Til denne genseren er det kun brukt DROPS Cotton Viscose i vrangbordkantene. DROPS Cotton Viscose tilhørte garngruppe A, og du kan velge garn fra denne garngruppen. Viscosen i DROPS Cotton Viscose gav en flott glans, denne glansen er dessverre ikke i de andre kvalitetene i garngruppe A. mvh DROPS Design

15.08.2022 - 10:55

country flag Laurence wrote:

Bonjour, c'est mon premier top down et je ne comprend pas comment ajouter les manches au dos/devant sur la même aiguille circulaire pour que l'emmanchure corresponde.

11.03.2022 - 12:59

DROPS Design answered:

Bonjour Laurence, cette vidéo montre comment vous allez placer les manches sur la même aiguille circulaire que le dos et le devant, entre les mailles du dos et du devant, au niveau des 7 mailles rabattues pour les emmanchures à la fin du bas du pull. Bon tricot!

14.03.2022 - 09:57

country flag Levêque wrote:

Peut-on remplacer les 2 fils de viscose par 1 ou 2 fils de cotton Light.

09.02.2022 - 09:10

DROPS Design answered:

Bonjour Mme Levêque, pas vraiment car Cotton Viscose faisait partie du groupe A alors que Cotton Light est du groupe B - vous pouvez utiliser DROPS Loves You 7 ou bien Safran . Retrouvez ici comment calculer la nouvelle quantité. Bon tricot!

09.02.2022 - 13:37

country flag Zuzana wrote:

Ďakujem za pekný model. Plietol sa mi trochu ťažšie, lebo preklad do češtiny bol s mnohými významovými chybami (vďaka anglickej verzii som sa dopátrala, ako to autorky mysleli), tiež mi chýbali niektoré video návody. Trochu tu bol zmätok s vlnou, ktorá sa už nevyrába. Nakoniec sa všetko vyriešilo a z výsledku mám veľkú radosť.

31.07.2021 - 18:29

country flag Lene Johansen wrote:

Tusen takk for svar. Jeg må innrømme at jeg er like forvirret på mengden. Hvor mye trenger jeg av Drops Belle og hvor mye trenger jeg av Drops Love you for å strikke en genser i størrelse Large? Blir det: 750 g Drops Belle og Drops Love you, eller 650 g Drops Belle og Drops Love you? Og hva erstatter Drops Viscose? Beklager forvirringen.

22.04.2021 - 12:25

DROPS Design answered:

Hei igjen Lene, I oppskriften er det enten Drops Ice eller Drops Light, som er garn fra gruppe B. Drops Belle erstatter her, så du trenger 750 g. Drops Love You erstatter Drops Viscose og her trenger du 150 g. Hilsen Drops Team.

23.04.2021 - 08:26

country flag Lene Johansen wrote:

Hei, Hvilke garn skal jeg bruke dersom jeg kun ønsker å bruke plantefiber og ingen oljebaserte fibrer? Hvor mye trenger jeg til størrelse L? Takk for hjelpen! Lene

20.04.2021 - 11:10

DROPS Design answered:

Hei Lene, Vi har Drops Belle som er laget av bomull, viskose og lin. Det er et garn i gruppe B, så da trenger du å strikke sammen med et garn fra gruppe A for å få riktig strikkefasthet. Drops Love You er et garn fra gruppe A som er et bomullsgarn. Hvis du bruker disse 2 garntypene, kan du bruke mengdene i oppskriften, men husk å sjekke strikkefastheten din før du begynner. God fornøyelse!

22.04.2021 - 08:22

country flag Helma Mol wrote:

Goedemorgen, de Cotton viscose is uit het assortiment, is er een vervanger? Of zou ik het gewoon van Cotton light kunnen maken en dan 100 steken opzetten met nog 8?\r\nOf hebben jullie een ander idee?

28.03.2021 - 08:16

DROPS Design answered:

Dag Helma,

Cotton viscose valt in garengroep A, en kun je dus het beste vervangen door een garen uit garengroep A, zodat je dezelfde dikte hebt. Je komt dan op Safran uit. In plaats van 2 draden uit categorie A, zou je ook voor 1 draad uit Categorie C kunnen kiezen. In dat geval i s Paris een geschikte vervanging.

01.04.2021 - 20:19

country flag Andrea wrote:

Als ik bij maat M 61 steken overhoud op het einde van de hals, klopt het dan dat de voorpanden beide 9 steken over hebben? Ik begrijp niet hoe ik dan een ronde hals moet creeren, zonder aan de bovenkant af te kanten op de schouder. De resterende steken van de voorpanden vormen als het ware een hoek van 90 graden (weet niet hoe ik dit moet uitleggen zonder foto), daar kun je toch geen steken bij opnemen zodat het rond wordt? Dank en met vriendelijke groet, Andrea

03.01.2020 - 09:35

DROPS Design answered:

Dag Andrea,

Nadat je steken op een hulpdraad hebt gezet voor de hals op het achterpand, kant je nog een keer 1 steek af aan beide kanten. Het is nu inderdaad vrij hoekig, maar als je steken opneemt rondom voor de hals en de halsboord gaat breien, zul je zien dat de 'hoekigheid' erg mee valt en de boord zich wel mooi vormt voor de hals.

08.01.2020 - 09:12

country flag Fabienne wrote:

J'ai encore une question vous entendez quoi par empiècement car si je tricote tout en aiguilles droites et que je fais les diminution, où vient l'empiècement ? Merci

21.10.2019 - 13:10

DROPS Design answered:

Bonjour Fabienne, si vous tricotez tout sur aiguilles droites, vous devez entièrement modifier le modèle pour séparer chaque pièce: dos, devant et manches, du début jusqu'à la fin. L'empiècement se tricotant ici en rond à partir des emmanchures, il vous faudra le diviser également pour le répartir sur chaque partie correspondante. Votre magasin DROPS saura vous aider si vous avez besoin d'aide - même par mail ou téléphone. Bon tricot!

21.10.2019 - 14:53