
Popular categories
Looking for a yarn?


|
|||||||
Port of France |
|||||||
 |
 |
||||||
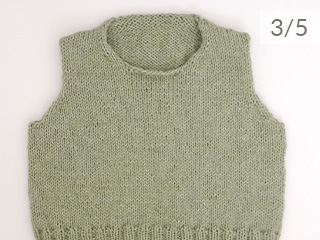
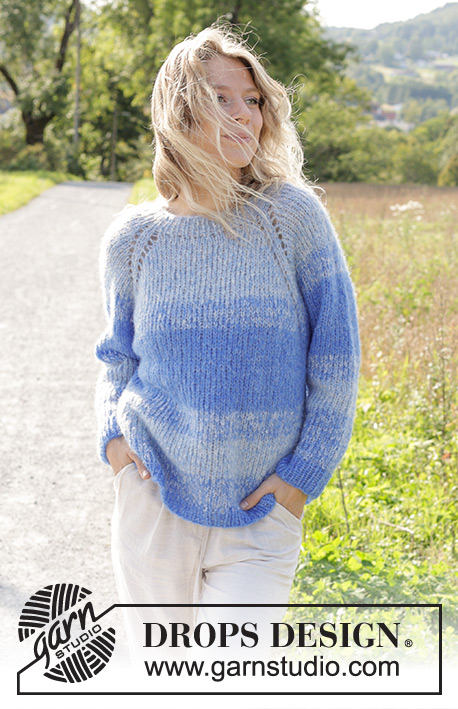
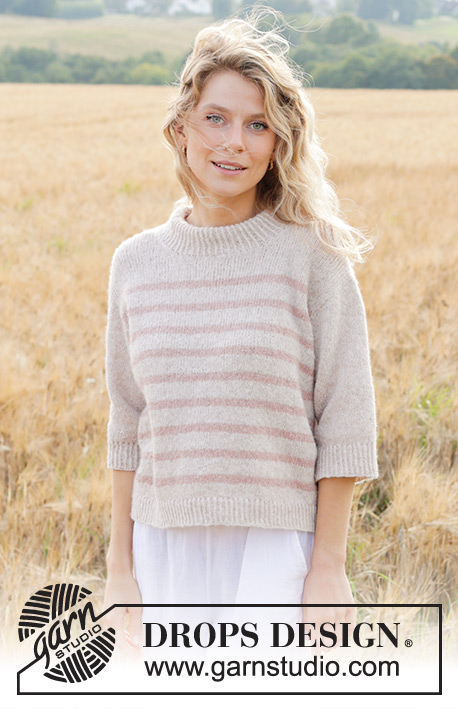
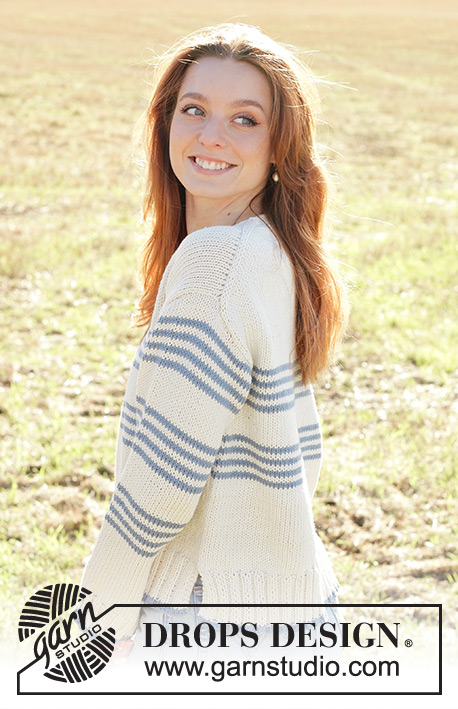
Knitted jumper in DROPS Paris. The piece is worked top down with diagonal/European shoulders, V-neck, stripes and split in sides. Sizes S - XXXL.
DROPS 250-11 |
|||||||
|
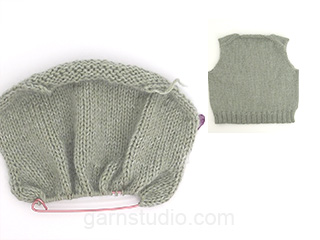
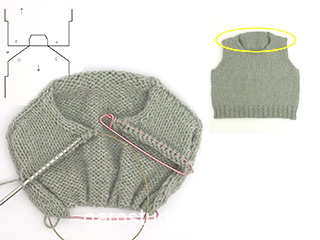
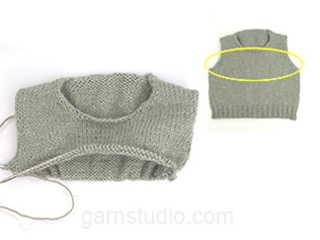
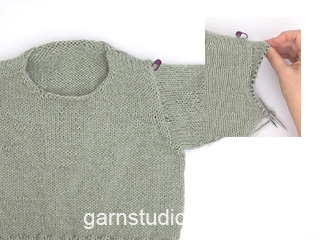
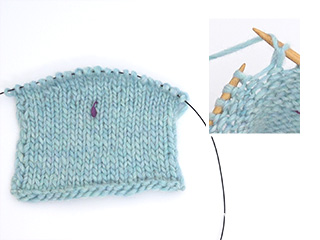
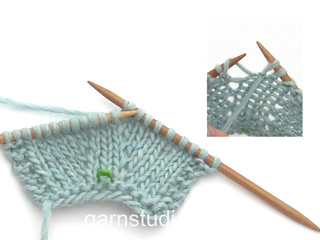
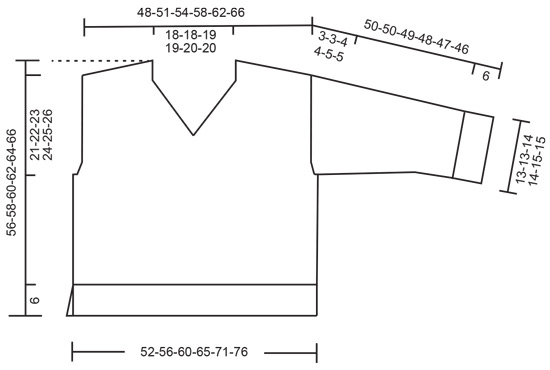
------------------------------------------------------- EXPLANATIONS FOR THE PATTERN: ------------------------------------------------------- GARTER STITCH (worked back and forth): Knit all rows. 1 ridge in height = knit 2 rows. PATTERN: See diagrams A.1 and A.2. The diagrams show all rows in the pattern from the right side. INCREASE TIP-1 (from right side): Increase 1 stitch towards the left. Use the left needle to pick up the strand between 2 stitches from the previous row, pick up strand from the front and knit the back loop. Increase 1 stitch towards the right. Use the left needle to pick up the strand between 2 stitches from the previous row, pick up strand from the back and knit the front loop. INCREASE TIP-2 (from wrong side): Increase 1 stitch towards the left. Use the left needle to pick up the strand between 2 stitches from the previous row, pick up strand from the back and purl the front loop. Increase 1 stitch towards the right. Use the left needle to pick up the strand between 2 stitches from the previous row, pick up strand from the front and purl the back loop. V-NECK: Increase for the V-neck on the front pieces. All increases are worked from the right side! RIGHT FRONT PIECE: Work until there are 4 stitches left on the row, make 1 yarn over, knit 1, work A.1. On next row (= wrong side) slip the yarn over knit-wise onto the right needle, insert the left needle into the yarn-over and replace it on the left needle, purl the front loop. LEFT FRONT PIECE: Work A.2, knit 1, make 1 yarn over, knit to end of row. On next row (= wrong side) purl the yarn over twisted to avoid a hole: STRIPES: Work 1 repeat with stripes as follows: 2 rounds / rows with colour jeans blue 2 rounds / rows with colour off white 2 rounds / rows with colour jeans blue 2 rounds / rows with colour off white 2 rounds / rows with colour jeans blue 2 rounds / rows with colour off white 2 rounds / rows with colour jeans blue = 14 rounds / rows. 1 repeat with stripes measures approx. 6½ cm. Then work 12 rounds / rows with colour off white (approx. 5½ cm) for the next stripe. Work a total of 2 rpeeats with stripes on body and 3 repeats with stripes on sleeves. Then continue with colour off white. STRIPE TIP (applies to stripes when knitted in the round): For a neater transition at the end/beginning of the round when working stripes, it can be worked as follows: Change to the new color and work 1 round. Work the first stitch of the 2nd round as follows: Take the first stitch from the previous round onto the needle, knit this stitch together with the first stitch. KNITTING TIP: When working short rows, there will be a small hole when the piece is turned - the hole can be closed by tightening the thread or using the German Short rows technique as follows: Slip the first stitch as to purl. Then place the strand over the right needle, and tighten the strand tightly at the back (this should result in two loops on the needle). These loops are knitted together on the next row. DECREASE TIP (for sleeves): Decrease 1 stitch on each side of the marker-thread as follows: Work until there are 3 stitches left before the marker-thread, knit 2 together, knit 2 (marker-thread sits between these 2 stitches), slip 1 stitch knit-wise, knit 1 and pass the slipped stitch over the knitted stitch. ------------------------------------------------------- START THE PIECE HERE: ------------------------------------------------------- JUMPER – SHORT OVERVIEW OF THE PIECE: The pattern uses both long and short needles; start with the length which fits the number of stitches and change when necessary. The piece is started back and forth, casting on stitches for the back of the neck, then working the back piece at the same time as increasing stitches for the shoulders, giving slightly diagonal shoulders. Work until the armholes are finished. The front piece is started in 2 sections, first the neck, then stitches are knitted up along one back shoulder and the piece is worked back and forth while increasing for the neck. The other shoulder is worked in the same way. The 2 front pieces are joined when the V-neck is finished and worked until the armholes are finished. The front and back pieces are joined and the body continued in the round with circular needle. Finally, the body is divided for the split in each side and finished back and forth. Stitches are knitted up around each armhole, the sleeve cap worked back and forth with short rows, then the sleeve is finished in the round. The neck is sewn together at the back and sewn to the neckline. BACK PIECE: Cast on 32-32-34-34-36-36 stitches with circular needle size 5 mm and colour off-white DROPS Paris. Purl 1 row from the wrong side. Read INCREASE TIP-1 and work as follows from the right side: Knit 3, increase towards the left, knit until there are 3 stitches left, increase towards the right, knit 3. Read INCREASE TIP-2 and work as follows from the wrong side: Purl 3, increase towards the left, purl until there are 3 stitches left, increase towards the right, purl 3. Continue like this, increasing from both the right and wrong side a total of 25-27-29-32-35-38 times. After the last increase there are 82-86-92-98-106-112 stitches. Insert 1 marker outermost on one side. The piece is now measured from here! Continue with stocking stitch, working STRIPES – read description above, and increasing for the armholes as follows: When the piece measures 13-14-15-15-16-17 cm work stripes. AT THE SAME TIME, when the piece measures 14-15-16-16-16-16 cm increase for the armholes as follows from the right side: Knit 3, increase towards the left, knit until there are 3 stitches left, increase towards the right, knit 3 - remember INCREASE TIP-1 and REMEMBER THE KNITTING TENSION! Increase like this, on each row from the right side, a total of 2-2-2-2-3-4 times = 86-90-96-102-112-120 stitches. Continue working until the piece measures 16-17-18-18-19-20 cm from the marker, measured along the armhole. Finish after a row from the wrong side. The armhole increases should be finished and you have approx. 3 cm of stripes. Cut the strand and place the stitches on a stitch holder. RIGHT FRONT PIECE: Cast on 4 stitches with double pointed needles size 5 mm and colour off-white DROPS Paris. Work the neck as follows from the right side: 1 edge stitch in stocking stitch, A.1. Work back and forth with knit over knit and purl over purl for 8-8-8½-8½-9-9 cm. Cut the strand. Knit up 25-27-29-32-35-38 stitches inside the top stitches along the back right shoulder from the right side (1 stitch in each row along the diagonal shoulder) then continue over the neck from the right side as follows: Purl 2 together (= edge stitch decreased), knit 2 = 28-30-32-35-38-41 stitches. All measurements are now taken from here! Work stocking stitch and A.1 back and forth as before. When the piece measures 8-9-9-10-10-11 cm, increase for the V-NECK. Increase 1 stitch every 2nd row (each row from the right side) a total of 13-13-14-14-15-15 times = 41-43-46-49-53-56 stitches. Finish after a row from the right side. Place the stitches on a stitch holder. LEFT FRONT PIECE: Cast on 4 stitches with double pointed needles size 5 mm and colour off-white DROPS Paris. Work the neck as follows from the right side: Work A.2, 1 edge stitch in stocking stitch. Work back and forth with knit over knit and purl over purl for 8-8-8½-8½-9-9 cm, with the last row from the wrong side. Do not cut the strand. On the next row from the right side work as follows: Knit 2, purl 2 together (= edge stitch decreased), knit up 25-27-29-32-35-38 stitches inside the top stitches along the back left shoulder, from the right side (1 stitch in each row along the diagonal shoulder) = 28-30-32-35-38-41 stitches. All measurements are now taken from here! Work stocking stitch and A.2 back and forth as before. When the piece measures 8-9-9-10-10-11 cm, increase for the V-NECK – read description above. Increase 1 stitch every 2nd row (each row from the right side) a total of 13-13-14-14-15-15 times = 41-43-46-49-53-56 stitches. Finish after a row from the right side. The 2 front pieces are now joined, working from the wrong side as follows: Purl the 41-43-46-49-53-56 stitches from the left front piece, place the stitches from the right front piece on the needle and purl them = 82-86-92-98-106-112 stitches. Work as follows from the right side: Knit 39-41-44-47-51-54, place the next 2 stitches on a cable needle in front of the piece, knit 2, knit 2 from cable needle, knit the remaining 39-41-44-47-51-54 stitches. Work stocking stitch back and forth, and work STRIPES when the piece measures 23-24-25-27-28-29 cm. AT THE SAME TIME, increase for the armholes from the right side as follows, when the piece measures 24-25-26-28-28-28 cm: Knit 3, increase towards the left, knit until there are 3 stitches left, increase towards the right, knit 3 - remember INCREASE TIP-1. Increase like this on each row from the right side a total of 2-2-2-2-3-4 times = 86-90-96-102-112-120 stitches. Continue working until the piece measures 26-27-28-30-31-32 cm, finishing after a row from the wrong side. The armhole increases should be finished and you have approx. 3 cm of stripes; make sure you finish on the same row in the stripes as on the back piece. Now join the front and back pieces for the body. BODY: Work the 86-90-96-102-112-120 stitches from the front piece, cast on 2-6-6-8-8-10 stitches (= in side under sleeve), work the 86-90-96-102-112-120 stitches from the back piece, cast on 2-6-6-8-8-10 stitches (= in side under sleeve) = 176-192-204-220-240-260 stitches. Continue with stocking stitch and stripes in the round - read STRIPE TIPS, until the piece measures 50-52-54-56-58-60 cm, measured from the top front shoulder. Now divide for the split in each side, with 88-96-102-110-120-130 stitches on both the front and back pieces. Finish each piece separately. FRONT PIECE: Change to circular needle size 3.5 mm and continue back and forth. On the next row (right side) work rib as described below and increase 18-18-20-20-22-24 stitches evenly on the first row (do not increase over the garter stitches) = 106-114-122-130-142-154 stitches: Work 2 GARTER STITCHES – read description above, rib (knit 2, purl 2 – remembering to increase stitches as described above) until there are 4 stitches left, knit 2, 2 garter stitches. Work this rib for 5 cm. Change to colour jeans blue and work 2 more rows of rib. Cast off. The jumper measures approx. 56-58-60-62-64-66 cm, measured from the top front shoulder. BACK PIECE: Work in the same way as the front piece. SLEEVES: Lay the piece flat and insert 1 marker at the top of the armhole (NOTE! This is not where the stitches were knitted up but 5-5-5-6-6-6 cm down the front piece = mid-top of shoulder). Use circular needle size 5 mm. Start in the middle of the cast-on stitches under the sleeve, knit up 74-80-84-90-94-98 stitches around the armhole – with equal numbers of stitches on each side of the marker. Work stocking stitch and short rows back and forth as follows, starting mid-under the sleeve (this gives the sleeve a better fit): Row 1 (right side): Knit 10-10-11-11-12-12 stitches past the marker, turn – read KNITTING TIP. Row 2 (wrong side): Purl 10-10-11-11-12-12 stitches past the marker, turn Row 3 (right side): Knit 10-10-8-9-6-6 stitches past the previous turn, turn. Row 4 (wrong side): Purl 10-10-8-9-6-6 stitches past the previous turn, turn. Repeat rows 3 and 4 until you have turned a total of 3-3-4-4-6-6 times on each side (you have worked 30-30-35-38-42-42 stitches past the marker). Knit to mid-under sleeve (beginning of round). Insert 1 marker-thread here which is used when decreasing under the sleeve. Allow the thread to follow your work onwards. Work stocking stitch in the round and STRIPES. When the sleeve measures 4-4-5-5-6-6 cm, measured from the knitted-up stitches (all measurements are taken mid-top of sleeve), decrease 2 stitches under the sleeve – read DECREASE TIP. Decrease like this every 2nd round 2-3-3-4-4-5 times, then every 2½-2½-2-1½-1½-1½ cm 13-15-15-17-17-18 times. A total of 15-18-18-21-21-23 times = 44-44-48-48-52-52 stitches. Work until the sleeve measures 44-44-43-42-41-40 cm. Change to circular needle size 3.5 mm. Work rib (knit 2, purl 2) AT THE SAME TIME as you increase 8-8-8-8-8-8 stitches evenly on the first round = 52-52-56-56-60-60 stitches. Work this rib for 5 cm. Change to colour jeans blue and work 2 more rounds of rib. Cast off. The sleeve measures 50-50-49-48-47-46 cm. ASSEMBLY: Sew the neck together mid-back and sew the neck to the neckline at the back. |
|||||||
Diagram explanations |
|||||||
|
|||||||

|
|||||||
|
|||||||
|
Have you made this or any other of our designs? Tag your pictures in social media with #dropsdesign so we can see them! Do you need help with this pattern?You'll find tutorial videos, a Comments/Questions area and more by visiting the pattern on garnstudio.com. © 1982-2024 DROPS Design A/S. We reserve all rights. This document, including all its sub-sections, has copyrights. Read more about what you can do with our patterns at the bottom of each pattern on our site. |
|||||||


With over 40 years in knitting and crochet design, DROPS Design offers one of the most extensive collections of free patterns on the internet - translated to 17 languages. As of today we count 304 catalogues and 11422 patterns - 11422 of which are translated into English (UK/cm).
We work hard to bring you the best knitting and crochet have to offer, inspiration and advice as well as great quality yarns at incredible prices! Would you like to use our patterns for other than personal use? You can read what you are allowed to do in the Copyright text at the bottom of all our patterns. Happy crafting!
Comments / Questions (7)
Ich finde die Mengenangabe nicht...oder kann ich nur nicht richtig sehen?
26.04.2024 - 15:12DROPS Design answered:
Liebe Frau Zander, die benötige Garnmenge finden Sie für jede Größe im Kopfteil unter Tab "Anleitung", z.B. in S brauchen Sie 500 g DROPS Paris / 50 g das Knaüel = 10 Knäuel in Farbe 17 + 150/50 = 3 Knäuel Farbe 30. Viel Spaß beim Stricken!
26.04.2024 - 15:48Wieso steht unter dem Namen/Nr. der Anleitung die Garngruppe C oder A+A und dann beim verwendeten Garn DROPS PARIS mit der Garngruppe B? Das verwirrt mich gerade.
03.04.2024 - 13:10DROPS Design answered:
Liebe Angelika, das ist nur ein Typo, sollte hier C sein und nicht B. Danke für den Hinweis, eine Korrektur erfolgt. Viel Spaß beim Stricken!
03.04.2024 - 13:24Très joli modèle printanier
20.02.2024 - 11:32Sail away
22.01.2024 - 08:23Four stribes
18.01.2024 - 18:29Brittany Coasts
18.01.2024 - 17:23Sailors sweater Or Cottage core cardigan
18.01.2024 - 15:52