
Popular categories
Looking for a yarn?


|
||||||||||
Oat Flakes Cardigan |
||||||||||
 |
 |
|||||||||
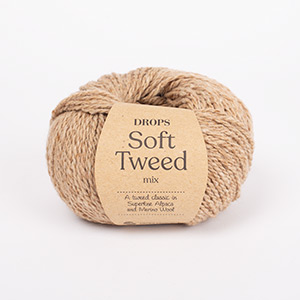
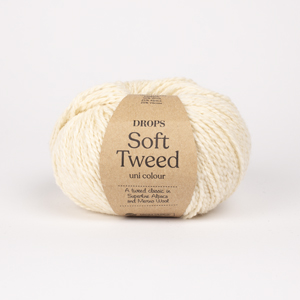
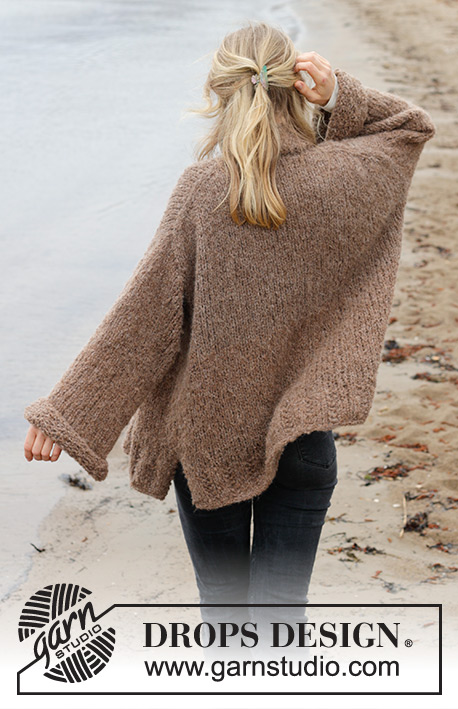
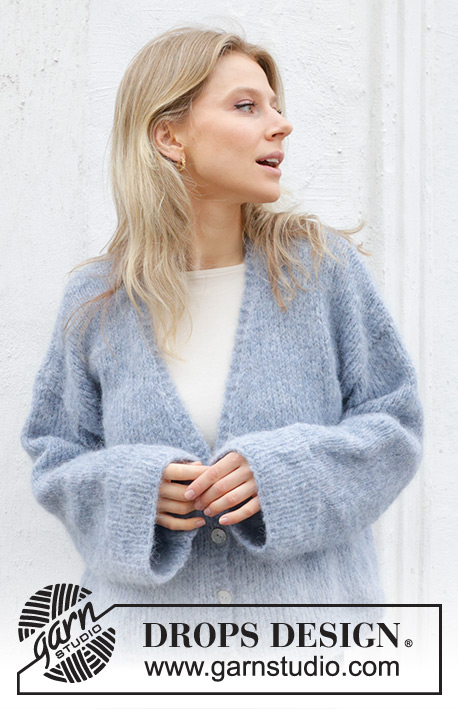
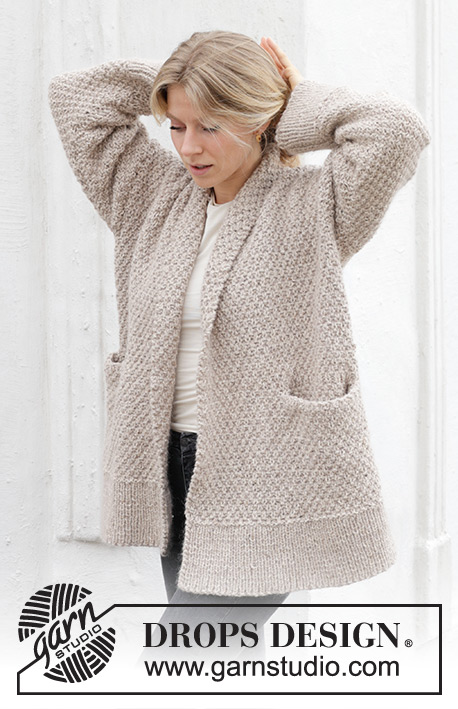
Knitted jacket in DROPS Soft Tweed and DROPS Kid-Silk. The piece is worked bottom up with moss stitch, shawl-collar, pockets and split in sides. Sizes S - XXXL.
DROPS 244-16 |
||||||||||
|
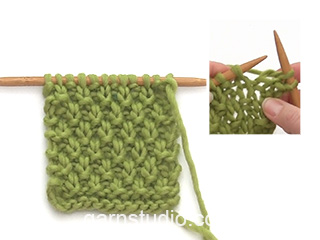
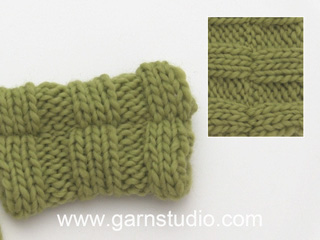
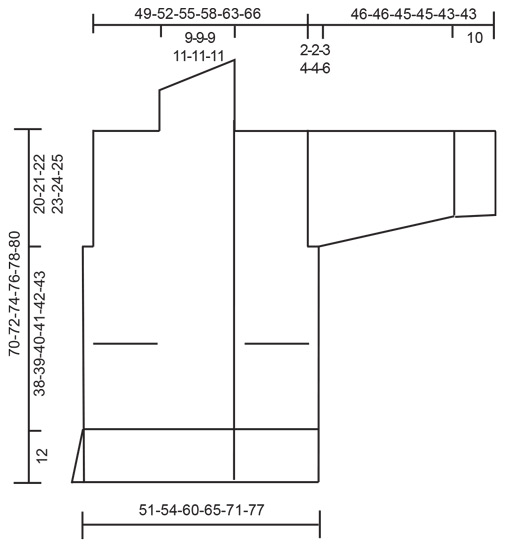
------------------------------------------------------- EXPLANATIONS FOR THE PATTERN: ------------------------------------------------------- GARTER STITCH (worked back and forth): Knit all rows. 1 ridge = knit 2 rows. PATTERN: See diagram A.1. The diagram shows all rows in the pattern from the right side. NOTE! First row in A.1 is worked from the wrong side. DECREASE TIP (evenly spaced): To work out how to decrease evenly, count the total number of stitches on needle (e.g., 103 stitches) minus the edge stitches (e.g., 2 stitches) and divide the remaining stitches by the number of decreases to be made (e.g., 37) = 2.7. In this example decrease by knitting together approx. each 2nd and 3rd stitch. INCREASE TIP (mid-under sleeve): Increase 1 stitch inside 1 edge stitch on each side by making 1 yarn over. On the next row work the yarn overs twisted to avoid holes. Then work the new stitches into A.1. KNITTING TIP: So the pattern fits, work 1 more stitch between the pocket and side on the left front piece than on the right front piece. CASTING-OFF TIP: To avoid the cast-off edge being tight you can cast off with a larger size needle. If the edge is still tight, make 1 yarn over after approx. each 4th stitch at the same time as casting off; the yarn overs are cast off as normal stitches. ------------------------------------------------------- START THE PIECE HERE: ------------------------------------------------------- JACKET – SHORT OVERVIEW OF THE PIECE: The piece is worked in sections, back and forth, bottom up and sewn together. BACK PIECE: Cast on 103-109-119-129-141-153 stitches with circular needle size 5 mm and 1 strand of each colour DROPS Soft Tweed and 1 strand DROPS Kid-Silk (= 3 strands). Work next row as follows from the wrong side: 1 edge stitch in GARTER STITCH – read description above, * purl 1, knit 1 *, work from *-* until there are 2 stitches left, purl 1 and 1 edge stitch in garter stitch. Continue this rib for 12 cm. Knit 1 row from the right side and decrease 37-39-41-45-49-53 stitches evenly spaced – read DECREASE TIP, then cast on 1 stitch at the end of the row (edge stitch). Change to circular needle size 7 mm. Turn, work 1 edge stitch in garter stitch, pattern A.1 to the end of the row, then cast on 1 stitch (edge stitch) = 68-72-80-86-94-102 stitches. Continue A.1 with 1 edge stitch in garter stitch on each side. REMEMBER THE KNITTING TENSION! When the piece measures 50-51-52-53-54-55 cm from the cast-on edge, cast off 2-2-4-5-6-8 stitches for the armholes at the beginning of the next 2 rows = 64-68-72-76-82-86 stitches. Continue A.1 with 1 edge stitch in garter stitch on each side. When the piece measures 68-70-72-74-76-78 cm, cast off the middle 10-10-10-12-12-12 stitches for the neck and finish each shoulder separately. Then cast off 1 stitch on the next row from the neck = 26-28-30-31-34-36 shoulder stitches. When the piece measures 70-72-74-76-78-80 cm, cast off – read CASTING-OFF TIP. Work the other shoulder in the same way. POCKET POUCHES: Cast on 24 stitches with circular needle size 7 mm and 1 strand of each colour DROPS Soft Tweed and 1 strand DROPS Kid-Silk (= 3 strands). Work stocking stitch with 1 edge stitch in garter stitch on each side. When the pouch measures 7 cm, work A.1 (first row in A.1 is worked from the wrong side) with 1 edge stitch in garter stitch on each side. When the pouch measures 16 cm, cast off 1 stitch at the beginning of the next 2 rows = 22 stitches – with the last row worked, row 1 in A.1 (this is important so the pattern matches the jacket). Place the stitches on a stitch holder. Work 3 more pouches in the same way = 4 pocket pouches. RIGHT FRONT PIECE: Cast on 73-77-81-91-97-103 stitches with circular needle size 5 mm and 1 strand of each colour DROPS Soft Tweed and 1 strand DROPS Kid-Silk (= 3 strands). Work as follows from the wrong side: 1 edge stitch in garter stitch, * purl 1, knit 1 *, work from *-* until there are 2 stitches left, purl 1 and 1 edge stitch in garter stitch. Continue this rib for 12 cm. Knit 1 row from the right side and decrease 27-29-29-35-37-39 stitches evenly spaced – remember DECREASE TIP, then cast on 1 stitch at the end of the row (edge stitch). Change to circular needle size 7 mm. Turn, work 1 edge stitch in garter stitch, A.1 until there is 1 stitch left and 1 edge stitch in garter stitch = 47-49-53-57-61-65 stitches. Continue A.1 with 1 edge stitch in garter stitch on each side. When the piece measures 31 cm – and the next row is the last row in A.1 (important so the pattern matches the pockets), work as follows from the right side: Work the first 23-25-27-27-29-31 stitches, insert a marker here, work the next 22 stitches, insert a marker here (= 1 marker on each side of the pocket opening), work the last 2-2-4-8-10-12 stitches. Turn and work back from the wrong side as follows: Work to the first marker. Now work the pouch together with the pocket opening at the same time as stitches are cast off (make sure the wrong side on the pouch is towards the wrong side on the front piece and the stitches are worked together in A.1): * Work the first/next stitch from the pocket opening together with the first stitch on the pouch, work the next stitch from the pocket opening together with the next stitch on the pouch. Pass the first together-worked stitches over the last together-worked stitches *. Work from *-* until all stitches on the pouch and opening have been worked together and cast off. Work to the end of the row. Remove the markers. Turn and work as far as the pocket, knit the 22 stitches on another pouch (matching A.1), work to the end of the row = 47-49-53-57-61-65 stitches. There are 2 pouches on the front piece which will later be assembled. Continue with A.1 and 1 edge stitch in garter stitch on each side. When the piece measures 50-51-52-53-54-55 cm from the cast-on edge, cast off 2-2-4-5-6-8 stitches for the armhole at the beginning of the row from the side (i.e., next row from the wrong side) = 45-47-49-52-55-57 stitches. Continue with A.1 and 1 edge stitch in garter stitch on each side. When the piece measures 70-72-74-76-78-80 cm, cast off the first 26-28-30-31-34-36 stitches on the next row from the wrong side and work the last 19-19-19-21-21-21 stitches. Now work the collar as follows: ROW 1 (= right side): Work pattern as before over the first 11-11-11-13-13-13 stitches, knit the last 8 stitches. ROW 2 (= wrong side): Knit the first 8 stitches, work pattern as before over the last 11-11-11-13-13-13 stitches. ROW 3: Work pattern as before over the first 11-11-11-13-13-13 stitches, turn. ROW 4: Work pattern as before over the 11-11-11-13-13-13 stitches. Repeat rows 1 – 4 until the collar measures 7-7-7-8-8-8 cm at the shortest point (i.e., left-hand side seen from the right side = towards the shoulder). Cast off – remember CASTING-OFF TIP. LEFT FRONT PIECE: Cast on 73-77-81-91-97-103 stitches with circular needle size 5 mm and 1 strand of each colour DROPS Soft Tweed and 1 strand DROPS Kid-Silk (= 3 strands). Work as follows from the wrong side: 1 edge stitch in garter stitch, * purl 1, knit 1 *, work from *-* until there are 2 stitches left, purl 1 and 1 edge stitch in garter stitch. Continue this rib for 12 cm. Knit 1 row from the right side and decrease 27-29-29-35-37-39 stitches evenly spaced – remember DECREASE TIP. Change to circular needle size 7 mm. Turn and work A.1 to end of row, cast on 1 stitch (edge stitch) = 47-49-53-57-61-65 stitches. Continue A.1 with 1 edge stitch in garter stitch on each side. When the piece measures 31 cm – and the next row is the last row in A.1 (important so the pattern matches the pockets), work as follows from the right side: Work the first 3-3-5-9-11-13 stitches – read KNITTING TIP, insert a marker here, work the next 22 stitches, insert a marker here (= 1 marker on each side of the pocket opening), work the last 22-24-26-26-28-30 stitches. Turn and work back from the wrong side as follows: Work to the first marker. Now the pouch is worked together with the pocket opening at the same time as stitches are cast off (make sure the wrong side on the pouch is towards the wrong side on the front piece and the stitches are worked together in A.1): * Work the first/next stitch from the pocket opening together with the first stitch on the pouch, work the next stitch from the pocket opening together with the next stitch on the pouch. Pass the first together-worked stitches over the last together-worked stitches *. Work from *-* until all stitches on the pouch and opening have been worked together and cast off. Work to the end of the row. Remove the markers. Turn and work as far as the pocket, knit the 22 stitches on another pouch (matching A.1), work to the end of the row = 47-49-53-57-61-65 stitches. There are 2 pouches on the front piece which will later be assembled. Continue with A.1 and 1 edge stitch in garter stitch on each side. When the piece measures 50-51-52-53-54-55 cm from the cast-on edge, cast off 2-2-4-5-6-8 stitches for the armhole at the beginning of the row from the side (i.e., next row from the right side) = 45-47-49-52-55-57 stitches. Continue with A.1 and 1 edge stitch in garter stitch on each side. When the piece measures 70-72-74-76-78-80 cm, cast off the first 26-28-30-31-34-36 stitches on the next row from the right side and work the last 19-19-19-21-21-21 stitches. Now work the collar as follows: ROW 1 (= wrong side): Work pattern as before over the first 11-11-11-13-13-13 stitches, knit the last 8 stitches. ROW 2 (= right side): Knit the first 8 stitches, work pattern as before over the last 11-11-11-13-13-13 stitches. ROW 3: Work pattern as before over the first 11-11-11-13-13-13 stitches, turn. ROW 4: Work pattern as before over the 11-11-11-13-13-13 stitches. Repeat rows 1 – 4 until the collar measures 7-7-7-8-8-8 cm at the shortest point (i.e., right-hand side seen from the right side = towards the shoulder). Cast off – remember CASTING-OFF TIP. SLEEVES: Cast on 54-58-58-60-60-64 stitches with circular needle size 5 mm and 1 strand of each colour DROPS Soft Tweed and 1 strand DROPS Kid-Silk (= 3 strands). Work the next row from the right side as follows: 1 edge stitch in garter stitch, * knit 1, purl 1 *, work from *-* until there is 1 stitch left, 1 edge stitch in garter stitch. Continue this rib for 10 cm. Knit 1 row from the right side and decrease 16-18-18-18-18-20 stitches evenly spaced – remember DECREASE TIP = 38-40-40-42-42-44 stitches. Change to circular needle size 7 mm. Purl back from the wrong side with 1 edge stitch in garter stitch on each side. Continue A.1 with 1 edge stitch in garter stitch on each side. When the sleeve measures 12 cm, increase 1 stitch inside the 1 edge stitch on each side – read INCREASE TIP. Increase like this every 4½-4½-3-3-2½-2 cm a total of 7-7-9-9-10-11 times = 52-54-58-60-62-66 stitches. Continue working until the sleeve measures 44-44-42-41-39-37 cm. Insert 1 marker in each side –mark the bottom of the armhole. Continue working until the sleeve measures 46-46-45-45-43-43 cm. Cast off - remember CASTING-OFF TIP. Work the other sleeve in the same way. ASSEMBLY: Sew the shoulder seams inside the cast-off edge – make sure the seam is not tight. Sew the sleeve seams as far as the markers = 2-2-3-4-4-6 cm split at top of the sleeve. Sew this split to the bottom of the armhole - see sketch, then sew the sleeve to the rest of the armhole. Sew the side seams, inside 1 edge stitch as far down as the rib (= 12 cm split on each side). Sew the collar together mid-back and the collar to the neckline. Lay the pocket pouches together and sew around the edges. |
||||||||||
Diagram explanations |
||||||||||
|
||||||||||

|
||||||||||

|
||||||||||
|
||||||||||
|
Have you made this or any other of our designs? Tag your pictures in social media with #dropsdesign so we can see them! Do you need help with this pattern?You'll find tutorial videos, a Comments/Questions area and more by visiting the pattern on garnstudio.com. © 1982-2024 DROPS Design A/S. We reserve all rights. This document, including all its sub-sections, has copyrights. Read more about what you can do with our patterns at the bottom of each pattern on our site. |
||||||||||


With over 40 years in knitting and crochet design, DROPS Design offers one of the most extensive collections of free patterns on the internet - translated to 17 languages. As of today we count 304 catalogues and 11422 patterns - 11422 of which are translated into English (UK/cm).
We work hard to bring you the best knitting and crochet have to offer, inspiration and advice as well as great quality yarns at incredible prices! Would you like to use our patterns for other than personal use? You can read what you are allowed to do in the Copyright text at the bottom of all our patterns. Happy crafting!
Comments / Questions (34)
Ich komme mit der Beschreibung zum Stricken des Kragens nicht klar. In Reihe 3 und 4 sind nur die 11 Maschen genannt. Was passiert mit den 8 Maschen? Wie komme ich am Ende auf 7 Maschen? für den Kragen?
24.03.2024 - 14:17Buonasera, nel pattern viene detto di lavorare un intero ferro a dritto sul dritto del lavoro prima di iniziare la maglia a grana di riso doppia; ma dalle foto risulta che il dritto del lavoro sia lavorato con un ferro a rovescio. Potreste cortesemente dirmi quale sia quello corretto? Più che altro perché quando si dovranno lavorare le parti con le tasche risulta difficile capire quale sia quello giusto e quello sbagliato. Grazie mille.
10.03.2024 - 18:50DROPS Design answered:
Buonasera Paola, si deve lavorare un ferro diritto dal diritto del lavoro. Buon lavoro!
17.03.2024 - 18:50Merci pour ce tuto. J’ai déjà bien avancé mais je ne comprend pas bien la partie du col. Pourquoi 8 des mailles sont elles à tricoter à l’endroit et non au point fantaisie comme le reste ? Je trouve que c’est moins joli d’avoir ce changement. Merci pour la réponse.
22.02.2024 - 19:14DROPS Design answered:
Bonjour Lorene, on tricote ces mailles au point mousse pour permettre au point de blé (A.1) de ne pas être perturbé par les rangs raccourcis; ainsi, A.1 continue et l'extérieur du col est au point mousse. Bon tricot!
23.02.2024 - 08:18Hoi, als ik de vest in een maat S wil breien, hoeveel bolletjes wol heb ik dan nodig? En klopt het dat er drie verschillende bolletjes worden gebruikt?
24.01.2024 - 09:26DROPS Design answered:
Dag Tamara,
Bovenaan bij de materialenlijst staat per maat aangegeven hoeveel gram je nodig hebt. (Het eerste getal geldt voor maat S, het tweede getal voor maat M, enzovoort). 1 bol weegt meestal 50 gram, maar let erop dat dit per garensoort verschillend kan zijn. Dus als er bijvoorbeeld 400 gram staat dan zou je 8 bollen nodig hebben als 1 bol 50 gram weegt. Bij dit patroon heb je inderdaad 3 verschillende soorten bolletjes nodig; 2 kleuren van Soft Tweed en 1 kleur van Kid-Silk.
28.01.2024 - 19:26Can you tell me what size the model is and what size was knitted, I would like to know the amount of ease to work out which size to knit. Thank you so much.
22.01.2024 - 15:59DROPS Design answered:
Dear Theresa, the model is an M size, wearing an M size garment. You can see the measurements of the garment in cm in the size charts, at the end of the pattern. You can choose how much ease to have by comparing the measurements of the finished garment to your own. Happy knitting!
22.01.2024 - 23:21Dzień dobry! Skończyłam robić sweter i nie wiem dokładnie jak przyszyć kołnierz do dekoltu i z szyć plecy. Czy istnieje szansa na dostanie bardziej szczegółowej instrukcji? Dziękuję! :)
14.01.2024 - 13:41DROPS Design answered:
Witaj Anno, spójrz na dół wzoru, gdzie znajdują się instrukcje video. Znajdziesz tak jak się wykonuje prosty szalowy kołnierz i zszywa oraz jak zszyć boki swetra. Pozdrawiamy!
15.01.2024 - 11:02Hello, I am very confused with the instructions for the pocket. What does it mean "make sure the wrong side on the pouch is towards the wrong side on the front piece". This is happening during a row on the wrong side and the explanation seems very confusing. Thanks a lot for your help
13.01.2024 - 01:17DROPS Design answered:
Dear Susana, this is a double pocket. Before starting the front piece you should have two pocket pieces for each front piece. The first pocket piece is worked together with the front piece stitches (in this case, the wrong side of the front piece and the wrong side of the pocket piece are facing each other, which is necessary so that all of the visible pocket pieces will be on the right side. Then, on the next row, work 22 stitches from the other pocket piece and then you continue with the front piece. To finish the jacket sew all of the openings in the pocket. Happy knitting!
14.01.2024 - 20:27Hi there, I am working the last bit in the pouches and I am confused with this part: "When the pouch measures 16 cm, cast off 1 stitch at the beginning of the next 2 rows = 22 stitches – with the last row worked, row 1 in A.1 (this is important so the pattern matches the jacket). " Does my last row needs to be A1 or, do I have to work to the last row and then work A1?
09.01.2024 - 23:11DROPS Design answered:
Dear Mrs Araujo, the last row worked on pouch should be the first row in A.1, this means start casting off on the 4th row in A.1, turn and work next row = row 1 in A.1 casting off 1 st at the beg of row. Happy knitting!
10.01.2024 - 09:29Hi there, I am working the back piece in Size S and it says "When the piece measures 68 cm, cast off the middle 10 stitches for the neck and finish each shoulder separately. Then cast off 1 stitch on the next row from the neck = 26 shoulder stitches. " If I am not wrong 68 minus 10 is 58 and divided by each shoulder it should be 29 stitches. Even if I do minus 1 of the stitch that I will be casting off from the neck that would still only be 28. How do we get to 26? Can someone help?
04.01.2024 - 00:09DROPS Design answered:
Hi Susan, You cast off 2 stitches on each side for the armholes when the back piece measures 50 cm. This leaves you with 64 stitches. Then when you cast off the middle 10 stitches (at 68 cm) you are left with 54 stitches, minus 1 stitch more for the neck, you now have 26 stitches on the shoulder. Hope this helps and happy knitting!
04.01.2024 - 07:41När den andra fickpåsen stickas med, ska den väl vara med avigsidan utåt? Dvs med rätan in mot den första fiskpåsen? Och den borde då ha ett varv mer på sig redan, för att stämma med A-mönstret då man redan stickat ett varv till ( ” ihop och avmaskningsvarvet” till framsidan av fickan. Nu blir det ju fel i A-mönstret.. (lite som på bilden)
17.12.2023 - 02:06DROPS Design answered:
Hej Majken, du har två fickor för varje framstycke. Första stickas ihop med framstycket (i det här fallet är avigsidan på framstycket och avigsidan på fickstycket vända mot varandra. Sedan, på nästa varv, sticka 22 maskor från det andra fickstycket och sedan fortsätter du med framstycket enligt mönstret.
16.01.2024 - 11:32