DROPS Alpaca Bouclé
DROPS Alpaca Bouclé
80% Alpaca, 15% Wool, 5% Polyamide
from 3.60 £ /50g
DROPS Brushed Alpaca Silk
77% Alpaca, 23% Silk
from 2.90 £ /25g
Get the yarn to make this pattern from 41.20£.

The yarn cost is calculated from the pattern’s smallest size and the yarn’s cheapest product type. Looking for an even better price? You might find it on the DROPS Deals!

DROPS SS24

Dream Weaver

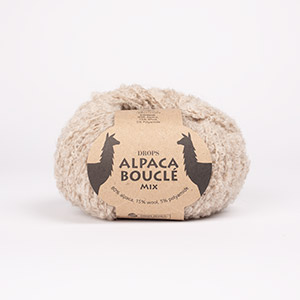
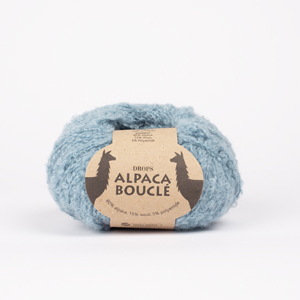
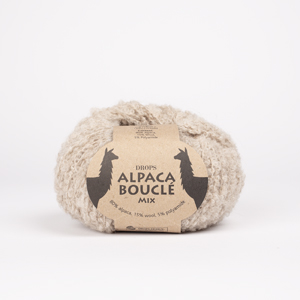
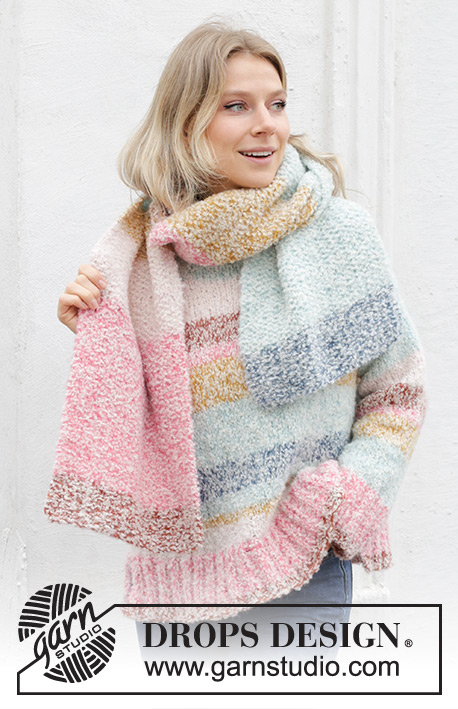
Knitted over-sized jumper in DROPS Alpaca Bouclé and DROPS Brushed Alpaca Silk. The piece is worked top down with European/diagonal shoulders, stripes, high neck and split in sides. Sizes XS - XXL.

DROPS 243-34
DROPS Design: Pattern ab-145
Yarn group C + C or E
-------------------------------------------------------

SIZES:
XS - S - M - L - XL - XXL

YARN:
DROPS ALPACA BOUCLÉ from Garnstudio (belongs to yarn group C)
250-300-300-350-400-400 g colour 100, off white
And use:
DROPS BRUSHED ALPACA SILK from Garnstudio (belongs to yarn group C)
50-50-50-50-50-75 g colour 15, light sea green
50-50-50-50-50-50 g colour 31, hot pink
25-25-25-25-25-25 g colour 12, powder pink
25-25-25-25-25-25 g colour 19, curry
25-25-25-25-25-25 g colour 24, rust
25-25-25-25-25-25 g colour 25, steel blue

NEEDLES:
DROPS CIRCULAR NEEDLE SIZE 7 MM: Length 40 cm and 80 cm.
DROPS CIRCULAR NEEDLE SIZE 5.5 MM: Length 40 cm and 80 cm.
DROPS DOUBLE POINTED NEEDLES SIZE 7 MM.
DROPS DOUBLE POINTED NEEDLES SIZE 5.5 MM.
The technique MAGIC LOOP can be used – you then only need 80 cm circular needle in each size.

KNITTING TENSION:
12 stitches in width and 16 rows in height with stocking stitch and 1 strand of each quality = 10 x 10 cm.
NOTE: Needle size is only a guide. If you get too many stitches on 10 cm, change to a larger needle size. If you get too few stitches on 10 cm, change to a smaller needle size.

-------------------------------------------------------

Alternative Yarn – See how to change yarns here
Yarn Groups A to F – Use the same pattern and change the yarn here
Yarn usage using an alternative yarn – Use our yarn converter here

-------------------------------------------------------

DROPS Alpaca Bouclé
DROPS Alpaca Bouclé
80% Alpaca, 15% Wool, 5% Polyamide
from 3.60 £ /50g
DROPS Brushed Alpaca Silk
77% Alpaca, 23% Silk
from 2.90 £ /25g
Get the yarn to make this pattern from 41.20£.

The yarn cost is calculated from the pattern’s smallest size and the yarn’s cheapest product type. Looking for an even better price? You might find it on the DROPS Deals!

Pattern instructions

NOTE: This pattern is written in British English. All measurements in charts are in cm. For conversion from cm to inches - click here. There are different terms for crocheting in British and American English. If this pattern includes crochet, click for "crochet terms" here. For this pattern in American English, please click here.
-------------------------------------------------------

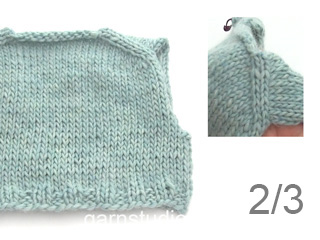
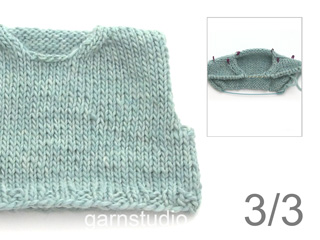
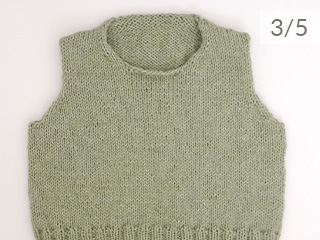
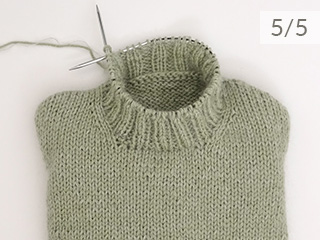
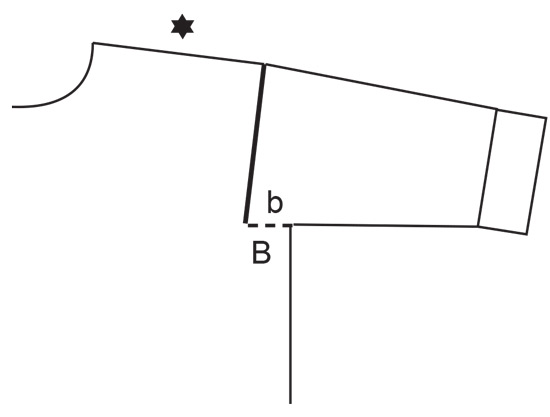
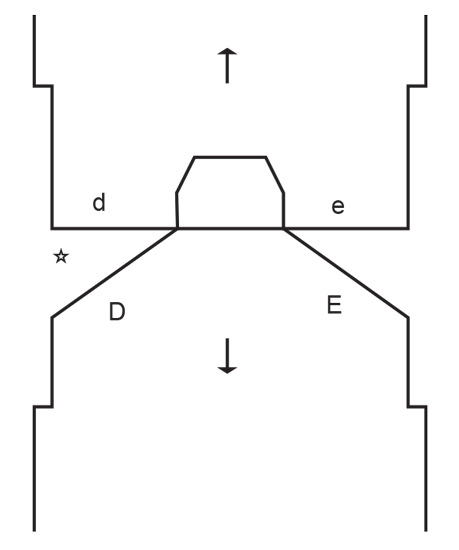
EXPLANATIONS FOR THE PATTERN:
-------------------------------------------------------

GARTER STITCH (worked back and forth):
Knit all rows.
1 ridge = knit 2 rows.

INCREASE TIP FROM THE RIGHT SIDE:
Increase towards the left AFTER MARKER:
Use left needle to pick up thread between 2 stitches from row below, pick up thread from front and knit stitch in back loop.
Increase towards the right BEFORE MARKER:
Use left needle to pick up thread between 2 stitches from row below, pick up thread from behind and knit stitch in front loop.

INCREASE TIP FROM THE WRONG SIDE:
Increase towards the left AFTER MARKER:
Use left needle to pick up thread between 2 stitches from row below, pick up thread from behind and purl stitch in front loop.
Increase towards the right BEFORE MARKER:
Use left needle to pick up thread between 2 stitches from row below, pick up thread from front and purl stitch in back loop.

DECREASE TIP (for sleeves):
Decrease 1 stitch on either side of the marker-thread as follows: Work until there are 3 stitches left before the marker-thread, knit 2 together, knit 2 (marker-thread sits between these 2 stitches), slip 1 stitch knit-wise, knit 1 and pass the slipped stitch over the knitted stitch (2 stitches decreased).
STRIPES – SHORT INFO:
The whole garment is worked with 1 strand DROPS Alpaca Bouclé and 1 strand DROPS Brushed Alpaca Silk (2 strands). Only DROPS Brushed Alpaca Silk changes colour when working the stripes (which are worked in stocking stitch).

STRIPES BACK/FRONT PIECES:
6 cm with colour powder pink.
4 cm with colour rust.

STRIPES BODY:
2 cm with colour hot pink.
5 cm with colour curry.
7-7-8-8-9-9 cm with colour light sea green.
4 cm with colour steel blue.
3-3-3-4-4-4 cm with colour light sea green.
2 cm with colour curry.
4-5-5-5-5-6 cm or to desired length, with colour powder pink.

STRIPES SLEEVES:
6 cm with colour powder pink.
4 cm with colour rust.
2 cm with colour hot pink.
5 cm with colour curry.
9-8-8-8-7-7 cm or to desired length, with colour light sea green.

KNITTING TIP (fastening strands):
When changing to a new colour as the stripes are worked, stop when there are 8 stitches left before the new stripe. Cut the DROPS Brushed Alpaca Silk strand approx. 10-12 cm from the work, tie this end together with the new colour-strand (approx. 7-8 cm end on the strand that was cut so that there are 2 strand ends approx. 7-8 cm), split the strand ends and work the last stitches with 2 strands in the colors you have just knitted with, after the knot you work the next stitches with 2 strands in the next stripe color (the strand ends will now be worked in) .
Do this every time you change colours, changing colours on alternate sides of the piece.

-------------------------------------------------------

START THE PIECE HERE:

-------------------------------------------------------

JUMPER - SHORT OVERVIEW OF THE PIECE:
The jumper is worked in stocking stitch and stripes with 1 strand of each quality.
The top of the back piece is worked back and forth on circular needle from the top down until the armholes are finished. Stitches are knitted up for the front piece along each shoulder on the back piece and increased for the neck. The front piece is worked back and forth until the armholes are finished.
The front and back pieces are joined and the body continued in the round on circular needle before being divided for the split in each side.
Stitches are knitted up around each armhole. The sleeve cap is worked back and forth then the rest of the sleeves are worked in the round with double pointed needles/small circular needle. The neck is worked in the round to finish.

BACK PIECE:
Cast on 22-24-24-26-26-26 stitches with circular needle size 7 mm, 1 strand DROPS Alpaca Bouclé and 1 strand DROPS Brushed Alpaca Silk colour light sea green (2 strands). Purl 1 row from the wrong side.
Insert a marker inside the 3 outermost stitches on each side. The markers must be inside the outermost 3 stitches on each row.
Work stocking stitch back and forth.
AT THE SAME TIME increase AFTER the marker at the beginning of the row from the right side and BEFORE the marker at the end of the row – read INCREASE TIP FROM RIGHT SIDE.
On the next row (wrong side) increase in the same way – read INCREASE TIP FROM WRONG SIDE.
Continue increasing from both the right and wrong side a total of 19-21-23-24-26-28 times. REMEMBER THE KNITTING TENSION!
After the last increase there are 60-66-70-74-78-82 stitches. Work 2 rows without increasing.
Insert a marker in the outermost stitch on each side, the piece is now measured from here!
Continue working for 4-5-5-6-7-8 cm, measured along the armhole from the marker (the piece measures approx. 16-18-19-21-23-26 cm from the cast-on edge mid-back).
Read KNITTING TIP and work STRIPES BACK/FRONT PIECES (and read SHORT INFO above).
When the stripes are finished and the next row is from the right side, the piece measures approx. 14-15-15-16-17-18 cm from the marker – measured along the armhole. Cut the strands, place the stitches on a thread or another needle and work the front piece.

FRONT PIECE:
Start on the left shoulder (when the garment is worn).
Use 1 strand DROPS Alpaca Bouclé and 1 strand DROPS Brushed Alpaca Silk colour light sea green (2 strands), Knit up 19-21-23-24-26-28 stitches inside 1 stitch along the shoulder on the back piece (1 stitch in each row along the shoulder).
Work stocking stitch back and forth.
When the piece measures 5-6-7-8-9-9 cm, increase for the neck at the beginning of each row from the right side, after the first 3 stitches - remember INCREASE TIP FROM RIGHT SIDE. Increase 1 stitch 4 times = 23-25-27-28-30-32 stitches. After the last increase, work back from the wrong side. Cut the strand, place the stitches on a thread or another needle and work the right shoulder as described below.

Use 1 strand DROPS Alpaca Bouclé and 1 strand DROPS Brushed Alpaca Silk colour light sea green (2 strands), Knit up 19-21-23-24-26-28 stitches inside 1 stitch along the right back shoulder.
Work stocking stitch back and forth.
When the piece measures 5-6-7-8-9-9 cm, increase for the neck at the end of each row from the right side, before the last 3 stitches - remember INCREASE TIP FROM RIGHT SIDE. Increase 1 stitch 4 times = 23-25-27-28-30-32 stitches. After the last increase, work back from the wrong side.

Work the next row as follows from the right side: Stocking stitch over the 23-25-27-28-30-32 stitches on the right shoulder, cast on 14-16-16-18-18-18 stitches for the neck, stocking stitch over the 23-25-27-28-30-32 stitches from the left shoulder = 60-66-70-74-78-82 stitches. Work stocking stitch until the piece measures 14-15-17-18-19-20 cm. Remember KNITTING TIP and work STRIPES BACK/FRONT PIECES.
When the stripes are finished and the next row is from the right side, the piece measures approx. 24-25-27-28-29-30 cm from the knitted up stitches – measured along the armhole.
The front and back pieces are now joined for the body.

BODY:
Change to 1 strand DROPS Alpaca Bouclé and 1 strand DROPS Brushed Alpaca Silk colour hot pink (2 strands). Work stocking stitch over the 60-66-70-74-78-82 stitches on the front piece, cast on 2-2-2-4-6-8 stitches, stocking stitch over the 60-66-70-74-78-82 stitches on the back piece, cast on 2-2-2-4-6-8 stitches = 124-136-144-156-168-180 stitches.
Insert 1 marker-thread in the middle of the 2-2-2-4-6-8 cast-on stitches under each sleeve. Allow them to follow your work onwards; they are used when dividing for the split in each side.
Work to the first marker-thread – the round starts here.
Work STRIPES BODY – read description above (remember KNITTING TIP and SHORT INFO).
When the stripes are finished the body measures approx. 27-28-29-30-31-32 cm from the join, with 10 cm left.
Now divide for the split in each side and finish each piece separately.

FRONT PIECE:
= 62-68-72-78-84-90 stitches. Change to circular needle size 5.5 mm, 1 strand DROPS Alpaca Bouclé and 1 strand DROPS Brushed Alpaca Silk colour hot pink. Knit 1 row from the right side and increase 16-18-18-20-22-24 stitches evenly spaced = 78-86-90-98-106-114 stitches.
Work next row as follows from the wrong side: 2 GARTER STITCHES – read description above, * purl 2, knit 2 *, work from *-* until there are 4 stitches left, purl 2 and 2 garter stitches. Work this rib back and forth for 8 cm.
Change to 1 strand Alpaca Bouclé and 1 strand Brushed Alpaca Silk colour rust. Continue the rib for 2 cm more (10 cm rib in total). Cast off a little loosely. The jumper measures approx. 56-58-60-62-64-66 cm from the top of the shoulder.

BACK PIECE:
Place the stitches on circular needle size 5.5 mm and work in the same way as the front piece.

LEFT SLEEVE:
Use circular needle size 7 mm, 1 strand DROPS Alpaca Bouclé and 1 strand DROPS Brushed Alpaca Silk colour light sea green (2 strands).
Knit up from the right side 29-30-32-33-35-36 stitches from the bottom of the armhole up the front piece to the shoulder and 17-18-18-19-21-22 stitches from the shoulder down the back piece = 46-48-50-52-56-58 stitches round the armhole.
Insert 1 marker in the middle of the row – the sleeve is measured from here.
Work stocking stitch back and forth for 1-1-1-2-3-3 cm. Now join the sleeve using short circular needle/double pointed needles size 7 mm and finish the sleeve in the round. Insert 1 marker-thread at the beginning of the round (mid-under sleeve). Allow the thread to follow your work onwards.
You now work stripes and decrease under the sleeve. Read the whole section before continuing.
Start at the marker thread and work stocking stitch in the round.
When the sleeve measures 5-5-5-5-6-6 cm from the marker, decrease 2 stitches mid-under the sleeve – read DECREASE TIP. Decrease every 5-4½-4½-4-2½-2½ cm a total of 6-7-7-7-9-9 times = 34-34-36-38-38-40 stitches.
AT THE SAME TIME, when you have worked 10-10-10-9-9-9 cm with colour light sea green, work STRIPES SLEEVES.
When the stripes are finished the sleeve measures approx. 35-34-34-32-30-30 cm with 10 cm left.
Change to double pointed needles size 5.5 mm, 1 strand Alpaca Bouclé and 1 strand Brushed Alpaca Silk colour hot pink. Knit 1 round and increase 10-10-12-10-10-12 stitches evenly spaced = 44-44-48-48-48-52 stitches.
Work rib (knit 2, purl 2) for 8 cm.
Change to 1 strand Alpaca Bouclé and 1 strand Brushed Alpaca Silk colour rust. Continue the rib for 2 cm more (10 cm rib in total). Cast off a little loosely. The sleeve measures approx. 46-45-45-44-43-43 cm.

RIGHT SLEEVE:
Work in the same way as the left sleeve but knit up 17-18-18-19-21-22 stitches from the bottom of the armhole up the back piece to the shoulder and 29-30-32-33-35-36 stitches down the front piece.

NECK:
Start on one shoulder and knit up, inside 1 edge stitch, 80 to 96 stitches round the neckline with short circular needle size 5.5 mm, 1 strand Alpaca Bouclé and 1 strand Brushed Alpaca Silk colour light sea green (2 strands). Stitch count must be divisible by 4. Work rib in the round (knit 2, purl 2) for 18-18-18-21-21-21 cm. Cast off a little loosely.
Fold the neck double to the inside and fasten with a couple of stitches on each shoulder.

ASSEMBLY:
Sew the bottom of the armholes – see sketch.

Diagram

symbols = Bottom of armhole sewn together: b to B
symbols = stitches for left front shoulder (d) knitted up along left back shoulder (D), stitches for right front shoulder (e), knitted up along right back shoulder (E)
symbols = knitting direction
diagram
diagram
diagram

Each of our patterns has specific tutorial videos to help you.

Do you have a question? See a list of frequently asked questions (FAQ)

Knitting tension is what determines the final measurements of your work, and is usually measured per 10 x 10 cm. It is provided like so: number of stitches in width x number of rows in height - eg: 19 stitches x 26 rows = 10 x 10 cm.

The knitting tension is very individual; some people knit/crochet loosely while others work tightly. You adjust the knitting tension with the needle size, which is why the suggested needle size is only meant as a guide! You need to adjust this (up or down) to ensure that YOUR knitting tension matches the knitting tension provided in the pattern. If you work with a different knitting tension than provided you will have a different yarn consumption, and your work will have different measurements than what the pattern suggests.

The knitting tension also determines which yarns can replace each other. As long as you achieve the same knitting tension you can replace one yarn with another.

See DROPS lesson: How to measure your tension/gauge

See DROPS video: How to make a gauge tension swatch

The required amount of yarn is provided in grams, eg: 450 g. To calculate how many balls you’ll need you first need to know how many grams are in 1 ball (25g, 50g or 100g). This information is available if you click on the individual yarn quality on our pages. Divide the amount required with the amount of each ball. For example, if each ball is 50g (the most common amount), the calculation will be as follows: 450 / 50 = 9 balls.

The important thing when changing from one yarn to another is that the knitting/crochet tension remains the same. This is so that the measurements of the finished piece will be the same as on the sketch provided. It is easier to achieve the same knitting tension using yarns from the same yarn group. It is also possible to work with multiple strands of a thinner yarn to achieve the knitting tension of a thicker one. Please try our yarn converter. We recommend you to always work a test swatch.

Please NOTE: when changing yarn the garment might have a different look and feel to the garment in the photo, due to individual properties and qualities of each yarn.

See DROPS lesson: Can I use a different yarn than the one mentioned in the pattern?

All our yarns are categorised into yarn groups (from A to F) according to thickness and knitting tension – group A contains the thinnest yarns and group F the thickest. This makes it easier for you to find alternative yarns to our patterns, should you wish to switch yarn. All yarns within the same group have a similar knitting tension and can easily replace each other. However, different yarn qualities have different structures and properties which will give the finished work a unique look and feel.

Click here for an overview of the yarns in each yarn group

At the top of all our patterns you’ll find a link to our yarn calculator, which is a helpful tool should you wish to use a different yarn than suggested. By filling in the yarn quality you wish to replace, the amount (in your size) and number of strands, the calculator will present good alternative yarns with the same knitting tension. Additionally it will tell you how much you’ll require in the new qualities and whether you’ll need to work with multiple strands. Most skeins are 50g (some are 25g or 100g).

If the pattern is worked with multiple colours, every colour will have to be calculated separately. Similarly, if the pattern is worked with several strands of different yarns (for example 1 strand Alpaca and 1 strand Kid-Silk) you will have to find alternatives for each, individually.

Click here to see our yarn calculator

Since different yarns have different qualities and textures we have chosen to keep the original yarn in our patterns. However, you can easily find options among our available qualities by using our yarn calculator, or simply pick a yarn from the same yarn group.

It is possible that some retailers still have discontinued yarns in stock, or that someone has a few skeins at home that they would like to find patterns for.

The yarn calculator will provide both alternative yarn as well as required amount in the new quality.

If you think it's hard to decide what size to make, it can be a good idea to measure a garment you own already and like the size of. Then you can pick the size by comparing those measures with the ones available in the pattern's size chart.

You'll find the size chart at the bottom of the pattern.

See DROPS lesson: How to read size chart

The needle size provided in the pattern serves only as a guide, the important thing is to follow the knitting tension. And since knitting tension is very individual, you will have to adjust the needle size to ensure that YOUR tension is the same as in the pattern – maybe you’ll have to adjust 1, or even 2 needle sizes, up or down to achieve the correct tension. For this, we recommend that you work test swatches.

Should you work with a different knitting tension than the one provided, the measurements of the finished garment might deviate from the measurement sketch.

See DROPS lesson: How to measure your tension/gauge

See DROPS video: How to make a tension/gauge swatch

Working a garment top-down provides more flexibility and room for personal adjustment. For example it is easier to try the garment on while working, as well as making adjustments to length of yoke and shoulder caps.

The instructions are carefully explaining every step, in the correct order. Diagrams are adjusted to the knitting direction and are worked as usual.

The diagram depicts all rows/rounds, and every stitch seen from the right side. It is read from bottom to top, from right to left. 1 square = 1 stitch.

When working back and forth, every other row is worked from the right side and every other row is worked from the wrong side. When working from the wrong side, the diagram will have to be worked reversed: from left to right, knit stitches are purled, purl stitches are knit etc.

When working in the round every round is worked from the right side and the diagram are worked from right to left on all rounds.

See DROPS lesson: How to read knitting diagrams

The diagram depicts all rows/rounds, and every stitch seen from the right side. It is worked from bottom to top, from right to left.

When working back and forth every other row is worked from the right side: from right to left and every other row is worked from the wrong side: from left to right.

When working in the round, every row in the diagram are worked from the right side, from right to left.

When working a circular diagram you start in the middle and work your way outwards, counter clockwise, row by row.

The rows usually start with a given number of chain stitches (equivalent to the height of the following stitch), this will either be depicted in the diagram or explained in the pattern.

See DROPS lesson: How to read crochet diagrams

Instructions for working several diagrams after each other on the same row/round, will often be written like so: “work A.1, A.2, A.3 a total of 0-0-2-3-4 times". This means you work A.1 once, then A.2 is worked once, and A.3 is repeated (in width) the number of times provided for your size – in this case like so: S = 0 times, M = 0 times, L=2 times, XL= 3 times and XXL = 4 times.

The diagrams are worked as usual: begin with the first row in A.1, then work the first row in A.2 etc.

See DROPS lesson: How to read knitting diagrams

See DROPS lesson: How to read crochet diagrams

The total width of the garment (from wrist-to-wrist) will be larger in the larger sizes, despite the actual sleeves being shorter. The larger sizes have longer sleeve caps and wider shoulders, so there will be a good fit in all sizes.

The measurement sketch/schematic drawing provides information regarding the full length of the garment. If it’s a jumper or a jacket the length is measured from the highest point on the shoulder closest to the neckline, and straight down to the bottom of the garment. It is NOT measured from the tip of shoulder. Similarly, the length of yoke is measured from the highest point on the shoulder and down to where yoke is split into body and sleeves.

On a jacket measures are never taken along bands, unless specifically stated. Always measure inside band stitches when measuring the length.

See DROPS lesson: How to read a schematic drawing

Diagrams are often repeated on the round or in height. 1 repeat is the diagram the way it appears in the pattern. If it says to work 5 repeats of A.1 in the round, then you work A.1 a total of 5 times after/next to each other in the round. If it says to work 2 repeats of A.1 vertically/in height you work the entire diagram once, then begin again at the start and work the entire diagram one more time.

Chain stitches are slightly narrower than other stitches and to avoid working the cast-on edge too tight, we simply chain more stitches to begin with. The stitch count will be adjusted on the following row to fit the pattern and measurement sketch.

The rib edge is more elastic and will contract slightly compared to, for example, stocking stitch. By increasing before the rib edge, you avoid a visible difference in width between the rib edge and the rest of the body.

It’s very easy to cast off too tightly, and by making yarn overs while casting off (and simultaneously casting these off) you avoid a too tight cast off edge.

See DROPS video: How to bind off with yarn overs (yo)

To achieve an even increase (or decrease) you can increase on, for example: every 3rd and 4th row alternately, like so: work 2 rows and increase on the 3rd row, work 3 rows and increase on the 4th. Repeat this until the increase is complete.

See DROPS lesson: Increase or decrease 1 st on every 3rd and 4th row alternately

Should you prefer to work in the round instead of back and forth, you may of course adjust the pattern. You’ll need to add steeks mid-front (usually 5 stitches), and follow the instructions. When you would normally turn and work from the wrong side, simply work across the steek and continue in the round. At the end you’ll cut the piece open, pick up stitches to work bands, and cover the cut edges.

See DROPS video: How to knit steeks and cut open

Should you prefer to work back and forth instead of in the round, you may of course adjust the pattern so you work the pieces separately and then assemble them at the end. Divide the stitches for the body in 2, add 1 edge stitch in each side (for sewing) and work the front and back pieces separately.

See DROPS lesson: Can I adapt a pattern for circular needles into straight needles?

Pattern repeats can vary slightly in the different sizes, in order to get the correct proportions. If you’re not working the exact same size as the garment in the photo, yours might deviate slightly. This has been carefully developed and adjusted so that the complete impression of the garment is the same in all sizes.

Make sure to follow instructions and diagrams for your size!

If you have found a pattern you like which is available in women’s size it’s not very difficult to convert it to men’s size. The biggest difference will be the length of sleeves and body. Start working on the women size that you think would fit across the chest. The additional length will be worked right before you cast off for the armhole/sleeve cap. If the pattern is worked top-down you can add the length right after the armhole or before the first decrease on sleeve.

Regarding additional yarn amount, this will depend on how much length you add, but it is better with a skein too many than too few.

All yarns will have excess fibres (from production) that might come off as lint or shedding. Brushed yarns (ie hairier yarns) have more of these loose, excess fibres, causing more shedding.

Shedding also depends on what is worn under or over the garment, and whether this pulls at the yarn fibres. It’s therefore not possible to guarantee that there will be no shedding

Below are some tips on how to get the best result when working with hairier yarns:

1. When the garment is finished (before you wash it) shake it vigorously so the looser hairs come off. NOTE: do NOT use a lint roller, brush or any method that pulls at the yarn.

2. Place the garment in a plastic bag and put it in your freezer - the temperature will cause the fibres to become less attached to each other, and excess fibres will come off easier.

3. Leave in the freezer for a few hours before taking it out and shaking it again.

4. Wash the garment according to the instructions on the yarn label.

Pilling is a natural process that happens to even the most exclusive of fibers. It's a natural sign of wear and tear that is hard to avoid, and that is most visible in high friction areas of your garment like a sweater's arms and cuffs.

You can make your garment look as new by removing the pilling, using a fabric comb or a pill/lint remover.

Still can't find the answer you need? Then scroll down and leave your question so one of our experts can try to help you. This will be done normally within 5 to 10 working days.
In the meantime, you can read the questions and answers that others have left to this pattern or join the DROPS Workshop on Facebook to get help from fellow knitters/crocheters!

You might also like...

Post a comment to pattern DROPS 243-34

We would love to hear what you have to say about this pattern!

If you want to leave a question, please make sure you select the correct category in the form below, to speed up the answering process. Required fields are marked *.

Comments / Questions (18)

country flag Abby wrote:

Does this mean you’re releasing more colors of alpaca boucle?

06.08.2023 - 21:05

country flag Linda wrote:

Navn: Free

06.08.2023 - 20:30

country flag Danielle Llorens wrote:

Rainbow

06.08.2023 - 16:17

country flag Blumstein wrote:

Pourrais je avoir des explications pour ce modèle svp merci

06.08.2023 - 10:48

country flag Andrea wrote:

Winter sun

06.08.2023 - 10:18

country flag Nadia Trappeniers wrote:

Frosty

04.08.2023 - 08:52

country flag Ould Oufella MC wrote:

Pull avec plusieurs couleurs coordonnées superbe

04.08.2023 - 07:13

country flag Monica Flantua wrote:

Winter spring

04.08.2023 - 07:03

country flag Libellule01 wrote:

Berlingot

03.08.2023 - 19:37

country flag Wilma wrote:

Milkshake feast

03.08.2023 - 19:35