DROPS Karisma
DROPS Karisma
100% Wool
from 3.00 $ /50g
Get the yarn to make this pattern from 15.00$.

The yarn cost is calculated from the pattern’s smallest size and the yarn’s cheapest product type. Looking for an even better price? You might find it on the DROPS Deals!

DROPS SS24

Meet the Captain

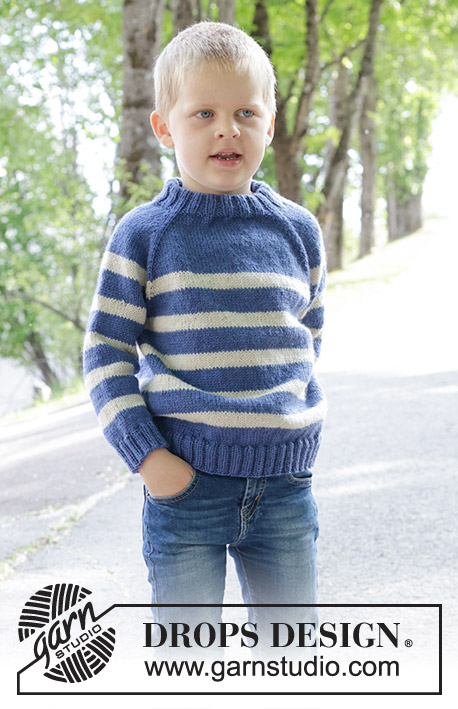
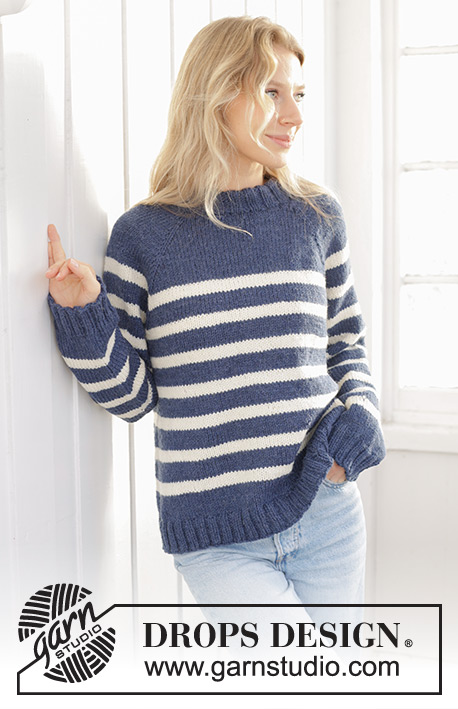
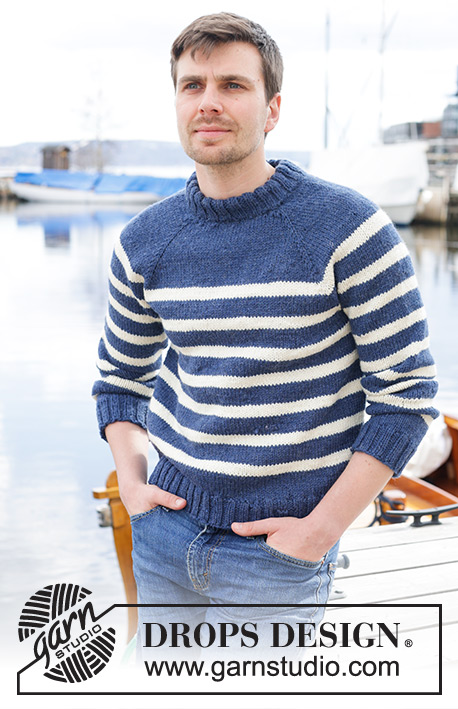
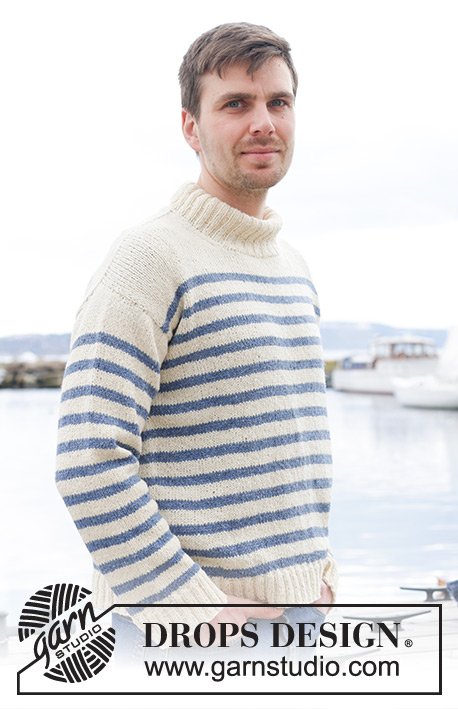
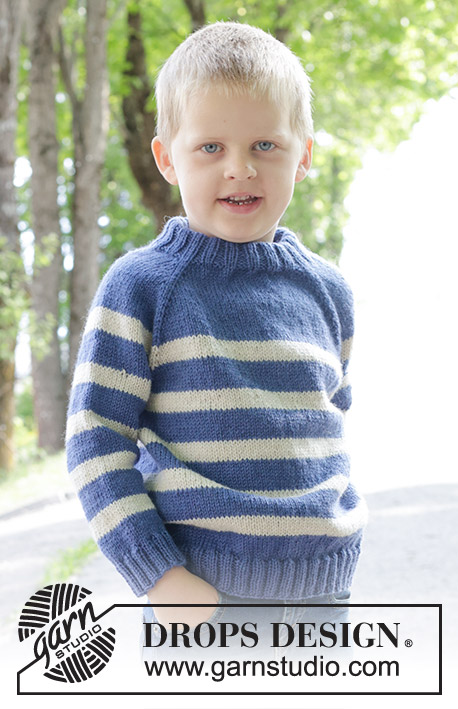
Knitted sweater for children in DROPS Karisma. The piece is worked top down with double neck, stripes and raglan. Sizes 2 – 12 years.

DROPS Children 47-5
DROPS Design: Pattern u-107-bn
Yarn group B
-----------------------------------------------------------

SIZES:
2 - 3/4 - 5/6 - 7/8 - 9/10 - 11/12 years
Child’s height in cm:
92 - 98/104 - 110/116 - 122/128 - 134/140 - 146/152
Child’s height in feet:
3ft - 3ft3/3ft5 - 3ft3/3ft5 – 3ft7/3ft9 - 4ft5/4ft7 - 4ft9/4ft12

Finished measurements:
Chest measurements: 70-74-80-84-88-92 cm = 27½"-29⅛"-31½"-33"-34⅝"-36¼"
Full length: 36-40-44-48-52-55 cm = 14¼"-15¾"-17¼"-19"-20½"-21⅝"
All measurements in charts are in cm.


YARN:
DROPS KARISMA from Garnstudio (belongs to yarn group B)
150-200-250-250-300-350 g color 65, denim blue
100-100-100-100-150-150 g color 85, light beige

NEEDLES:
DROPS CIRCULAR NEEDLE SIZE 4 MM = US 6: Length 40 cm = 16" and 60 cm = 24".
DROPS CIRCULAR NEEDLE SIZE 3.5 MM = US 4: Length 40 cm = 16" and 60 cm = 24".
DROPS DOUBLE POINTED NEEDLES SIZE 4 MM = US 6.
DROPS DOUBLE POINTED NEEDLES SIZE 3.5 MM = US 4.
The technique MAGIC LOOP can be used – you then only need 80 cm = 32" circular needle in each size.

KNITTING GAUGE:
21 stitches in width and 28 rows in height with stockinette stitch = 10 x 10 cm = 4" x 4".
NOTE: Needle size is only a guide. If you get too many stitches on 10 cm = 4", change to a larger needle size. If you get too few stitches on 10 cm = 4", change to a smaller needle size.

-------------------------------------------------------

Alternative Yarn – See how to change yarns here
Yarn Groups A to F – Use the same pattern and change the yarn here
Yarn usage using an alternative yarn – Use our yarn converter here

-------------------------------------------------------

DROPS Karisma
DROPS Karisma
100% Wool
from 3.00 $ /50g
Get the yarn to make this pattern from 15.00$.

The yarn cost is calculated from the pattern’s smallest size and the yarn’s cheapest product type. Looking for an even better price? You might find it on the DROPS Deals!

Pattern instructions

NOTE: This pattern is written in American English. All measurements in charts are in cm. For conversion from inches to cm - click here. There are different terms for crocheting in American and British English. If this pattern includes crochet, click for "crochet terms" here. For this pattern in British English, please click here.
-------------------------------------------------------

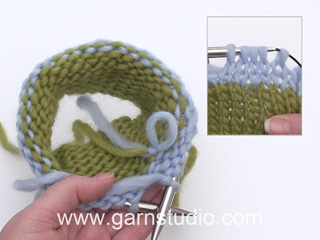
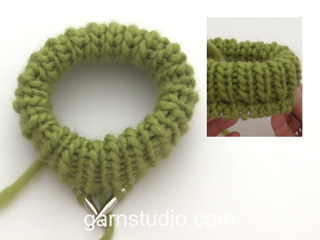
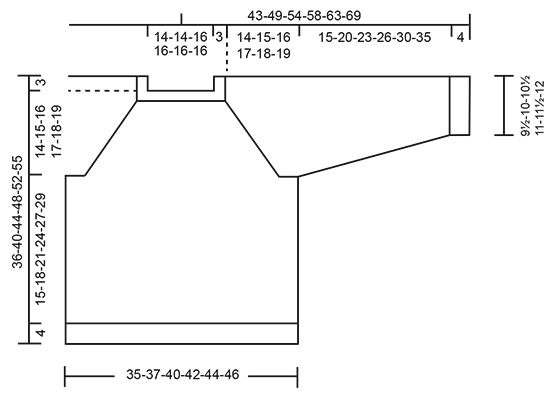
EXPLANATIONS FOR THE PATTERN:
-------------------------------------------------------

INCREASE TIP (evenly spaced):
Increase 1 stitch by making 1 yarn over which is worked twisted on the next round to avoid a hole.

RAGLAN:
Increase 1 stitch before/after 2 knitted stitches in each transition between body and sleeves. Marker-threads sit between these 2 stitches.
Increase 1 stitch by making 1 yarn over, which is knitted twisted on the next round to avoid a hole. Then work the new stitches in stockinette stitch.

STRIPES:
Work with color denim blue until the yoke measures 9-10-11-12-13-14 cm = 3½"-4"-4⅜"-4¾"-5⅛"-5½" (from the neck). Then work stripes: * 6 rounds color light beige (approx. 2 cm = ¾"), 9 rounds color denim blue (approx. 3 cm = 1⅛") *, work from *-*.

DECREASE TIP (for sleeves):
Decrease 1 stitch on either side of the marker-thread as follows: Work until there are 3 stitches left before the marker-thread, knit 2 together, knit 2 (marker-thread sits between these 2 stitches), slip 1 stitch knit-wise, knit 1 and pass the slipped stitch over the knitted stitch.

-------------------------------------------------------

START THE PIECE HERE:

-------------------------------------------------------

SWEATER – SHORT OVERVIEW OF THE PIECE:
The neck and yoke are worked in the round with circular needle, top down. The yoke is divided for body and sleeves and the body is continued in the round with circular needle. The sleeves are worked in the round with short circular needle/double pointed needles.

DOUBLE NECK:
Cast on 80-80-88-88-88-88 stitches with color denim blue DROPS Karisma, using short circular needles size 3.5 and 4 MM = US 6 held together. Remove the needle size 4 MM = US 6 keeping stitches on the needle size 3.5 MM = US 4 (this gives you an elastic cast-on edge). Work rib in the round (knit 2, purl 2) for 7 cm = 2¾".
Fold the neck double to the inside and work 1 more round of rib, working every 4th stitch together with its corresponding stitch on the cast-on edge.
You now have a double neck. The yoke is measured from here.

YOKE:
Change to circular needle size 4 MM = US 6. Insert 4 marker-threads and increase evenly as described below. NOTE: Each marker-thread is inserted between 2 knitted stitches and marks the raglan-line. (Begin of the round is between back piece and right sleeve).
Knit 2, insert marker-thread 1 between these 2 stitches, knit 14 (right sleeve), knit 2, insert marker-thread 2 between these 2 stitches, knit 22-22-26-26-26-26 and increase 4-4-6-6-6-8 stitches evenly over these stitches - read INCREASE TIP (= 26-26-32-32-32-34 stitches on the front piece), knit 2, insert marker-thread 3 between these 2 stitches, knit 14 (left sleeve), knit 2, insert marker-thread 4 between these 2 stitches, knit 22-22-26-26-26-26 and increase 4-4-6-6-6-8 stitches evenly over these stitches (= 26-26-32-32-32-34 stitches on the back piece) = 88-88-100-100-100-104 stitches.

Work stockinette stitch in the round and increase for raglan as well as working stripes – read the next 2 sections before continuing!

RAGLAN:
Increase for RAGLAN on each side of all 4 marker-threads – read description above, every 2nd round a total of 9-9-9-8-8-7 times = 160-160-172-164-164-160 stitches.
Continue to increase every 2nd round but every 2nd increase is only on the front and back pieces (4 stitches increased), i.e., increase on the front and back pieces every 2nd round and on the sleeves every 4th round. Increase like this 10-12-12-14-16-18 times on the front and back pieces (5-6-6-7-8-9 times on the sleeves). REMEMBER THE KNITTING GAUGE!

STRIPES:
When the piece measures 9-10-11-12-13-14 cm = 3½"-4"-4⅜"-4¾"-5⅛"-5½" from the neck, work STRIPES – read description above.

After the last increase there are 220-232-244-248-260-268 stitches (66-70-76-78-82-86 stitches between the marker threads on the front and back pieces and 44-46-46-46-48-48 stitches between the marker threads on each sleeve).
Continue with stockinette stitch and stripes but without further increases until the yoke measures 14-15-16-17-18-19 cm = 5½"-6"-6¼"-6¾"-7"-7½" from the neck mid-front.

Now divide for the body and sleeves as follows:
Knit 1 as before, place the next 44-46-46-46-48-48 stitches on a thread for the sleeve, cast on 8-8-8-10-10-10 stitches (in side under sleeve), knit 66-70-76-78-82-86 (front piece), place the next 44-46-46-46-48-48 stitches on a thread for the sleeve, cast on 8-8-8-10-10-10 stitches (in side under sleeve), knit to end of round (= 66-70-76-78-82-86 back piece). The body and sleeves are finished separately. The piece is now measured from here!

BODY:
= 148-156-168-176-184-192 stitches. Continue with stockinette stitch and stripes until you have worked 4-5-5-6-7-7 beige stripes. Finish the piece with color denim blue. When the body measures 15-18-21-24-27-29 cm = 6"-7"-8¼"-9½"-10⅝"-11⅜" from the division, knit 1 round and increase 20-24-24-28-28-28 stitches evenly spaced = 168-180-192-204-212-220 stitches.
Change to circular needle size 3.5 MM = US 4. Work rib (knit 2, purl 2) for 4 cm = 1½". Bind off a little loosely.
The sweater measures approx. 36-40-44-48-52-55 cm = 14¼"-15¾"-17¼"-19"-20½"-21⅝" from the shoulder.

SLEEVES:
Place the 44-46-46-46-48-48 stitches from the thread on the one side of the piece on short circular needle/double pointed needles size 4 MM = US 6 and knit up 1 stitch in each of the 8-8-8-10-10-10 stitches cast on under the sleeve = 52-54-54-56-58-58 stitches. Insert a marker-thread in the middle of the new stitches under the sleeve.
Start at the marker-thread and continue stockinette stitch and stripes in the round.
When the sleeve measures 2-2-3-3-3-3 cm = ¾"-¾"-1⅛"-1⅛"-1⅛"-1⅛", decrease 1 stitch on each side of the marker-thread – read DECREASE TIP. Decrease like this every 2-3-4-5-6-9 cm = ¾"-1⅛"-1½"-2"-2⅜"-3½" a total of 6-6-5-5-5-4 times = 40-42-44-46-48-50 stitches. When there are the same number of stripes on the sleeve as on the body, finish with color denim blue. Work until the sleeve measures 15-20-23-26-30-35 cm = 6"-8"-9"-10¼"-11¾"-13¾" from the division (or to desired length, there is approx. 4 cm = 1½" left). Knit 1 round and increase 8-6-8-6-8-6 stitches evenly spaced = 48-48-52-52-56-56 stitches. Change to double pointed needles size 3.5 MM = US 4 and work rib (knit 2, purl 2) for 4 cm = 1½". Bind off a little loosely. The sleeve measures approx. 19-24-27-30-34-39 cm = 7½"-9½"-10⅝"-11¾"-13⅜"-15¼" from the division.
Work the other sleeve in the same way.

Diagram

All measurements in charts are in cm.

diagram measurements

Each of our patterns has specific tutorial videos to help you.

Do you have a question? See a list of frequently asked questions (FAQ)

Knitting tension is what determines the final measurements of your work, and is usually measured per 10 x 10 cm. It is provided like so: number of stitches in width x number of rows in height - eg: 19 stitches x 26 rows = 10 x 10 cm.

The knitting tension is very individual; some people knit/crochet loosely while others work tightly. You adjust the knitting tension with the needle size, which is why the suggested needle size only serve as a guide! You need to adjust this (up or down) to ensure that YOUR knitting tension matches the knitting tension provided in the pattern. If you work with a different knitting tension than provided you will have a different yarn consumption, and your work will have different measurements than what the pattern suggests.

The knitting tension also determines which yarns can replace each other. As long as you achieve the same knitting tension you can replace one yarn with another.

See DROPS lesson: How to measure your tension/gauge

See DROPS video: How to make a gauge tension swatch

The required amount of yarn is provided in grams, eg: 450 g. To calculate how many balls you’ll need you first need to know how many grams are in 1 ball (25g, 50g or 100g). This information is available if you click on the individual yarn quality on our pages. Divide the amount required with the amount of each ball. For example, if each ball is 50g (the most common amount), the calculation will be as follows: 450 / 50 = 9 balls.

The important thing when changing from one yarn to another is that the knitting/crochet tension remains the same. This is so that the measurements of the finished piece will be the same as on the sketch provided. It is easier to achieve the same knitting tension using yarns from the same yarn group. It is also possible to work with multiple strands of a thinner yarn to achieve the knitting tension of a thicker one. Please try our yarn converter. We recommend you to always work a test swatch.

Please NOTE: when changing yarn the garment might have a different look and feel to the garment in the photo, due to individual properties and qualities of each yarn.

See DROPS lesson: Can I use a different yarn than the one mentioned in the pattern?

All our yarns are categorised into yarn groups (from A to F) according to thickness and knitting tension – group A contains the thinnest yarns and group F the thickest. This makes it easier for you to find alternative yarns to our patterns, should you wish to switch yarn. All yarns within the same group have a similar knitting tension and can easily replace each other. However, different yarn qualities have different structures and properties which will give the finished work a unique look and feel.

Click here for an overview of the yarns in each yarn group

At the top of all our patterns you’ll find a link to our yarn converter, which is a helpful tool should you wish to use a different yarn than suggested. By filling in the yarn quality you wish to replace, the amount (in your size) and number of strands, the converter will present good alternative yarns with the same knitting tension. Additionally it will tell you how much you’ll require in the new qualities and whether you’ll need to work with multiple strands. Most skeins are 50g (some are 25g or 100g).

If the pattern is worked with multiple colours, every colour will have to be converted separately. Similarly, if the pattern is worked with several strands of different yarns (for example 1 strand Alpaca and 1 strand Kid-Silk) you will have to find alternatives for each, individually.

Click here to see our yarn converter

Since different yarns have different qualities and textures we have chosen to keep the original yarn in our patterns. However, you can easily find options among our available qualities by using our yarn converter, or simply pick a yarn from the same yarn group.

It is possible that some retailers still have discontinued yarns in stock, or that someone has a few skeins at home that they would like to find patterns for.

The yarn converter will provide both alternative yarn as well as required amount in the new quality.

If you think it's hard to decide what size to make, it can be a good idea to measure a garment you own already and like the size of. Then you can pick the size by comparing those measures with the ones available in the pattern's size chart.

You'll find the size chart at the bottom of the pattern.

See DROPS lesson: How to read size chart

The needle size provided in the pattern serves only as a guide, the important thing is to follow the knitting tension. And since knitting tension is very individual, you will have to adjust the needle size to ensure that YOUR tension is the same as in the pattern – maybe you’ll have to adjust 1, or even 2 needle sizes, up or down to achieve the correct tension. For this, we recommend that you work test swatches.

Should you work with a different knitting tension than the one provided, the measurements of the finished garment might deviate from the measurement sketch.

See DROPS lesson: How to measure your tension/gauge

See DROPS video: How to make a gauge tension swatch

Working a garment top-down provides more flexibility and room for personal adjustment. For example it is easier to try the garment on while working, as well as making adjustments to length of yoke and shoulder caps.

The instructions are carefully explaining every step, in the correct order. Diagrams are adjusted to the knitting direction and are worked as usual.

The diagram depicts all rows/rounds, and every stitch seen from the right side. It is read from bottom to top, from right to left. 1 square = 1 stitch.

When working back and forth, every other row is worked from the right side and every other row is worked from the wrong side. When working from the wrong side, the diagram will have to be worked reversed: from left to right, knit stitches are purled, purl stitches are knit etc.

When working in the round every round is worked from the right side and the diagram are worked from right to left on all rounds.

See DROPS lesson: How to read knitting diagrams

The diagram depicts all rows/rounds, and every stitch seen from the right side. It is worked from bottom to top, from right to left.

When working back and forth every other row is worked from the right side: from right to left and every other row is worked from the wrong side: from left to right.

When working in the round, every row in the diagram are worked from the right side, from right to left.

When working a circular diagram you start in the middle and work your way outwards, counter clockwise, row by row.

The rows usually start with a given number of chain stitches (equivalent to the height of the following stitch), this will either be depicted in the diagram or explained in the pattern.

See DROPS lesson: How to read crochet diagrams

Instructions for working several diagrams after each other on the same row/round, will often be written like so: “work A.1, A.2, A.3 a total of 0-0-2-3-4 times". This means you work A.1 once, then A.2 is worked once, and A.3 is repeated (in width) the number of times provided for your size – in this case like so: S = 0 times, M = 0 times, L=2 times, XL= 3 times and XXL = 4 times.

The diagrams are worked as usual: begin with the first row in A.1, then work the first row in A.2 etc.

See DROPS lesson: How to read knitting diagrams

See DROPS lesson: How to read crochet diagrams

The total width of the garment (from wrist-to-wrist) will be larger in the larger sizes, despite the actual sleeves being shorter. The larger sizes have longer sleeve caps and wider shoulders, so there will be a good fit in all sizes.

The measurement sketch/schematic drawing provides information regarding the full length of the garment. If it’s a jumper or a jacket the length is measured from the highest point on the shoulder (usually closest to the neckline), and straight down to the bottom of the garment. It is NOT measured from the tip of shoulder. Similarly, the length of yoke is measured from the highest point on the shoulder and down to where yoke is split into body and sleeves.

See DROPS lesson: How to read a schematic drawing

Diagrams are often repeated on the round or in height. 1 repeat is the diagram the way it appears in the pattern. If it says to work 5 repeats of A.1 in the round, then you work A.1 a total of 5 times after/next to each other in the round. If it says to work 2 repeats of A.1 vertically/in height you work the entire diagram once, then begin again at the start and work the entire diagram one more time.

Chain stitches are slightly narrower than other stitches and to avoid working the cast-on edge too tight, we simply chain more stitches to begin with. The stitch count will be adjusted on the following row to fit the pattern and measurement sketch.

The rib edge is more elastic and will contract slightly compared to, for example, stocking stitch. By increasing before the rib edge, you avoid a visible difference in width between the rib edge and the rest of the body.

It’s very easy to cast off too tightly, and by making yarn overs while casting off (and simultaneously casting these off) you avoid a too tight cast off edge.

See DROPS video: How to bind off with yarn overs (yo)

To achieve an even increase (or decrease) you can increase on, for example: every 3rd and 4th row alternately, like so: work 2 rows and increase on the 3rd row, work 3 rows and increase on the 4th. Repeat this until the increase is complete.

See DROPS lesson: Increase or decrease 1 st on every 3rd and 4th row alternately

Should you prefer to work in the round instead of back and forth, you may of course adjust the pattern. You’ll need to add steeks mid-front (usually 5 stitches), and follow the instructions. When you would normally turn and work from the wrong side, simply work across the steek and continue in the round. At the end you’ll cut the piece open, pick up stitches to work bands, and cover the cut edges.

See DROPS video: How to knit steeks and cut open

Should you prefer to work back and forth instead of in the round, you may of course adjust the pattern so you work the pieces separately and then assemble them at the end. Divide the stitches for the body in 2, add 1 edge stitch in each side (for sewing) and work the front and back pieces separately.

See DROPS lesson: Can I adapt a pattern for circular needles into straight needles?

Pattern repeats can vary slightly in the different sizes, in order to get the correct proportions. If you’re not working the exact same size as the garment in the photo, yours might deviate slightly. This has been carefully developed and adjusted so that the complete impression of the garment is the same in all sizes.

Make sure to follow instructions and diagrams for your size!

If you have found a pattern you like which is available in women’s size it’s not very difficult to convert it to men’s size. The biggest difference will be the length of sleeves and body. Start working on the women size that you think would fit across the chest. The additional length will be worked right before you cast off for the armhole/sleeve cap. If the pattern is worked top-down you can add the length right after the armhole or before the first decrease on sleeve.

Regarding additional yarn amount, this will depend on how much length you add, but it is better with a skein too many than too few.

All yarns will have excess fibres (from production) that might come off as lint or shedding. Brushed yarns (ie hairier yarns) have more of these loose, excess fibres, causing more shedding.

Shedding also depends on what is worn under or over the garment, and whether this pulls at the yarn fibres. It’s therefore not possible to guarantee that there will be no shedding

Below are some tips on how to get the best result when working with hairier yarns:

1. When the garment is finished (before you wash it) shake it vigorously so the looser hairs come off. NOTE: do NOT use a lint roller, brush or any method that pulls at the yarn.

2. Place the garment in a plastic bag and put it in your freezer - the temperature will cause the fibres to become less attached to each other, and excess fibres will come off easier.

3. Leave in the freezer for a few hours before taking it out and shaking it again.

4. Wash the garment according to the instructions on the yarn label.

Pilling is a natural process that happens to even the most exclusive of fibers. It's a natural sign of wear and tear that is hard to avoid, and that is most visible in high friction areas of your garment like a sweater's arms and cuffs.

You can make your garment look as new by removing the pilling, using a fabric comb or a pill/lint remover.

Still can't find the answer you need? Then scroll down and leave your question so one of our experts can try to help you. This will be done normally within 5 to 10 working days.
In the meantime, you can read the questions and answers that others have left to this pattern or join the DROPS Workshop on Facebook to get help from fellow knitters/crocheters!

You might also like...

Post a comment to pattern DROPS Children 47-5

We would love to hear what you have to say about this pattern!

If you want to leave a question, please make sure you select the correct category in the form below, to speed up the answering process. Required fields are marked *.

Comments / Questions (18)

country flag Inger wrote:

Tror det er feil i oppskriften? Øk 9 ganger, litt lengre ned står det øk 10 ganger. Men økningene sammstemmer ikke med maske antallet?? (Str 2 år)

19.04.2024 - 11:29

DROPS Design answered:

Hei Inger. Nei, ingen feil. Du starter med 80, øker til 88. Så starter raglanøkningene. Du øker først 9 ganger på hver side av merkene på hver 2. omgang = 8 økte masker pr økeomgang = 9 x 8 = 72 økte masker + 88 = 160 masker. Deretter skal det økes forskjellig fra forstykket/bakstykket og ermene. Det økes 10 ganger ved forstykket/bakstykket (fremdeles på hver 2. omgang) og kun 5 ganger ved ermene (ved hver 4. omgang). 4 økt masker ved forstykket/bakstykket x 10 ganger = 40 masker + 4 økte masker ved ermene x 5 ganger = 20 masker = 160 + 40 + 20 = 220 masker. mvh DROPS Design

22.04.2024 - 11:59

country flag Esther wrote:

Wat is de reden van het meerderen in de rij voor de boord?

28.03.2024 - 16:49

DROPS Design answered:

Dag Esher,

Dit is om te voorkomen dat de boord het werk (te veel) samentrekt.

28.03.2024 - 17:36

country flag Rikke wrote:

Kan det virkelig passe, at man skal tage 28 masker UD inden ribkanten for neden? Og 8 på ærmerne.? Bliver det ikke meget løst?? Man plejer da at tage ind inden rib.. hvad er formålet med de udtagninger?

26.02.2024 - 21:53

DROPS Design answered:

Hei. Ribkanten er mere elastisk og vil trække sig lidt sammen i forhold til det glatstrikkede. Ved at tage ud før ribben, så undgår du en for stor forskel mellem krop og kant. Mvh DROPS Design

27.02.2024 - 14:11

country flag Carmen Delia Van Bockel wrote:

Modelo 47 5. Aumentado con lazada y retorcida en la vuelta, no consigo el dibujo de la foto. Dibujo me refiero a ese canalon que forma el " raglan". Gracias

16.02.2024 - 03:18

country flag Carmen Delia Van Bockel wrote:

Hola. Gracias por la contestación anterior. Ya había leido las instrucciones de RAGLAN pero sigo- y lo siento - sin entender lo de " transición " como tampoco queda claro lo de " aumenta 1 punto antes/después de 2 puntos en cada transición. Me consuela leer las dudas de otros sobre la misma question. En mi caso es el primer "raglan" por eso tantas dudas. Algo se debe poder aclarar ¿ no? Muchas gracias.

12.02.2024 - 13:41

DROPS Design answered:

Hola Carmen, la transición entre el cuerpo y la manga significa justo el sitio que separa los puntos de la manga y el cuerpo. Estas transiciones están marcadas, ya que has insertado un hilo marcador entre 2 puntos; este hilo se podría llamar la "transición" en este patrón. Tienes que aumentar siempre antes y después de la transición (para aumentar tanto en el cuerpo como las mangas). Entonces tienes que aumentar como sigue: Trabajar hasta que queden 2 puntos antes del hilo marcador, 1 hebra, 2 derechos, (hilo marcador), 2 derechos, 1 hebra. También puedes mirar el siguiente vídeo: https://www.garnstudio.com/video.php?id=592&lang=es

18.02.2024 - 19:43

country flag Carmen Delia Van Bockel wrote:

Por favor aclarar el significado fe transicion y todo a partir de aumentar 1 punto etcetera 1/2...es mi primer raglan y por ello tantas preguntas Gracias

12.02.2024 - 13:41

DROPS Design answered:

Hola Carmen, la transición entre el cuerpo y la manga significa justo el sitio que separa los puntos de la manga y el cuerpo. Estas transiciones están marcadas, ya que has insertado un hilo marcador entre 2 puntos; este hilo se podría llamar la "transición" en este patrón. Tienes que aumentar siempre antes y después de la transición (para aumentar tanto en el cuerpo como las mangas). Entonces tienes que aumentar como sigue: Trabajar hasta que queden 2 puntos antes del hilo marcador, 1 hebra, 2 derechos, (hilo marcador), 2 derechos, 1 hebra. También puedes mirar el siguiente vídeo: https://www.garnstudio.com/video.php?id=592&lang=es

18.02.2024 - 19:43

country flag Carmen Delia Van Bockel wrote:

Hola. Gracias por la contestación anterior. Ya había leido las instrucciones de RAGLAN pero sigo- y lo siento - sin entender lo de " transición " como tampoco queda claro lo de " aumenta 1 punto antes/después de 2 puntos en cada transición. Me consuela leer las dudas de otros sobre la misma question. En mi caso es el primer "raglan" por eso tantas dudas. Algo se debe poder aclarar ¿ no? Muchas gracias.

12.02.2024 - 13:39

DROPS Design answered:

Hola Carmen, la transición entre el cuerpo y la manga significa justo el sitio que separa los puntos de la manga y el cuerpo. Estas transiciones están marcadas, ya que has insertado un hilo marcador entre 2 puntos; este hilo se podría llamar la "transición" en este patrón. Tienes que aumentar siempre antes y después de la transición (para aumentar tanto en el cuerpo como las mangas). Entonces tienes que aumentar como sigue: Trabajar hasta que queden 2 puntos antes del hilo marcador, 1 hebra, 2 derechos, (hilo marcador), 2 derechos, 1 hebra. También puedes mirar el siguiente vídeo: https://www.garnstudio.com/video.php?id=592&lang=es

18.02.2024 - 19:42

country flag Carmen Delia Van Bockel wrote:

Estoy en el modelo niños 47-5. Tengo 88 puntos comenzando la manga. Su patrón dice: aumentar 9 veces cada 2nda vuelta = 160 puntos. Por favor, ¿ como/cuantos puntos cada vez? Gracias

11.02.2024 - 15:24

DROPS Design answered:

Hola Carmen, lee la sección de RAGLÁN para más información. Aumentar 1 punto antes/después de 2 puntos derechos en cada transición entre el cuerpo y las mangas. Los hilos marcadores están entre estos 2 puntos. Tienes 4 hilos marcadores, por lo que aumentas 8 puntos (1 antes y 1 después de cada transición) haciendo 1 lazada. Aumentas en vueltas alternas: 1 vuelta sin aumentos, 1 con aumentos, 1 vuelta sin aumentos, 1 con aumentos, e.t.c. En total, debes trabajar 9 vueltas con aumentos. Aquí habrás obtenido 160 puntos.

11.02.2024 - 23:29

country flag Ule wrote:

Hallo, wieviel Maschen sollen in der Passe zugenommen werden bevor die Raglanlinie beginnt? Ich finde leider keine Angabe in der deutschsprachigen Anleitung. Danke für Ihre Mühe und die vielen schönen Anleitungen! Ule

29.01.2024 - 13:08

DROPS Design answered:

Liebe Ute, für die Passe wird es so zugenommen, siehe RAGLANZUNAHMEN: zuerst: beidseitig jedes der 4 Markierungsfäden in jeder 2. Runde insgesamt 9-9-9-8-8-7 x in der Höhe dann abwechslungsweise 4 (nur Vorder- und Rückenteil) und 8 Maschen (Vorder- Rückenteil + Ärmel) zunehmen: Auf diese Weise 10-12-12-14-16-18 x in der Höhe am Vorderteil/Rückenteil zunehmen (5-6-6-7-8-9 x in der Höhe an den Ärmeln). Viel Spaß beim stricken!

30.01.2024 - 07:36

country flag Julie Sarauw wrote:

Jeg kan ikke få antal masker til ærmerne til at stemme ifølge opskriften… strikker str 122/128 så 14 masker + 7 omgange med udtagning til ærmer, giver da kun (14+14+2)= 30 masker pr ærme og ikke 46 masker som der står i opskriften? Mvh Julie

09.12.2023 - 13:07

DROPS Design answered:

Hei Julie. På hvert erme har du 14 masker + 1 maske i hver raglanlinje = 16 masker, (16 masker mellom merketråd nr. 1 og nr. 2 og mellom merketråd nr. 3 og nr. 4). Så økes det til raglan ved hver raglanlinje på hver 2. omgang totalt 8 ganger = 8 + 16 + 8 masker = 32 masker. Så skal det kun økes til raglan på hver 4. omgang på ermene 7 ganger = 7 + 32 + 7 = 46 masker, som det står i oppskriften. mvh DROPS Design

11.12.2023 - 10:48