
Popular categories
Looking for a yarn?


|
|||||||||||||
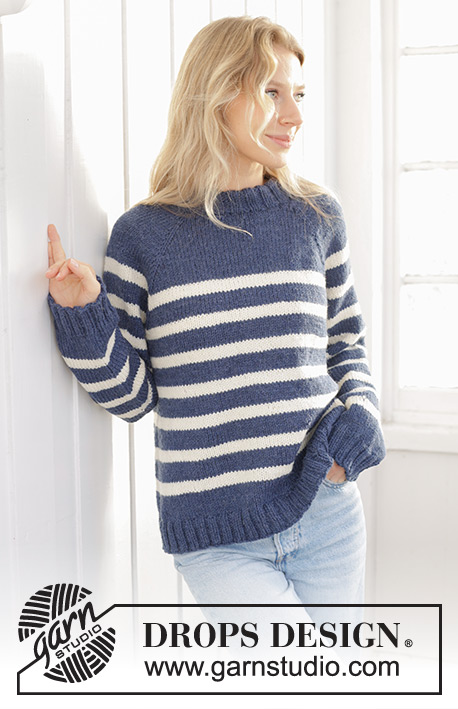
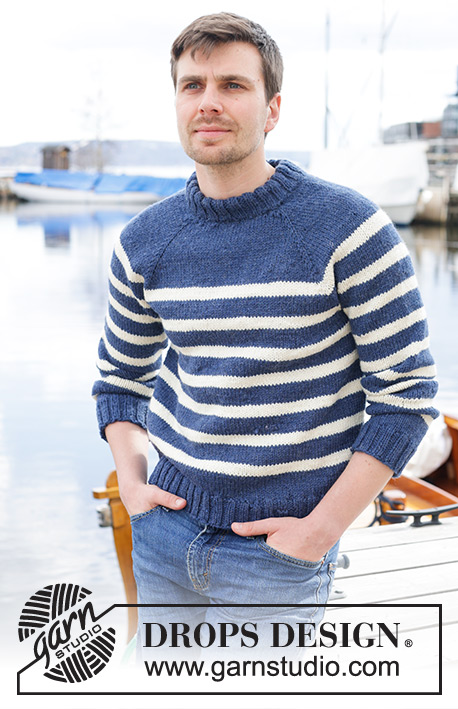
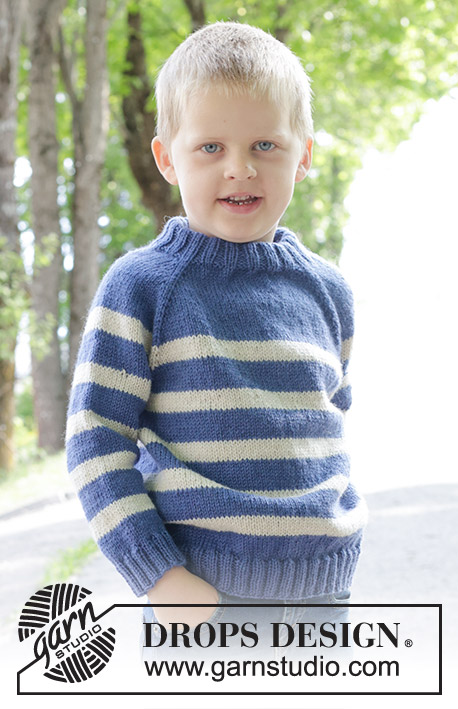
Sailor Stripes |
|||||||||||||
 |
 |
||||||||||||
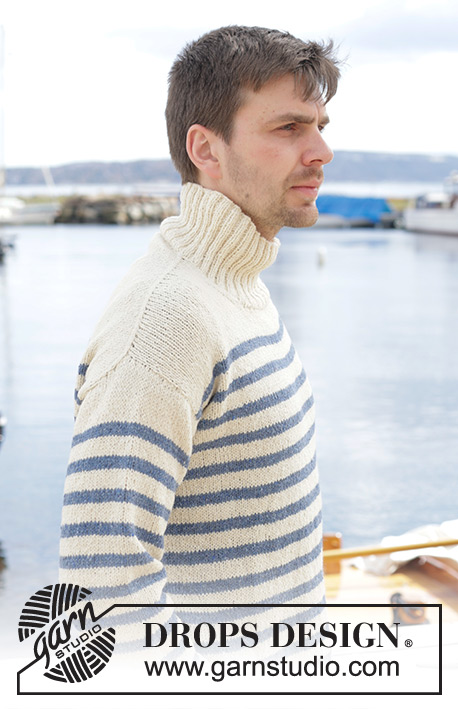
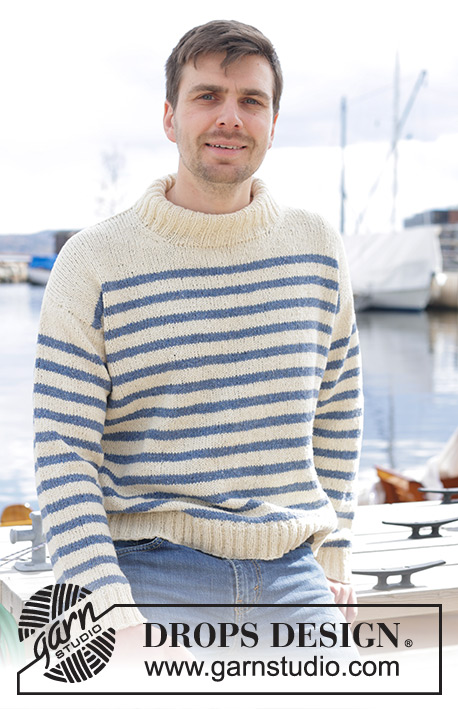
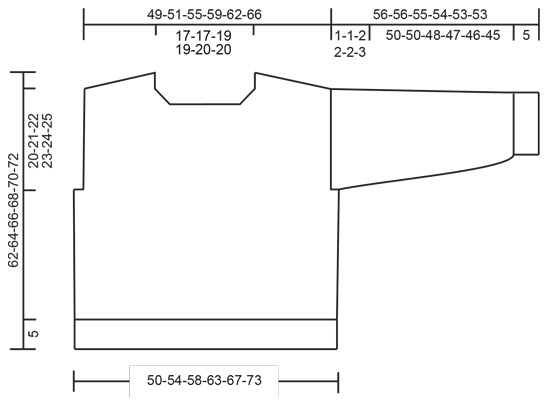
Knitted sweater for men in DROPS Soft Tweed. The piece is worked top down, with diagonal shoulders / European shoulders, stripes and high neck. Sizes S - XXXL.
DROPS 233-23 |
|||||||||||||
|
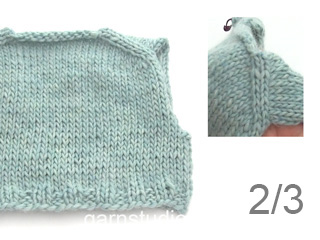
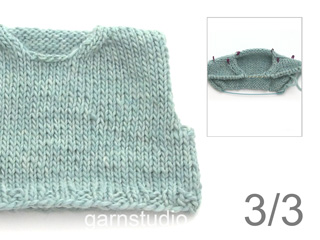
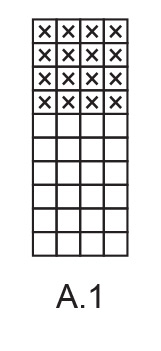
------------------------------------------------------- EXPLANATIONS FOR THE PATTERN: ------------------------------------------------------- STRIPES: See diagram A.1. STRIPE-TIP (working in the round): To get a neater transition between the rounds when working stripes. Change to the new color and work 1 round. Work the first stitch on the next round as follows: Pick up the back loop of the stitch under the first stitch on the left needle and place it on the left needle. Knit this stitch together with the next stitch on the left needle. The transition will then be less visible. INCREASE TIP FROM RIGHT SIDE: AFTER MARKER: The new stitch twists to the left. Use the left needle to pick up the strand between 2 stitches from the previous row, pick up strand from the front and knit the back loop. BEFORE MARKER: The new stitch twists to the right. Use the left needle to pick up the strand between 2 stitches from the previous row, pick up strand from the back and knit the front loop. INCREASE TIP FROM WRONG SIDE: AFTER MARKER: The new stitch twists to the left. Use the left needle to pick up the strand between 2 stitches from the previous row, pick up strand from the back and purl the front loop. BEFORE MARKER: The new stitch twists to the right. Use the left needle to pick up the strand between 2 stitches from the previous row, pick up strand from the front and purl the back loop. DECREASE TIP (for sleeves): Decrease 1 stitch on either side of the marker-thread as follows: Work until there are 3 stitches left before the marker-thread, knit 2 together, knit 2 (marker-thread sits between these 2 stitches), slip 1 stitch knit-wise, knit 1 and pass the slipped stitch over the knitted stitch. ------------------------------------------------------- START THE PIECE HERE: ------------------------------------------------------- SWEATER - SHORT OVERVIEW OF THE PIECE: The top of the back piece is worked back and forth with circular needle, top down, until the armholes are finished. Stitches are knitted up along each shoulder, increased for the neck and the front piece worked back and forth with circular needle until the armholes are finished. The front and back pieces are joined and the body is worked in the round with circular needle. Stitches are knitted around the armhole and the sleeve cap worked back and forth with circular needle, then the rest of the sleeve worked in the round with circular needle/double pointed needles. The neck is worked to finish. BACK PIECE: Cast on 37-37-41-41-45-45 stitches with circular needle size 4 MM = US 6 and color off white DROPS Soft Tweed. Purl 1 row from the wrong side. Insert 1 marker inside the 3 outermost stitches on each side. The markers remain inside these 3 stitches onwards. Work stockinette stitch back and forth. AT THE SAME TIME increase AFTER the marker at the beginning of the row from the right side and BEFORE the marker at the end of this row – read INCREASE TIP FROM RIGHT SIDE. On the next row (wrong side) increase in the same way – read INCREASE TIP FROM WRONG SIDE. Continue with stockinette stitch and increase from both the right and wrong side a total of 33-35-37-41-43-47 times. REMEMBER THE KNITTING GAUGE! After the last increase there are 103-107-115-123-131-139 stitches and the piece measures approx. 12-12-13-15-15-17 cm = 4¾"-4¾"-5⅛"-6"-6"-6¾" from the cast-on edge. Continue with color off white until the piece measures 4-5-5-6-7-8 cm = 1½"-2"-2"-2⅜"-2¾"-3⅛" (measured along the armhole). Now work A.1 over all stitches and repeat the pattern in height - read STRIPES, until the piece measures 15-16-16-17-18-19 cm = 6"-6¼"-6¼"-6¾"-7"-7½" (measured along the armhole) and A.1 has been worked 3 times in height. Cut the strand. Place the stitches on a thread.. FRONT PIECE: Start on the left shoulder (when the piece is worn). Knit up, from the right side, 33-35-37-41-43-47 stitches inside 1 stitch along the left shoulder on back piece (i.e. knit up 1 stitch in each row along the edge) with color off white. Work stockinette stitch back and forth. When the front piece measures 6 cm = 2⅜", increase stitches for the neck as follows: Increase 1 stitch inside 3 stitches at the beginning of each row from the right side, remember INCREASE TIP FROM RIGHT SIDE! Increase like this a total of 5-5-6-6-7-7 times. After the last increase there are 38-40-43-47-50-54 stitches. Lay the piece to one side after a row from the wrong side. Work the right front shoulder, knitting up 33-35-37-41-43-47 stitches from the right side, inside 1 stitch along the right back shoulder, with color off white. Work stockinette stitch back and forth. When the piece measures 6 cm = 2⅜", increase stitches for the neck as follows: Increase 1 stitch inside 3 stitches at the end of each row from the right side, remember INCREASE TIP FROM RIGHT SIDE! Increase like this a total of 5-5-6-6-7-7 times = 38-40-43-47-50-54 stitches. Work back from the wrong side. Work the next row from the right side as follows: Stockinette stitch over the 38-40-43-47-50-54 stitches from the right front piece, cast on 27-27-29-29-31-31 stitches for the neck, stockinette stitch over the 38-40-43-47-50-54 stitches from the left front piece = 103-107-115-123-131-139 stitches. Continue with stockinette stitch back and forth. When the piece measures 14-15-17-18-19-20 cm = 5½"-6"-6¾"-7"-7½"-8" (measured along the armhole) work A.1 as on the back piece, until the front measures approx. 25-26-28-29-30-31 cm = 9¾"-10¼"-11"-11⅜"-11¾"-12¼" and A.1 has been worked 3 times in height. The front and back pieces are now joined for the body. BODY: Continue the stripes from the right side over the 103-107-115-123-131-139 stitches on the front piece, cast on 2-6-6-10-10-14 stitches (in side under sleeve), work the 103-107-115-123-131-139 stitches on the back piece, cast on 2-6-6-10-10-14 stitches (in side under sleeve) = 210-226-242-266-282-306 stitches. Continue A.1 in the round - read STRIPE-TIP above – until the piece measures approx. 57-59-61-63-65-67 cm = 22½"-23¼"-24"-24¾"-25½"-26⅜", measured from the top of the shoulder on the front piece – finish after two rounds with color off white. Knit 1 round and increase 22-22-26-26-26-30 stitches evenly spaced = 232-248-268-292-308-336 stitches. Change to circular needle size 3 MM = US 2.5. Work rib (knit 2, purl 2) for 5 cm = 2" with color off white. Bind off a little loosely. The sweater measures 62-64-66-68-70-72 cm = 24⅜"-25¼"-26"-26¾"-27½"-28⅜", measured from the top of the shoulder on the front piece. RIGHT SLEEVE: Use circular needle size 4 MM = US 6 and color off white, knit up from the right side 32-34-34-36-38-40 stitches from the bottom of the armhole and up the back piece, then 53-55-59-61-63-65 stitches from the shoulder and down the armhole on the front piece = 85-89-93-97-101-105 stitches. Insert 1 marker in the middle of the row, which is used to measure the sleeve. Start from the wrong side and work stockinette stitch back and forth until the sleeve measures 1-1-2-2-2-3 cm = ⅜"-⅜"-¾"-¾"-¾"-1⅛". Join the sleeve and continue in the round using short circular needle/double pointed needles. Insert 1 marker-thread at the beginning of the round (mid-under sleeve). Allow the thread to follow your work onwards. Work stockinette stitch in the round until the sleeve measures 3-3-3-4-4-4 cm = 1⅛"-1⅛"-1⅛"-1½"-1½"-1½". Then work A.1 - remember STRIPE-TIP. AT THE SAME TIME when the sleeve measures 2-5-3-6-3-7 cm = ¾"-2"-1⅛"-2⅜"-1⅛"-2¾", decrease 2 stitches under the sleeve – read DECREASE TIP. Decrease like this every 3-2½-2½-2-2-1½ cm = 1⅛"-1"-1"-¾"-¾"-½" a total of 16-17-18-19-21-22 times = 53-55-57-59-59-61 stitches. Work until the sleeve measures 51-51-50-49-48-48 cm = 20"-20"-19¾"-19¼"-19"-19". There is 5 cm = 2" left. Finish after a couple of rounds with color off white. Knit 1 round and increase 7-9-7-9-9-11 stitches evenly spaced = 60-64-64-68-68-72 stitches. Change to double pointed needles size 3 MM = US 2.5. Work rib (knit 2, purl 2) for 5 cm = 2". Bind off a little loosely with knit over knit and purl over purl. The sleeve measures approx. 56-56-55-54-53-53 cm = 22"-22"-21⅝"-21¼"-21"-21". Sew together the bottom of the armhole – see sketch. LEFT SLEEVE: Use circular needle size 4 MM = US 6 and color off white, knit up from the right side 53-55-59-61-63-65 stitches from the bottom of the armhole up the front piece, then 32-34-34-36-38-40 stitches from the shoulder down the back piece = 85-89-93-97-101-105 stitches. Insert 1 marker in the middle of the row, which is used to measure the sleeve. Work in the same way as the right sleeve. Sew together the bottom of the armhole – see sketch. NECK: Start on one shoulder and knit up from the right side, inside 1 edge stitch,116 to 132 stitches with short circular needle size 3 MM = US 2.5 and color off white. Stitch-number should be divisible by 4. Work rib in the round (knit 2, purl 2) for 10 cm = 4". Bind off. If you want a double neck, fold the neck to the inside and sew a couple of stitches by each shoulder to fasten it in place. |
|||||||||||||
Diagram explanations |
|||||||||||||
|
|||||||||||||
|
|||||||||||||

|
|||||||||||||

|
|||||||||||||
|
|||||||||||||
|
Have you made this or any other of our designs? Tag your pictures in social media with #dropsdesign so we can see them! Do you need help with this pattern?You'll find tutorial videos, a Comments/Questions area and more by visiting the pattern on garnstudio.com. © 1982-2024 DROPS Design A/S. We reserve all rights. This document, including all its sub-sections, has copyrights. Read more about what you can do with our patterns at the bottom of each pattern on our site. |
|||||||||||||


With over 40 years in knitting and crochet design, DROPS Design offers one of the most extensive collections of free patterns on the internet - translated to 17 languages. As of today we count 304 catalogs and 11422 patterns - 11417 of which are translated into English (US/in).
We work hard to bring you the best knitting and crochet have to offer, inspiration and advice as well as great quality yarns at incredible prices! Would you like to use our patterns for other than personal use? You can read what you are allowed to do in the Copyright text at the bottom of all our patterns. Happy crafting!
Comments / Questions (3)
For the sleeves, should I cast on from the mid of armpit? In this case what is the point of the first 2 cm back and forth? Thanks for explaining
08.02.2024 - 22:07DROPS Design answered:
Dear Virginia, the stitches for sleeves are picked up along armholes but not in the cast on stitches under sleeve when joining body together. You first work in rows for 1, 2 or 3 cm (see size), then join in the round. These 1, 2 or 3 cm will be then sewn to the stitches cast on mid under sleeve. Happy knitting!
09.02.2024 - 07:59Vilken snygg tröja! Jag ber min mor att sticka en sådan åt mig med detsamma!
08.08.2023 - 13:47Kan man i denne opskrift se hvilke mål størrelserne svare til ?
05.06.2023 - 13:59DROPS Design answered:
Hei Mette Denne genseren er skrevet i 6 størrelser, fra S til XXXL. Om du ser nederst på oppskriften ser du målskissen til genseren og her står de ulike målene. Første tallet i tallrekkene tilhører str. S og det siste tallet i tallrekkene str. XXXL. I f.eks str. S er bredden på genseren 50 (x2) cm, lengden 62 cm og vrangbordkanten nederst er 5 cm. mvh DROPS Design
05.06.2023 - 14:34