DROPS Baby Merino
DROPS Baby Merino
100% Wool
from 4.55 $ /50g
Get the yarn to make this pattern from 31.85$.

The yarn cost is calculated from the pattern’s smallest size and the yarn’s cheapest product type. Looking for an even better price? You might find it on the DROPS Deals!

DROPS SS24

Sage Twist

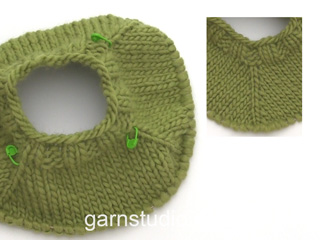
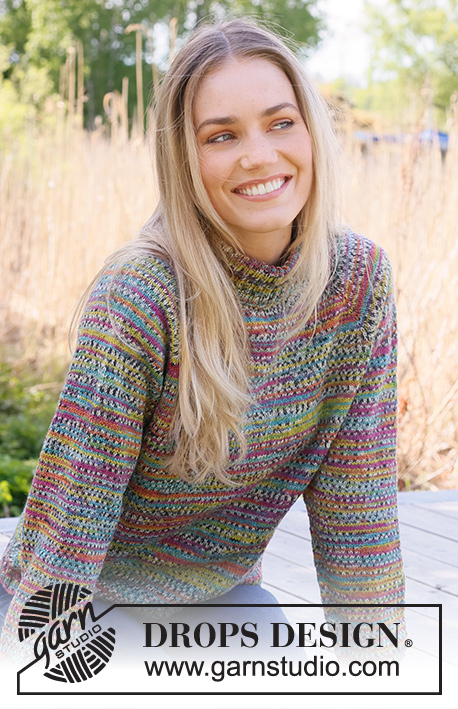
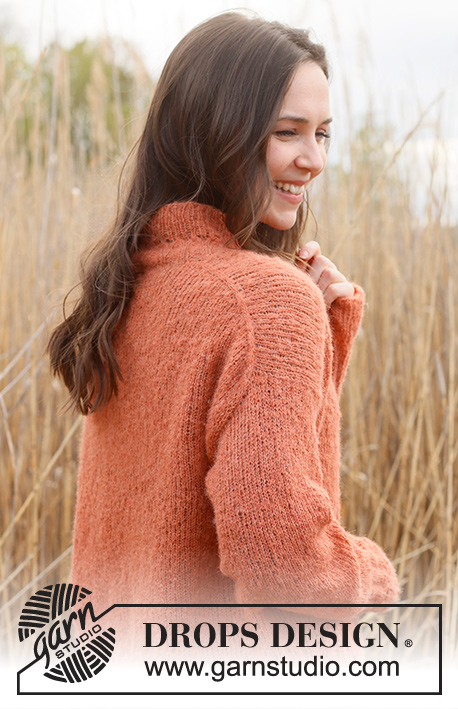
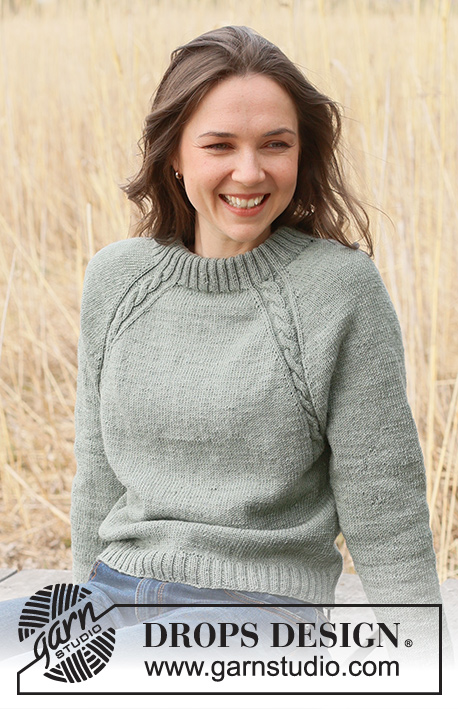
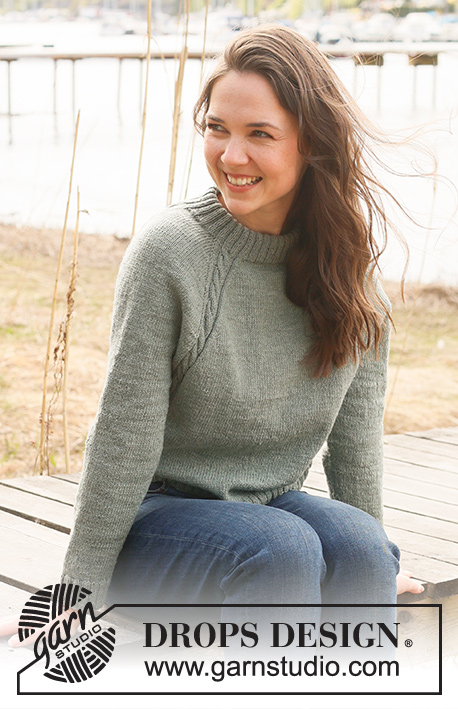
Knitted sweater in DROPS BabyMerino. The piece is worked top down with raglan, double neck and cables. Sizes S - XXXL.

DROPS 237-31
DROPS Design: Pattern bm-102
Yarn group A
-------------------------------------------------------

SIZES:
S - M - L - XL - XXL – XXXL

Finished measurements:
Chest measurements: 90-98-106-116-128-140 cm = 35½"-38½"-41¾"-45¾"-50⅜"-55"
Full length: 52-54-56-58-60-62 cm = 20½"-21¼"-22"-22¾"-23⅝"-24⅜"
All measurements in charts are in cm.

MATERIALS:
DROPS BABY MERINO from Garnstudio (belongs to yarn group A)
350-400-450-500-550-600 g color 50, sage green

NEEDLES:
DROPS CIRCULAR NEEDLE SIZE 3 MM = US 2.5: Length 40 cm = 16" and 80 cm = 32".
DROPS CIRCULAR NEEDLE SIZE 2.5 MM = US 1.5: Length 40 cm = 16" and 80 cm = 32".
DROPS DOUBLE POINTED NEEDLES SIZE 3 MM = US 2.5.
DROPS DOUBLE POINTED NEEDLES SIZE 2.5 MM = US 1.5.
DROPS CABLE NEEDLE.
The technique MAGIC LOOP can be used – you then only need circular needle of 80 cm = 32" in each size.

KNITTING GAUGE:
26 stitches in width and 34 rows in height with stockinette stitch = 10 x 10 cm = 4" x 4".
NOTE: Needle size is only a guide. If you get too many stitches on 10 cm = 4", change to a larger needle size. If you get too few stitches on 10 cm = 4", change to a smaller needle size.

-------------------------------------------------------

Alternative Yarn – See how to change yarns here
Yarn Groups A to F – Use the same pattern and change the yarn here
Yarn usage using an alternative yarn – Use our yarn converter here

-------------------------------------------------------

DROPS Baby Merino
DROPS Baby Merino
100% Wool
from 4.55 $ /50g
Get the yarn to make this pattern from 31.85$.

The yarn cost is calculated from the pattern’s smallest size and the yarn’s cheapest product type. Looking for an even better price? You might find it on the DROPS Deals!

Pattern instructions

NOTE: This pattern is written in American English. All measurements in charts are in cm. For conversion from inches to cm - click here. There are different terms for crocheting in American and British English. If this pattern includes crochet, click for "crochet terms" here. For this pattern in British English, please click here.
-------------------------------------------------------

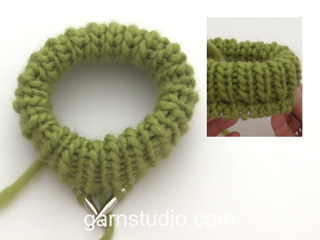
EXPLANATIONS FOR THE PATTERN:
-------------------------------------------------------

PATTERN:
See diagrams A.1 and A.2.

RAGLAN:
Increase 1 stitch on each side of A.1/A.2 by making 1 yarn over. Work the yarn over as follows on the next round:
BEFORE A.1/A.2:
Slip the yarn-over off the left needle, then replace it the other way round (insert the left needle into the back when replacing it). Knit the front loop. The stitch twists to the right.
AFTER A.1/A.2:
Knit the back loop. The stitch twists to the left.
The new stitches are subsequently worked in stockinette stitch.

DECREASE TIP (sleeves):
Decrease 1 stitch on either side of the marker as follows: Work until there are 3 stitches left before the marker, knit 2 together, knit 2 (marker sits between these 2 stitches), slip 1 stitch as if to knit, knit 1 and pass the slipped stitch over the knitted stitch.

-------------------------------------------------------

START THE PIECE HERE:

-------------------------------------------------------

SWEATER – SHORT OVERVIEW OF THE PIECE.
The neck, yoke and body are worked in the round, top down. The sleeves are worked in the round with short circular needle/double pointed needles.

DOUBLE NECK:
Cast on 120-128-128-136-136-140 stitches with DROPS Baby Merino using short circular needles sizes 3 MM = US 2.5 and 2.5 MM = US 1.5 held together. Remove the needle size 3 MM = US 2.5 (this gives you an elastic cast-on edge). Work rib (knit 2, purl 2) for 9 cm = 3½".
Fold the neck double to the inside and work 1 more round of rib, working every 2nd stitch together with its corresponding stitch on the cast-on edge.
You now have a double neck. The yoke is measured from here.

YOKE:
Change to circular needle size 3 MM = US 2.5, work and increase as follows: Work A.1, work stockinette stitch and increase 4 stitches evenly over the next 10 stitches (14 sleeve-stitches), A.1, work stockinette stitch and increase 6-4-6-4-6-8 stitches evenly over the next 22-26-26-30-30-34 stitches (28-30-32-34-36-42 stitches on the front piece), A.1, work stockinette stitch and increase 4 stitches evenly over the next 10 stitches (14 sleeve-stitches), A.1, work stockinette stitch and increase 6-4-6-4-6-8 stitches evenly over the next 22-26-26-30-30-34 stitches (28-30-32-34-36-42 stitches on the back piece) = 148-152-156-160-164-176 stitches.

Read the next section before continuing!
Read RAGLAN in explanations above and start to increase on the next round. AT THE SAME TIME, when diagram A.1 is finished in height continue with A.2 over A.1. REMEMBER THE KNITTING GAUGE!

Increase differently on the sleeves and body:
SLEEVES:
Increase every 2nd round 10-12-10-20-30-40 times, then every 4th round 10-12-15-12-9-4 times.
FRONT/ BACK PIECE:
Increase every 2nd round 24-27-31-40-49-54 times, then every 4th round 7-8-7-3-0-0 times.

When all the increases are finished there are 352-388-408-460-516-568 stitches. Between each A.2 there are 54-62-64-78-92-102 stitches on each sleeve and 90-100-108-120-134-150 stitches on the front and back pieces.
Continue with stockinette stitch and A.2 without increases and without cables (just knit and purl as shown in the diagram) until the yoke measures 25-27-28-30-32-34 cm = 9¾"-10⅝"-11"-11¾"-12½"-13⅜" from the neck.
Divide for the body and sleeves (in the middle of A.2): Knit 8 (middle of A.2), place the next 70-78-80-94-108-118 stitches on a thread without working them, cast on 12-12-14-14-16-16 stitches under the sleeve, knit 106-116-124-136-150-166 (front piece), place the next 70-78-80-94-108-118 stitches on a thread without working them, cast on 12-12-14-14-16-16 stitches under the sleeve, knit 98-108-116-128-142-158 (back piece).
The body and sleeves are finished separately and the piece is now measured from here.

BODY:
= 236-256-276-300-332-364 stitches. Work stockinette stitch in the round for a further 19-19-20-20-20-20 cm = 7½"-7½"-8"-8"-8"-8" or to desired length (approx. 4 cm = 1½" left). Knit 1 round and increase 16-16-20-24-28-28 stitches evenly spaced = 252-272-296-324-360-392 stitches. Change to circular needle size 2.5 MM = US 1.5 and work rib (knit 2, purl 2) for 4 cm = 1½". Bind off with knit over knit and purl over purl. The sweater measures approx. 52-54-56-58-60-62 cm = 20½"-21¼"-22"-22¾"-23⅝"-24⅜" from the shoulder down.

SLEEVES:
Place the 70-78-80-94-108-118 stitches from the thread on the one side of the piece on short circular needle/double pointed needles size 3 MM = US 2.5 and knit up 1 stitch in each of the 12-12-14-14-16-16 stitches cast on under the sleeve = 82-90-94-108-124-134 stitches. Insert a marker in the middle of the new stitches under the sleeve.
Read DECREASE TIP and work stockinette stitch in the round for 4-4-4-4-2-2 cm = 1½"-1½"-1½"-1½"-¾"-¾". Now decrease as follows in the different sizes:

SIZES S, M, L, XL and XXL:
Decrease every 2½-2-1½-1-1 cm = 1"-¾"-½"-⅜"-⅜" 12-15-16-21-28 times.
SIZE XXXL:
Decrease alternately every ½ cm = ⅛" and 1 cm = ⅜" 32 times.

ALL SIZES:
= 58-60-62-66-68-70 stitches.
Work until the sleeve measures 36-34-34-32-31-30 cm = 14¼"-13⅜"-13⅜"-12½"-12¼"-11¾" or to desired length (approx. 4 cm = 1½" left). Change to double pointed needles size 2.5 MM = US 1.5. Knit 1 round and increase 10-8-10-6-8-10 stitches evenly spaced = 68-68-72-72-76-80 stitches. Work rib (knit 2, purl 2) for 4 cm = 1½". Bind off with knit over knit and purl over purl.
Work the other sleeve in the same way.

This pattern has been corrected.

Updated online: 02.11.2022
YOKE:...= 148-152-156-160-164-176 stitches.

Diagram

All measurements in charts are in cm.

symbols = knit
symbols = purl
symbols = between 2 stitches make 1 yarn over which is purled twisted on the next round
symbols = place 3 stitches on cable needle in front of piece, knit 3, knit 3 from cable needle
diagram
diagram

Each of our patterns has specific tutorial videos to help you.

Do you have a question? See a list of frequently asked questions (FAQ)

Knitting tension is what determines the final measurements of your work, and is usually measured per 10 x 10 cm. It is provided like so: number of stitches in width x number of rows in height - eg: 19 stitches x 26 rows = 10 x 10 cm.

The knitting tension is very individual; some people knit/crochet loosely while others work tightly. You adjust the knitting tension with the needle size, which is why the suggested needle size only serve as a guide! You need to adjust this (up or down) to ensure that YOUR knitting tension matches the knitting tension provided in the pattern. If you work with a different knitting tension than provided you will have a different yarn consumption, and your work will have different measurements than what the pattern suggests.

The knitting tension also determines which yarns can replace each other. As long as you achieve the same knitting tension you can replace one yarn with another.

See DROPS lesson: How to measure your tension/gauge

See DROPS video: How to make a gauge tension swatch

The required amount of yarn is provided in grams, eg: 450 g. To calculate how many balls you’ll need you first need to know how many grams are in 1 ball (25g, 50g or 100g). This information is available if you click on the individual yarn quality on our pages. Divide the amount required with the amount of each ball. For example, if each ball is 50g (the most common amount), the calculation will be as follows: 450 / 50 = 9 balls.

The important thing when changing from one yarn to another is that the knitting/crochet tension remains the same. This is so that the measurements of the finished piece will be the same as on the sketch provided. It is easier to achieve the same knitting tension using yarns from the same yarn group. It is also possible to work with multiple strands of a thinner yarn to achieve the knitting tension of a thicker one. Please try our yarn converter. We recommend you to always work a test swatch.

Please NOTE: when changing yarn the garment might have a different look and feel to the garment in the photo, due to individual properties and qualities of each yarn.

See DROPS lesson: Can I use a different yarn than the one mentioned in the pattern?

All our yarns are categorised into yarn groups (from A to F) according to thickness and knitting tension – group A contains the thinnest yarns and group F the thickest. This makes it easier for you to find alternative yarns to our patterns, should you wish to switch yarn. All yarns within the same group have a similar knitting tension and can easily replace each other. However, different yarn qualities have different structures and properties which will give the finished work a unique look and feel.

Click here for an overview of the yarns in each yarn group

At the top of all our patterns you’ll find a link to our yarn converter, which is a helpful tool should you wish to use a different yarn than suggested. By filling in the yarn quality you wish to replace, the amount (in your size) and number of strands, the converter will present good alternative yarns with the same knitting tension. Additionally it will tell you how much you’ll require in the new qualities and whether you’ll need to work with multiple strands. Most skeins are 50g (some are 25g or 100g).

If the pattern is worked with multiple colours, every colour will have to be converted separately. Similarly, if the pattern is worked with several strands of different yarns (for example 1 strand Alpaca and 1 strand Kid-Silk) you will have to find alternatives for each, individually.

Click here to see our yarn converter

Since different yarns have different qualities and textures we have chosen to keep the original yarn in our patterns. However, you can easily find options among our available qualities by using our yarn converter, or simply pick a yarn from the same yarn group.

It is possible that some retailers still have discontinued yarns in stock, or that someone has a few skeins at home that they would like to find patterns for.

The yarn converter will provide both alternative yarn as well as required amount in the new quality.

If you think it's hard to decide what size to make, it can be a good idea to measure a garment you own already and like the size of. Then you can pick the size by comparing those measures with the ones available in the pattern's size chart.

You'll find the size chart at the bottom of the pattern.

See DROPS lesson: How to read size chart

The needle size provided in the pattern serves only as a guide, the important thing is to follow the knitting tension. And since knitting tension is very individual, you will have to adjust the needle size to ensure that YOUR tension is the same as in the pattern – maybe you’ll have to adjust 1, or even 2 needle sizes, up or down to achieve the correct tension. For this, we recommend that you work test swatches.

Should you work with a different knitting tension than the one provided, the measurements of the finished garment might deviate from the measurement sketch.

See DROPS lesson: How to measure your tension/gauge

See DROPS video: How to make a gauge tension swatch

Working a garment top-down provides more flexibility and room for personal adjustment. For example it is easier to try the garment on while working, as well as making adjustments to length of yoke and shoulder caps.

The instructions are carefully explaining every step, in the correct order. Diagrams are adjusted to the knitting direction and are worked as usual.

The diagram depicts all rows/rounds, and every stitch seen from the right side. It is read from bottom to top, from right to left. 1 square = 1 stitch.

When working back and forth, every other row is worked from the right side and every other row is worked from the wrong side. When working from the wrong side, the diagram will have to be worked reversed: from left to right, knit stitches are purled, purl stitches are knit etc.

When working in the round every round is worked from the right side and the diagram are worked from right to left on all rounds.

See DROPS lesson: How to read knitting diagrams

The diagram depicts all rows/rounds, and every stitch seen from the right side. It is worked from bottom to top, from right to left.

When working back and forth every other row is worked from the right side: from right to left and every other row is worked from the wrong side: from left to right.

When working in the round, every row in the diagram are worked from the right side, from right to left.

When working a circular diagram you start in the middle and work your way outwards, counter clockwise, row by row.

The rows usually start with a given number of chain stitches (equivalent to the height of the following stitch), this will either be depicted in the diagram or explained in the pattern.

See DROPS lesson: How to read crochet diagrams

Instructions for working several diagrams after each other on the same row/round, will often be written like so: “work A.1, A.2, A.3 a total of 0-0-2-3-4 times". This means you work A.1 once, then A.2 is worked once, and A.3 is repeated (in width) the number of times provided for your size – in this case like so: S = 0 times, M = 0 times, L=2 times, XL= 3 times and XXL = 4 times.

The diagrams are worked as usual: begin with the first row in A.1, then work the first row in A.2 etc.

See DROPS lesson: How to read knitting diagrams

See DROPS lesson: How to read crochet diagrams

The total width of the garment (from wrist-to-wrist) will be larger in the larger sizes, despite the actual sleeves being shorter. The larger sizes have longer sleeve caps and wider shoulders, so there will be a good fit in all sizes.

The measurement sketch/schematic drawing provides information regarding the full length of the garment. If it’s a jumper or a jacket the length is measured from the highest point on the shoulder (usually closest to the neckline), and straight down to the bottom of the garment. It is NOT measured from the tip of shoulder. Similarly, the length of yoke is measured from the highest point on the shoulder and down to where yoke is split into body and sleeves.

See DROPS lesson: How to read a schematic drawing

Diagrams are often repeated on the round or in height. 1 repeat is the diagram the way it appears in the pattern. If it says to work 5 repeats of A.1 in the round, then you work A.1 a total of 5 times after/next to each other in the round. If it says to work 2 repeats of A.1 vertically/in height you work the entire diagram once, then begin again at the start and work the entire diagram one more time.

Chain stitches are slightly narrower than other stitches and to avoid working the cast-on edge too tight, we simply chain more stitches to begin with. The stitch count will be adjusted on the following row to fit the pattern and measurement sketch.

The rib edge is more elastic and will contract slightly compared to, for example, stocking stitch. By increasing before the rib edge, you avoid a visible difference in width between the rib edge and the rest of the body.

It’s very easy to cast off too tightly, and by making yarn overs while casting off (and simultaneously casting these off) you avoid a too tight cast off edge.

See DROPS video: How to bind off with yarn overs (yo)

To achieve an even increase (or decrease) you can increase on, for example: every 3rd and 4th row alternately, like so: work 2 rows and increase on the 3rd row, work 3 rows and increase on the 4th. Repeat this until the increase is complete.

See DROPS lesson: Increase or decrease 1 st on every 3rd and 4th row alternately

Should you prefer to work in the round instead of back and forth, you may of course adjust the pattern. You’ll need to add steeks mid-front (usually 5 stitches), and follow the instructions. When you would normally turn and work from the wrong side, simply work across the steek and continue in the round. At the end you’ll cut the piece open, pick up stitches to work bands, and cover the cut edges.

See DROPS video: How to knit steeks and cut open

Should you prefer to work back and forth instead of in the round, you may of course adjust the pattern so you work the pieces separately and then assemble them at the end. Divide the stitches for the body in 2, add 1 edge stitch in each side (for sewing) and work the front and back pieces separately.

See DROPS lesson: Can I adapt a pattern for circular needles into straight needles?

Pattern repeats can vary slightly in the different sizes, in order to get the correct proportions. If you’re not working the exact same size as the garment in the photo, yours might deviate slightly. This has been carefully developed and adjusted so that the complete impression of the garment is the same in all sizes.

Make sure to follow instructions and diagrams for your size!

If you have found a pattern you like which is available in women’s size it’s not very difficult to convert it to men’s size. The biggest difference will be the length of sleeves and body. Start working on the women size that you think would fit across the chest. The additional length will be worked right before you cast off for the armhole/sleeve cap. If the pattern is worked top-down you can add the length right after the armhole or before the first decrease on sleeve.

Regarding additional yarn amount, this will depend on how much length you add, but it is better with a skein too many than too few.

All yarns will have excess fibres (from production) that might come off as lint or shedding. Brushed yarns (ie hairier yarns) have more of these loose, excess fibres, causing more shedding.

Shedding also depends on what is worn under or over the garment, and whether this pulls at the yarn fibres. It’s therefore not possible to guarantee that there will be no shedding

Below are some tips on how to get the best result when working with hairier yarns:

1. When the garment is finished (before you wash it) shake it vigorously so the looser hairs come off. NOTE: do NOT use a lint roller, brush or any method that pulls at the yarn.

2. Place the garment in a plastic bag and put it in your freezer - the temperature will cause the fibres to become less attached to each other, and excess fibres will come off easier.

3. Leave in the freezer for a few hours before taking it out and shaking it again.

4. Wash the garment according to the instructions on the yarn label.

Pilling is a natural process that happens to even the most exclusive of fibers. It's a natural sign of wear and tear that is hard to avoid, and that is most visible in high friction areas of your garment like a sweater's arms and cuffs.

You can make your garment look as new by removing the pilling, using a fabric comb or a pill/lint remover.

Still can't find the answer you need? Then scroll down and leave your question so one of our experts can try to help you. This will be done normally within 5 to 10 working days.
In the meantime, you can read the questions and answers that others have left to this pattern or join the DROPS Workshop on Facebook to get help from fellow knitters/crocheters!

You might also like...

Post a comment to pattern DROPS 237-31

We would love to hear what you have to say about this pattern!

If you want to leave a question, please make sure you select the correct category in the form below, to speed up the answering process. Required fields are marked *.

Comments / Questions (34)

country flag Hilary wrote:

Thank you. Those yarn-over increases apprar in the RAGLAN instructions, but not in the YOKE instructions, where the final stitch count of 148cannot be achieved. I assume that the yarn-over increases should take place in the YOKE section, otherwise the final 148 can't happen. Thanks again for being so prompt. Much happier knitting now!

26.01.2024 - 20:48

country flag Hilary wrote:

I am struggling with pattern 237-31. I have knit the double neck and am trying to set up the yoke. I initially cast on 120 stitches, but when I add up all the stitches needed for the yoke, there need to be 128 stitches ( 16 for A1x4, 10 for sleeves x2, 22 for main body x2). Where do the other 8 stitches come from? At the end of the set-up, with 20 stitches increased, there should be 148, but I will only have 140, and I can't make the pattern work.

26.01.2024 - 07:12

DROPS Design answered:

Hi Hillary, You originally have 120 stitches: You increase 4 after the first A.1, 6 after the second, 4 after the third , 6 after the fourth A.1. In addition you increase 2 stitches (2 yarn overs) on the first row in each A.1 = 8 increased stitches. You therefore have 148 stitches after all the increases. Hope this helps and happy knitting!

26.01.2024 - 07:36

country flag Gunilla Olofsson wrote:

Har lagt upp 128 maskor och stickat första A1 När A1 är färdigt blir det 126 stickade maskor plus 2 omslag Har sen försökt vidare x flera och mönstret bli fel Kan ni hjälpa mig? Mönster 237-31 Vänligen Gunilla

06.01.2024 - 17:00

DROPS Design answered:

Hej Gunilla, du har 128m och börjar på nedersta varvet i A.1 och ökar 2 m i alla 4 raglan, du ökar även på ärmarna och på fram och bakstycke så du har 152 eller 156m allt efter vilken storlek du stickar :)

11.01.2024 - 14:41

country flag Janina Ahner wrote:

Liebes Team, wie komme ich nach allen Raglanzunahmen auf die Gesamtmaschenzahl von 388? Wenn ich insgesamt für das Vorder- und Rückenteil 35x 8 Maschen und 24x 4 Maschen für die Ärmel zunehme sind das 376 Maschen, aber es befanden sich ja bereits 152 Maschen auf der Nadel? Ich hoffe, ich habe mich verständlich ausgedrückt. Vielen Dank für eine Antwort. Grüße Janina

03.01.2024 - 07:40

DROPS Design answered:

Liebe Janina, für die Ärmel nimmt man (12+12 Mal) 4 Maschen = 96 Maschen zu, für das Rumpfteil nimmt man (37+8 Mal) 4 Maschen (2 beim Vorderteil und 2 beim Rückenteil) = 140 Maschen zu; es waren 152 Maschen + 96 + 140=388 Maschen. Viel Spaß beim stricken!

03.01.2024 - 08:43

country flag Susann wrote:

Jag vill sticka denna tröja nerifrån och upp går det ? Om det går hur ska jag tänka då?

28.11.2023 - 12:32

DROPS Design answered:

Hej Susan, det er meget lettere at strikke den oppefra og ned, da kan du også prøve den undervejs og anpasse efter ønsket længde. Her ser du hvordan man gør: Hur man stickar en tröja uppifrån och ner

28.11.2023 - 14:27

country flag Brigitte wrote:

Hallo, bitte überprüfen Sie die Beschreibung zur PASSE. Ich vermute das sich dort ein Fehler eingeschlichen hat bzw. Zeilen in der Beschreibung fehlen. Z.B. Anschlag 120. Wenn man die Aufteilung in Ärmel und Rumpf- und Vorderteil mit den Zunahmen vornimmt - so wie beschrieben - kommt man nicht auf 148 Maschen! Freundliche Grüße Brigitte

26.11.2023 - 15:03

DROPS Design answered:

Liebe Brigitte, bei dieser 1. Runde wird man in jedem A.1 2 Maschen zunehmen (so 2 M x 4 = 8 Zunahmen), dann wird es 4 M in jedem Ärmel + 6 Maschen beim Vorder + 6 Maschen beim Rückenteil zugenonmmen = 120+8+8+12=148 Maschen insgesamt. Viel Spaß beim stricken!

27.11.2023 - 09:39

country flag Lara wrote:

Könnten Sie mir bitte die Raglanzzunahmen genauer erklären? Ich verstehe den Rythmus nicht.

05.11.2023 - 12:15

DROPS Design answered:

Liebe Lara, die Raglanzunahmen werden zuerst in jeder 2. Runde gestrickt (= je 8 Maschen pro Zunahmenrunde) dann nehmen Sie für Rumpfteil in jeder 2. Runde weiter wie zuvor zu, aber gleichzeitig nehmen Sie nur in jeder 4. Runde für die Ärmel zu (es wird abwechslungsweise 4 und 8 Maschen zugenommen), dann nehmen Sie für Rumpf und Ärmel in jeder 4. Runde zu (= 8 Zunahmen), in einigen Größen wird es dann am Ende nur für Rumpfteil zugenommen nicht mehr bei den Ärmeln (= 4 Zunahmen). Viel Spaß beim stricken!

06.11.2023 - 08:32

country flag Karoline wrote:

Jeg skal til at opdele i ærme og forstykke og bagstykke. Skal alle opdelingerne finde sted i midten af snoningerne, eller skal alle fire stykker have en hel snoning i deres del? Føler at starten er svær at forstå, da jeg ikke ved om jeg skal starte omgangen i midten af en snoning også strikke 8 masker, eller jeg strikker de 8 masker hvorved man ender i midten af en snoning?

30.10.2023 - 22:48

DROPS Design answered:

Hej Karoline, de første 8 masker som strikkes - for at komme til midten af A.2 - kommer til at høre sammen med rygstykket, så du får samme antal masker på for og rygstykke :)

31.10.2023 - 09:11

country flag Wendy Hawkins wrote:

When starting 3rd size with 156 std then increasing 31x8 and 7x8 x=304+156 origins std ,this equals 460 but pattern says 408 ?

20.08.2023 - 19:27

DROPS Design answered:

Dear Mrs Hawkins, in this jumper, you won't increase on the same rhythm on body and sleeves, this means in 3rd size you increase for sleeves 4 sts 10 times on every 2nd round then 15 times on every 4th round (= 100 sts in total), at the same time you increase for body 4 sts 31 times on every other round and 7 times on every 4th round (=152 sts) so that you will increase either 8 sts on the round or only 4 sts (when increasing for body on every other round but for sleeves on every 4th round). And there are: 156+100+152=408 sts in total. Happy knitting!

21.08.2023 - 09:18

country flag Liv Spang wrote:

Jeg er begynder i sweaterstrik og strikker str. M men er i tvivl om hvordan jeg tager ud på ærmer og for-/bagstykke. Der står tag ud på hver 2. Omgang x antal gange og hver 4. omgang x antal gange men ikke hvor mange masker der tages ud hver gang eller hvor? Jeg regner mig til det er to masker hvert sted men skal de fordeles jævnt eller tages ud i start og slut af ærme og for-/bagstykke. Håber I kan hjælpe mig.

07.08.2023 - 15:11

DROPS Design answered:

Hej Liv, du tager ud til raglan ved at lave 1 omslag før og efter A.1/A.2, se øverst i opskriften hvor der står RAGLAN hvordan du strikker omslagene på næste pind :)

10.08.2023 - 14:31