
Categorías populares
¿Buscas un hilo?


Comentarios / Preguntas (114)
![]() Desiree Williams escribió:
Desiree Williams escribió:
I’m confused about the beginning, where it says to chain 5 to form a ring, and then you are supposed to work 12 dc in the ring. How do you go from 5 to 12? I can see if there are 6 in the ring, and then two dc per stitch to make 12. Am I missing something? Thanks!
01.02.2025 - 19:37DROPS Design respondió:
Dear Desiree, with the 5 chain stitches you form a ring. Then, you will work 12 dc inside the hole of the ring, not in each of the chain stitches. Happy crochetting!
02.02.2025 - 23:44
![]() Lisa escribió:
Lisa escribió:
Hi, Working on the bag, love it! At the point round 12, After decrease to 112. Dou you do consist rounds of 112.? With no more decreases? About how many rows to gain the bucket bag? Thanks Lisa
09.06.2024 - 17:35DROPS Design respondió:
Dear Lisa, after decreasing to 112, simply finish 1 vertical repeat of chart A.2, without increases or decreases, just the 112 stitches. So work all rows of chart A.2 once and you can fasten off. Happy crochetting!
09.06.2024 - 19:47
![]() Ruth Burton escribió:
Ruth Burton escribió:
Your suggested hook size to get correct tension is 5.5mm but the pattern says use 4.5mm! Obviously I'll do a tension square before starting my bag.
30.05.2024 - 08:51DROPS Design respondió:
Dear Ruth, gauge is personal to each individual, therefore we suggest that a gauge swatch is donw ALWAYS for each project and final needle (or hook) size is selected accordingly. Happy Crafting!
04.06.2024 - 02:59
![]() Prasanthi escribió:
Prasanthi escribió:
Made this beautiful bag. Gifted it to my niece on her birthday and she is so thrilled to receive this. Thank you so much for the clear instructions and graph. Would love to post the picture of the bag but I don't see where to attach the pic.
18.03.2024 - 09:50
![]() Andrea escribió:
Andrea escribió:
On A.2 where it says (= 7 repetitions in width) does this mean “the next 7 rounds?” And when it says “AT THE SAME TIME on 1st round in A.2 dec 4 dc evenly = 112 dc.” Does this mean the last round should decrease to 112 dc?
04.01.2024 - 17:23DROPS Design respondió:
Dear Andrea, no this means you have to repeat A.2 a total of 7 times in the round as follows: work the 16 stitches in diagram A.2 (- there are 114 sts, work the first round A.2 decreasing 4 sts evenly on this round = 112 sts remain); Work each round a total of 7 times in the round until A.2 is done. Happy crocheting!
05.01.2024 - 08:06
![]() Petra escribió:
Petra escribió:
Man soll die Tasche mit 2 Fäden "Paris" häkeln. Bezieht sich das auf die Tapestry Technik, die ja immer mindestens 2fädig ist? Ansonsten müsste ich ja bei 2 Farben mit 4 Fäden arbeiten. Ich verstehe es nicht.
21.10.2023 - 15:07DROPS Design respondió:
Liebe Petra, es wird immer mit 2 Fäden also doppelfäddig gehäkelt - siehe Maschenprobe: 12 Stäbchen x 7 Reihen mit 2 Fäden = 10 x 10 cm, in diesem Video zeigen wir (für ein anderes Modell), wie das Muster gehäkelt wird - hier wird man genauso häkeln, aber mit 2 Fäden jeder Farbe anstatt nur 1 Faden jeder Farbe wie im Video. Viel Spaß beim häkeln!
23.10.2023 - 09:38
![]() Joanne Seitz escribió:
Joanne Seitz escribió:
At the end of Row 4, it says in bold letters, REMEMBER THE CROCHET GAUGE. How big should the circle measure at this point? I do not see that mentioned.
05.07.2023 - 01:31
![]() Joanne Seitz escribió:
Joanne Seitz escribió:
At the end of Row 4, it says in bold letters, REMEMBER THE CROCHET GAUGE. How big should the circle measure at this point? I do not see that mentioned.
05.07.2023 - 01:29DROPS Design respondió:
Dear Mrs Seitz, with 7 rounds = 10 cm, the first 4 rounds should measure approx. 6 cm. Happy crocheting!
05.07.2023 - 07:51
![]() Joanne Seitz escribió:
Joanne Seitz escribió:
Hi, I understand now that each row should begin with 3 chains. Does that begin with Round 1 when you are working 12 dc into the chain? And then you will sl st into the third chain before moving on to Round 2?
04.07.2023 - 01:22DROPS Design respondió:
Dear Mrs Seitz, you need to crochet 3 chains at the beginning of every round with dc (US-English), this means from the 1st round, in other words on round 1, crochet 3 chains + 11 dc in the magic round = 12 dc, slip stitch in the 3rd chain from beg of round to join then work 2nd round starting with 3 chains to replace first dc and so on. Happy crocheting!
04.07.2023 - 08:41
![]() Virkaten escribió:
Virkaten escribió:
Teen käsitöitä harrastuksena ja myyn niitä kaksi tai kolme kertaa vuodessa myyjäisissä ja joskus somen välityksellä. Yhden mallin kappalemäärä on usein vain 1. Ohjeiden alareunassa puhutaan vain neuleiden myynnistä. Saako näin myydä myös virkkauksia ja asusteita?
25.05.2023 - 12:53DROPS Design respondió:
Hei, kyllä, voit myydä myös virkkauksia ja asusteita tähän tapaan.
29.05.2023 - 16:49
|
|||||||||||||||||||
Market Day#marketdaybag |
|||||||||||||||||||
 |
 |
||||||||||||||||||
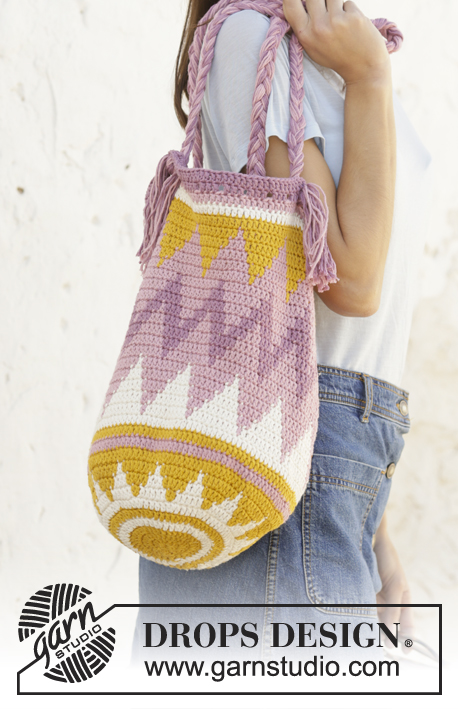
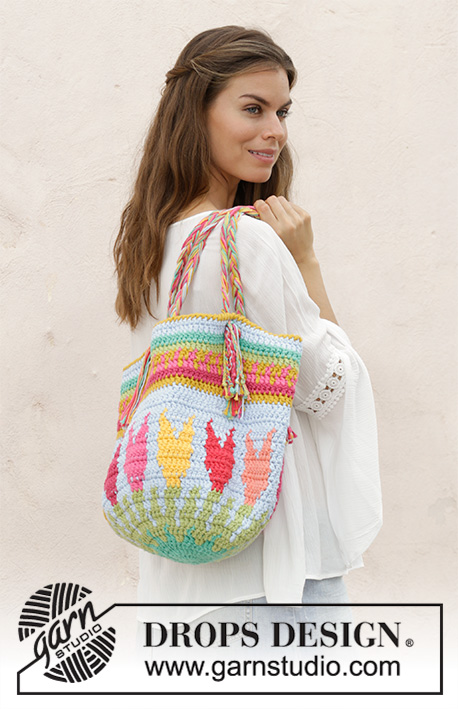
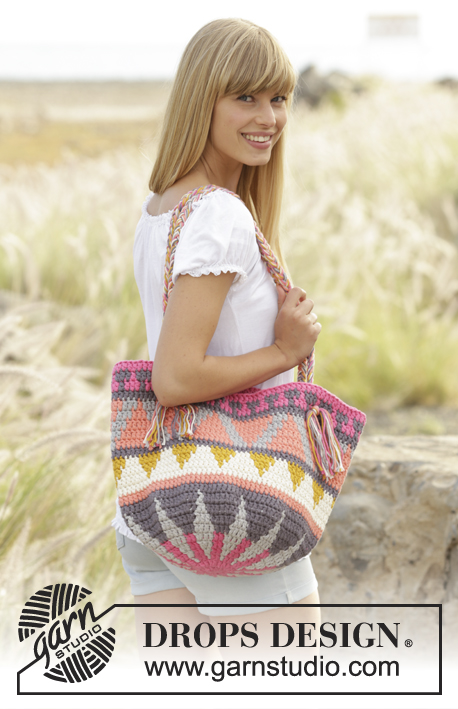
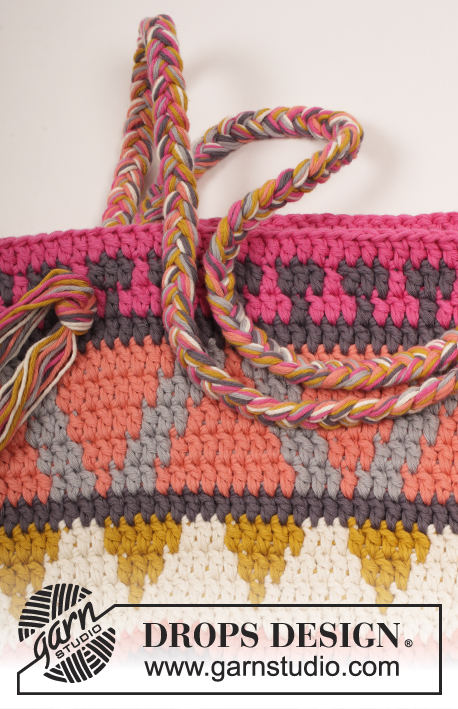
Bolso DROPS en ganchillo con patrón de colores en 2 hilos “Paris”.
DROPS 170-1 |
|||||||||||||||||||
|
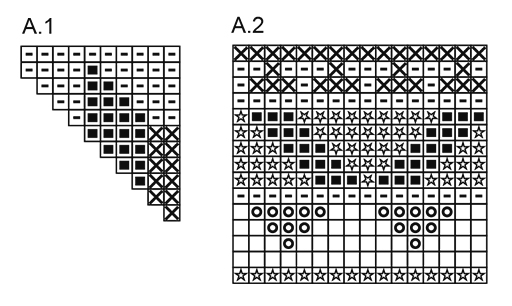
PATRÓN: Ver diagramas A.1 y A.2. Los diagramas muestran los colores en el patrón. 1 cuadrado = 1 p.a. TIP PARA USAR DOBLE HILO: Usar el cabo de hilo tanto del interior como del exterior del ovillo. Al hacer el cambio para un nuevo ovillo, tratar de evitar cambiar ambos hilos al mismo tiempo – para evitar tener un hilo demasiado grueso cuando se entretejen los hilos al final. PATRÓN DE COLORES (trabajado en redondo): Cuando se cambia de color, trabajar de la manera siguiente: Trabajar el último p.a. con el primer color pero no hacer la última lazada, cambiar al color siguiente y extraer la última lazada, después trabajar el p.a. siguiente. Cuando se trabaja con dos colores, colocar los hilos del color no trabajado sobre los pts de la vta anterior, trabajar alrededor de los hilos para queden escondidos y sigan la labor en redondo. INFORMACIÓN PARA LA ELABORACIÓN DEL TRABAJO: Sustituir el 1er p.a. al principio de cada vta con 3 cad, terminar la vta con 1 p.bjs en la 3ª cad. TIP PARA DISMINUIR: Disminuir 1 p.a. trabajando 2 p.a. juntos de la manera siguiente: Trabajar 1 p.a. pero no hacer la última lazada, (= 2 pts en la ag), trabajar el p.a. siguiente, pero en la última lazada, extraer el hilo a través de todos los 3 bucles en la ag. ------------------------------------------------------ BOLSO: Trabajar en redondo con 2 hilos de cada color – LEER TIP PARA USAR DOBLE HILO. Montar 5 cad con 2 hilos rosado intenso en ag de ganchillo tamaño 4.5 mm y formar un anillo con 1 p.bjs en la 1ª cad. Después trabajar en redondo y de acuerdo al diagrama A.1 (trabajar 12 repeticiones de A.1 a lo ancho) – LEER PATRÓN DE COLORES. VUELTA 1: Trabajar 12 p.a. en el anillo – leer INFORMACIÓN PARA LA ELABORACIÓN DEL TRABAJO. VUELTA 2: Trabajar 2 p.a. en cada p.a. = 24 p.a. VUELTA 3: Trabajar * 1 p.a. en el primer p.a., 2 p.a. en el p.a. siguiente *, repetir de *a* en toda la vta = 36 p.a. VUELTA 4: Trabajar * 1 p.a. en cada uno de los primeros 2 p.a., 2 p.a. en el p.a. siguiente *, repetir de *a* en toda la vta = 48 p.a. RECORDARSE DE MANTENER LA MISMA TENSIÓN DE LA MUESTRA! VUELTAS 5-10: Continuar con los aumentos y el patrón como antes, es decir, en cada vta trabajar 1 p.a. más entre los aumentos = 120 p.a. VUELTA 11: Trabajar la última vta en A.1 y, AL MISMO TIEMPO, disminuir 4 p.a. distribuidos equitativamente, disminuir trabajando 2 y 2 p.a. juntos = 116 p.a. VUELTA 12: Continuar trabajando en redondo, pero sin aumentos y trabajar de acuerdo a A.2 (= 7 repeticiones a lo ancho), AL MISMO TIEMPO, en la 1ª vta en A.2, disminuir 4 p.a. distribuidos equitativamente = 112 p.a. Continuar hasta que A.2 esté trabajado, cortar y asegurar los hilos. ASAS: Cortar 6 hilos de cada color de 120 cm = 36 hilos. Colocar los hilos juntos y hacer un nudo flojo, dejar aprox 12 cm después del nudo. Distribuir los hilos en 3 grupos, con 12 hilos en cada grupo. Trenzar los grupos entre sí hasta que la trenza mida aprox 68 cm. Dividir el final de la trenza en 2. Pasar las 2 mitades a través del bolso, con 1 p.a. de separación, en la 3ª vta de la orilla. Atarlas juntamente en un nudo al frente del bolso. Desatar el nudo al principio de la trenza y asegurarla al bolso de la misma manera, pero en el lado opuesto. Hacer otra trenza de la misma manera – ver foto. |
|||||||||||||||||||
Explicaciones del diagrama |
|||||||||||||||||||
|
|||||||||||||||||||
|
|||||||||||||||||||
¿Terminaste este patrón?Entonces, etiqueta tus fotos con #dropspattern #marketdaybag o envíalas a la galería #dropsfan. ¿Necesitas ayuda con este patrón?Encontrarás 9 videos tutoriales, un espacio para comentarios/preguntas y más visitando la página del patrón en garnstudio.com © 1982-2025 DROPS Design A/S. Todos los derechos reservados. Este documento, incluyendo todas sus sub-secciones, está protegido por los derechos de autor (copyright). Lee más acerca de lo que puedes hacer con nuestros patrones en la parte de abajo de cada patrón de nuestro sitio. |
|||||||||||||||||||


Con más de 40 años en el diseño de modelos de punto y de ganchillo, DROPS Design ofrece una de las más vastas colecciones de patrones gratuitos en el internet - traducidos en 17 idiomas. Al día de hoy, contamos con 314 catálogos y 11824 patrones - de los cuales 11057 están traducidos en español.
Nosotros trabajamos con mucho esmero para brindarte lo mejor que las labores de punto y ganchillo tienen para ofrecer,inspiración y consejos, así como hilos de magnífica calidad a precios increíbles! Te gustaría usar nuestros patrones para otro fin además del uso personal? Puedes leer acerca de lo que estás permitida a hacer en el texto de Copyright en la parte de abajo de todos nuestros patrones. Felices labores!
Escribe un comentario sobre DROPS 170-1
¡Nos encantaría saber qué piensas acerca de este patrón!
Si quieres escribir una pregunta referente al patrón, por favor asegúrate de elegir la categoría correcta en el formulario debajo, para acelerar el proceso de respuesta. Los campos obligatorios están marcados con un *.