
Looking for a yarn?


Comments / Questions (67)
![]() Marianne Andersen wrote:
Marianne Andersen wrote:
Det står i oppskriften at jeg skal dele forstykket i høyre og venstre del ved 38 cm (xl). Men er ikke det veldig tidlig? Det ser da ut for meg at starten på V-halsen kommer veldig langt «ned». Kan det være riktig?
29.04.2025 - 17:57DROPS Design answered:
Hei Marianne, Ja, du begynner å felle til V halsen før du feller til ermehullene. Du kan selvfølgelig vente med å starte V halsen hvis du ikke vil ha den så langt ned. God fornøyelse!
05.05.2025 - 06:53
![]() Joan Herzog wrote:
Joan Herzog wrote:
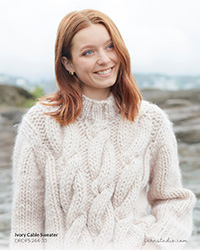
The photo shows a ribbed (k1, p1) V neck edge finish, but I do not see that written in the instructions. Are you supposed to just pick them up at the end on your own, without direction?
22.11.2024 - 21:44DROPS Design answered:
Dear Joan, there is no ribbed V-neck edge finish. The neck edge is worked in garter stitch as explained in the front piece shoulders (= 4 sts in garter st towards the neck). Since you knit all rows, both from the right side and wrong side, the remaining texture may look like a rib, but it's actually garter stitch ridges. Remember to decrease not in the 4 sts in garter stitch but right when you change from the neck edge stitches to the body stitches (so in the 5th or 5 to last stitch). Happy knitting!
24.11.2024 - 19:48
![]() Genelot wrote:
Genelot wrote:
Merci pour votre réponse rapide,en fait j aimerai tricoter ce genre de pull avec kidsilk,col V en manches raglan. J ai vu ds le film hors saison 2024, auriez vous un modèle approchant Merci bcp
05.10.2024 - 04:17DROPS Design answered:
Bonjour Mme Genelot, retrouvez ici tous nos pulls avec col V et emmanchures raglan; en espérant que l'un d'eux puisse vous inspirer. Bon tricot!
07.10.2024 - 07:28
![]() Genelot wrote:
Genelot wrote:
Le modèle est expliqué avec du point mousse,alors qu on dirait qu il est en côtes anglaises y a t il une erreur ou ais je rien compris?
01.10.2024 - 08:38DROPS Design answered:
Bonjour Mme Genelot, on explique au tout début des explications comment tricoter du point mousse, mais ce pull se tricote en jersey, pas en côtes anglaises. Retrouvez tous nos pulls tricotés en côtes anglaises (toutes techniques confondues) ici. Bon tricot!
01.10.2024 - 09:44
![]() MARIE-CLAUDE wrote:
MARIE-CLAUDE wrote:
Bonjour, J'ai acheté de laine DROP MELODY et je souhaiterais faire un pull à col rond et je ne trouve pas de modèle à faire mais pas avec des aiguilles circulaire je ne sais pas tricoter en aiguille circulaire. Pourriez vous me dire si vous avec des modèles avec aiguilles droites. Merci
18.08.2023 - 12:44DROPS Design answered:
Bonjour Marie-Claude, les aiguilles circulaires sont parfois utilisées pour tricoter en allers et retours, juste pour avoir suffisamment de place pour y loger toutes les mailles, c'est la cas ici, vous pouvez simplement tricoter avec des aiguilles droites - pour la prochaine fois, si besoin, découvrez grâce à cette leçon comment adapter un modèle sur aiguilles droites. Bon tricot!
18.08.2023 - 16:04
![]() Luigina Farronato wrote:
Luigina Farronato wrote:
Comment se procurer cette laine pour ce modèle je suis au Maroc plus précisément à Agadir Merci
13.12.2022 - 10:36DROPS Design answered:
Bonjour Mme Farronato, vous trouverez la liste des magasins DROPS expédiant dans le monde entier ici. Visitez leur site pour en savoir plus et n'hésitez pas à les contacter pour toute information complémentaire. Bon tricot!
13.12.2022 - 11:28
![]() Katleen wrote:
Katleen wrote:
Drops Melody is dunner geworden. Kan u het patroon aanpassen ?
03.07.2022 - 23:10DROPS Design answered:
Dag Katleen,
Bij mijn weten is DROPS Melody niet dunner geworden, maar bij dit patroon wordt met opzet een grotere naalddikte gebruikt en de stekenverhouding in dit patroon is ook anders dan dat standaard staat aangegeven bij het garen. Dit is om een meer open of losser effect te krijgen.
08.07.2022 - 08:49
![]() Virginia McCormack wrote:
Virginia McCormack wrote:
I do not understand your response above to my question regarding the finished number of stitches for the sleeve. The largest size on the pattern is 42 sets. You say it should be 68sts. Is/was there a correction to the original pattern somewhere indicating this increase in numbers? Do I need to re write the pattern myself to make the sleeve fit the arm hole?
02.03.2022 - 04:34DROPS Design answered:
Please check if previous answer can help you.
02.03.2022 - 09:57
![]() Virginia McCormack wrote:
Virginia McCormack wrote:
The body of the sweater is perfect as per the tension swatch and size. My pattern says 42 stitches for finished X-LARGE sleeve. Wondering where you got the number 68?
01.03.2022 - 16:55DROPS Design answered:
Dear Mrs McCormack, oops I missed your comment was about sleeves sorry, my bad. In XL you should have 38 sts for the sleeve (42 sts in XXXL), this means these 38 (42) sts are approx. 18 (20) cm (without the edge st for seams on each side). Your sleeve should then perfectly fit the armhole which should be 18 cm in XL and 20 cm in XXXL. Can this help?
02.03.2022 - 09:20
![]() Virginia wrote:
Virginia wrote:
I have knit the sleeves for the Summer Melody sweater 3 times in different sizes incl. X-Large and none fit the sweater . All far too small and too short. Is there a correction to this pattern I have missed? has anyone else had this problem?
01.03.2022 - 05:26DROPS Design answered:
Dear Virginia, what about your tension? Do you have 10 sts x 12 rows in stocking stitch = 10 x 10 cm? In XL you should have then 68 sts before armholes = approx. 66 cm (2 sts for seam allowance). Read more about tension here. Happy knitting!
01.03.2022 - 10:12
|
|
Summer Melody#summermelodysweater |
|
|
|
|
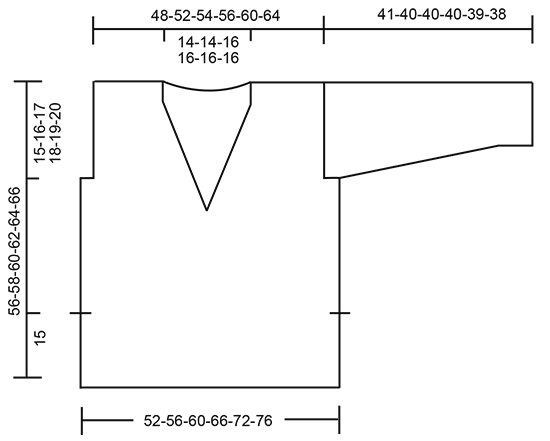
Knitted DROPS jumper in stockinette st with V-neck and vents in ”Melody”. Size: S - XXXL.
DROPS 170-33 |
|
|
GARTER ST (back and forth): K all rows. 1 ridge = K2 rows. DECREASE TIP: Dec inside sts in garter st. All dec are done from RS! Dec as follows before sts in garter st: K 2 tog. Dec as follows after sts in garter st: Slip 1 st as if to K, K 1, psso. ---------------------------------------------------------- JUMPER: Worked back and forth on circular needle. BACK PIECE: Cast on 54-58-62-68-74-78 sts (includes 1 edge st in each side) on circular needle size 8 mm / US 11 with Melody. Work 2 ridges in GARTER ST - see explanation above. Switch to circular needle size 9 mm / US 13 and work in stockinette st with 3 sts in garter st in each side of piece. REMEMBER THE KNITTING GAUGE When piece measures 15 cm / 6", the vents are done. Then work in stockinette st with 1 edge st in garter st in each side of piece. When piece measures 41-42-43-44-45-46 cm / 16⅛"-16½"-17"-17¼"-17¾"-18", bind off 2-2-3-5-6-6 sts for armholes at beg of the next 2 rows = 50-54-56-58-62-66 sts on needle. Continue in stockinette st. When piece measures 51-53-55-57-59-61 cm / 20"-21"-21⅝"-22½"-23¼"-24", work 2 ridges over the middle 22-22-24-24-24-24 sts. On next row from RS dec 1 st inside sts in garter st in each side - Read DECREASE TIP! Next row bind off the middle 14-14-16-16-16-16 sts for neck and finish each shoulder separately = 17-19-19-20-22-24 sts. Continue in stockinette st with 4 sts in garter st towards the neck. When piece measures 55-57-59-61-63-65 cm / 21⅝"-22½"-23¼"-24"-24¾"-25½", work 1 ridge over all sts. Bind off. Work the other shoulder the same way. FRONT PIECE: Cast on and work as back piece. When piece measures 36-36-37-38-39-40 cm / 14¼"-14¼"-14½"-15"-15¼"-15¾", divide the piece for right and left shoulder, work next row from RS as follows: Work as before over the first 26-28-30-33-36-38 sts, then slip these sts on a stitch holder for left shoulder = 28-30-32-35-38-40 sts for right shoulder. RIGHT SHOULDER: Continue in stockinette st with 4 sts in garter st towards the neck and 1 edge st in garter st in the side - AT THE SAME TIME bind off for armhole when piece measures 41-42-43-44-45-46 cm / 16⅛"-16½"-17"-17¼"-17¾"-18" as on back piece, and dec for neck inside 4 sts in garter st as follows: 1 st every other row 9-9-10-10-10-10 times in total = 17-19-19-20-22-24 sts on needle. When piece measures 55-57-59-61-63-65 cm / 21⅝"-22½"-23¼"-24"-24¾"-25½", work 1 ridge over all sts. Bind off. LEFT SHOULDER: = 26-28-30-33-36-38 sts. Cast on 2 sts towards the neck for overlap in neck edge at the front = 28-30-32-35-38-40 sts. Then work shoulder as right shoulder. Fasten the 2 sts with neat stitches on the back of neck edge on right shoulder. SLEEVE: Worked back and forth on circular needle. Cast on 22-22-24-24-26-26 sts (includes 1 edge st in each side) on circular needle size 8 mm / US 11 with Melody. Work 2 ridges. Switch to circular needle size 9 mm / US 13 and work in stockinette st with 1 edge st in garter st in each side of piece. When piece measures 6 cm / 2⅜", inc 1 st inside 1 edge st in each side of piece. Repeat inc every 8-6-6-5-5-4 cm / 3"-2½"-2½"-2"-2"-1½" 4-5-5-6-6-7 more times = 32-34-36-38-40-42 sts. Bind off when piece measures 41-40-40-40-39-38 cm / 16"-15¾"-15¾"-15¾"-15¼"-15" (shorter measurements in the larger sizes because of wider shoulders). Make another sleeve the same way. ASSEMBLY: Sew the shoulder seam. Sew in sleeves. Sew sleeve seams and side seams in one inside 1 edge st down to vents. |
|
 |
|
Have you finished this pattern?Tag your pictures with #dropspattern #summermelodysweater or submit them to the #dropsfan gallery. Do you need help with this pattern?You'll find 20 tutorial videos, a Comments/Questions area and more by visiting the pattern on garnstudio.com. © 1982-2025 DROPS Design A/S. We reserve all rights. This document, including all its sub-sections, has copyrights. Read more about what you can do with our patterns at the bottom of each pattern on our site. |
With over 40 years in knitting and crochet design, DROPS Design offers one of the most extensive collections of free patterns on the internet - translated to 17 languages. As of today we count 319 catalogs and 12042 patterns - 12032 of which are translated into English (US/in).
We work hard to bring you the best knitting and crochet have to offer, inspiration and advice as well as great quality yarns at incredible prices! Would you like to use our patterns for other than personal use? You can read what you are allowed to do in the Copyright text at the bottom of all our patterns. Happy crafting!
Post a comment to pattern DROPS 170-33
We would love to hear what you have to say about this pattern!
If you want to leave a question, please make sure you select the correct category in the form below, to speed up the answering process. Required fields are marked *.