
Popular categories
Looking for a yarn?


Comments / Questions (19)
![]() Paula wrote:
Paula wrote:
Hi, i cannot see the diagrams or print the pattern, is there a problem? Thanks!
25.09.2021 - 17:38DROPS Design answered:
Dear Paula, the pattern loads properly for us, the problem, if there is any not on pour side. To print the pattern please click on the print sign, and then to the "continue to the pattern" . Happy Stitching!
27.09.2021 - 03:15
![]() Lizzi wrote:
Lizzi wrote:
MERCI BEAUCOUP
13.11.2019 - 11:20
![]() Lizzi wrote:
Lizzi wrote:
Comment éviter le décalage lors d un jacquard en rond j ai déjà tricote ce modèle et j aimerai le refaire en bleu et blanc mais sans ce décalage Merci pour votre reponse
12.11.2019 - 19:21DROPS Design answered:
Bonjour Lizzi, cette vidéo montre comment tricoter des rayures sans décalage, vous pouvez utiliser cette technique dans le jacquard, en fonction du motif, parfois, simplement resserrer le fil entre la dernière m et la première m du rang peut suffire. Bon tricot!
13.11.2019 - 08:46
![]() Anne wrote:
Anne wrote:
Bonjour je commence le diagramme du poncho et je débute dans le jacquard. Faut il lire toutes les lignes de dans le même sens ou de gauche à droite puis de droite à gauche ? Merci pour votre réponse en espérant que ma question est claire
07.10.2016 - 00:08DROPS Design answered:
Bonjour Anne, on tricote ici en rond, on va lire le diagramme tous les tours de droite à gauche, en commençant en bas à droite. Bon tricot!
07.10.2016 - 08:45Brenda wrote:
I was wondering how many yards is in a ball of this wool? I am allergic to wool. But still love to make it. Or...Do you have a yarn without real wool in it?
25.08.2016 - 22:08DROPS Design answered:
Dear Brenda, you will find required materials in each size under tab "Materials" and content under shadecard - read more about yarns here/a> and find an alternative here. Your 26.08.2016 - 10:53
![]() Corrie wrote:
Corrie wrote:
Is het mogelijk de poncho in 1 stuk te breien in plaats van een voorkant en een achterkant?
14.08.2016 - 14:10DROPS Design answered:
De poncho wordt in een stuk gebreid, in de rondte, tot aan de splitten.
14.08.2016 - 21:29
![]() Claudie wrote:
Claudie wrote:
Je vous remercie pour votre reponse et j'aimerais poser une dernière question....je suis arrivée à la bordure finale qui est tricotée au point mousse, faut-il la tricoter avec les aiguilles n° 5 ou 6 en espérant que cela ne roulotte pas après rabattage des mailles .... Je voulais aussi rassurer M Leroy sur ce modele , je n'avais jamais tricoté avec des aiguilles circulaires ne fait de jacquard....c.est chose faite, le rendu est superbe. Cordialement C Vanholsbeke
28.01.2016 - 11:02DROPS Design answered:
Bonjour Claudie, les 4 cm point mousse en bas du devant et du dos se tricotent avec les aiguilles 6. Bon tricot!
28.01.2016 - 13:32
![]() Leroy wrote:
Leroy wrote:
Je vais commencer le modèle Drops 156-11 c'est un poncho avec 2 grosses nouveautés et difficultés pour moi: - le jacquard dont le dessin donné est réduit; et pour le départ et les augmentations je suis un peu perdu !!! - le jersey en aiguille circulaire est assez bien montré sur la vidéo et je m'exerce ... Merci SVP de m'apporter quelques compléments d'explications
28.10.2015 - 17:54DROPS Design answered:
Bonjour Mme Leroy, le diagramme du jacquard va être répété 12-15 fois (cf taille) en largeur, placez un marqueur entre chaque motif que vous tricotez pour mieux vous repérer si besoin. Cliquez ici pour savoir comment répartir des augmentations/diminutions. Bon tricot!
28.10.2015 - 18:32
![]() Sandra Gerner wrote:
Sandra Gerner wrote:
Liebes Drops-Team, ich habe eine Frage zu der Strickanleitung: Zeigt das Diagramm A1 lediglich die Hinreihen oder auch die Rückreihen? Falls es nur die Hinreihen anzeigt, stricke ich die Rückreihen mit Camel? Dann irritiert mich noch ein Satz in der Anleitung: "Dann nach Diagramm A.1 str und abn." Wenn ich mir das Diagramm ansehe, nehme ich doch Maschen zu und nicht ab. Ich sage schon mal vielen Dank für Ihre Hilfe.
07.02.2015 - 09:25DROPS Design answered:
Sie stricken ja zunächst in Runden. Es sind alle Runden eingezeichnet und Sie stricken jede Rd so, wie in der Zeichenerklärung erklärt, weitere R/Rd gibt es nicht. Sie haben Recht, dass Sie nach Diagramm A.1 zunehmen und nicht abnehmen, das wird in Kürze korrigiert.
08.02.2015 - 16:09
![]() Olinda Silva wrote:
Olinda Silva wrote:
Adorei o modelo, pois é super simples e muito elegante
09.10.2014 - 16:31
|
||||||||||||||||
Nordic Autumn#nordicautumnponcho |
||||||||||||||||
|
|
||||||||||||||||
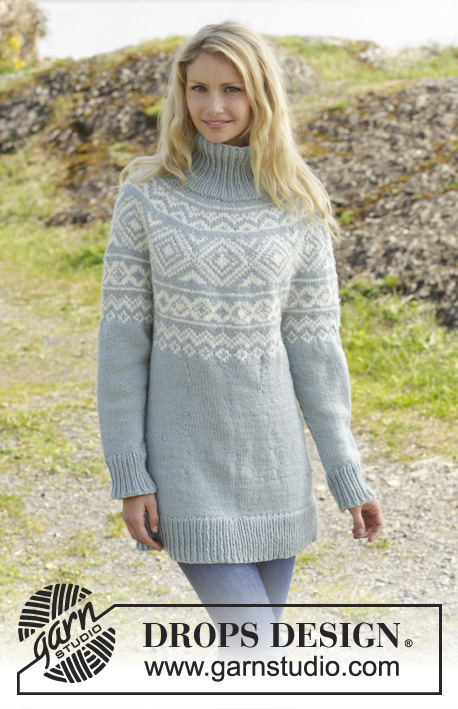
Knitted DROPS poncho with Norwegian pattern, worked top down in ”Nepal”. Size: S - XXXL.
DROPS 156-11 |
||||||||||||||||
|
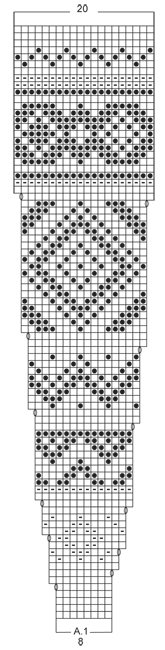
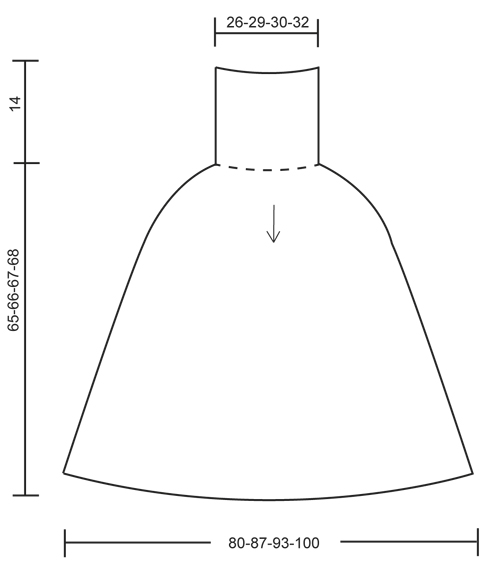
GARTER ST (back and forth on needle): K all rows. 1 ridge = 2 rows K GARTER ST (in the round on circular needle): * K 1 round and P 1 round *, repeat from *-*. 1 ridge = 2 rounds. PATTERN: See diagram A.1. The diagrams are worked in stockinette st. ---------------------------------------------------------- PONCHO: The piece is worked top down. First work in the round on circular needle, then divide the piece and work back and forth. Cast on 102-114-120-126 sts on circular needle size 5 mm / US 8 with camel. Work rib = K 1/P 2 for 14 cm / 5½". Insert 1 marker. NOW MEASURE PIECE FROM HERE! Switch to circular needle size 6 mm / US 10. Work 3 rounds in stockinette st while AT THE SAME TIME on 1st round dec 6-10-8-6 sts evenly = 96-104-112-120 sts. REMEMBER THE GAUGE! Then work and inc according to A.1 (= 12-13-14-15 times in width). When A.1 has been worked 1 time vertically, there are 240-260-280-300 sts on needle. Piece measures approx. 45 cm / 17 ¾". Insert 1 marker at beg of round and 1 marker after 120-130-140-150 sts. Now work with camel. Work in stockinette st with 5 sts in GARTER ST – see explanation above, on each side of both markers (= 10 sts in garter st in each side of piece). Work 2 ridges in total over sts on each side of marker. Then divide the piece at the markers. FRONT PIECE: = 120-130-140-150 sts. Continue with 5 sts in GARTER ST – see explanation above – in the sides and stockinette st until piece measures 61-62-63-64 cm / 24"-24½"-24¾"-25¼". Work in garter st for 4 cm / 1½". Bind off. BACK PIECE: Work as front piece. |
||||||||||||||||
Diagram explanations |
||||||||||||||||
|
||||||||||||||||
 |
||||||||||||||||
 |
||||||||||||||||
Have you finished this pattern?Tag your pictures with #dropspattern #nordicautumnponcho or submit them to the #dropsfan gallery. Do you need help with this pattern?You'll find 23 tutorial videos, a Comments/Questions area and more by visiting the pattern on garnstudio.com. © 1982-2026 DROPS Design A/S. We reserve all rights. This document, including all its sub-sections, has copyrights. Read more about what you can do with our patterns at the bottom of each pattern on our site. |
||||||||||||||||


With over 40 years in knitting and crochet design, DROPS Design offers one of the most extensive collections of free patterns on the internet - translated to 17 languages. As of today we count 325 catalogs and 12298 patterns - 12288 of which are translated into English (US/in).
We work hard to bring you the best knitting and crochet have to offer, inspiration and advice as well as great quality yarns at incredible prices! Would you like to use our patterns for other than personal use? You can read what you are allowed to do in the Copyright text at the bottom of all our patterns. Happy crafting!
Post a comment to pattern DROPS 156-11
We would love to hear what you have to say about this pattern!
If you want to leave a question, please make sure you select the correct category in the form below, to speed up the answering process. Required fields are marked *.