
Popular categories
Looking for a yarn?


Comments / Questions (50)
![]() Carmen-Gabriela wrote:
Carmen-Gabriela wrote:
Hallo:) Gibt es ein Video für die lockere Bommel/Pompon/Quaste? Mein Gebilde ist etwas eigenartig^ - Ich habe die Fäden serpentinenartig in die Hand gelegt, i.d. Mitte zus.gebunden, die Schlingenenden kann man durchschneiden. Nun ist es wie eine Schleife. Aber wie hochkant befestigen? - Ich möchte mir dieses TOP-MODELL nicht vermasseln.
11.09.2019 - 17:28DROPS Design answered:
Liebe Carmen-Gabriela, hier zeigen wir wie man einen Pompon macht, je mehr Garn Sie benutzen, desto dichter wird der Pompon, benutzen Sie etwas weniger Garn, um einen lockeren Pompon zu haben. Viel Spaß beim stricken!
12.09.2019 - 08:28Lada wrote:
Awesome! I just doubt it really requires 5 bolls of ESKIMO to knit this hat. Will see:-)
21.10.2015 - 10:32
![]() Mirjam wrote:
Mirjam wrote:
Kul!
11.12.2013 - 13:30
![]() Vero wrote:
Vero wrote:
Muss man nach den ersten 10 cm wirklich auf re und li jeweils eine Masche ABnehmen? Danke!
05.11.2012 - 16:17DROPS Design answered:
Hallo Vero, Sie haben völlig Recht, auf der einen Seite wird zugenommen Ich werde dies sofort korrigieren.
12.11.2012 - 18:33
![]() DROPS Deutsch wrote:
DROPS Deutsch wrote:
Wir haben leider nicht die Möglichkeit Anleitungen umzuschreiben aber ich schicke Ihren Wunsch an das Designteam weiter.
16.01.2012 - 09:09
![]() Lembke wrote:
Lembke wrote:
Sehr geehrte Damen, ich habe eine große Bitte, ist es möglich mir für eine Teufelsmütze im Halbpatent eine Anleitung zu schicken. es geht um die Abnahme bzw. Zunahmestellen in einwandfreier Optik.Ich habe die Mützen vor 30Jahren gestrickt und leider die Musterlösüng verlegt.Bitte helfen sie mir. Danke
15.01.2012 - 18:47
![]() Demma wrote:
Demma wrote:
Ohje ja malli olivat tosi ihania, mutta langa menekki ei pitänyt alkuunkaan paikkaansa. En tehnyt omaan pipooni tupsua, mutta silti minulta meni vain hitusen yli 100g lankaa. Tuskin tupsu kuitenkaan 150grammaa painaa... :( ?
20.10.2009 - 19:33
![]() Jag wrote:
Jag wrote:
Den är såååå söt=)
04.10.2009 - 14:13
![]() Anna wrote:
Anna wrote:
Påskkycklingens Återkomst :D
07.09.2009 - 15:20
![]() Gillian wrote:
Gillian wrote:
I am going to make the hat without the pom-pom to fit under the hood of my coat. Ideal for cold wintry nights walking home from work.
01.09.2009 - 21:59
|
|||||||||||||
Joust#joustset |
|||||||||||||
 |
 |
||||||||||||
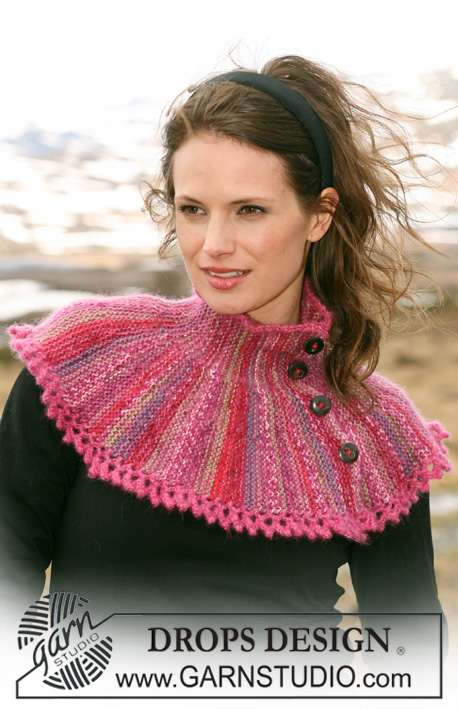
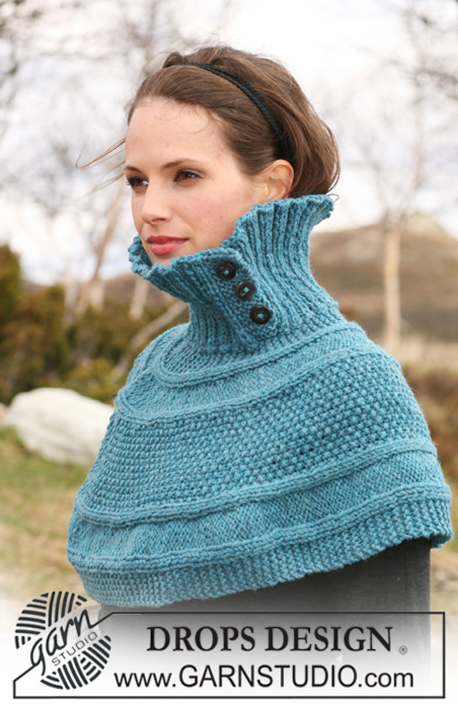
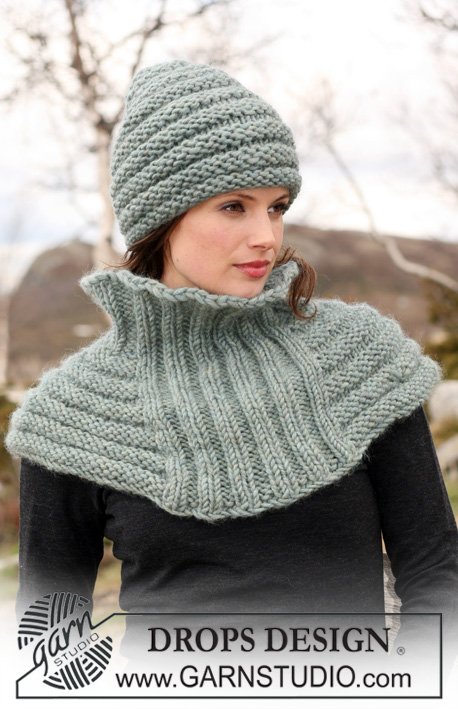
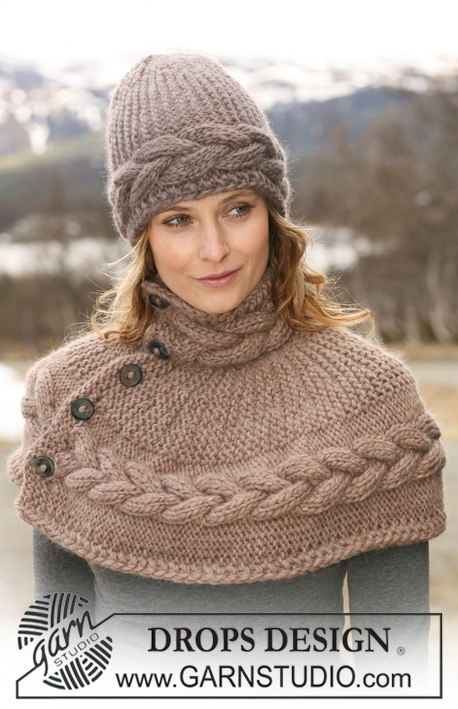
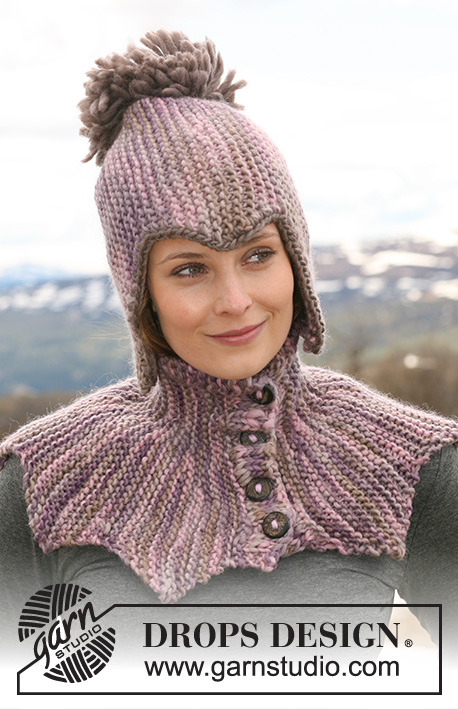
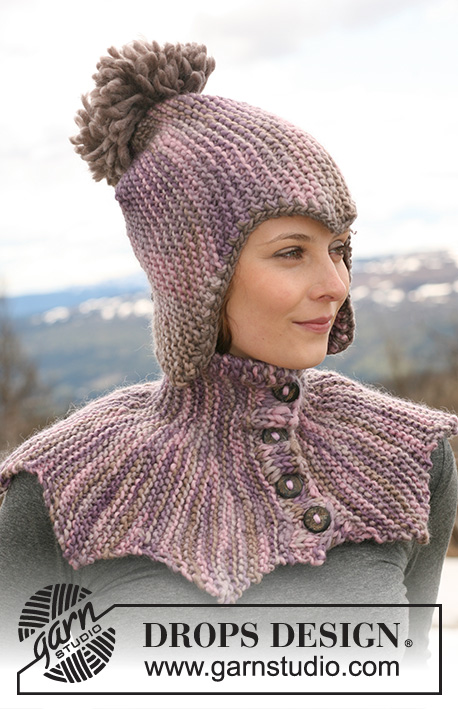
Set comprises: DROPS neck warmer with buttons, worked from side to side in garter st and hat in garter st in ”Snow
DROPS 117-25 |
|||||||||||||
|
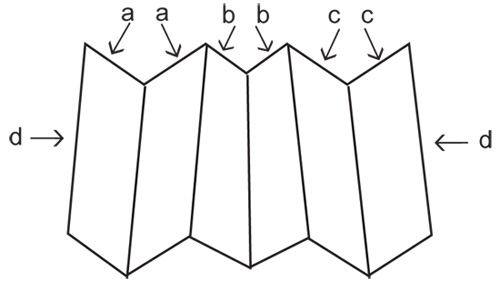
NECK WARMER: -------------------------------------------------------- GARTER ST (back and forth on needle): K all rows. BUTTONHOLES: Make 4-4-5 buttonholes on right front band as follows from WS: 1 buttonhole = K2 tog and make 1 YO: Size S/M - L/XL: 2 garter sts, P2, make buttonhole, work 8-8 sts in rib, make buttonhole, work 6-10 sts in rib, make buttonhole, work 8-8 sts in rib, make buttonhole, finish with P2 and 2 garter sts. Size XXL/XXXL: 2 garter sts, P2, K2, * make buttonhole, work 6 sts in rib *, repeat from *-* a total of 4 times, finish with make buttonhole and K2, P2 and 2 garter sts. INCREASING TIP: Inc with 1 YO, on next row work YO into back of loop to avoid a hole. ZIGZAG PATTERN: 1 zigzag repeat = 24 rows. Inc in bottom edge of piece by working 2 sts in the outermost st, repeat on every other row a total of 6 times, then dec by K tog the 2 outermost sts, repeat on every other row a total of 6 times. SHORTENED ROWS: Work shortened rows as follows, beg from RS: Work 17-21-25 sts, turn - see KNITTING TIP below - and work 17-21-25 sts on return row, work 21-25-29 sts, turn and work 21-25-29 sts on return row, work 2 rows on all sts *, repeat from *-*. KNITTING TIP: When turning mid piece, slip first st as if to K, tighten thread and work return row to avoid a hole in transition. -------------------------------------------------------- -------------------------------------------------------- NECK WARMER: Worked from side to side. Cast on 38-42-46 sts on needle size 7 mm / US 10½ with Snow. NOTE: Work the last 2 sts on needle (towards neck) with 2 threads throughout. Continue as follows – from RS: 2 GARTER STS - see above, rib K2 /P2 until 4 sts remain, finish with K2, and 2 garter sts (with double thread). When rib measures 4 cm / 1½" P 1 row from WS, AT THE SAME TIME dec 8 sts evenly on row = 30-34-38 sts. Change to needle size 8 mm / US 11 and continue in garter st, AT THE SAME TIME work shortened rows and zigzag pattern with start from RS - see above. REMEMBER THE GAUGE! When piece measures approx 36-38-40 cm / 14¼"-15"-15¾" at the top towards neck – adjust to after 1 full repeat of both shortened rows and zigzag pattern -change to needle size 7 mm / US 10½. K 1 row from RS, AT THE SAME TIME inc 8 sts evenly on row – see INCREASING TIP = 38-42-46 sts. Now continue as follows from WS: 2 garter sts, rib P2/K2 until 4 sts remain, finish with P2 and 2 garter sts. Continue like this until rib measures 2 cm / ¾". On next row from WS make BUTTONHOLES – see above. Continue in rib K2/P2 with 2 garter sts each side and bind off with K over K and P over P when rib measures 4 cm / 1½". Piece measures approx 40-42-44 cm / 15¾"-16½"-17¼" at the top and 104-110-116 cm / 41"-43⅜"-45¾" at the bottom. Sew on buttons to left front band. ------------------------------------------------------- HAT: -------------------------------------------------------- GARTER ST (back and forth on needle): K all rows. INCREASING TIP: Inc 1 st by making 1 YO inside the outermost st. On next row work YO into back of loop to avoid a hole. DECREASING TIP: At beg of row: slip first st as if to K, K1, psso. At the end of row: slip last but one st as if to K, K1, psso. -------------------------------------------------------- HAT: Cast on 25-26-27 sts on needle size 7 mm / US 10½ with Snow and work 6 rows GARTER ST – see above. Now inc and dec as follows on every other row (= every row from RS) – see INCREASING TIP and DECREASING TIP. Inc 1 st on right side of piece and dec 1 st on left side of piece on every other row (= every row from RS) until piece measures 9-10-11 cm / 3½"-4"-4⅜". Dec 1 st on right side of piece and inc 1 st on left side of piece on every other row until piece measures 18-20-22 cm / 7"-8"-8¾". Inc 1 st on right side of piece and dec 1 st on left side of piece on every other row until piece measures 22.5-25-27.5 cm / 8⅞"-9¾"-10¾" (= half the hat). Dec 1 st on right side of piece and inc 1 st on left side of piece on every other row until piece measures 27-30-33 cm / 10⅝"-11¾"-13". Inc 1 st on right side of piece and dec 1 st on left side of piece on every other row until piece measures 36-40-44 cm / 14¼"-15¾"-17¼". Dec 1 st on right side of piece and inc 1 st on left side of piece on every other row until piece measures 45-50-55 cm / 17¾"-19¾"-21⅝". Bind off. ASSEMBLY: Front = Part of piece with 3 whole points. Back = Part of piece with 2 whole points and 2 half points. Now sew hat tog as follows - see fig: Sew tog, edge to edge, the first half point to first half of the first whole point. Then sew second half of first whole point to first half of second whole point. Then second half of second whole point to the last half point. Now sew hat tog mid back. CROCHET BORDER: Crochet a border round bottom edge of hat with beige on crochet hook size 8 mm / L/11 as follows: * 1 sc, 1 ch, skip approx 1 cm / ⅜" *, repeat from *-* and finish with 1 sl st in first sc. TASSEL: Fold a 36 cm / 14" long thread beige double (= length 18 cm / 7"). Continue to fold thread double until you have a small "ball". Gather threads by tightening a thread round the middle several times. Attach the middle of tassel to the top of hat, cut threads each end open so that thread ends fall over the hat. |
|||||||||||||
Diagram explanations |
|||||||||||||
|
|||||||||||||
 |
|||||||||||||
Have you finished this pattern?Tag your pictures with #dropspattern #joustset or submit them to the #dropsfan gallery. Do you need help with this pattern?You'll find 21 tutorial videos, a Comments/Questions area and more by visiting the pattern on garnstudio.com. © 1982-2026 DROPS Design A/S. We reserve all rights. This document, including all its sub-sections, has copyrights. Read more about what you can do with our patterns at the bottom of each pattern on our site. |
|||||||||||||


With over 40 years in knitting and crochet design, DROPS Design offers one of the most extensive collections of free patterns on the internet - translated to 17 languages. As of today we count 324 catalogs and 12272 patterns - 12262 of which are translated into English (US/in).
We work hard to bring you the best knitting and crochet have to offer, inspiration and advice as well as great quality yarns at incredible prices! Would you like to use our patterns for other than personal use? You can read what you are allowed to do in the Copyright text at the bottom of all our patterns. Happy crafting!
Post a comment to pattern DROPS 117-25
We would love to hear what you have to say about this pattern!
If you want to leave a question, please make sure you select the correct category in the form below, to speed up the answering process. Required fields are marked *.