
Categorías populares
¿Buscas un hilo?


Comentarios / Preguntas (119)
![]() Blau escribió:
Blau escribió:
Hej jeg vil gerne strikke Cassie bolero men vil gerne brug Karisma istedet for Big Merino. Ved du hvor meget garn jeg skal bruge og hvordan jeg kan tilpasse opskriften til Karisma garnet? Jeg skal strikke i størrelse L. Tak på forhånd og god påske! Mvh, Blau
29.03.2026 - 22:34DROPS Design respondió:
Hej, da skal du nok vælge en størrelse større :)
09.04.2026 - 11:17
![]() Margaret Tigchelaar escribió:
Margaret Tigchelaar escribió:
I understood direction to mean repeat A.1a and A1b for 90 sts. on each right side. and end with A1 c. That worked perfectly, but I got stuck on row 15, not enough sts. to do c, slip 1st, k2tog, psso.Error? or misunderstood the directions? Thank you!
13.08.2025 - 16:10DROPS Design respondió:
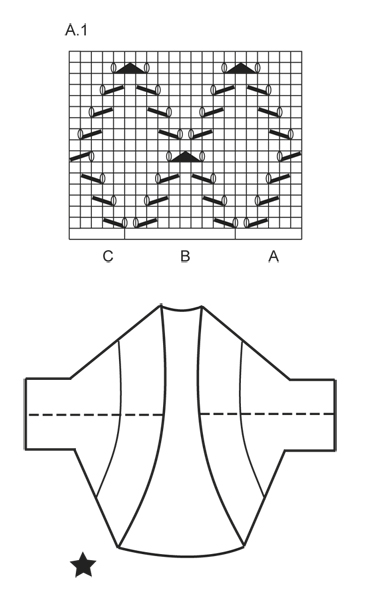
Dear Mrs Tigchelaar, on 15th row, you will work the last 2 sts A.1A with the first stitch A.1B, the 2nd yarn over is now the first st A.1B; then you will work the last 2 sts each A.1B with the first stitch next A.1B / A.1C at the end of the row; and the 2nd yarn over is now the first stitch next A.1B/A.1C. Happy knitting!
14.08.2025 - 08:35
![]() Margaret Tigchelaar escribió:
Margaret Tigchelaar escribió:
I received a comment that my question was too long. Does that mean that you did not receive it? If I don't hear,from you, I will resend shorter version.
13.08.2025 - 16:02
![]() Barbara escribió:
Barbara escribió:
Hallo, werden, wie beschrieben, an den Rändern nur krausrechte Maschen gestrickt und keine Randmaschen? An den Kanten die zusammengenäht werden, wäre doch jeweils eine Randmaschen besser... Danke für eure Hilfe!
24.05.2025 - 10:07DROPS Design respondió:
Liebe Barbara, es sind hier nur 3 Maschen krausrechts beidseitig, dann wird die Naht in das äusserte Glied von den äusserten Maschen gemacht, so braucht man keine extra Randmaschen. Viel Spaß beim Stricken!
26.05.2025 - 09:06
![]() Margaret Mc Mullan escribió:
Margaret Mc Mullan escribió:
Finding it difficult to follow the pattern for bolero thank you margaret
30.05.2024 - 10:06
![]() Gabriele Speck escribió:
Gabriele Speck escribió:
Muss ich für den Bolero das in der Anleitung vorgegebene Teil 2x stricken? Zbs. Vor- und Rückenteil?
15.12.2023 - 14:03DROPS Design respondió:
Liebe Frau Speck, es wird nur in einem Stück gestrickt, dann doppel gefaltet und zusammen genäht (die gestrichte Linien oben mit den gestrichten Linien unten zusammennähen und beidseitig (links und rechts) wiederholen. Viel Spaß beim stricken!
15.12.2023 - 15:40
![]() Sadi escribió:
Sadi escribió:
With assembly, what is meant by 1 Edge St.... what is best stich for the seams
14.07.2023 - 17:41
![]() Sadi escribió:
Sadi escribió:
I can not seem to get 15 correct, seems to ruin the pattern, loss of a stich Please just write it out I did k4, yo, S1, K2tog, psso Repeat Yo, k7, Yo, s1, K2tog, psso Then looks like Yo k4 needed at the end but I have only 3 stitches for that bit But clearly this not quite right
11.05.2023 - 17:34DROPS Design respondió:
Dear Sadi, on the 15th row, work the last 2 sts in A together with the first stitch B, work then the last 2 sts in B together with the first stitch next B / then C. The first yarn over + the stitch remaining after decrease are now the last 2 stitches in the repeat and the 2nd yarn over is now the first stitch next repeat. Happy knitting!
12.05.2023 - 07:41
![]() Sadi escribió:
Sadi escribió:
Would it possible to get a written version of the pattern rather than the diagram. I find the diagram more difficult to understand. I know all the individual types of stitches, but I don't use patterns and do not want to knit it all wrong
09.05.2023 - 01:49DROPS Design respondió:
Dear Sadi, we only have a diagram to this pattern, but this lesson might help you understanding how to read diagram, and in this video shows how to work a similar (but not exactly the same) lace pattern. Hope it can help. Happy knitting!
09.05.2023 - 07:48
![]() Ruth OBrien escribió:
Ruth OBrien escribió:
I do not understand the NOTE! Continue A.1 so that A.1 fits before the inc for sleeve. It seems to me that A1 is now part of the 10 stitches added for the sleeve. Please clarify what is meant under the NOTE
02.05.2021 - 22:50DROPS Design respondió:
Dear Ruth, it means, that for stitches you've knitted with pattern before, continue the pattern, and other stitches should be counted for the the pattern from the stitches already patterned, so it continue the existing pattern without a break. Happy Knitting!
03.05.2021 - 09:31
|
|||||||||||||||||||
Cassie#cassiebolero |
|||||||||||||||||||
 |
 |
||||||||||||||||||
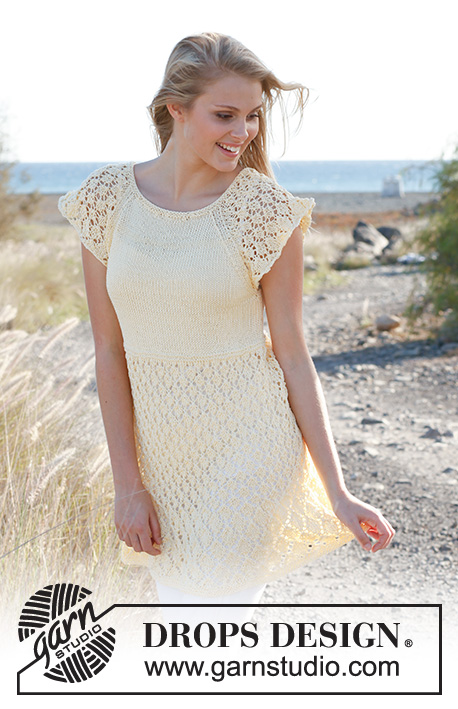
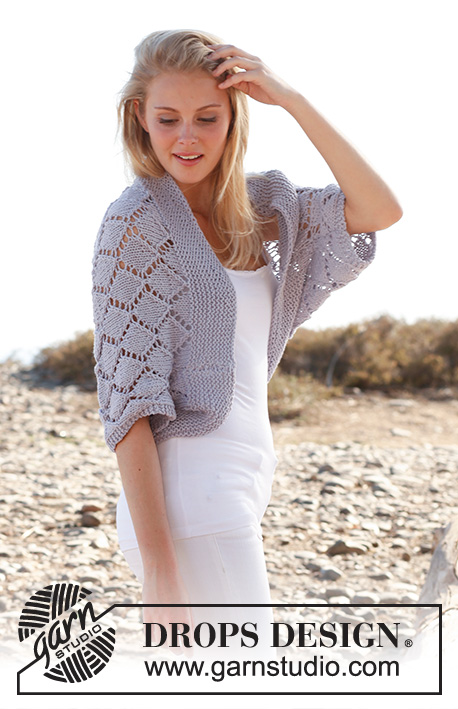
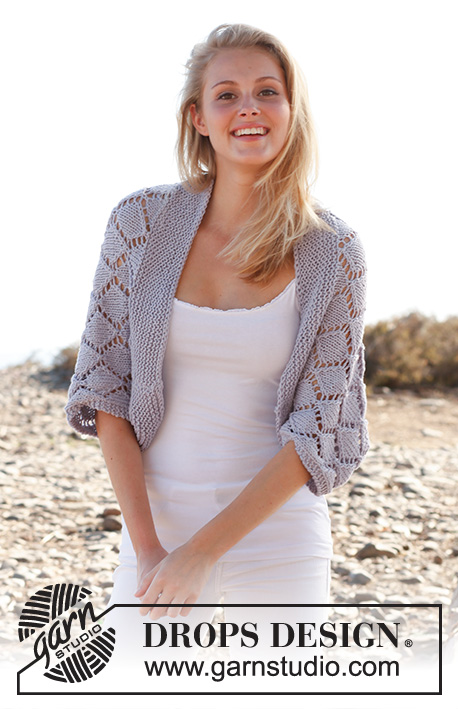
Bolero de punto DROPS con patrón de calados, en “Big Merino”. Talla: S – XXXL.
DROPS 146-16 |
|||||||||||||||||||
|
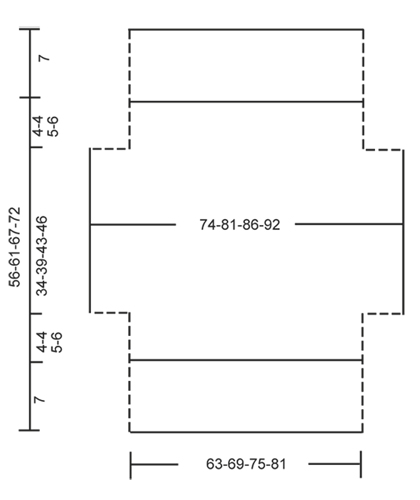
PT MUSGO (de ida y vuelta en la ag): Tejer todas las hileras de derecho. 1 surco = 2 hileras tejidas de derecho. PATRÓN: Ver diagrama A.1, el diagrama muestra todas las hileras en el patrón vistas por el LD. ------------------------------------------------------ BOLERO: Tejido de ida y vuelta en ag circular para tener espacio suficiente para todos los pts. Mon 107-117-127-137 pts en ag circular tamaño 5 mm con Big Merino. Tejer en pt musgo hasta que la pieza mida 7 cm. Después tejer de la manera sig, por el LD: 3 pts en PT MUSGO – ver explicación arriba, A.1A (= 6 pts), A.1B sobre los 90-100-110-120 pts sig, terminar con A.1 C (= 5 pts) y 3 pts en PT MUSGO. Continuar A.1 con 3 pts en pt musgo en cada lado. RECUERDE MANTENER LA MISMA TENSIÓN DE TEJIDO DE LA MUESTRA! Cuando la pieza mida 11-11-12-13 cm, mon 10 nuevos pts al final de las 2 hileras sig para la manga = 127-137-147-157 pts. Tejer de la manera sig: 3 pts en pt musgo, A.1A (= 6 pts), A.1 B sobre los 110-120-130-140 pts sig, terminar con A.1 C (= 5 pts) y 3 pts en PT MUSGO. NOTA! Continuar A.1 para que calce correctamente antes de los aum para la manga. Cuando la manga mida 45-50-55-59 cm, rem 10 pts al inicio de las 2 hileras sig = 107-117-127-137 pts. Tejer de la manera sig: 3 pts en pt musgo, A.1A (= 6 pts), A.1B sobre los 90-100-110-120 pts sig, terminar con A.1 C (= 5 pts) y 3 pts en pt musgo. Cuando la pieza mida 49-54-60-65 cm, tejer en pt musgo sobre todos los pts. Rem cuando la pieza mida 56-61-67-72 cm. TERMINACIÓN: Hacer las costuras laterales y debajo de las mangas en una, a 1 pt del pt de orillo – ver la línea punteada en el esquema. |
|||||||||||||||||||
Explicaciones del diagrama |
|||||||||||||||||||
|
|||||||||||||||||||
 |
|||||||||||||||||||
 |
|||||||||||||||||||
¿Terminaste este patrón?Entonces, etiqueta tus fotos con #dropspattern #cassiebolero o envíalas a la galería #dropsfan. ¿Necesitas ayuda con este patrón?Encontrarás 15 videos tutoriales, un espacio para comentarios/preguntas y más visitando la página del patrón en garnstudio.com © 1982-2026 DROPS Design A/S. Todos los derechos reservados. Este documento, incluyendo todas sus sub-secciones, está protegido por los derechos de autor (copyright). Lee más acerca de lo que puedes hacer con nuestros patrones en la parte de abajo de cada patrón de nuestro sitio. |
|||||||||||||||||||


Con más de 40 años en el diseño de modelos de punto y de ganchillo, DROPS Design ofrece una de las más vastas colecciones de patrones gratuitos en el internet - traducidos en 17 idiomas. Al día de hoy, contamos con 324 catálogos y 12290 patrones - de los cuales 11675 están traducidos en español.
Nosotros trabajamos con mucho esmero para brindarte lo mejor que las labores de punto y ganchillo tienen para ofrecer,inspiración y consejos, así como hilos de magnífica calidad a precios increíbles! Te gustaría usar nuestros patrones para otro fin además del uso personal? Puedes leer acerca de lo que estás permitida a hacer en el texto de Copyright en la parte de abajo de todos nuestros patrones. Felices labores!
Escribe un comentario sobre DROPS 146-16
¡Nos encantaría saber qué piensas acerca de este patrón!
Si quieres escribir una pregunta referente al patrón, por favor asegúrate de elegir la categoría correcta en el formulario debajo, para acelerar el proceso de respuesta. Los campos obligatorios están marcados con un *.