
Categorías populares
¿Buscas un hilo?


Comentarios / Preguntas (235)
![]() Anna escribió:
Anna escribió:
Hei, hvordan anbefaler dere å strikke ermene for å forlenge de? Jeg vil gjerne at de skal bli ganske lange. Tusen takk i forvei ₊˚⊹♡
06.01.2026 - 21:59DROPS Design respondió:
Hei Anna, Det er best å forlenge ermet etter at du er ferdig med å øke men før du begynner på ermtoppen, slik at du får fasongen riktig på nedre delen. Hilsen Drops Team.
07.01.2026 - 06:45
![]() Marjon escribió:
Marjon escribió:
Ik wil beginnen met het linker voorpand. Ik snap niet waarom ik 10st op een hulpdraad moet zetten? Brei ik die niet mee? Terwijl er staat dat je afkant voor de hals bij het begin van iedere naald. Is dat dan de buitenste steek, dus dus op de hulpdraad? Of de eerste steek die op de naald staat? Als ik ze niet meebrei, wat doe ik er dan wel mee?
25.08.2023 - 08:47DROPS Design respondió:
Dag Marjon,
Deze steken brei je niet mee en laat je gewoon op een hulpnaald (grote veiligheidsspeld) staan. Als je moet afkanten voor de hals zijn dat de steken ernaast. Op het eind zet je de steken van de hulpdraad weer op een naald en neem je daarnaast steken op rondom de hals om een rand rondom de hals te breien (zie 'afwerking').
28.08.2023 - 07:24
![]() Marjon escribió:
Marjon escribió:
Ik heb 308 steken opgezet. Als ik patroon volg, dan herhaal ik het patroon voor het lijf 10x (2x6st+10x17st+9x14st=308). In patroon staat 9x, maar dan kom ik op een totaal van 277st. Dit zou me wel goed uitkomen, want ik wil eigenlijk een M/L breien. Kan ik de 9x aanhouden en dus het aantal steken wijzigen en daarmee een tussenmaat breien? (En er lijkt dus een fout in het patroon te staan)
04.06.2023 - 13:27DROPS Design respondió:
Dag Marjon,
Je breit 6 voorbiessteken, dan herhaal je (M1 (17 st) en 14 averecht) = 31 st in totaal 9 keer, dan nog een keer M1 (17 st) en nog 6 voorbiessteken. In totaal kom je dan op 308 steken. Een tussenmaat zou je kunnen breien door in plaats van steeds 14 averecht, minder averechte steken te breien. Maar kijk dan ook even heel goed hoe dit uitkomt bij bijvoorbeeld de schouders en de armsgaten.
07.06.2023 - 11:41
![]() Marion escribió:
Marion escribió:
Als ik het vest als trui wil breien op een rondbreinaald, is het dan voldoende om middenvoor over de gehele lengte 6 steken averrecht te breien (dus de helft van de voorbies aanhouden)?
05.04.2023 - 17:38DROPS Design respondió:
Dag Marion,
Ja, je kunt inderdaad de helft van de voorbies weglaten, want dat is de overlap voor de knoopbies.
12.04.2023 - 20:37
![]() Shubhangi Kundu escribió:
Shubhangi Kundu escribió:
Hello! Could you kindly explain how we go from 56 sts to 33 sts after binding off for neck and armhole for size L/XL? I'm probably not understanding how the binding off works. I understood that [(2×2sts)×2 + (2×1st)×5] = 18 sts are bound off for the armhole and [(2×2sts)×1 + (2×1st)×2] = 8 sts are bound off for the neckline, but I think that is somehow wrong. Please correct me. Thank you!
14.11.2022 - 05:59DROPS Design respondió:
Hi Shubhangi, On the left front piece you start off with 56 stitches, as you say. On each row from the side you bind off 2 stitches x 2, the 1 stitch x 5 for the armhole (9 stitches bound off). For the neck, you place the 10 stitches towards mid-front on a thread and then bind off on each row from the neck, 2 stitches x 1 and 1 stitch x 2 (10 + 4 stitches). You have a total of 23 stitches either bound off or on a thread. 56 - 23 =33 stitches left. Hope this helps and happy knitting!
14.11.2022 - 06:53
![]() Shubhangi Kundu escribió:
Shubhangi Kundu escribió:
"Then bind off for armhole at beg of every row from the side: 2 sts 2-2-4 times and 1 st 4-5-6 times." Could you kindly explain this line to me?
08.11.2022 - 04:49DROPS Design respondió:
Hi Shubhangi, You are shaping the armholes by binding off at the beginning of each row. Start by binding off 2 stitches at the beginning of the row from both the right and wrong side (4 stitches in total) and then repeat this the correct number of times for your size (e.g. 1 more time in size S/M = 8 stitches bound off). Then bind off 1 stitch at the beginning of both the right side and wrong side and, using size S/M, this will be repeated 4 times = another 8 stitches bound off. Hope this helps and happy knitting!
08.11.2022 - 07:36
![]() Pam Dale escribió:
Pam Dale escribió:
How many stitches are left on the sleeves when you cast off? I’ve modified the sleeves so they are full length and I’ve worked them in the round but a bit unclear when I get to the cap of the sleeve and how many stitches cast off before final cast off
09.07.2021 - 23:10DROPS Design respondió:
Dear Pam Dale, the number of stitches at the end of the sleeve will depend on your tension, most important is here that you cast off the number of sts stated for the size + 2 stitches on each side until sleeve measures 40 cm (make sure you have cast off 2 sts the same number of times on each side), adjusting after a whole repeat of M.1 and cast off. Happy knitting!
12.07.2021 - 07:13
![]() Mirja escribió:
Mirja escribió:
Ich habe ein sehr großes Problem. Ich habe die schöne Jacke fast fertig gestrickt und nun reicht die angegebene Wollmenge bei mir nicht aus.( stricke S/M und hatte 500g gekauft, da die Mengenangabe bisher immer bei mir passte). Ich habe daraufhin in dem Shop ( Mondolana) nachbestellt unter Angabe der Dyelot Nr. Die gab es aber nicht mehr und die mir zugeschickte Wolle ist farblich etwas anders. Wo bekomme ich nun noch die Farbe 40 mit Dyelot Nr 839?? Ich kann sonst leider nicht fertig werden.
12.06.2021 - 18:56DROPS Design respondió:
Liebe Mirja, gerne können Sie einen anderen Laden fragen, oder vielleicht auch in der DROPS Workshop-Gruppe können Sie andere Strickerinnen fragen.
14.06.2021 - 08:44
![]() Marie POUPON escribió:
Marie POUPON escribió:
Bonjour ! J'ai ENFIN terminé ce gilet ! Reste à bloquer à la vapeur ! Merci pour tout ! ;-)
14.02.2021 - 07:33
![]() Nicole escribió:
Nicole escribió:
Ich bin bezüglich der Oberweite und Hüfte bei 50 cm und Taille 44 cm. Kann ich mich während des hochstrickens zunächst an Gr. L, zur Taille hin an Gr S/M und bei der Oberweite wieder an Gr. L orientieren hinsichtlich der Zu- und Abnahmen? Ausserdem kommt mir die Umfangsangabe zu Beginn ( z.B. 59 bei Gr.S/M) recht groß vor, obwohl die Jacke dort doch eng anliegen soll.
10.02.2021 - 20:48DROPS Design respondió:
Liebe Nicole, am besten messen Sie eine ähnliche Jacke, die Sie gerne haben und vergleichen Sie diese Maßen mit der Skizze - hier lesen Sie mehr - Sicher kann Ihnen noch Ihr DROPS Laden damit weiterhelfen, auch telefonisch oder per E-Mail. Viel Spaß beim stricken!
11.02.2021 - 06:43
|
||||||||||||||||||||||||||||
Grace#gracecardigan |
||||||||||||||||||||||||||||
 |
 |
|||||||||||||||||||||||||||
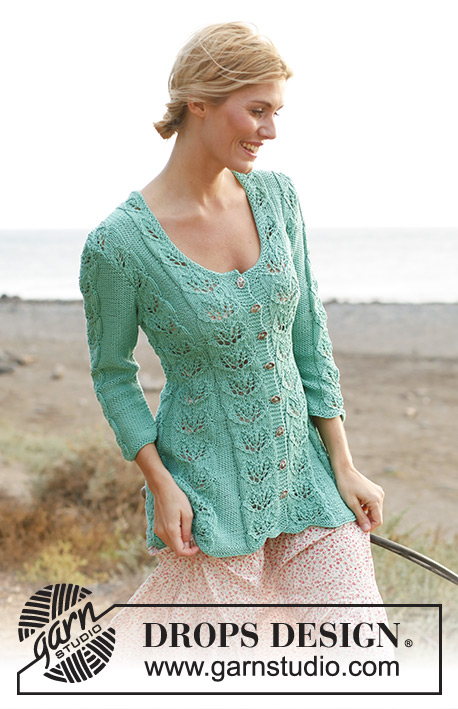
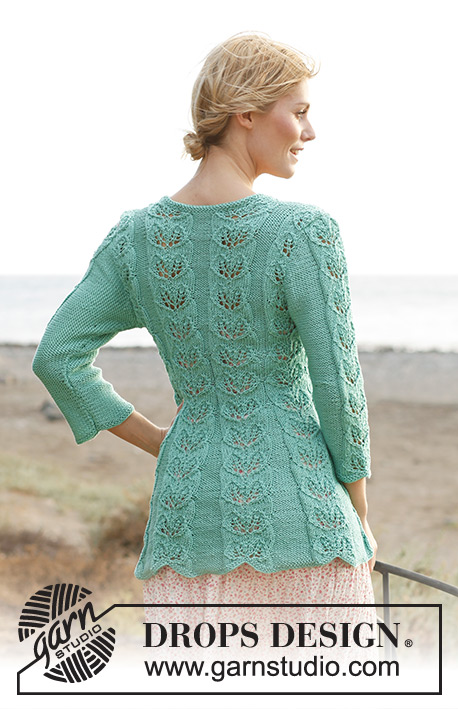
Cardigan DROPS, entallado, tejido con patrón de calados y mangas 3/4 en “Muskat” o “Cotton Viscose”. Talla: S – XXXL.
DROPS 138-5 |
||||||||||||||||||||||||||||
|
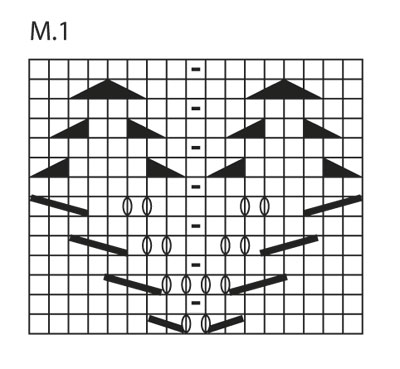
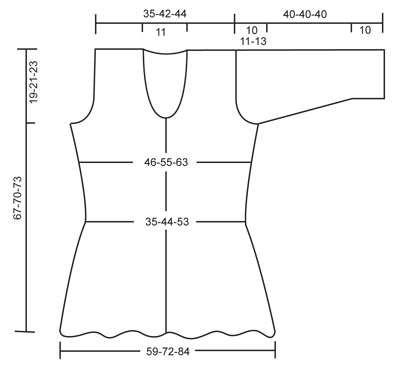
PT MUSGO (de ida y vuelta en la ag): Tejer todas las vtas de derecho. PATRÓN: Ver diagrama M.1. El diagrama muestra el patrón por el LD. OJALES: Rem para los ojales en el borde derecho. 1 ojal = tejer juntos de derecho el 3º y 4º pt a partir del centro del frente y hacer 1 HEB (lazada). Rem para los ojales cuando la pieza mida: TALLA S/M: 8, 14, 20, 26, 32, 38, 44 y 50 cm TALLA L/XL: 8, 14, 21, 27, 33, 40, 46 y 52 cm TALLA XXL/XXXL: 8, 15, 21, 28, 34, 41, 48 y 54 cm NOTA: Rem para el último ojal cuando solamente resten 2 vtas antes de las dism para el escote. ------------------------------------------------------ CUERPO: Tejido de ida y vuelta en ag circular a partir del centro del frente. Mon 253-308-359 pts (incl 6 pts del borde en cada lado del centro del frente) en ag circular tamaño 4 mm con Muskat. Tejer 3 vtas de derecho (1ª vta = LR). Después tejer de la manera sig (visto por el LD): 6 pts del borde en PT MUSGO – ver explicación arriba - * diagrama M.1 (= 17 pts), tejer 15-14-13 pts reveses *, repetir de *a* un total de 7-9-11 veces, diagrama M.1 y 6 pts del borde en pt musgo. Continuar de esta manera. RECUERDE MANTENER LA MISMA TENSIÓN DE TEJIDO DE LA MUESTRA! Cuando la pieza mida aprox 3-5-7 cm (ajustar para que la vta sig sea tejida por el LD), dism 1 pt en cada sección de pts reveses tejiendo juntos de revés los primeros 2 pts. Repetir las dism en cada 6ª vta un total de 14-13-12 veces – NOTA: Dism alternadamente al final y al inicio de cada sección de pts reveses. AL MISMO TIEMPO, cuando la pieza mida 8 cm, empezar a rem para los OJALES – ver explicación arriba! Después de todas las dism en las secciones de pts reveses, tenemos 155-191-227 pts restantes en la ag y solamente 1 pt revés entre cada sección de M.1 (la pieza ahora mide aprox 31 cm). Continuar hasta que la pieza mida aprox 34-35-36 cm (ajustar para que la vta sig sea tejida por el LD), ahora aum 1 pt en cada sección de pts reveses haciendo 1 HEB después de todos los pts reveses, en la vta sig (por el LR) tejer las HEB retorcidas de derecho (es decir, tejer por atrás del pt en vez de adelante) para evitar que se formen agujeros. Repetir los aum en cada 6ª vta un total de 6-5-4 veces – NOTA: Aum alternadamente antes y después de todos los pts reveses haciendo 1 HEB. Cuando todos los aum estén hechos, tenemos 7-6-5 pts reveses en cada sección de pts reveses y 197-236-272 pts en total en la ag. Cuando la pieza mida aprox 48-49-50 cm (ajustar para que la vta sig sea tejida por el LD), tejer la vta sig de la manera sig: Tejer 47-56-64 pts como antes (= pieza del delantero derecho), rem 7-9-11 pts para la sisa, tejer 89-106-121 pts como antes (= pieza de la espalda), rem 7-9-11 pts para la sisa, tejer los últimos 47-56-64 pts como antes (= pieza del delantero izquierdo). Terminar cada parte por separado. DELANTERO IZQUIERDO: = 47-56-64 pts. Después rem para la sisa al inicio de cada vta a partir del lado: 2 pts 2-2-4 veces y 1 pt 4-5-6 veces. AL MISMO TIEMPO, cuando la pieza mida 51-53-55 cm, deslizar los 10 pts más externos del lado del centro del frente en un gancho o seguro aux para el escote. Después rem al inicio de cada vta a partir del escote: 2 pts 1 vez y 1 pt 2 veces. Después de todos los rem para la sisa y escote, tenemos 25-33-36 pts restantes en el hombro. Tenemos ahora ½ repetición del diagrama M.1 del lado del escote en todas las tallas, también tenemos ½ repetición del lado de la sisa en la talla más pequeña. Continuar el patrón como antes con 1 pt en pt musgo en cada lado. Cuando la pieza mida aprox 67-70-73 cm – ajustar después de 1 repetición completa del diagrama M.1 – rem. DELANTERO DERECHO: Tejer como la pieza del delantero izquierdo, pero a la inversa. ESPALDA: = 89-106-121 pts. Continuar rem para las sisas al inicio de cada vta, en cada lado, como lo hizo en la pieza del frente = 73-88-93 pts. Cuando la pieza mida aprox 65-68-72 cm (terminar después de 1 vta por el LR cuando resten 4 vtas en el diagrama M.1), rem los 23-22-21 pts centrales para el escote y terminar cada hombro por separado. Rem cuando la última repetición haya sido tejida. MANGA: Tejida de ida y vuelta en ag circular. Mon 53-57-61 pts (incl 1 pt de orillo en cada lado) en ag circular tamaño 4 mm con Muskat. Tejer 3 vtas de derecho (1ª vta = LR). Tejer la vta sig de la manera sig (por el LD): 1 pt de orillo en pt musgo, 17-19-21 pts reveses, diagrama M.1, 17-19-21 pts reveses y 1 pt de orillo en pt musgo. Cuando la pieza mida 10 cm, aum 1 pt en cada lado. Repetir los aum a cada 2-1½-1 cm un total de 10-12-15 veces = 73-81-91 pts (tejer los pts aum de revés, visto por el LD). LEER TODA LA SECCIÓN SIGUIENTE ANTES DE CONTINUAR! Cuando la pieza mida 30-29-27 cm (medidas más cortas en las tallas más grandes debido a copete de manga más largo y a una mayor anchura de hombros), rem para el copete de manga al inicio de cada vta, en cada lado: 4 pts 1 vez, 2 pts 3 veces y 1 pt 6-7-10 veces, después rem 2 pts en cada lado hasta que la pieza mida aprox 40 cm – ajustar después de 1 repetición completa del diagrama M.1. Rem los pts restantes. TERMINACIÓN: Hacer las costuras de los hombros. ORILLA DEL CUELLO: Levantar aprox 100 a 110 pts alrededor del escote (incl los pts en los ganchos o seguros aux en el frente) en ag circular tamaño 4 mm. Tejer 3 vtas de derecho y rem. Hacer las costuras de las mangas a 1 pt del pt de orillo y pegar las mangas. Coser los botones. Echar vapor sobre la prenda para que tenga una caída atractiva. |
||||||||||||||||||||||||||||
Explicaciones del diagrama |
||||||||||||||||||||||||||||
|
||||||||||||||||||||||||||||
 |
||||||||||||||||||||||||||||
 |
||||||||||||||||||||||||||||
¿Terminaste este patrón?Entonces, etiqueta tus fotos con #dropspattern #gracecardigan o envíalas a la galería #dropsfan. ¿Necesitas ayuda con este patrón?Encontrarás 23 videos tutoriales, un espacio para comentarios/preguntas y más visitando la página del patrón en garnstudio.com © 1982-2026 DROPS Design A/S. Todos los derechos reservados. Este documento, incluyendo todas sus sub-secciones, está protegido por los derechos de autor (copyright). Lee más acerca de lo que puedes hacer con nuestros patrones en la parte de abajo de cada patrón de nuestro sitio. |
||||||||||||||||||||||||||||


Con más de 40 años en el diseño de modelos de punto y de ganchillo, DROPS Design ofrece una de las más vastas colecciones de patrones gratuitos en el internet - traducidos en 17 idiomas. Al día de hoy, contamos con 324 catálogos y 12278 patrones - de los cuales 11658 están traducidos en español.
Nosotros trabajamos con mucho esmero para brindarte lo mejor que las labores de punto y ganchillo tienen para ofrecer,inspiración y consejos, así como hilos de magnífica calidad a precios increíbles! Te gustaría usar nuestros patrones para otro fin además del uso personal? Puedes leer acerca de lo que estás permitida a hacer en el texto de Copyright en la parte de abajo de todos nuestros patrones. Felices labores!
Escribe un comentario sobre DROPS 138-5
¡Nos encantaría saber qué piensas acerca de este patrón!
Si quieres escribir una pregunta referente al patrón, por favor asegúrate de elegir la categoría correcta en el formulario debajo, para acelerar el proceso de respuesta. Los campos obligatorios están marcados con un *.