
Categorías populares
¿Buscas un hilo?


Comentarios / Preguntas (131)
![]() Stefania escribió:
Stefania escribió:
Quindi, se ho capito bene per la taglia S il diagramma M3 è composto di 20 maglie invece che 18 ? Grazie ancora e buona giornata
24.03.2026 - 08:18DROPS Design respondió:
Buonasera Stefania, è solo per l'inizio che si parte dalla taglia, poi si lavora il diagramma intero. Buon lavoro!
28.03.2026 - 20:45
![]() Stefania escribió:
Stefania escribió:
Scusate, sto facendo la parte alta del davanti dove si parla del diagramma M3. Sto eseguendo la taglia S. Voi dite di iniziare dove c’è la lettera S ma il diagramma poi lo termino dove c’è la lettera S o a fine diagramma.? Grazie
23.03.2026 - 20:08DROPS Design respondió:
Buonasera Stefania, poi deve lavorare il diagramma intero. Buon lavoro!
23.03.2026 - 22:11
![]() Stefania escribió:
Stefania escribió:
Ho eseguito diversi vostri maglioni . Ora però Non riesco a capire gli aumenti delle maniche. Cosa si intende quando dite di fare ogni 9/8/6/ecc ferri per 12 ecc volte? E i numero delle maglie 86/90/94 ecc sono maglie totali o quelle di aumento ? Grazie
04.03.2026 - 18:30DROPS Design respondió:
Buonasera Stefania, i diversi numeri sono le taglie del modello: deve fare riferimento al numero riportato per la taglia che sta lavorando. Buon lavoro!
04.03.2026 - 22:50
![]() Mariángeles escribió:
Mariángeles escribió:
Buenos días, muchas gracias por el patrón, me parece muy bonito. Me extraña mucho que después del elástico o resorte haya que disminuir puntos, ¿no será más bien aumentarlos? Muchas gracias por la aclaración.
03.02.2026 - 14:23DROPS Design respondió:
Hola Mariángeles, normalmente tenemos más puntos en el elástico para que el elástico no quede tenso. Como se trabaja de abajo arriba, el borde elástico inferior en elástico no tiene que quedar prieto y la disminución de puntos después nos asegura que la sección en elástico y el comienzo del jersey tenga una anchura similar, a pesar de la diferencia en la textura de los puntos.
23.02.2026 - 00:36
![]() Donna escribió:
Donna escribió:
Knitting an XXL I'm confused about where to start each row in M.3, and after repeating the design 7 times, where to start the finish of each row. On the RS, start at the arrow and reading from R to L, do 5 stitches; then , after 7 repeats, at the end of the row, do 6 stitches, reading from far R to L? Do I start every row on RS at the arrow? But not on WS? On WS, do I start 6 stitches in from the far right side of the diagram, and then finish the final 5 starting on the far left?
20.01.2026 - 02:04DROPS Design respondió:
Hi Donna, It is just starting the diagram which involves the arrow, you then work to the end of the round, repeating the full width of the diagram each side until you work the edge stitch at the end of the row (this will not be the end of a repeat as both sides are symmetrical). When you work back from the right side, you begin the diagram where you finished on the previous row, repeat full widths until you reach where you started on the diagram, then work 1 edge stitch. Hope this helps. Regards, Drops Team.
20.01.2026 - 08:00
![]() Arlene escribió:
Arlene escribió:
What does “adjust after one half repetition or one whole repetition of diagram m1 and m2 vertically” mean? Also when I start on size medium in m3 do I keep going back to where I started or the beginning of the row?
30.12.2025 - 17:46DROPS Design respondió:
Dear Arlene, it means that we don't need to exactly stop working charts M1 and M2 when piece measures 58-60-62-64-66-68 cm but rather we need to ensure that, around that measurement, we stop at a row that is the last row of the chart or the row in the middle of the chart, to avoid interrupting the stitch-pattern too much. The arrow show which stitch of the chart will be the first stitch of the row; afterwards you need to work the stitch in the same position in the next row, so you should consider the arrow the beginning/end of the chart (for the first/last repeat of the row). Happy knitting!
12.01.2026 - 00:16
![]() Francine Pelletier escribió:
Francine Pelletier escribió:
Merci , Mon problème est M3. je débute rg end avec 1 m. lis puis à partir de la flèche pour L, je tricote de dr. vers la gche les 13 m et les 5 m avant la flèche. J’ai fait 6x le diag de 18 m et il me reste 9 m ( 8 et 1 lis) avant la fin du rv end. Je fais quoi avec ces m? J’espère que je suis claire avec mes explications Merci de m’éclairer
12.12.2025 - 18:12DROPS Design respondió:
Bonjour Mme Pelletier, après avoir répété le diagramme en entier, reprenez le diagramme au début pour terminer le rang avec les 8 premières mailles du diagramme. Notez bien quelle est la dernière maille tricotée sur l'endroit, ce sera la 1ère m à tricoter sur l'envers, et pensez à lire le diagramme de gauche à droite sur l'envers. Bon tricot!
15.12.2025 - 10:15
![]() Francine Pelletier escribió:
Francine Pelletier escribió:
Pouvez-vous m’éclairer svp À la grandeur L , au dos, lorsque je suis rendue à tricoter le M3 j’ai 118 m. et le diagramme a 18 m. . Il reste 10 m à la fin du rang dont 2 pour les m. lisières. Je débute bien le diagramme comme indiqué. Est-ce moi qui fait erreur ? Merci de m’éclairer J’aime votre modèle
12.12.2025 - 16:13DROPS Design respondió:
Bonjour Mme Pelletier, continuez vos diagrammes comme avant, comme vous avez rabattu la 1ère maille et la dernière de M.1 au début et à la fin du rang, vous allez commencer (sur l'endroit) M.1 par la 2ème maille (= 1 m jersey) et vous terminez le dernier M.1 du rang par l'avant-dernière maille (1 m jersey). Bon tricot!
12.12.2025 - 16:49
![]() Corrie escribió:
Corrie escribió:
Bij m3 beging je dan bij de pijl? En dan het hele patroon
17.09.2025 - 17:46
![]() Louise escribió:
Louise escribió:
Je vois la correction apportée pour la taille XL qui n'est pas différente du patron original. Est-ce que le patron d'origine a été corrigé? Merci
11.08.2025 - 22:53DROPS Design respondió:
Bonjour Louise, la correction ne s'applique que si vous aviez imprimé les explications auparavant, autrement, les explications en ligne ont déjà été corrigées. Bon tricot!
12.08.2025 - 09:03
|
||||||||||
Sir Lancelot#sirlancelotsweater |
||||||||||
|
|
||||||||||
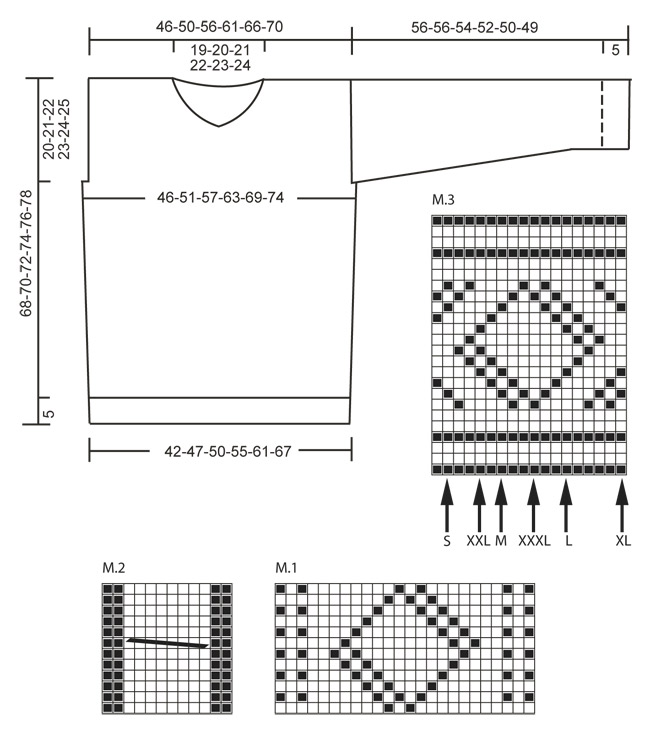
Pulóver de punto para hombre con patrón texturado y escote en V, en DROPS Karisma. Tallas S a XXXL
DROPS 135-36 |
||||||||||
|
PT MUSGO (de ida y vuelta en la ag): Todas las vtas de derecho. PATRÓN: Ver diagramas M.1 a M.3 – los diagramas muestran el patrón por el LD. M.1 = 24 pts de ancho, M.2 = 12 pts de ancho y M.3 = 18 pts de ancho. ------------------------------------------------------ ESPALDA: Tejida de ida y vuelta en la ag. Mon 110-122-134-146-158-170 pts (incl 1 pt de orillo en cada lado) en ag tamaño 3 mm con Karisma. Tejer resorte de la manera sig (visto por el LD): 1 pt de orillo en PT MUSGO – ver explicación arriba, * 1d, 3r *, repetir de *a*, terminar con 1 pt de orillo en pt musgo. Cuando el resorte mida aprox 5 cm (ajustar para que la vta sig sea por el LR), cambiar a ag tamaño 4 mm. Tejer 1 vta de revés por el LR, y, al mismo tiempo, dism 12 pts distribuidos equitativamente = 98-110-122-134-146-158 pts. Tejer la vta sig (por el LD) de la manera sig: TALLA S: 1 pt de orillo en pt musgo, diagrama M.1, M.2, M.1, M.2, M.1 y 1 pt de orillo en pt musgo. TALLA M: 1 pt de orillo en pt musgo, 6 pts en pt jersey, diagrama M.1, M.2, M.1, M.2, M.1, 6 pts en pt jersey y 1 pt de orillo en pt musgo. TALLA L: 1 pt de orillo en pt musgo, diagrama M.2, M.1, M.2, M.1, M.2, M.1, M.2 y 1 pt de orillo en pt musgo. TALLA XL: 1 pt de orillo en pt musgo, 6 pts en pt jersey, diagrama M.2, M.1, M.2, M.1, M.2, M.1, M.2, 6 pts en pt jersey y 1 pt de orillo en pt musgo. TALLA XXL: 1 pt de orillo en pt musgo, 12 pts del diagrama M.1 – empezar en el 13º pt a partir del lado derecho en el diagrama, diagrama M.2, M.1, M.2, M.1, M.2, M.1, M.2 y 12 pts del diagrama M.1 – empezar en el primer pt en el diagrama – y 1 pt de orillo en pt musgo. TALLA XXXL: 1 pt de orillo en pt musgo, 18 pts del diagrama M.1 – empezar en el 7º pt a partir del lado derecho en el diagrama, diagrama M.2, M.1, M.2, M.1, M.2, M.1, M.2 y 18 pts del diagrama M.1 – empezar en el primer pt en el diagrama – y 1 pt de orillo en pt musgo. TODAS LAS TALLAS: Continuar tejiendo de la misma manera hasta que la pieza mida 48-49-50-51-52-53 cm. RECUERDE MANTENER LA MISMA TENSIÓN DE TEJIDO DE LA MUESTRA! Ahora rem 1-2-2-3-4-5 pts en cada lado para las sisas (es decir, rem al inicio de las 2 vtas sig) = 96-106-118-128-138-148 pts. Continuar el patrón como antes, con 1 pt de orillo en pt musgo en cada lado. Cuando la pieza mida aprox 58-60-62-64-66-68 cm (ajustar después de 1 media repetición ó 1 repetición completa del diagrama M.1 y M.2 verticalmente), tejer 2 vtas en pt jersey, después continuar con el diagrama M.3 sobre todos los pts (excepto el pt de orillo) – ver la flecha para su talla, ésta marca dónde empezar en el diagrama). AL MISMO TIEMPO, cuando resten 4 vtas del diagrama M.3, rem los 36-38-40-42-44-46 pts para el escote y terminar cada hombro por separado. Continuar rem 2 pts en la vta sig a partir del escote = 28-32-37-41-45-49 pts restantes en el hombro. Cuando el diagrama M.3 esté terminado, tejer aprox 1 cm en pt jersey, después rem. La pieza mide aprox 68-70-72-74-76-78 cm. DELANTERO: Mon y tejer como lo hizo en la pieza de la espalda. Rem para la sisa como lo hizo en la pieza de la espalda y continuar hasta que la pieza mida aprox 58-60-62-64-66-68 cm. Después tejer 2 vtas en pt jersey – AL MISMO TIEMPO, en la 1ª vta, rem los 4 pts centrales para el escote y terminar cada hombro por separado. Tejer el patrón como lo hizo en la pieza de la espalda (asegurarse que el diagrama M.3 sea tejido de la misma manera en cada lado del escote) – AL MISMO TIEMPO rem en cada vta a partir del escote: 2 pts 5-6-7-8-9-10 veces y después 1 pt 8-7-6-5-4-3 veces = 28-32-37-41-45-49 pts restantes en el hombro. Rem cuando haya tejido el mismo número de vtas que en la pieza de la espalda. MANGA: Tejida de ida y vuelta en la ag. Mon 62 pts para todas las tallas (incl 1 pt de orillo en cada lado) en ag tamaño 3 mm con Karisma. Tejer resorte de la manera sig (visto por el LD): 1 pt de orillo en pt musgo, * 1d, 3r *, repetir de *a*, terminar con 1 pt de orillo en pt musgo. Cuando la pieza mida aprox 5 cm (ajustar para que la vta sig sea tejida por el LR), cambiar a ag tamaño 4 mm. Tejer 1 vta de revés por el LR. Tejer la vta sig de la manera sig: 1 pt de orillo en pt musgo, diagrama M.1, M.2, M.1 y 1 pt de orillo en pt musgo, continuar de esta manera. Cuando la pieza mida 9 cm, aum 1 pt en cada lado. Repetir el aum cada 9ª-8ª-6ª-5ª-4ª-4ª vta un total de 12-14-16-18-20-21 veces – tejer los pts aum en pt jersey = 86-90-94-98-102-104 pts. Cuando la pieza mida aprox 46-46-44-42-40-39 cm (ajustar después de 1 media ó 1 repetición completa del diagrama M.1 y M.2 verticalmente. Los aum deben estar todos hechos), tejer 2 vtas en pt jersey y después continuar con el diagrama M.3 – empezar en el primer pt en el lado derecho del diagrama (el patrón no encajará al final de la vta). Después del diagrama M.3 tejer (si hay espacio suficiente) en pt jersey hasta que la pieza mida 56-56-54-52-50-49 cm (medidas más cortas en las tallas más grandes debido a una mayor anchura de hombros) y rem. TERMINACIÓN: Hacer las costuras de los hombros. CUELLO: Levantar aprox 119 a 139 pts (múltiplo de 4 + 3) alrededor del escote en ag circular tamaño 3 mm con Karisma – empezar en el centro del frente. Después la pieza es tejida de ida y vuelta a partir del centro del frente. La primera vta por el LR es tejida de la manera sig: 1 pt de orillo en pt musgo, * 1r, 3d *, repetir de *a* y terminar con 1r y 1 pt de orillo en pt musgo. Continuar con derecho sobre derecho y revés sobre revés, y el pt de orillo en pt musgo hasta que la orilla del cuello mida aprox 6 cm. Rem con derecho sobre derecho y revés sobre revés. Colocar el lado izquierdo del cuello sobre el lado derecho, asegurar con puntadas prolijas por el LR y LD. Coser las mangas a 1 pt del pt de orillo. Hacer las costuras de las mangas y laterales en una, a 1 pt del pt de orillo. |
||||||||||
Explicaciones del diagrama |
||||||||||
|
||||||||||
 |
||||||||||
¿Terminaste este patrón?Entonces, etiqueta tus fotos con #dropspattern #sirlancelotsweater o envíalas a la galería #dropsfan. ¿Necesitas ayuda con este patrón?Encontrarás 19 videos tutoriales, un espacio para comentarios/preguntas y más visitando la página del patrón en garnstudio.com © 1982-2026 DROPS Design A/S. Todos los derechos reservados. Este documento, incluyendo todas sus sub-secciones, está protegido por los derechos de autor (copyright). Lee más acerca de lo que puedes hacer con nuestros patrones en la parte de abajo de cada patrón de nuestro sitio. |
||||||||||


Con más de 40 años en el diseño de modelos de punto y de ganchillo, DROPS Design ofrece una de las más vastas colecciones de patrones gratuitos en el internet - traducidos en 17 idiomas. Al día de hoy, contamos con 324 catálogos y 12278 patrones - de los cuales 11658 están traducidos en español.
Nosotros trabajamos con mucho esmero para brindarte lo mejor que las labores de punto y ganchillo tienen para ofrecer,inspiración y consejos, así como hilos de magnífica calidad a precios increíbles! Te gustaría usar nuestros patrones para otro fin además del uso personal? Puedes leer acerca de lo que estás permitida a hacer en el texto de Copyright en la parte de abajo de todos nuestros patrones. Felices labores!
Escribe un comentario sobre DROPS 135-36
¡Nos encantaría saber qué piensas acerca de este patrón!
Si quieres escribir una pregunta referente al patrón, por favor asegúrate de elegir la categoría correcta en el formulario debajo, para acelerar el proceso de respuesta. Los campos obligatorios están marcados con un *.