
Categorías populares
¿Buscas un hilo?


Comentarios / Preguntas (24)
![]() Lisa escribió:
Lisa escribió:
Vorrei questo schema top down Grazie
27.04.2026 - 20:14DROPS Design respondió:
Buonasera Lisa, purtroppo ci è impossibile riprogettare i modelli per le singole esigenze. Sul nostro sito può trovare tanti altri modelli top-down. Buon lavoro!
27.04.2026 - 21:28
![]() Rachel Wallace escribió:
Rachel Wallace escribió:
Hi, pattern says when piece measures 48 cm (22.75 inches) knit garter sts over middle. 48 cm is not 22.75 inches. Shouldn't it be just under 19 inches?
25.04.2024 - 01:44DROPS Design respondió:
Dear Mrs Wallace, you are right, conversion into inches sounds wrong, measurements will be checked and pattern edited asap. Thanks for noticing. Happy knitting!
25.04.2024 - 08:26
![]() Laura Roy escribió:
Laura Roy escribió:
On the BACK portion of the pattern. Where it says; "Then cast on 44-42-41-38-35 sts each side ... measures 46-48-50-52-54 cm means that from the bottom of the waves (cast on edge) to where I am now measures 46-48-50-52-54 cm, correct? Or should I be knitting the 195stitches for an additional 24-3/8" making the entire sweater 46" long? Any instruction on the sleeves? TIA
24.01.2024 - 21:00DROPS Design respondió:
Dear Mrs Roy, measure from the cast on edge, you will now work the neckline edge then cast off for neck. Happy knitting!
25.01.2024 - 09:15
![]() Pat Glessner escribió:
Pat Glessner escribió:
I just read the question from Laura on 2/02/15, which is the point at which I am. I have bound off the middle 27 sts. leaving the sleeves and the neck edges. Instructions say that you do this at 20 1/2 inches and continue with 5 garter sts. at neckline. The next instruction is to bind off when the piece measures 20 1/2 inches, and I am confused - what do I continue and what do I bind off and when?
26.04.2020 - 00:51DROPS Design respondió:
Dear Mrs Glessner, it looks like 2 measurements are missing in inches in this pattern - these will be added asap - in size M you bind off the middle 27 sts when piece measures 50 cm = 19.68" then continue with 5 sts in garter st towards neck and cast off when piece measures 52 cm = 20½''. Happy knitting!
27.04.2020 - 08:56
![]() Nevermore escribió:
Nevermore escribió:
Hello, will you please translate this into italian? thanks
30.06.2019 - 14:48DROPS Design respondió:
Hello Nevermore. We will translate the pattern into Italian as soon as possible. Please check the website in the next few days. Tradurremo il modello in Italiano quanto prima . Controlli il sito nei prossimi giorni. Buon lavoro!
30.06.2019 - 15:01
![]() Margaret Allison escribió:
Margaret Allison escribió:
I'm an experienced knitter but I can't make the 17 stitch wave pattern (101-5 ) fit the 70 stitches required for the back piece. I also assume that an edge stitch is 1 knit stitch at each end. Hope to hear from you soon as I want to get on with It! Thank you in advance. I have watched your videos.
12.03.2019 - 18:14DROPS Design respondió:
Hi Margaret Allison. You have 1 edge stitch at each end (K1- WS and RS). You work the pattern M.1 over 68 stitches, it means 4 times in row (68:17=4). How to knit a wave pattern you will find HERE. Happy knitting!
12.03.2019 - 19:33
![]() Chiqui escribió:
Chiqui escribió:
Dus ik heb de keuze welke mindering ik kies voor of na de 5 biessteken? ik hoef ze dus niet allebei toe te passen? Ik dacht nl dat ik de twee mogelijkheden om het om moest toepassen. Corrigeert u mij als ik het verkeerd begrijp.
16.04.2018 - 10:38DROPS Design respondió:
Hallo Chiqui, Het is de bedoeling dat je steeds vlak naast de voorbiessteken mindert. Op het rechter voorpand is dat voor de biessteken en daar brei je dus 2 steken samen. Op het linker voorpand is dat na de biessteken 1 afhalen, 1 breien, de afgehaalde steek overhalen. De manier 'liggen' de geminderde steken mooi en ziet het uitendelijke werk er mooier uit.
21.04.2018 - 13:43
![]() Chiqui escribió:
Chiqui escribió:
Moet ik bij de mindering van het voorpand afwisselend in de 2e nl 2 r samenbreien en in nld 4 na de 5 voorbiesst 1 st afh, 1r, afgh st overhalen? Ik krijg nl niet de schuine kant bij de hals.
15.04.2018 - 15:13DROPS Design respondió:
Hallo Chiqui, Als je de mindering vlak voor de bies doet, moet je 2 steken samenbreien. Als je hem vlak na de bies doet, 1 st. afhalen, 1 st recht en de afgehaalde steek overhalen. Dat komt er op neer dat je op het rechter voorpand alle minderingen maakt door samen te breien. In het patroon staat vervolgens hoe vaak je moet minderen, dus om de hoeveel naalden.
16.04.2018 - 09:03Anne escribió:
Hei Neulon jakkua, jonka koko on xl. Ihmettelen, kuinka etukappaleiden silmukkamäärän ero voi olla niin suuri kokojen l ja xl välillä. Ero on 34 silmukkaa! Onko tässä virhe?
20.06.2017 - 11:05DROPS Design respondió:
Hei, silmukkamäärä on aaltokuvion vuoksi aluksi suuri, mutta silmukoita kavennetaan mallineuleen jälkeen pois työstä. Halutessasi voit luoda 17 silmukkaa vähemmin, jolloin työhön tulee 1 mallikerta aaltokuvioita vähemmän.
14.08.2017 - 13:59
![]() Chiqui escribió:
Chiqui escribió:
Hoe brei ik de verkeerde kant van het telpatroon, moet ik de steken av breien? dus 2 st av samenbreien en 1 omslag 1 av? Dit wordt niet duidelijk aangegeven
08.03.2017 - 23:44DROPS Design respondió:
Hoi Chiqui. Als goed is, dan moet je niet het patroon op de verkeerde kant breien, alleen aan de goede kant.
09.03.2017 - 13:43
|
|||||||||||||
Cotton Waves#cottonwavescardigan |
|||||||||||||
|
|
|||||||||||||
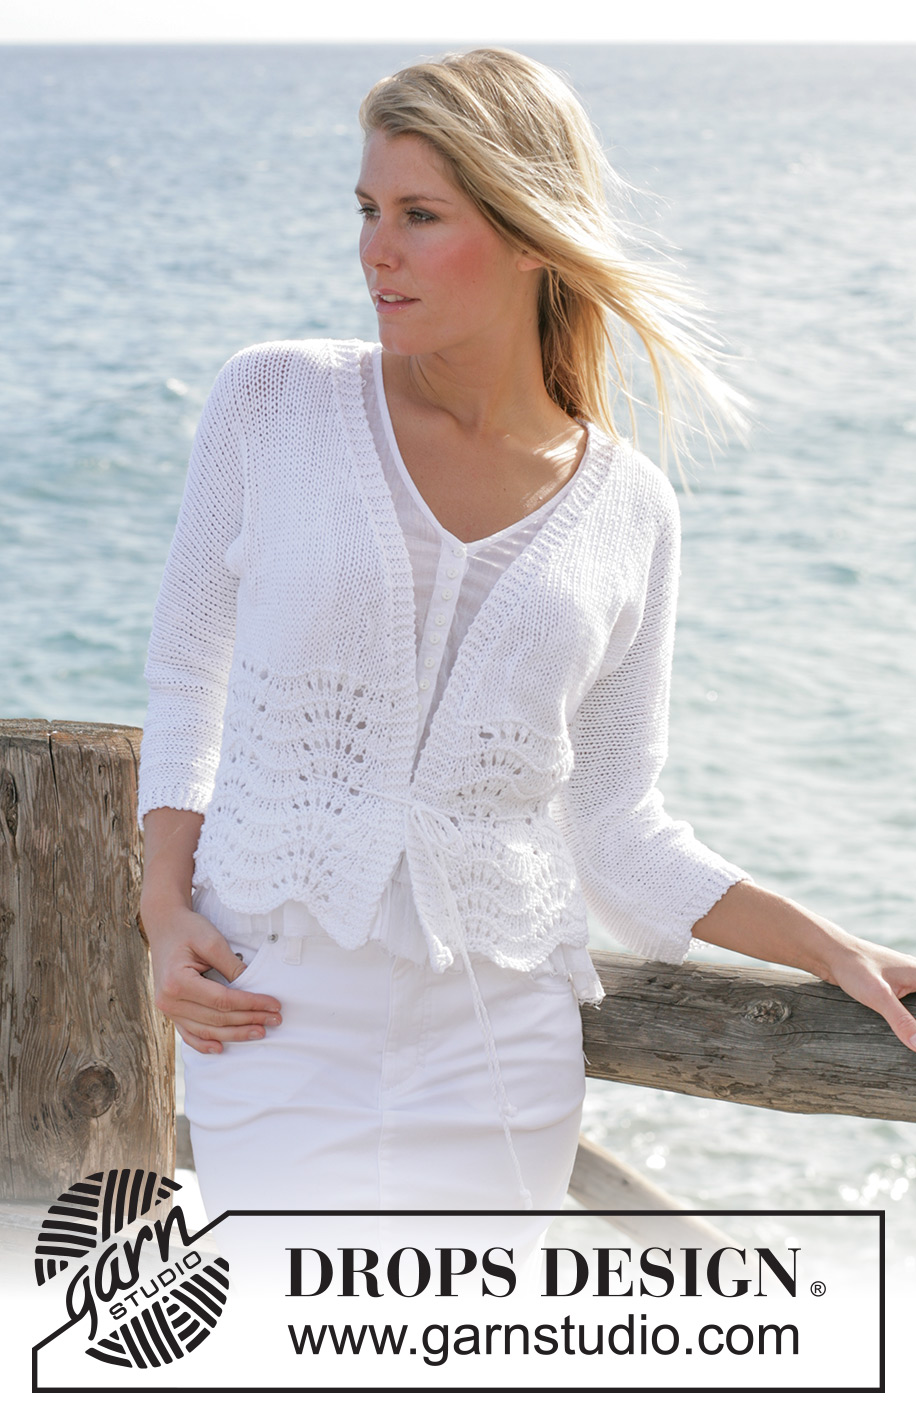
Chaqueta DROPS tejida con patrón de ondas en ”Bomull-Lin”. Talla S - XXL
DROPS 101-5 |
|||||||||||||
|
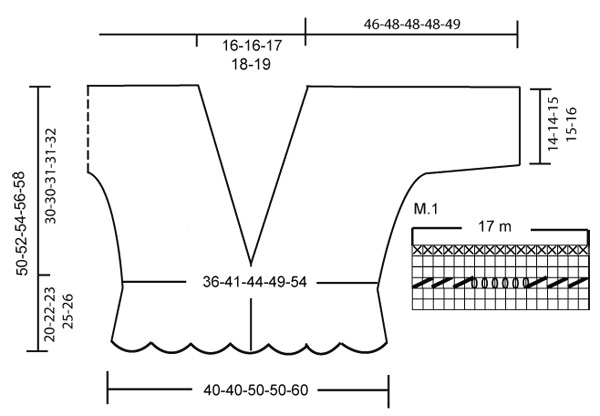
TENSIÓN DEL TEJIDO: 17 pts x 22 filas con ag tamaño 5.5 mm en pt jersey = 10 x 10 cm PATRÓN: Ver el diagrama M.1. El patrón se muestra por el LD. PUNTO MUSGO (de ida y vta en ag): Trabajar todas las filas de derecho. TIP PARA LAS DISMINUCIONES (se aplica al escote): Hacer todas las dism por el LD. Dism como sigue antes de 5 pts en pt musgo:2 pjd Dism como sigue después de 5 pts en pt musgo:.Desl 1 pt como de derecho, 1 d., pasar el pt desl por encima. ---------------------------------------------------------------------------------------------------------------------------------------------- ESPALDA: Mont 70-70-87-87-104 pts (incl 1 pt orillo a cada lado) con 2 ag (ag tamaño 5 mm y tamaño 5.5 mm) con Bomull-Lin. (Montando sobre 2 ag se asegura un borde más elástico). Retirar la ag tamaño 5.5 mm y trabajar 4 filas en pt musgo con ag tamaño 5 mm. Continuar trabajando M.1 - ver explicación arriba con 1 pt orillo a cada lado. Cuando la labor mida 20 cm ajustar el número de pts a 63-71-77-85-94 pts y continuar en pt jersey con ag tamaño 5.5 mm. Al mismo tiempo cuando la labor mida 20-22-23-25-26 cm aum 1 pt para la manga a cada lado cada 2ª fila: un total de 17 vcs = 97-105-111-119-128 pts. Ahora montar 44-42-41-38-35 pts a cada lado para la manga = 185-189-193-195-198 pts. Continuar trabajando los 4 pts del borde a cada lado en pt musgo. Cuando la labor mida 46-48-50-52-54 cm trabajar en pt musgo sobre los 37-37-39-41-42 pts centrales (trabajar en pt jersey en el resto de los pts). Cuando la labor mida 48-50-52-54-56 cm cerrar los 27-27-29-31-32 pts centrales para el escote = 79-81-82-82-83 pts para cada hombro/manga. Continuar con 5 pts en pt musgo en el escote. Rematar cuando la labor mida 50-52-54-56-58 cm. DELANTERO DERECHO: Mont 40-40-40-57-57 (incl 1 pt de orillo en el lado y 5 pts de la cenefa en el centro del delantero en pt musgo) con 2 ag (ag tamaño 5 mm y tamaño 5.5 mm) con Bomull-Lin. Retirar la ag tamaño 5.5 mm y trabajar 4 filas en pt musgo con ag tamaño 5 mm. Continuar trabajando M.1 - ver explicación arriba con 1 pt orillo en el lado y 5 pts en pt musgo en el centro del delantero. Cuando la labor mida 20 cm ajustar el número de pts a 37-41-44-48-53 pts, continuar trabajando en pt jersey con ag tamaño 5.5mm con 5 pts en pt musgo en el centro del delantero. Al mismo tiempo cuando la labor mida 20-22-23-25-26 cm aum pts para la manga como se describe para la espalda. Al mismo tiempo cuando la labor mida 21 cm dism para el escote dentro de 5 pts de la cenefa - ver explicaciones arriba: dism 1 pt alternando cada 2º y 4ª fila un total de 19-19-20-21-22 vcs. Quedan 79-81-82-82-83 pts después de completar todos los aum y dism para el hombro/manga. Rematar cuando la labor mida 50-52-54-56-58 cm. DELANTERO IZQUIERDO: Montar pts y trabajar de la misma manera que el delantero derecho pero a la inversa. TERMINACIÓN: Hacer la costura del hombro/manga con la técnica de grafting. Coser la manga y los lados al mismo tiempo. CORDON RETORCIDO: Cortar 2 hilos de aprox 3 m de largo cada uno. Retorcerlos hasta que ofrezcan resistencia. Doblar por la mitad y dejar que vuelvan a retorcerse. Hacer un nudo en cada extremo. Pasar el cordón a través del patrón de ondas a unos 10-15 cm del borde inferior de la chaqueta. |
|||||||||||||
Explicaciones del diagrama |
|||||||||||||
|
|||||||||||||
 |
|||||||||||||
¿Terminaste este patrón?Entonces, etiqueta tus fotos con #dropspattern #cottonwavescardigan o envíalas a la galería #dropsfan. ¿Necesitas ayuda con este patrón?Encontrarás 16 videos tutoriales, un espacio para comentarios/preguntas y más visitando la página del patrón en garnstudio.com © 1982-2026 DROPS Design A/S. Todos los derechos reservados. Este documento, incluyendo todas sus sub-secciones, está protegido por los derechos de autor (copyright). Lee más acerca de lo que puedes hacer con nuestros patrones en la parte de abajo de cada patrón de nuestro sitio. |
|||||||||||||


Con más de 40 años en el diseño de modelos de punto y de ganchillo, DROPS Design ofrece una de las más vastas colecciones de patrones gratuitos en el internet - traducidos en 17 idiomas. Al día de hoy, contamos con 325 catálogos y 12298 patrones - de los cuales 11696 están traducidos en español.
Nosotros trabajamos con mucho esmero para brindarte lo mejor que las labores de punto y ganchillo tienen para ofrecer,inspiración y consejos, así como hilos de magnífica calidad a precios increíbles! Te gustaría usar nuestros patrones para otro fin además del uso personal? Puedes leer acerca de lo que estás permitida a hacer en el texto de Copyright en la parte de abajo de todos nuestros patrones. Felices labores!
Escribe un comentario sobre DROPS 101-5
¡Nos encantaría saber qué piensas acerca de este patrón!
Si quieres escribir una pregunta referente al patrón, por favor asegúrate de elegir la categoría correcta en el formulario debajo, para acelerar el proceso de respuesta. Los campos obligatorios están marcados con un *.