DROPS Alpaca
DROPS Alpaca
100% Alpaca
from 3.40 £ /50g
DROPS Puddel
DROPS Puddel
94% Mohair, 6% Polyester
Discontinued
find alternatives
DROPS Super Sale

Grey Dove

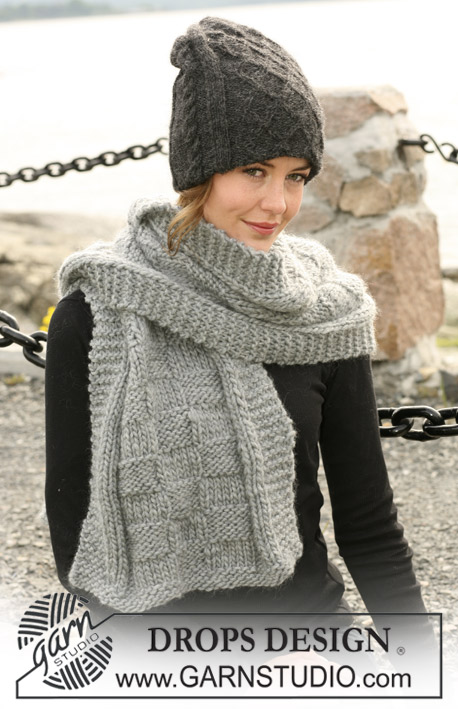
A set of: DROPS beret and gloves with lace pattern in ”Alpaca”, and scarf in ”Puddel”.

DROPS 102-3
Size: Beret: One-size
Gloves: S/M – L/XL

Materials: DROPS Alpaca from Garnstudio
Colour no. 501, lightgrey: 150-150 g

DROPS Short Circular needle and Double pointed needles size 2 mm – or needle size needed to make 30 sts x 39 rows in stocking stitch on 10 x 10 cm.

DROPS Crochet hook 3 mm.

-------------------------------------------------------

Alternative Yarn – See how to change yarns here
Yarn Groups A to F – Use the same pattern and change the yarn here
Yarn usage using an alternative yarn – Use our yarn converter here

-------------------------------------------------------

DROPS Alpaca
DROPS Alpaca
100% Alpaca
from 3.40 £ /50g
DROPS Puddel
DROPS Puddel
94% Mohair, 6% Polyester
Discontinued
find alternatives

DROPS Super Sale

SAVE 30% on 6 cotton favourites!
Valid until 12.04.2024

Pattern instructions

NOTE: This pattern is written in British English. All measurements in charts are in cm. For conversion from cm to inches - click here. There are different terms for crocheting in British and American English. If this pattern includes crochet, click for "crochet terms" here. For this pattern in American English, please click here.
Pattern: See diagram M.1 and M.2.

Increase tip (apply to beret): First inc are made in the 1st and 3rd P part in M.2. Second inc are made in the 2nd and 4th P part in M.2. Inc alternately like this so that finally there are P6 in every P part.

Decrease tip (apply to beret): First dec are made in the1st and 3rd P part in M.2. Second dec are made in the 2nd and 4th P part in M.2. Dec alternately like this so that finally you have dec 5 sts in all P parts (= P1 remains in every P part).

BERET
Beret: Knit in the round. Cast on loosely 144 sts on circular needle size 2 mm with Alpaca. K1 round and then work M.1. When piece measures 3 cm work M.2. At the same time inc 1 st in every other P part on every 6th row a total of 6 times – read inc.tip above = 216 sts. When piece measures 13 cm dec 1 st in every other P part on every 4th row a total of 10 times – read dec.tip = 96 sts. Now K2 rows at the same time knit all sts tog 2 by 2 = 24 sts. Pull the thread through the remaining sts and pull tog. The beret measures approx 23 cm.
Crochet border along edge: Crochet with hook 3 mm and Alpaca: 1 dc, * 3 ch, skip approx 1 cm, 1 dc *, repeat *-* and end with 1 sl st in first dc.

GLOVES
Left glove: Knit in the round on double pointed needles. Cast on 56-60 sts on double pointed needles size 2 mm with Alpaca. Work like this: P3, K1, M.1 over the next 24 sts, * P3, K1 *, repeat *-* until end of round. When piece measures 3 cm work M.2 over sts in M.1, the remaining sts in stocking stitch.
When piece measures 12 cm inc for thumb like this: inc 1 st on each side of next to last st on round on every 4th round a total of 6-7 times – inc by making YO, on next round knit YO twisted (i.e. knit in back loop instead of in the front to prevent holes) = 13-15 thumb sts.
When piece measures 17-18 cm slip these 13-15 sts + 1 st on each side (= 15-17 sts) on a thread and cast on 3 new sts over these = 56-60 sts. Continue to knit until piece measures approx 20-22 cm - finish after a whole repeat of M.2. Work 1 round in stocking stitch over all sts. Slip 22-24 sts on top of hand on a thread, keep 12-13 sts on needle and put the remaining 22-23 sts inside hand on another thread.
Little finger: = 12-13 sts, cast on 2 new sts towards sts on the tread = 14-15 sts. Knit stocking stitch round in 5½ -6½ cm, then knit all sts tog 2 by 2. Cut the tread and pull through the remaining sts, pull tog.
Hand: Slip sts on thread back on needle, pick up 2 sts in edge towards little finger = 46-49 sts. Work 3 rounds in stocking stitch. Keep the 2 new sts towards little finger + 7-7 sts on top of hand and 6-7 sts inside hand on needle. Slip back the remaining sts on each one thread (= 15-17 sts on top of hand and 16-16 sts inside hand).
Ring finger: = 15-16 sts, cast on 1-2 new sts towards sts on threads = 16-18 sts. Work stocking stitch round in approx 7-8 cm, then knit all sts tog 2 by 2. Cut the tread and pull through the remaining sts, pull tog.
Middle finger: Put 7-8 sts from the tread on top of hand + 8-8 sts from the tread inside hand back on needle, pick in addition up 2 sts towards ring finger and cast on 1-2 new sts toward sts on threads = 18-20 sts. Work stocking stitch round in approx 7½-8½ cm, then knit all sts tog 2 by 2. Cut the tread and pull through the remaining sts, pull tog.
Index finger: Put the remaining 16-17 sts from threads back on needle, pick in addition up 2-3 sts towards middle finger = 18-20 sts. Work in stocking stitch round in approx 6½-7½ cm, then knit all sts tog 2 by 2. Cut the tread and pull through the remaining sts, pull tog.
Thumb: Put thumb sts on needle and pick in addition up 3 sts along edge behind thumb sts = 18-20 sts. Work stocking stitches in the round for approx 5½-6 cm, then knit all sts tog 2 by 2. Cut the tread and pull through the remaining sts, pull tog.
Crochet border along edge: Crochet with hook 3 mm and Alpaca: 1 dc, * 3 ch, skip approx 1 cm, 1 dc *, repeat *-* and end with 1 sl st in first dc.

Right glove: Knit as left but reversed, i.e. knit like this from beg:
* K1, P3 *, repeat *-* over 28-32 sts, M.1, K1, P3. Inc for thumb on each side of 2nd st on round, instead of the next to last.


SCARF
Measure: ca 35 x 120 cm
Materials: DROPS Puddel from Garnstudio
200 g colour no. 07, middle grey

DROPS Needle size 7 mm – or needle size needed to make 10 sts x 28 rows in garter stitch with Puddel on 10 x 10 cm.

Garter stitch: Knit all rows back and forth on needle

Scarf: Cast on 35 sts on needle size 7 mm with Puddel. Work in garter stitch – see explanation above. When piece measures 30 cm inc 1 st in each side on every 4th row a total of 2 times = 39 sts. When piece measures 88 cm dec 1 st in each side on every 4th row a total of 2 times = 35 sts. Cast off when piece measures 120 cm.
Put each end of the scarf toward each other and fasten with some stitches.

This pattern has been corrected.

Updated online: 25.08.2008
DROPS Crochet hook 3 mm.

Along the edge on hat and gloves:
Crochet border: Crochet with hook 3 mm and Alpaca: 1 dc, * 3 ch, skip approx 1 cm, 1 dc *, repeat *-* and end with 1 sl st in first dc.

Diagram

symbols = K
symbols = P
symbols = YO, K2 tog
symbols = slip 1 st as if to K, K1, psso, YO
symbols = YO, slip 1 st as if to K, K2 tog,
psso, YO
diagram

Each of our patterns has specific tutorial videos to help you.

Do you have a question? See a list of frequently asked questions (FAQ)

Knitting tension is what determines the final measurements of your work, and is usually measured per 10 x 10 cm. It is provided like so: number of stitches in width x number of rows in height - eg: 19 stitches x 26 rows = 10 x 10 cm.

The knitting tension is very individual; some people knit/crochet loosely while others work tightly. You adjust the knitting tension with the needle size, which is why the suggested needle size is only meant as a guide! You need to adjust this (up or down) to ensure that YOUR knitting tension matches the knitting tension provided in the pattern. If you work with a different knitting tension than provided you will have a different yarn consumption, and your work will have different measurements than what the pattern suggests.

The knitting tension also determines which yarns can replace each other. As long as you achieve the same knitting tension you can replace one yarn with another.

See DROPS lesson: How to measure your tension/gauge

See DROPS video: How to make a gauge tension swatch

The required amount of yarn is provided in grams, eg: 450 g. To calculate how many balls you’ll need you first need to know how many grams are in 1 ball (25g, 50g or 100g). This information is available if you click on the individual yarn quality on our pages. Divide the amount required with the amount of each ball. For example, if each ball is 50g (the most common amount), the calculation will be as follows: 450 / 50 = 9 balls.

The important thing when changing from one yarn to another is that the knitting/crochet tension remains the same. This is so that the measurements of the finished piece will be the same as on the sketch provided. It is easier to achieve the same knitting tension using yarns from the same yarn group. It is also possible to work with multiple strands of a thinner yarn to achieve the knitting tension of a thicker one. Please try our yarn converter. We recommend you to always work a test swatch.

Please NOTE: when changing yarn the garment might have a different look and feel to the garment in the photo, due to individual properties and qualities of each yarn.

See DROPS lesson: Can I use a different yarn than the one mentioned in the pattern?

All our yarns are categorised into yarn groups (from A to F) according to thickness and knitting tension – group A contains the thinnest yarns and group F the thickest. This makes it easier for you to find alternative yarns to our patterns, should you wish to switch yarn. All yarns within the same group have a similar knitting tension and can easily replace each other. However, different yarn qualities have different structures and properties which will give the finished work a unique look and feel.

Click here for an overview of the yarns in each yarn group

At the top of all our patterns you’ll find a link to our yarn calculator, which is a helpful tool should you wish to use a different yarn than suggested. By filling in the yarn quality you wish to replace, the amount (in your size) and number of strands, the calculator will present good alternative yarns with the same knitting tension. Additionally it will tell you how much you’ll require in the new qualities and whether you’ll need to work with multiple strands. Most skeins are 50g (some are 25g or 100g).

If the pattern is worked with multiple colours, every colour will have to be calculated separately. Similarly, if the pattern is worked with several strands of different yarns (for example 1 strand Alpaca and 1 strand Kid-Silk) you will have to find alternatives for each, individually.

Click here to see our yarn calculator

Since different yarns have different qualities and textures we have chosen to keep the original yarn in our patterns. However, you can easily find options among our available qualities by using our yarn calculator, or simply pick a yarn from the same yarn group.

It is possible that some retailers still have discontinued yarns in stock, or that someone has a few skeins at home that they would like to find patterns for.

The yarn calculator will provide both alternative yarn as well as required amount in the new quality.

If you think it's hard to decide what size to make, it can be a good idea to measure a garment you own already and like the size of. Then you can pick the size by comparing those measures with the ones available in the pattern's size chart.

You'll find the size chart at the bottom of the pattern.

See DROPS lesson: How to read size chart

The needle size provided in the pattern serves only as a guide, the important thing is to follow the knitting tension. And since knitting tension is very individual, you will have to adjust the needle size to ensure that YOUR tension is the same as in the pattern – maybe you’ll have to adjust 1, or even 2 needle sizes, up or down to achieve the correct tension. For this, we recommend that you work test swatches.

Should you work with a different knitting tension than the one provided, the measurements of the finished garment might deviate from the measurement sketch.

See DROPS lesson: How to measure your tension/gauge

See DROPS video: How to make a tension/gauge swatch

Working a garment top-down provides more flexibility and room for personal adjustment. For example it is easier to try the garment on while working, as well as making adjustments to length of yoke and shoulder caps.

The instructions are carefully explaining every step, in the correct order. Diagrams are adjusted to the knitting direction and are worked as usual.

The diagram depicts all rows/rounds, and every stitch seen from the right side. It is read from bottom to top, from right to left. 1 square = 1 stitch.

When working back and forth, every other row is worked from the right side and every other row is worked from the wrong side. When working from the wrong side, the diagram will have to be worked reversed: from left to right, knit stitches are purled, purl stitches are knit etc.

When working in the round every round is worked from the right side and the diagram are worked from right to left on all rounds.

See DROPS lesson: How to read knitting diagrams

The diagram depicts all rows/rounds, and every stitch seen from the right side. It is worked from bottom to top, from right to left.

When working back and forth every other row is worked from the right side: from right to left and every other row is worked from the wrong side: from left to right.

When working in the round, every row in the diagram are worked from the right side, from right to left.

When working a circular diagram you start in the middle and work your way outwards, counter clockwise, row by row.

The rows usually start with a given number of chain stitches (equivalent to the height of the following stitch), this will either be depicted in the diagram or explained in the pattern.

See DROPS lesson: How to read crochet diagrams

Instructions for working several diagrams after each other on the same row/round, will often be written like so: “work A.1, A.2, A.3 a total of 0-0-2-3-4 times". This means you work A.1 once, then A.2 is worked once, and A.3 is repeated (in width) the number of times provided for your size – in this case like so: S = 0 times, M = 0 times, L=2 times, XL= 3 times and XXL = 4 times.

The diagrams are worked as usual: begin with the first row in A.1, then work the first row in A.2 etc.

See DROPS lesson: How to read knitting diagrams

See DROPS lesson: How to read crochet diagrams

The total width of the garment (from wrist-to-wrist) will be larger in the larger sizes, despite the actual sleeves being shorter. The larger sizes have longer sleeve caps and wider shoulders, so there will be a good fit in all sizes.

The measurement sketch/schematic drawing provides information regarding the full length of the garment. If it’s a jumper or a jacket the length is measured from the highest point on the shoulder closest to the neckline, and straight down to the bottom of the garment. It is NOT measured from the tip of shoulder. Similarly, the length of yoke is measured from the highest point on the shoulder and down to where yoke is split into body and sleeves.

On a jacket measures are never taken along bands, unless specifically stated. Always measure inside band stitches when measuring the length.

See DROPS lesson: How to read a schematic drawing

Diagrams are often repeated on the round or in height. 1 repeat is the diagram the way it appears in the pattern. If it says to work 5 repeats of A.1 in the round, then you work A.1 a total of 5 times after/next to each other in the round. If it says to work 2 repeats of A.1 vertically/in height you work the entire diagram once, then begin again at the start and work the entire diagram one more time.

Chain stitches are slightly narrower than other stitches and to avoid working the cast-on edge too tight, we simply chain more stitches to begin with. The stitch count will be adjusted on the following row to fit the pattern and measurement sketch.

The rib edge is more elastic and will contract slightly compared to, for example, stocking stitch. By increasing before the rib edge, you avoid a visible difference in width between the rib edge and the rest of the body.

It’s very easy to cast off too tightly, and by making yarn overs while casting off (and simultaneously casting these off) you avoid a too tight cast off edge.

See DROPS video: How to bind off with yarn overs (yo)

To achieve an even increase (or decrease) you can increase on, for example: every 3rd and 4th row alternately, like so: work 2 rows and increase on the 3rd row, work 3 rows and increase on the 4th. Repeat this until the increase is complete.

See DROPS lesson: Increase or decrease 1 st on every 3rd and 4th row alternately

Should you prefer to work in the round instead of back and forth, you may of course adjust the pattern. You’ll need to add steeks mid-front (usually 5 stitches), and follow the instructions. When you would normally turn and work from the wrong side, simply work across the steek and continue in the round. At the end you’ll cut the piece open, pick up stitches to work bands, and cover the cut edges.

See DROPS video: How to knit steeks and cut open

Should you prefer to work back and forth instead of in the round, you may of course adjust the pattern so you work the pieces separately and then assemble them at the end. Divide the stitches for the body in 2, add 1 edge stitch in each side (for sewing) and work the front and back pieces separately.

See DROPS lesson: Can I adapt a pattern for circular needles into straight needles?

Pattern repeats can vary slightly in the different sizes, in order to get the correct proportions. If you’re not working the exact same size as the garment in the photo, yours might deviate slightly. This has been carefully developed and adjusted so that the complete impression of the garment is the same in all sizes.

Make sure to follow instructions and diagrams for your size!

If you have found a pattern you like which is available in women’s size it’s not very difficult to convert it to men’s size. The biggest difference will be the length of sleeves and body. Start working on the women size that you think would fit across the chest. The additional length will be worked right before you cast off for the armhole/sleeve cap. If the pattern is worked top-down you can add the length right after the armhole or before the first decrease on sleeve.

Regarding additional yarn amount, this will depend on how much length you add, but it is better with a skein too many than too few.

All yarns will have excess fibres (from production) that might come off as lint or shedding. Brushed yarns (ie hairier yarns) have more of these loose, excess fibres, causing more shedding.

Shedding also depends on what is worn under or over the garment, and whether this pulls at the yarn fibres. It’s therefore not possible to guarantee that there will be no shedding

Below are some tips on how to get the best result when working with hairier yarns:

1. When the garment is finished (before you wash it) shake it vigorously so the looser hairs come off. NOTE: do NOT use a lint roller, brush or any method that pulls at the yarn.

2. Place the garment in a plastic bag and put it in your freezer - the temperature will cause the fibres to become less attached to each other, and excess fibres will come off easier.

3. Leave in the freezer for a few hours before taking it out and shaking it again.

4. Wash the garment according to the instructions on the yarn label.

Pilling is a natural process that happens to even the most exclusive of fibers. It's a natural sign of wear and tear that is hard to avoid, and that is most visible in high friction areas of your garment like a sweater's arms and cuffs.

You can make your garment look as new by removing the pilling, using a fabric comb or a pill/lint remover.

Still can't find the answer you need? Then scroll down and leave your question so one of our experts can try to help you. This will be done normally within 5 to 10 working days.
In the meantime, you can read the questions and answers that others have left to this pattern or join the DROPS Workshop on Facebook to get help from fellow knitters/crocheters!

You might also like...

Post a comment to pattern DROPS 102-3

We would love to hear what you have to say about this pattern!

If you want to leave a question, please make sure you select the correct category in the form below, to speed up the answering process. Required fields are marked *.

Comments / Questions (32)

country flag Birte Veith wrote:

Mütze Das erste Aufnehmen wird in der 1. Und 3. li.-Partie in M2 Was ist die li.-Parie?

05.05.2022 - 15:21

DROPS Design answered:

Liebe Frau Veith, in jedem M.2 stricken Sie 3 Maschen links insgesamt 4 Mal; bei der 1. Zunahmen, nehmen Sie die 3 li. Maschen auf 4 in jeder 1. und 3. zu (so haben Sie 4 M li, 1 M re, 3 M li, Lochumster, 4 M li, 1 M re, 3 M li, 1 M re), bei der nächsten Zunahmen nehmen Sie die linke Maschen zu, so daß es sind 4 Maschen überall - und so nehmen Sie weiter, bis es 6 linken Maschen in jedem M.2 sind. Viel Spaß beim stricken!

06.05.2022 - 07:34

country flag Liz wrote:

Thanks. However, can you tell me how to do the inc & dec please.

17.03.2021 - 18:32

DROPS Design answered:

Dear Liz, you can increase with a yarn over knitted twisted on next row or any other method you rather; decrease by knitting 2 stitches together. Happy knitting!

18.03.2021 - 09:02

country flag Liz wrote:

Hi, can you please show how to: "inc 1 st in each side on every 4th row a total of 2 times" & "dec 1 st in each side on every 4th row a total of 2 times". Thanks

17.03.2021 - 15:32

DROPS Design answered:

Dear Liz, for the increases, work: 1 row increasing 1 stitch on each side (= 2 sts in total), 3 rows without increasing, 1 row increasing 1 stitch on each side (= you have increased 4 sts = 39 sts on needle). For the decreases: work 1 row decreasing (K2 tog) 1 st on each side (= 2 sts decreased), work 3 rows without decreasing, work 1 row decreasing 1 st on each side = 35 sts remain. Happy knitting!

17.03.2021 - 16:13

country flag Rébecca wrote:

In der Anleitung für den Handschuh steht, dass zunächst M1 gestrickt wird. Im nächsten Satz soll M1 über M2 gestrickt werden. Sollte es nicht M2 über M1 heißen? Mit freundlichen Grüßen

10.01.2021 - 22:06

DROPS Design answered:

Liebe Rébecca, ja doch schon, nach M.1 stricken Sie M.2 über M;1 - Anleitung wird korrigiert, danke für den Hinweis. Viel Spaß beim stricken!

11.01.2021 - 10:25

country flag Sharon wrote:

The ends of the scarf are sewn together? To make a loop?

09.11.2019 - 19:18

DROPS Design answered:

Dear Sharon, yes, you are right, the ends of the "scarf" are sewn together to make it more like a shoulder warmer than a simple scarf. Happy Knitting!

10.11.2019 - 11:19

country flag Criss wrote:

Bonjour, Est-il possible de faire le bonnet avec une seule boule? Merci

12.01.2019 - 15:27

country flag Criss wrote:

Bonjour, J’ai il me restait une boule après avoir faire un autre travail et j’ai commencé le bonnet. Je suis à 13 cm et il me reste environ 13 grammes de laine. J’ai peur de ne pas avoir assez...... Est-il possible de faire le bonnet avec une seule boule ? Merci pour votre réponse.

12.01.2019 - 15:24

DROPS Design answered:

Bonjour Criss, il faut 150 g DROPS Alpaca pour l'ensemble bonnet et gants, nous n'avons malheureusement pas le détail de chaque modèle. En fonction de là où vous en êtes rendue au bonnet, il est possible que vous n'en ayez pas assez. Bon tricot!

14.01.2019 - 10:06

country flag Huong wrote:

Tusen takk for svaret!

14.01.2015 - 20:02

country flag Huong wrote:

Skal jeg øke i 1. omgang i M.2 på den måten: 3 vrang, 1 kast, 1 rett ,3 vrang og fortsette i M.2 inntil å begynne med økning i 3. vrangpari med 3 vrang, 1 kast, 1 rett og tilslutt 3 vrang, 1 rett? Skal økingen skal gjøre på den siste maske av vrangparti slik at det blir 3 vrang, 1 kast....eller det skal gjøre på begynnelse av vrangparti?

13.01.2015 - 15:53

DROPS Design answered:

Hei Huong. Pröv at se öketips til luen: 1.økning gjøres i 1. og 3.vrangparti i M.2. 2.økning gjøres i 2. og 4.vrangparti i M.2. Øk vekselsvis på denne måten slik at det til slutt er økt 3 m i alle vrangpartiene. Du kan selv bestemme om du vil öke i begynnelsen eller slutningen af hvert vrangparti - hvad du synes bliver paenest.

14.01.2015 - 15:11

country flag Huong wrote:

Når jeg begynner med M.2 skal jeg øke 1 m i 1. Og 3. vrangparti slik at det blir økt 12m. i første omgang? 2.omgang øker jeg i 2. og 4. vrangparti = 12 m blir økt og fortsette videre samme måte i 4. 5.og 6. omgang slik at m= 216. Skal jeg fortsette å øke samme måte når jeg begynner tilbake med M.2 ? Eller skal jeg bare strikke M2 uten økning inntil arbeidet kommer opp til 13cm?

11.01.2015 - 21:06

DROPS Design answered:

Hei Huong. Du skal kun öke til du har 216 m, derefter strikker du videre uden ökninger til du har 13 cm.

13.01.2015 - 13:47