
Popular categories
Looking for a yarn?


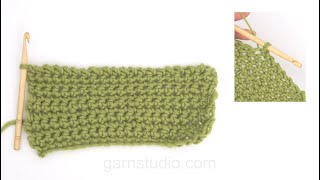
How to crochet a knit stitch in Tunisian/Afghan crochet

Start with a row of chain stitches. Work first row by inserting the hook back into the second chain from hook, pull yarn through, then insert hook in next chain, pull yarn through and so on until end of chain row. All new sts remain on the hook and at the end, there will be as many sts on the hook as the pattern required. Do not turn work, but now start binding off each stitch by first pulling yarn through 1 st, then yarn trough 2 sts at the same time until end of row. Make sure to have a constant number of sts everytime you pick up new sts. This technique creates a dense fabric with a definite front and back side.
Video #93, listed in: Crochet Videos, Crochet textures, Other crochet textures
Our videos do not have sound. We are a worldwide company and our videos are watched by people speaking endless of different languages and many do not understand English. So since there is not a given language for us to use, we instead have written instructions to accompany the video, and then there is no sound to disturb while watching.
You can adjust the speed of this video by clicking on the icon, on the play bar.
![]() Christel wrote:
Christel wrote:
Hej. Kan I hjælpe med at vise farveskift og hvordan tråden trækkes med. Skal man lave dunter? Med venlig hilsen Christel
26.12.2014 - 11:54DROPS Design :
Hej Christel. Vi har tilföjet det til önskesedlen :-).
05.01.2015 - 13:43
![]() Agnieszka wrote:
Agnieszka wrote:
Witam. Jak wykonać ten wzór na okraglo? Chce zrobić okrągły dywanik ale nie mogę znaleźć metody:)
06.10.2014 - 22:45DROPS Design :
Prośba została już zgłoszona i video wkrótce znajdzie się na stronie. Pozdrowienia od DROPS Design
15.12.2014 - 17:46
![]() Bi-crafty wrote:
Bi-crafty wrote:
What can be done to keep the fabric from curling?
23.11.2013 - 16:53DROPS Design :
Dear Bi-crafty, you can always block your work (with or without roof-rust pins to keep sides in place). Happy crocheting!
17.10.2014 - 16:17
![]() Dorinne wrote:
Dorinne wrote:
Clearly visible.
09.11.2013 - 17:03
![]() Marion wrote:
Marion wrote:
Marga, als Engels geen probleem is zoek dan eens op tunisch haken patronen. Dan vind je wel patronen. Groetjes.
01.11.2013 - 23:00
![]() Marga wrote:
Marga wrote:
Kunnen jullie een tunisch haakpatroon maken? Ik kan op internet niet veel vinden.
10.06.2013 - 14:23Amira wrote:
C'est magnifique,votre méthode d'explication est très lisible.
09.12.2012 - 23:35
![]() DROPS Design NL wrote:
DROPS Design NL wrote:
Wij hebben op dit moment helaas geen patronen beschikbaar voor Tunesisch haken
08.11.2012 - 10:41
![]() Leanne Boelens wrote:
Leanne Boelens wrote:
Is er ook een patroon beschikbaar voor het haken van een kerstbal op tunische manier?
07.11.2012 - 13:23Leave a comment or question to this video
Your email address will not be published. Required fields are marked *.
You might also like


With over 40 years in knitting and crochet design, DROPS Design offers one of the most extensive collections of free patterns on the internet - translated to 17 languages. As of today we count 314 catalogues and 11822 patterns translated into English (UK/cm).
We work hard to bring you the best knitting and crochet have to offer, inspiration and advice as well as great quality yarns at incredible prices! Would you like to use our patterns for other than personal use? You can read what you are allowed to do in the Copyright text at the bottom of all our patterns. Happy crafting!
Witam. Jak wykonać ten wzór na okraglo? Chce zrobić okrągły dywanik ale nie mogę znaleźć metody:)
06.10.2014 - 22:44