DROPS Merino Extra Fine
100% Wool
from 4.55 $ /50g
Get the yarn to make this pattern from 72.80$.

The yarn cost is calculated from the pattern’s smallest size and the yarn’s cheapest product type. Looking for an even better price? You might find it on the DROPS Deals!

DROPS SS24

Waterfall

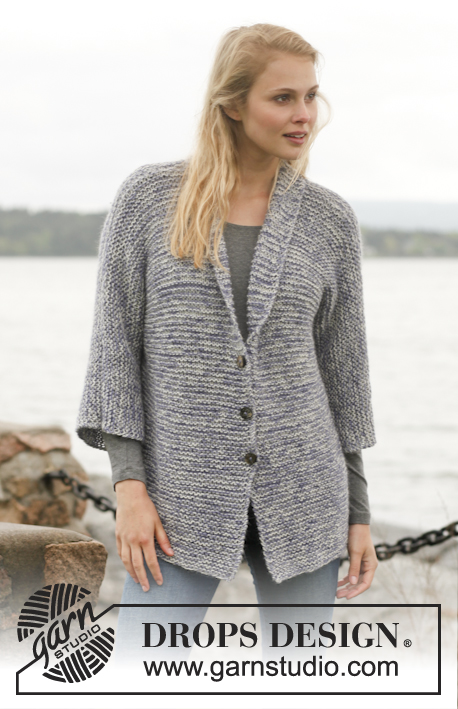
Crochet DROPS jacket with shawl collar in ”Merino Extra Fine”. Size: S - XXXL.

DROPS 149-37
DROPS design: Pattern no me-064
Yarn group B
-----------------------------------------------------------
Size: S/M – L/XL - XXL – XXXL
Finished measurements:
Bust: 106-120-132-146 cm / 41¾"-47"-52"-57½"
Full length: 72-78-83-88 cm / 28½"-30¾"-32¾"-34½"

Materials:
DROPS MERINO EXTRA FINE from Garnstudio
800-900-1000-1050 g color no 13, denim blue.

DROPS CROCHET HOOK size 5 mm / H/8 – or size needed to get 3 repetitions of A.1a = width 10 cm / 4" or 13 dc = 10 cm / 4" in width.

-------------------------------------------------------

Alternative Yarn – See how to change yarns here
Yarn Groups A to F – Use the same pattern and change the yarn here
Yarn usage using an alternative yarn – Use our yarn converter here

-------------------------------------------------------

DROPS Merino Extra Fine
100% Wool
from 4.55 $ /50g
Get the yarn to make this pattern from 72.80$.

The yarn cost is calculated from the pattern’s smallest size and the yarn’s cheapest product type. Looking for an even better price? You might find it on the DROPS Deals!

Pattern instructions

NOTE: This pattern is written in American English. All measurements in charts are in cm. For conversion from inches to cm - click here. There are different terms for crocheting in American and British English. If this pattern includes crochet, click for "crochet terms" here. For this pattern in British English, please click here.
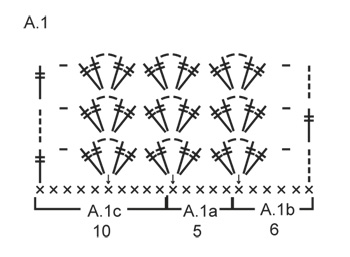
TR-GROUPS:
1 tr-group = 2 tr + ch 2 + 2 tr.

PATTERN:
See diagram A.1.
----------------------------------------------------------

BACK PIECE:
Worked back and forth. Ch 108-120-133-145 on hook size 5 mm / H/8 with Merino Extra Fine.
Work first row as follows (= WS): 1 sc in 2nd ch from hook and then 1 sc in each of the next 3 ch, * skip 1 ch, 1 sc in each of the next 4 ch *, repeat from *-* until 3-5-3-5 ch remain, skip 1 ch, 1 sc in each of the next 2-4-2-4 ch = 86-96-106-116 sc.
Continue to work as follows:

ROW 1 (= RS): Work A.1b 1 time, then work A.1a until 10 sc remain (= 14-16-18-20 times in width) and finish with A.1c 1 time. REMEMBER THE CROCHET GAUGE!
ROW 2 (= WS): Turn piece and work A.1c 1 time, A.1a (= 14-16-18-20 times in width), A.1b 1 time.
ROW 3 (= RS): Turn piece and work A.1b 1 time, A.1a (= 14-16-18-20 times in width), A.1c 1 time.
Repeat 2nd and 3rd row until piece measures approx. 46-50-54-58 cm / 18"-19¾"-21¼"-22¾" – make sure to finish with 3rd row (= RS). Fasten off.

Ch 30-25-25-20 loosely, beg from WS and continue A.1 over back piece as before and finish with 34-29-29-24 loose ch, turn piece. Continue to work as follows:
ROW 1 (= RS): In 10th ch from hook work 2 tr + 2 ch + 2 tr (= A.1b), work A.1a 4-3-3-2 times in total, skip the last 4 ch, in tr at beg of back piece work 2 tr + 2 ch + 2 tr (= 1 tr-group), then work A.1a over back piece as before but in last tr at end of back piece work 2 tr + 2 ch + 2 tr, then work over the last 30-25-25-20 ch as follows: Skip the next 4 ch, A.1a 4-3-3-2 times in total and then A.1c 1 time, turn piece.
ROW 2 (= WS): Turn piece and work A.1c 1 time, A.1a 24-24-26-26 times and finish with A.1b 1 time.
ROW 3 (= RS): Turn piece and work A.1b 1 time, A.1a 24-24-26-26 times and finish with A.1c 1 time.
Repeat 2nd and 3rd row until piece measures approx. 70-76-81-86 cm / 27½"-30"-32"-34" – make sure to finish with 3rd row (= RS).

Work 11-11-12-12 tr-groups, finish with 1 ch and 1 tr in ch-space on next tr-group. Fasten off. Skip 2 tr-groups (= neck). Work 1 sl st in ch-space on next tr-group, then ch 5. Work 11-11-12-12 tr-groups. Fasten off.

RIGHT FRONT PIECE:
Worked back and forth. Ch 98-104-110-117 on hook size 5 mm / H/8 with Merino Extra Fine. Work 1 sc in 2nd ch from hook and then 1 sc in each of the next 3 ch, * skip 1 ch, 1 sc in each of the next 4 ch *, repeat from *-* until 3-4-5-2 ch remain, skip 1 ch, work 1 sc in each of the next 2-3-4-1 ch = 78-83-88-93 sc.

ROW 1 (= RS): 4 ch (= 1 tr), 1 tr in each of the next 32 sc (= 33 tr for band) NOTE: Work band with every other row tr and dtr. Then ch 1, skip 4 sc, 2 tr + 2 ch + 2 tr in next sc, then work A.1a 6-7-8-9 times in total, finish with A.1c 1 time.
ROW 2 (= WS): Turn piece and work A.1c 1 time, A.1a 6-7-8-9 times, 2 tr + 2 ch + 2 tr in next tr-group, 1 ch, work 1 dtr in each of the next 33 tr.
ROW 3 (= RS): 4 ch (= 1 tr), 1 tr in each of the next 32 dtr (= 33 tr), 1 ch, 2 tr + 2 ch + 2 tr in first tr-group, then work A.1a 6-7-8-9 times in total, finish with A.1c 1 time.
Repeat 2nd and 3rd row until piece measures 46-50-54-58 cm / 18"-19¾"-21¼"-22¾". Make sure to finish after 3rd row (= RS). Fasten off.

Ch 30-25-25-20 loosely, beg from WS and then work A.1 and dtr over band as before, turn piece.

Continue to work as follows:
ROW 1 (= RS): 4 ch (= 1 tr), 1 tr in each of the next 32 tr (= 33 tr), 1 ch, 2 tr + 2 ch + 2 tr in ch-space in next tr-group, work A.1a until 1 tr remains on front piece, work 2 tr + 2 ch + 2 tr in tr, then work over the last 30-25-25-20 ch as follows: A.1a 4-3-3-2 times in total and then A.1c 1 time.
ROW 2 (= WS): Turn piece and work A.1c 1 time, A.1a 11-11-12-12 times, 2 tr + 2 ch + 2 tr in next tr-group, 1 ch, then 1 dtr in each of the last 33 tr.
ROW 3 (= RS): 4 ch (= 1 tr), 1 tr in each of the next 32 tr (= 33 tr), 1 ch, 2 tr + 2 ch + 2 tr in first tr-group, then work A.1a 11-11-12-12 times in total, finish with A.1c 1 time.
Repeat 2nd and 3rd row until piece measures 72-78-83-88 cm / 28½"-30¾"-32¾"-34½". Finish with 2nd row.

SHAWL COLLAR:
When piece measures 72-78-83-88 cm / 28½"-30¾"-32¾"-34½", only work over band sts (= 32 tr/dtr).
Then work short rows over band sts as follows:
ROW 1 (RS): 32 tr, turn piece.
ROW 2 (WS): 11 sc, 5 hdc, 5 dc, 11 tr, turn piece.
Repeat these 2 rows until piece measures 10-10-11-11 cm / 4"-4"-4½"-4½" on the most narrow part – make sure to finish with 1st row (RS).

LEFT FRONT PIECE:
Work as right but reversed.
NOTE: When piece measures approx. 46-50-54-58 cm / 18"-19¾"-21¼"-22¾" (make sure that last row is from RS), work next row from WS as follows: 33 dtr, work tr-groups as before over front piece and finish with 34-29-29-24 ch, turn piece and beg row as on back piece.
Work band sts as on right front piece, finish shawl collar with 1st row (from WS instead of RS).

ASSEMBLY:
Work collar tog mid back as follows: 1 sc, *1 ch, 1 sc in next st*, repeat *-*.
Place front piece on top of back piece and work the shoulders and band sts tog for neckline at the back as follows: * 1 sc through both layers, 3 ch, skip 2 dc *, repeat *-*.
Work the sides tog as follows: 1 sc, *3 ch,1 sc in ch on next row*, repeat *-*.
Work tog under sleeves as follows: * 1 sc in next ch with tr-group, 3 ch *, repeat *-* and end with 1 sc.

Diagram

All measurements in charts are in cm.

symbols = 1 sl st
symbols = 1 ch
symbols = 1 sc
symbols = 1 tr
diagram
diagram
Do you have a question? See a list of frequently asked questions (FAQ)

Knitting tension is what determines the final measurements of your work, and is usually measured per 10 x 10 cm. It is provided like so: number of stitches in width x number of rows in height - eg: 19 stitches x 26 rows = 10 x 10 cm.

The knitting tension is very individual; some people knit/crochet loosely while others work tightly. You adjust the knitting tension with the needle size, which is why the suggested needle size only serve as a guide! You need to adjust this (up or down) to ensure that YOUR knitting tension matches the knitting tension provided in the pattern. If you work with a different knitting tension than provided you will have a different yarn consumption, and your work will have different measurements than what the pattern suggests.

The knitting tension also determines which yarns can replace each other. As long as you achieve the same knitting tension you can replace one yarn with another.

See DROPS lesson: How to measure your tension/gauge

See DROPS video: How to make a gauge tension swatch

The required amount of yarn is provided in grams, eg: 450 g. To calculate how many balls you’ll need you first need to know how many grams are in 1 ball (25g, 50g or 100g). This information is available if you click on the individual yarn quality on our pages. Divide the amount required with the amount of each ball. For example, if each ball is 50g (the most common amount), the calculation will be as follows: 450 / 50 = 9 balls.

The important thing when changing from one yarn to another is that the knitting/crochet tension remains the same. This is so that the measurements of the finished piece will be the same as on the sketch provided. It is easier to achieve the same knitting tension using yarns from the same yarn group. It is also possible to work with multiple strands of a thinner yarn to achieve the knitting tension of a thicker one. Please try our yarn converter. We recommend you to always work a test swatch.

Please NOTE: when changing yarn the garment might have a different look and feel to the garment in the photo, due to individual properties and qualities of each yarn.

See DROPS lesson: Can I use a different yarn than the one mentioned in the pattern?

All our yarns are categorised into yarn groups (from A to F) according to thickness and knitting tension – group A contains the thinnest yarns and group F the thickest. This makes it easier for you to find alternative yarns to our patterns, should you wish to switch yarn. All yarns within the same group have a similar knitting tension and can easily replace each other. However, different yarn qualities have different structures and properties which will give the finished work a unique look and feel.

Click here for an overview of the yarns in each yarn group

At the top of all our patterns you’ll find a link to our yarn converter, which is a helpful tool should you wish to use a different yarn than suggested. By filling in the yarn quality you wish to replace, the amount (in your size) and number of strands, the converter will present good alternative yarns with the same knitting tension. Additionally it will tell you how much you’ll require in the new qualities and whether you’ll need to work with multiple strands. Most skeins are 50g (some are 25g or 100g).

If the pattern is worked with multiple colours, every colour will have to be converted separately. Similarly, if the pattern is worked with several strands of different yarns (for example 1 strand Alpaca and 1 strand Kid-Silk) you will have to find alternatives for each, individually.

Click here to see our yarn converter

Since different yarns have different qualities and textures we have chosen to keep the original yarn in our patterns. However, you can easily find options among our available qualities by using our yarn converter, or simply pick a yarn from the same yarn group.

It is possible that some retailers still have discontinued yarns in stock, or that someone has a few skeins at home that they would like to find patterns for.

The yarn converter will provide both alternative yarn as well as required amount in the new quality.

If you think it's hard to decide what size to make, it can be a good idea to measure a garment you own already and like the size of. Then you can pick the size by comparing those measures with the ones available in the pattern's size chart.

You'll find the size chart at the bottom of the pattern.

See DROPS lesson: How to read size chart

The needle size provided in the pattern serves only as a guide, the important thing is to follow the knitting tension. And since knitting tension is very individual, you will have to adjust the needle size to ensure that YOUR tension is the same as in the pattern – maybe you’ll have to adjust 1, or even 2 needle sizes, up or down to achieve the correct tension. For this, we recommend that you work test swatches.

Should you work with a different knitting tension than the one provided, the measurements of the finished garment might deviate from the measurement sketch.

See DROPS lesson: How to measure your tension/gauge

See DROPS video: How to make a gauge tension swatch

Working a garment top-down provides more flexibility and room for personal adjustment. For example it is easier to try the garment on while working, as well as making adjustments to length of yoke and shoulder caps.

The instructions are carefully explaining every step, in the correct order. Diagrams are adjusted to the knitting direction and are worked as usual.

The diagram depicts all rows/rounds, and every stitch seen from the right side. It is read from bottom to top, from right to left. 1 square = 1 stitch.

When working back and forth, every other row is worked from the right side and every other row is worked from the wrong side. When working from the wrong side, the diagram will have to be worked reversed: from left to right, knit stitches are purled, purl stitches are knit etc.

When working in the round every round is worked from the right side and the diagram are worked from right to left on all rounds.

See DROPS lesson: How to read knitting diagrams

The diagram depicts all rows/rounds, and every stitch seen from the right side. It is worked from bottom to top, from right to left.

When working back and forth every other row is worked from the right side: from right to left and every other row is worked from the wrong side: from left to right.

When working in the round, every row in the diagram are worked from the right side, from right to left.

When working a circular diagram you start in the middle and work your way outwards, counter clockwise, row by row.

The rows usually start with a given number of chain stitches (equivalent to the height of the following stitch), this will either be depicted in the diagram or explained in the pattern.

See DROPS lesson: How to read crochet diagrams

Instructions for working several diagrams after each other on the same row/round, will often be written like so: “work A.1, A.2, A.3 a total of 0-0-2-3-4 times". This means you work A.1 once, then A.2 is worked once, and A.3 is repeated (in width) the number of times provided for your size – in this case like so: S = 0 times, M = 0 times, L=2 times, XL= 3 times and XXL = 4 times.

The diagrams are worked as usual: begin with the first row in A.1, then work the first row in A.2 etc.

See DROPS lesson: How to read knitting diagrams

See DROPS lesson: How to read crochet diagrams

The total width of the garment (from wrist-to-wrist) will be larger in the larger sizes, despite the actual sleeves being shorter. The larger sizes have longer sleeve caps and wider shoulders, so there will be a good fit in all sizes.

The measurement sketch/schematic drawing provides information regarding the full length of the garment. If it’s a jumper or a jacket the length is measured from the highest point on the shoulder (usually closest to the neckline), and straight down to the bottom of the garment. It is NOT measured from the tip of shoulder. Similarly, the length of yoke is measured from the highest point on the shoulder and down to where yoke is split into body and sleeves.

See DROPS lesson: How to read a schematic drawing

Diagrams are often repeated on the round or in height. 1 repeat is the diagram the way it appears in the pattern. If it says to work 5 repeats of A.1 in the round, then you work A.1 a total of 5 times after/next to each other in the round. If it says to work 2 repeats of A.1 vertically/in height you work the entire diagram once, then begin again at the start and work the entire diagram one more time.

Chain stitches are slightly narrower than other stitches and to avoid working the cast-on edge too tight, we simply chain more stitches to begin with. The stitch count will be adjusted on the following row to fit the pattern and measurement sketch.

The rib edge is more elastic and will contract slightly compared to, for example, stocking stitch. By increasing before the rib edge, you avoid a visible difference in width between the rib edge and the rest of the body.

It’s very easy to cast off too tightly, and by making yarn overs while casting off (and simultaneously casting these off) you avoid a too tight cast off edge.

See DROPS video: How to bind off with yarn overs (yo)

To achieve an even increase (or decrease) you can increase on, for example: every 3rd and 4th row alternately, like so: work 2 rows and increase on the 3rd row, work 3 rows and increase on the 4th. Repeat this until the increase is complete.

See DROPS lesson: Increase or decrease 1 st on every 3rd and 4th row alternately

Should you prefer to work in the round instead of back and forth, you may of course adjust the pattern. You’ll need to add steeks mid-front (usually 5 stitches), and follow the instructions. When you would normally turn and work from the wrong side, simply work across the steek and continue in the round. At the end you’ll cut the piece open, pick up stitches to work bands, and cover the cut edges.

See DROPS video: How to knit steeks and cut open

Should you prefer to work back and forth instead of in the round, you may of course adjust the pattern so you work the pieces separately and then assemble them at the end. Divide the stitches for the body in 2, add 1 edge stitch in each side (for sewing) and work the front and back pieces separately.

See DROPS lesson: Can I adapt a pattern for circular needles into straight needles?

Pattern repeats can vary slightly in the different sizes, in order to get the correct proportions. If you’re not working the exact same size as the garment in the photo, yours might deviate slightly. This has been carefully developed and adjusted so that the complete impression of the garment is the same in all sizes.

Make sure to follow instructions and diagrams for your size!

If you have found a pattern you like which is available in women’s size it’s not very difficult to convert it to men’s size. The biggest difference will be the length of sleeves and body. Start working on the women size that you think would fit across the chest. The additional length will be worked right before you cast off for the armhole/sleeve cap. If the pattern is worked top-down you can add the length right after the armhole or before the first decrease on sleeve.

Regarding additional yarn amount, this will depend on how much length you add, but it is better with a skein too many than too few.

All yarns will have excess fibres (from production) that might come off as lint or shedding. Brushed yarns (ie hairier yarns) have more of these loose, excess fibres, causing more shedding.

Shedding also depends on what is worn under or over the garment, and whether this pulls at the yarn fibres. It’s therefore not possible to guarantee that there will be no shedding

Below are some tips on how to get the best result when working with hairier yarns:

1. When the garment is finished (before you wash it) shake it vigorously so the looser hairs come off. NOTE: do NOT use a lint roller, brush or any method that pulls at the yarn.

2. Place the garment in a plastic bag and put it in your freezer - the temperature will cause the fibres to become less attached to each other, and excess fibres will come off easier.

3. Leave in the freezer for a few hours before taking it out and shaking it again.

4. Wash the garment according to the instructions on the yarn label.

Pilling is a natural process that happens to even the most exclusive of fibers. It's a natural sign of wear and tear that is hard to avoid, and that is most visible in high friction areas of your garment like a sweater's arms and cuffs.

You can make your garment look as new by removing the pilling, using a fabric comb or a pill/lint remover.

Still can't find the answer you need? Then scroll down and leave your question so one of our experts can try to help you. This will be done normally within 5 to 10 working days.
In the meantime, you can read the questions and answers that others have left to this pattern or join the DROPS Workshop on Facebook to get help from fellow knitters/crocheters!

You might also like...

Post a comment to pattern DROPS 149-37

We would love to hear what you have to say about this pattern!

If you want to leave a question, please make sure you select the correct category in the form below, to speed up the answering process. Required fields are marked *.

Comments / Questions (85)

country flag Trisha A wrote:

I am currently doing the shawl collar but the pattern doesn't explain about decreasing, it only has a two row explanation of stitches. The picture clearly shows that the shawl collar should go to a point but the explanation states 'until the piece measures 10-10-11-11' It really doesn't make any sense to me - please help.

26.03.2019 - 22:11

DROPS Design answered:

Dear Trisha, you will get the same shape as on the chart when working the shawl collar - eg from RS on right shawl collar work 32 tr, turn and on next row from WS work: 11 sc, 5 hdc, 5 dc, 11 tr, turn. Repeat these 2 rows, the collar will be higher on the tr-side and shorter on the sc side. You should then measure along the sc-side = the most narrow part on collar. Happy crocheting!

27.03.2019 - 08:07

country flag Pam wrote:

Can you please give written pattern for each A1a A1b and A1c. Thank you

03.02.2019 - 18:32

DROPS Design answered:

Dear Pam, in UK-English work A.1B: 4 ch (= 1st dtr), 1 ch, slip 5 dc, 3 dtr, 2 ch, 2 dtr in next ch. A.1A: skip 4 dc, 2 dtr, 2 ch, 2 dtr in next dc, A.1c = skip 4 dc, 1 dtr, 2 ch, 1 dtr in next dc, 1 ch, skip 4 dc, 1 dtr in last dc. Happy crocheting!

04.02.2019 - 13:06

country flag Trisha A wrote:

Help. I can follow the pattern OK but the numbers just don't add up, I have even done an excel spreadsheet and still its not working. I have chained 120, having done all the 96 dc you then turn and follow the diagram, easy as the pattern reads ROW 1 (= RS): Work A.1b 1 time, then work A.1a until 10 dc remain (= 14-16-18-20 times in width) and finish with A.1c 1 time. Instead of getting 16 shell patterns I get 18! What am I doing wrong?

29.01.2019 - 17:40

DROPS Design answered:

Dear Trisha, You are working A.1b, repeating A.1c and finishing A.1c = you will get 18 shells at the end of pattern in size M together with A.1b and A.1c, that's right. Happy crocheting!

30.01.2019 - 07:20

country flag Clare wrote:

This is the first time I have attempted to crochet anything. I thought I had understood the pattern until I found the video for fan pattern! I was trying to take the dtr into the 2ch of previous row rather than just go under the chain. I wonder if I should start again ;-( Also for largest size why are there only 20 ch for the sleeves? I don't understand, I would have thought there should be more than smaller sizes. Seems like the sleeves will be much shorter than depicted in the photo?

14.01.2019 - 10:37

DROPS Design answered:

Dear Clare, you may start again as the pattern is explained/shown in the video. You cast on less sts on sleeve for larger size since shoulder will be larger. Happy crocheting!

14.01.2019 - 13:00

country flag Clare wrote:

This is the first time I have attempted to crochet anything. I thought I had understood the pattern until I found the video for fan pattern! I was trying to take the dtr into the 2ch of previous row rather than just go under the chain. I wonder if I should start again ;-( Also for largest size why are there only 20 ch for the sleeves? I don't understand, I would have thought there should be more than smaller sizes. Seems like the sleeves will be much shorter than depicted in the photo?

13.01.2019 - 23:41

country flag Mialina wrote:

Merci beaucoup !!!! Super réactif et compréhensible !!!! Bonne journée !!!

29.10.2018 - 11:03

country flag Mialina wrote:

Bonjour après avoir arrêté le travail du dos et monter les 30 ml que faut il faire ? Est ce qu’il faut laisser les mailles en l’air pendre et reprendre le dos avec les 3rgs de A1 et finir A1avzc des mailles en l’air ? Au secours je suis perdu

26.10.2018 - 17:51

DROPS Design answered:

Bonjour Mialina, vous crochetez les 30 ml, puis vous continuez A.1 sur les mailles du dos comme avant et terminez par 34 ml (= vous avez une chaînette de chaque côté du dos pour les manches). Au rang suivant, crochetez A.1b, répétez A.a et terminez par A.1c comme expliqué = votre premier rang sur les manches et le dos est fait, vous continuez maintenant sur toutes les mailles avec A.1b, A.1a et A.1c (vu sur l'endroit). Bon crochet!

29.10.2018 - 07:43

country flag Marie-claude Marceille wrote:

Je ne comprend pas la suite après avoir monté les 58 cm de dos! on ne coupe pas la laine et on monte 20 ml en prolongement de chaque extrémités du travail effectué pour les manches ?

18.10.2018 - 06:43

DROPS Design answered:

Bonjour Mme Marceille, après les 58 cm du dos, vous coupez le fil, puis continuez en montant une chaînette de 20 ml, puis crochetez A.1 comme avant sur le dos (= sur l'envers), et montez 24 ml pour l'autre manche. Continuez ensuite en point fantaisie comme indiqué. Bon crochet!

18.10.2018 - 09:43

country flag Marion Deira wrote:

Hallo, het haken van het vest ging prima, duidelijk allemaal. de schouders heb ik aan elkaar. nu ben ik erg aan het puzzelen met de kraag. ik kom er maar niet uit hoe dit nou aan elkaar zit en hoe het er uit moet zien aan de achterkant. kunt u mij daar bij helpen?

18.09.2018 - 15:47

DROPS Design answered:

Dag Marion, Als het goed is heb je tijdens het haken van de voorpanden een stukje extra gehaakt over alleen het deel van de voorbiezen, zodat er a.h.w. een lapje bovenop vast zit aan beide kanten. Deze beide stukken naai je aan de bovenkant vast en daarna aan de hals op het achterpand

19.09.2018 - 16:26

country flag Leni wrote:

Hallo, ik ben met het achterpand bij de mouwen. Maar ik kom er niet uit. Ik heb in totaal 18 dstk-groepen (1x a1c-16x a1a en 1x a1b). Nu moet ik op de lossen 1x a1c , 3xa1a + 1x a1a op de hoek haken(= 5 dstk-groepen). Er komen dus in totaal 5+ 5=10 dstk-groepen bij. Ik kom dus op totaal 28 dstk-groepen en niet zoals in het patroon staat 26. Wat doe ik fout?

24.07.2018 - 08:56

DROPS Design answered:

Dag Leni, Als ik het goed begrijp haak je maat L/XL, Ik heb het voor je uitgerekend en uitgetekend en als je de instructie volgt, komen er aan beide kanten 4 dstk-groepen bij, dus in totaal 8 dstk-groepen. Als je de 29 lossen aan het eind erbij gehaakt hebt, haak je de eerte dtsk-groep in de 10 losse vanaf de haaknaald en dan zou je uit moeten komen.

07.08.2018 - 09:34