
Suositut kategoriat
Etsitkö tiettyä lankaa?


Kommentit / Kysymykset (58)
![]() Minna Koskiranta kirjoitti:
Minna Koskiranta kirjoitti:
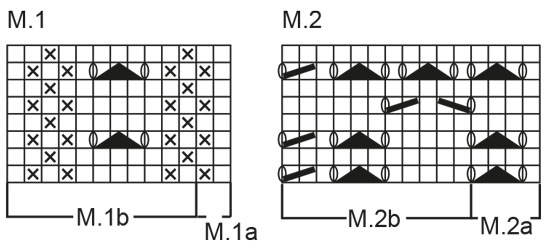
Hei, Olen tehnyt neuleesta n. 30 cm ruutupiirroksen 1 mukaisesti. Nyt pitäisi vaihtaa 2 ruutupiirrokseen. 1 kuvassa on mallikerrassa 13 silmukkaa ja 2 kuvassa mallikerrassa 15 silmukkaa. En nyt mitenkään saa onnistumaan näitä. Kuvaa on joskus korjattu niin lukee, mutta mikä siinä vielä on ettei onnistu? Ystävällisin terveisin Minna Koskiranta
07.07.2023 - 09:48DROPS Design vastasi:
Ohjeeseen on tehty toinen korjaus: Neulo seur. krs näin: 5 s helmineuletta (= etureunus), M.1A, neulo 231 (253-275) s piirroksen M.1B mukaisesti, 5 s helmineuletta (= etureunus). Jatka tällä jaolla kunnes työ on 29-30-32 cm ja neulo sitten seur. krs näin: 5 s helmineuletta (= etureunus), M.2A, neulo 229 (251-273) s piirroksen M.2B mukaisesti, 5 s helmineuletta (= etureunus).
21.08.2023 - 16:50
![]() Pietschner Kordula kirjoitti:
Pietschner Kordula kirjoitti:
Sie haben das M2 Diagramm online korrigiert am 4.3.2022! Leider sehe ich keine Veränderung zu dem alten Diagramm. Können Sie mir bitte mitteilen was geändert wurde?
07.03.2022 - 19:24DROPS Design vastasi:
Liebe Frau Pietschner, aktualisieren die Seite/leeren Sie Cache/Cookies, so können Sie am besten das neue Diagram M.2 sehen. Viel Spaß beim stricken!
08.03.2022 - 11:00
![]() Pietschner Kordula kirjoitti:
Pietschner Kordula kirjoitti:
Hallo, ich habe diese schöne Jacke jetzt angefangen und bei dem Muster M 2 hapert es gewaltig! Das Muster sieht überhaupt nicht aus, wie auf dem Foto! Besonders die 5. Reihe passt überhaupt!
03.03.2022 - 12:14DROPS Design vastasi:
Liebe Pietschne, Diagram M.2 wurde korrigiert, danke für den Hinweis. Viel Spaß beim stricken!
04.03.2022 - 15:22
![]() Patricia kirjoitti:
Patricia kirjoitti:
Können Sie mir bitte mitteilen, ob das Muster M2 korrigiert worden ist? Ich habe in älteren Kommentaren gelesen, dass das angekündigt war. Aber bei den Online-Korrekturen ist das Muster nicht aufgeführt. Danke und viele Grüße Patricia
30.10.2021 - 08:17Patricia vastasi:
Gefunden! Mit den ersten neun Maschen von M2b enden, dann wird das Muster symmetrisch. Ich teste das jetzt und hoffe, es ist korrekt. Viele Grüße!
30.10.2021 - 08:55
![]() Daniela kirjoitti:
Daniela kirjoitti:
Guten Tag. Irgend etwas stimmt nicht mit dem Muster M2 b. Es hat viel zu viele Löcher und das Resultat sieht überhaupt nicht aus wie auf dem Bild. In den Kommentaren sehe ich, dass viele das gleiche Problem haben. Gibt es ein neues Strichmuster? Vielen Dank für Ihre Antwort.
05.08.2021 - 08:26
![]() Orna Smith kirjoitti:
Orna Smith kirjoitti:
Sorry, in my former question. I said "slash" was Purl, I should have said "X" was Purl. Sorry. Lots of your other patterns say to switch on reverse, but this one doesn't. In looking at projects on Ravelry, I can see people have done it both ways! Hope you will clarify.
13.07.2021 - 20:35DROPS Design vastasi:
Dear Orna, pplease note that this is an older pattern of ours, and patterns were written somewhat differently back then. However, the diagrams always show every row as they seen from the right side. So if you see a stitch that looks like a knit stitch from the RS, but yoou are doing it from the WS, you should purl it. I hope that helps. Happy Stitching!
13.07.2021 - 21:05
![]() Orna Smith kirjoitti:
Orna Smith kirjoitti:
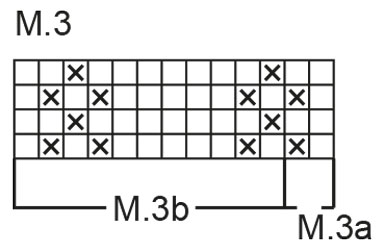
Your stitch directions the square is Knit and "slash" is Purl. It says nothing about reversing to Purl and Knit on wrong side. Nevertheless, I can see in the photos, at least on pattern 3, that is the case, there are 5 stitch columns of stockinette stitch. SO, Is that the case throughout? M1, on the other hand, looks like columns of seed stitch in picture, But following strict instructions would give you stockinette columns. Please clarify.
13.07.2021 - 18:21DROPS Design vastasi:
Dear Orna, the diagrams always show every row as they seen from the right side. Do if you see a stitch that looks like a knit stitch from the RS, but yoou are doing it from the WS, you should purl it. I hope that helps. Happy Stitching!
13.07.2021 - 21:04
![]() Sonja kirjoitti:
Sonja kirjoitti:
Guten Abend, ist das Muster mittlerweile richtig dargestellt oder muss ich beim stricken der Jacke etwas beachten? Auf den ersten Blick scheint es nicht so als wären die Muster symmetrisch. Liebe Grüße von Sonja
28.06.2021 - 22:27DROPS Design vastasi:
Liebe Sonja, Anleitung drucken Sie am besten wieder wenn Sie sie schon vor den Korrekturdaten gedruckt hatten, sonnst stimmen so Diagramme und Muster wird symetrisch sein. Viel Spaß beim stricken!
29.06.2021 - 08:58
![]() Susan Price kirjoitti:
Susan Price kirjoitti:
I have noticed that several people have the same problem as I, which is that the pattern grids for 2a and 2b do not generate the same pattern as the photos on Ravelry. You have provided the same answer to all of these questions, but it is still not corrected. I have knit 16 rows of the pattern as noted above and I would like to send you a picture of the resulting garment. It does not match the photos (which are quite lovely). Please provide your email and I will send it to you with my proposal.
20.06.2021 - 07:36DROPS Design vastasi:
Dear Mrs Price, pattern M.2 is worked as follows: start with M.2A (= 5 sts), then repeat M.2B (20-22-24 times over the next 220-242-264sts) and finish with the first 9 sts in M.2B (= 229-251-273 sts worked with M.2B and the pattern is symetrical). Hope this will help. Please send the picture to your store, they will be able to provide you any further personnal assistance, even per mail or telephone. Happy knitting!
21.06.2021 - 07:44
![]() Manuela Schwarzer kirjoitti:
Manuela Schwarzer kirjoitti:
Liebes Drops Team, Vielen Dank für die schnelle Antwort. Ich werde es gleich mal versuchen :-)
20.04.2021 - 07:31
|
|||||||||||||||||||
Beach Love |
|||||||||||||||||||
|
|
|||||||||||||||||||
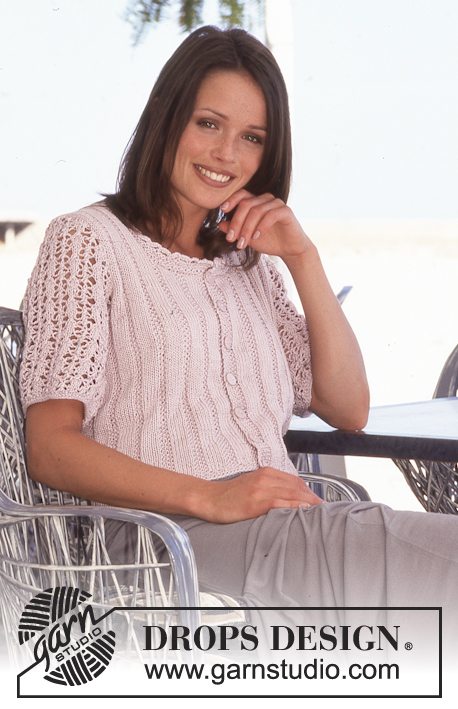
Pitkä pitsikoristeinen jakku
DROPS 60-16 |
|||||||||||||||||||
|
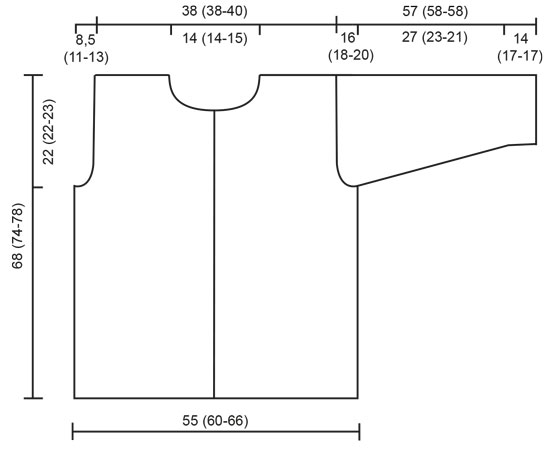
Takakappale ja etukappaleet: Neulo yhtenä kappaleena tasona kädenteihin asti ja sitten yläosat erikseen valmiiksi. - Luo 243-265-287 s (sis. 2 x 5 s etureunuksia varten) ja neulo 2 krs ainaoikeinneuletta ja sitten 3 krs helmineuletta. Neulo seur. krs näin: 5 s helmineuletta (= etureunus), M.1A, neulo 231 (253-275) s piirroksen M.1B mukaisesti, 5 s helmineuletta (= etureunus). Jatka tällä jaolla kunnes työ on 29-30-32 cm ja neulo sitten seur. krs näin: 5 s helmineuletta (= etureunus), M.2A, neulo 229 (251-273) s piirroksen M.2B mukaisesti, 5 s helmineuletta (= etureunus). Muista neuloa napinlävet oikeaan etureunukseen yllä olevan selostuksen mukaan. Kun työ on 43-47-49 cm, neulo viimeinen mallikerta valmiiksi, jatka neulomalla kohoneuletta ruutupiirros III mukaan ylös asti, aloita taas piirroksen oikeasta reunasta ja toista sitten mallikerta. Neulo edelleen 5 s helmineuletta kummassakin etureunassa. Kun työ on 46-52-55 cm, päätä kädentiet seur. krs:lla näin: neulo 59-65-70 s (= etukappale), päätä 8 s kädentietä varten, neulo 109-119-131 s (= takakappale), päätä 8 s toista kädentiet varten ja neulo loput 59-65-70 s. Neulo yläosat erikseen valmiiksi. Etukappaleet: = 59-65-70 s. Päätä kädentiet reunassa joka 2. krs:lla: 3-4-4 x 3 s, 2-3-5 x 2 s ja 2x1 s = 44-45-46 s. Päätä viimeisen napinläven jälkeisellä krs:lla - työ on n. 54-58-62 cm - etureunasta pääntietä varten joka 2. krs:lla: 1 x 10-11-11 s, 1x3 s, 2x2 s ja 2x1 s. Kun työ on 68-74-78 cm, päätä loput s:t kerralla olkaa varten. Takakappale: = 109-119-131 s. Päätä kädentiet kummassakin reunassa kuten edessä = 79-79-83 s. Kun työ on 66-72-76 cm, päätä keskimm. 25-25-27 s pääntietä varten ja neulo kumpikin puoli erikseen. Päätä vielä pääntien reunassa 2 s seur. krs:n alussa. Päätä olat samalla korkeudella kuin edessä. Hihat: Luo 59-59-59 s puikoille nro 4 ja neulo 2 krs ainaoikeinneuletta, 3 krs helmineuletta ja sitten seur. krs näin: 1 s ainaoikeinneuletta (= reunas), pitsineuletta ruutupiirros II mukaan, aloita piirroksen oikeasta reunasta ja toista sitten mallikerta, 1 s ainaoikeinneuletta (= reunas). Kun työ on 14-17-17 cm - neulo viim. mallikerta valmiiksi - jatka neulomalla kohoneuletta ylös asti ruutupiirros III mukaan, aloita ruutupiirroksen oikeasta reunasta ja toista sitten mallikerta. Lisää samanaikaisesti kummassakin reunassa S: vuorotellen joka 4. ja 5. krs:lla - M/L vuorotellen joka 3. ja 4. krs:lla - XL: joka 3. krs:lla 15-15-16 x 1 s = 89-89-91 s. Neulo lisätyt s:t mukaan kohoneuleeseen. Kun hihan pituus on 41-40-38 cm, päätä kummastakin reunasta joka 2. krs:lla: 2-1-1 x 3 s, 2x2 s, 15-19-22 x 1 s, 2-3-2 x 2 s, 2-1-1 x 3 s ja loput s:t kerralla. Hihan pituus on n. 57-58-58 cm. Viimeistely: Ompele olkasaumat. Pääntien reunus: Poimi puikoille nro 4 n. 115-125 s pääntien reunasta. Neulo 3 krs helmineuletta, 2 krs ainaoikeinneuletta, päätä. Ompele hihasaumat ja ompele hihat paikoilleen. Virkatut reunukset: Virkkaa helmaan, etureunoihin, pääntien reunaan ja hihojen alareunoihin virkkuukoukulla nro 2 näin: 1. krs: 1 ks, *4 kjs, jätä n. 1,5 cm väliin, 1 piilos* toista *-*. 2. krs: 4 ks jokaiseen kjs-kaareen, 1 piilos ed. krs:n piilos:aan. Ompele napit. |
|||||||||||||||||||
Ruutupiirroksen selitykset |
|||||||||||||||||||
|
|||||||||||||||||||
 |
|||||||||||||||||||
 |
|||||||||||||||||||
 |
|||||||||||||||||||
Oletko tehnyt tämän mallin?Tägää tällöin kuviasi #dropspattern tai lähetä kuvat #dropsfan galleriaan. Tarvitsetko apua tämän ohjeen kanssa?Löydät 27 ohjevideota, kommentteja/kysymyksiä ja muuta osoitteessa www.garnstudio.com © 1982-2026 DROPS Design A/S. Pidätämme kaikki oikeudet. Tämä tiedosto ja kaikki sen alatiedostot on suojattu tekijänoikeuslailla. Lue lisää siitä, mitä voit tehdä ohjeillamme, verkkosivujemme jokaisen ohjeen alaosasta. |
|||||||||||||||||||


DROPS Design on toiminut neule- ja virkkausalalla yli 40 vuotta ja meillä on yksi kaikkein laajin valikoima ilmaisia ohjeita verkossa - käännettynä 17 kielelle. Tänään meiltä löytyy 324 lehteä ja 12290 ohjetta - joista 11709 ohjetta on käännetty suomeksi.
Työskentelemme ahkerasti, jotta voisimme antaa teille kaikkein parhaimpia neule- ja virkkausohjeita, inspiraatiota ja neuvoja sekä korkealaatuisia lankoja todella edulliseen hintaan! Haluaisitko käyttää ohjeitamme muuhun kuin henkilökohtaiseen käyttöön? Voit lukea säännöistä ohjeiden Tekijänoikeus -tekstissä, joka löytyy kaikkien ohjeidemme alapuolelta. Hauskoja hetkiä käsitöiden parissa!
Lisää kommentti ohjeeseen DROPS 60-16
Haluamme mielellämme kuulla mielipiteesi tästä ohjeesta!
Mikäli haluat esittää kysymyksen, valitse oikea kategoria alla olevasta valikosta - tällä tavoin saat vastauksen nopeammin. Pakolliset kentät on merkitty tähdellä *.