
Suositut kategoriat
Etsitkö tiettyä lankaa?


Kommentit / Kysymykset (9)
![]() Michelle kirjoitti:
Michelle kirjoitti:
When moving from m1 to m2 what do I do with the first two stitches when they move over
24.02.2026 - 18:19DROPS Design vastasi:
Hi Maichelle, row 13: at the beginning put 2 sts on a cable needle behind the work (2 first sts in M1 diagram), then K 2, P 2 from the cable needle. Happy knitting!
08.04.2026 - 15:29
![]() Barbara Vagianos kirjoitti:
Barbara Vagianos kirjoitti:
How is the best way to adjust this pattern for a larger size? I want to make it for a 34.5 inch bust. Should I try to get a larger gauge and following the instructions for size L or should I add more cable repeats? Thanks for your help.
29.08.2025 - 16:59DROPS Design vastasi:
Dear Barbara, if you modify the gauge then it will be difficult to ensure that you have the correct gauge when working the different steps of the pattern. It would be best to cast on more initial stitches and work more cable repeats for a larger size. Happy knitting!
31.08.2025 - 20:54
![]() Petra Mannsshardt kirjoitti:
Petra Mannsshardt kirjoitti:
Wie ist das zu verstehen? Ich habe die Schultern zusammen genäht und wollte jetzt den Halsausschnitt sticken. 80 Maschen Plus die ca 88 Maschen vom hilfsfaden aufnehmen? Das kommt mir so viel vor. Da ich „Anfängerin“ bin , kenne ich mich da nicht so aus.
09.04.2024 - 13:29
![]() Jean Grimble kirjoitti:
Jean Grimble kirjoitti:
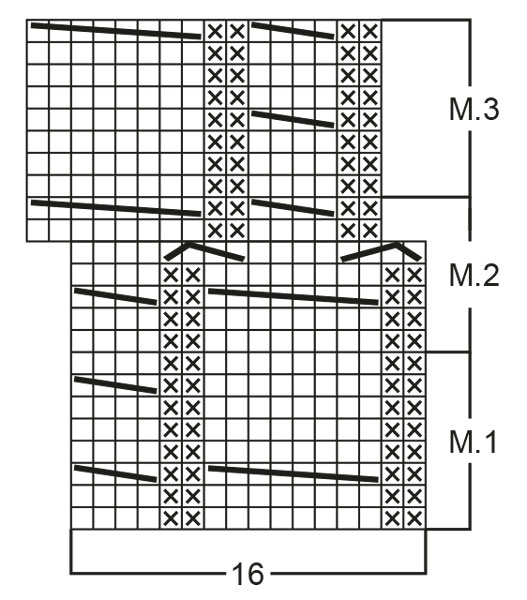
I am reading the chart. I have 208 stitches on my needles. The chart says to knit 5 repeats of Pattern 1 (80 sts) , then Pattern 2 one time (16 stiches) for a total of 96 stitches. Repeat that sequence and you have 192 stitches, leaving 16 stitches. Am I to knit 8 stiches either side of the cables????? The photo of the pattern does not indicate this. Bear with me, this is my first time reading a chart!!! I am sure this is my confusion!!
30.06.2023 - 17:05DROPS Design vastasi:
Dear Jean, the repeats are not horizontally but rather vertically. That is, you will work 1st row of M.1 on the whole row, then the 2nd row of M.1, e.t.c. After working all rows of M.1, instead of working M.2 you need to work M.1 again, until you have worked all of M.1 5 times vertically in total. On the next row, work 1st row of M.2, which will displace the pattern slightly, as explained in the pattern. After the last row of M.2, start working M.3 and repeat M.3 until you reach the final measurements. Happy knitting!
30.06.2023 - 21:09
![]() Ellen Rachich kirjoitti:
Ellen Rachich kirjoitti:
Your instructions are not very clear when decreasing or armholes...please explain when we start knitting front And start decreasing
03.04.2021 - 22:22DROPS Design vastasi:
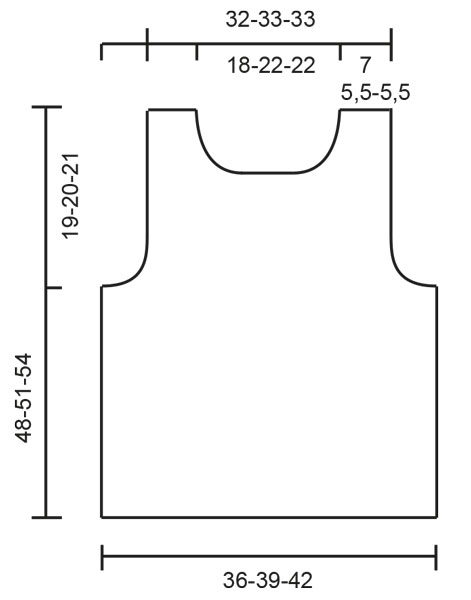
Dear Ellen, the numbers that are not in the description can be calculated from teh schematic drawing: you start decreasing for the armhole, when the piece is 29-31-33 cm long (depending on the size you are making). Happy Knitting!
04.04.2021 - 21:30
![]() Ellen Rachich kirjoitti:
Ellen Rachich kirjoitti:
How can I make this into a vneck for size small?
16.03.2021 - 20:12DROPS Design vastasi:
Dear Mrs Rachich, we are unfortunately not able to adjust every pattern to every single request - please contact your yarn store for any assistance adjusting the pattern to your own wishes. Thanks for your comprehension. Happy knitting!
17.03.2021 - 08:37
![]() Robyn kirjoitti:
Robyn kirjoitti:
For shaping the shoulders; since the middle 28 stitches are on a stitch holder how can I continue knitting in full rows? Surely I'll have to focus on one shoulder at a time rejoining the yarn for the second shoulder? Can you clarify?
21.06.2020 - 23:23DROPS Design vastasi:
Dear Robyn, after you have slipped the middle 28 sts for neck on a thread/stitch holder, continue each shoulder separately continuing dec for armhole as before and slipping more sts on same thread for neck. When first shoulder is finished, just work the 2nd one the same way but mirrored. Happy knitting!
22.06.2020 - 08:45
![]() Robyn kirjoitti:
Robyn kirjoitti:
I don't understand how to continue after the last part of the Body instruction, "Knit the rest of each part separately." Doesn't that mean I'll have to cut and rejoin the yarn for the back? Thank you
16.06.2020 - 00:18DROPS Design vastasi:
Dear Robyn, that's right you will slip all stitches for back piece on a thread or on a extra needle and continue first front piece, then join yarn to work back piece to the end. Happy knitting!
16.06.2020 - 09:04Heather kirjoitti:
What does this mean at the front "then put sts at each neck edge on the st holder every other row: 2 sts 2 times, 1 st 2 times = 40-48-48 sts on the st holder and 19-17-17 sts on each shoulder". I normally bind off for neck shaping, not sure about the way this is worded. Can you explain a little more in detail what I am to do here. I am stuck at this point and no local yarn store to assist. Thanks.!
19.07.2017 - 20:48DROPS Design vastasi:
Dear Heather, When working rows from neckline work the first 2 sts, then put them on the same st holder as sts for neckline, work to the end of row, work next row as before, then at the beg of next row work the first 2 sts and slip them on the st holder, continue row as before, work next row, then at the beg of next row, work the first st and slip it on the st holder. Repeat the last 2 rows = 6 sts are slipped on the st holder. Happy knitting!
20.07.2017 - 09:34
|
|||||||||||||||||||
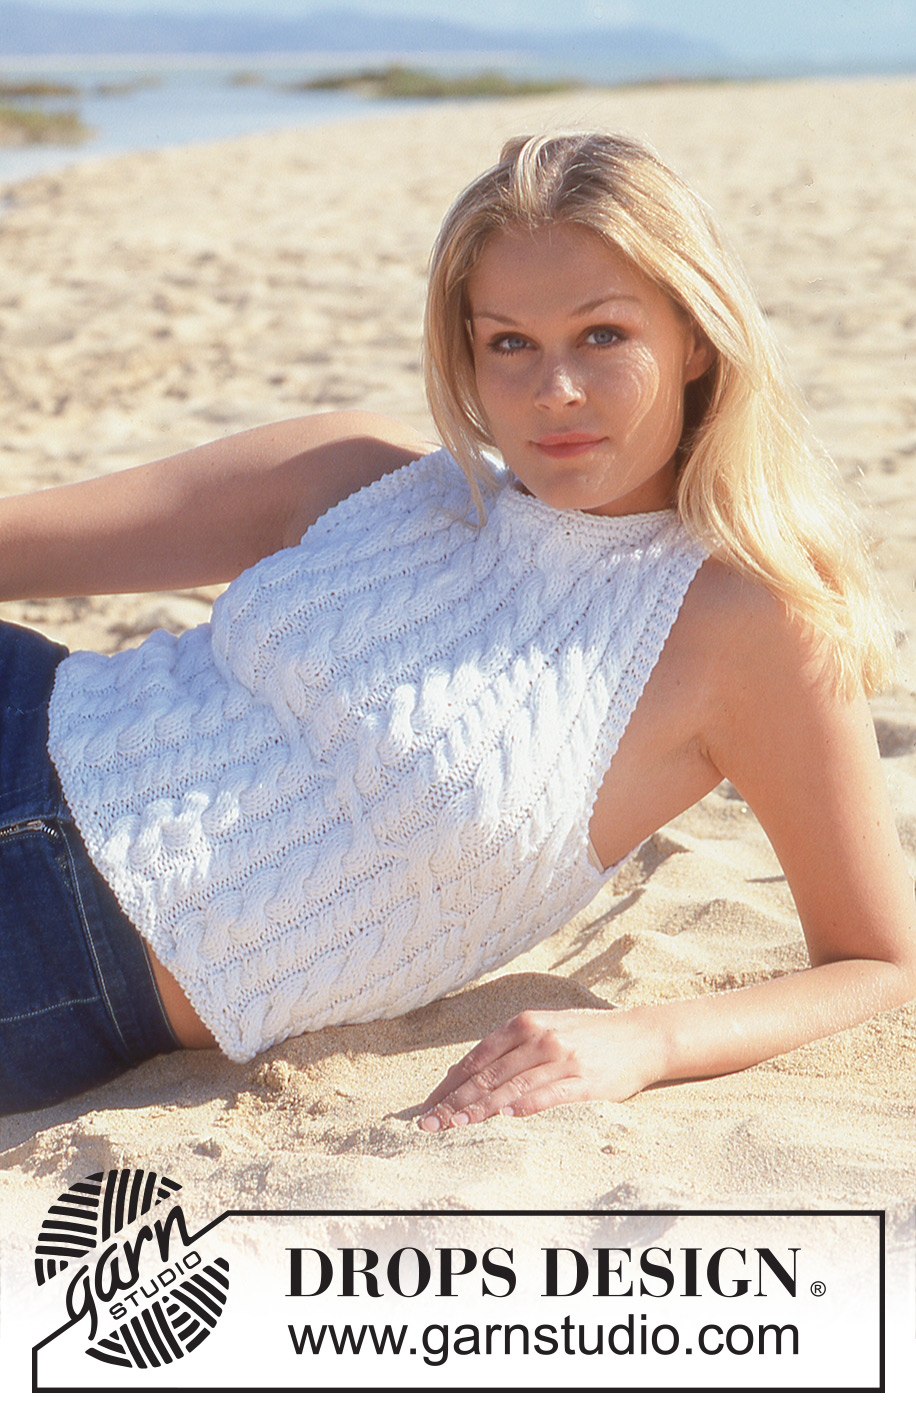
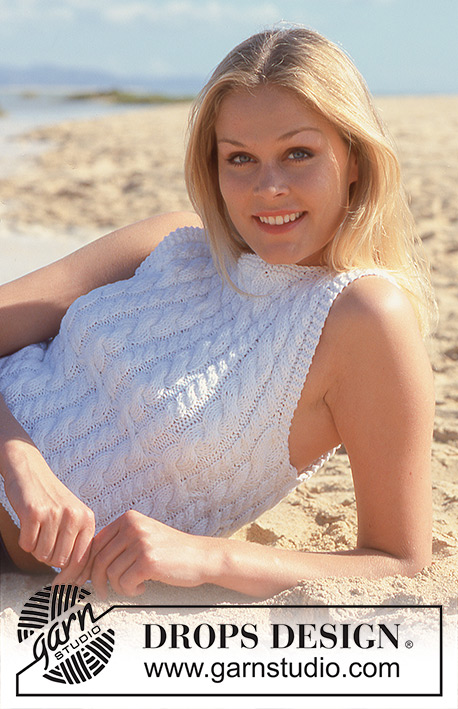
Whiteout#whiteouttop |
|||||||||||||||||||
 |
 |
||||||||||||||||||
Palmikkotoppi
DROPS 64-9 |
|||||||||||||||||||
|
Taka- etukappale: Luo 130-140-152 s pyöröpuikolle nro 4,5, neulo suljettuna neuleena 4 krs ainaoikeinneuletta ja lisää viim. krs:lla tasavälein 62-68-72 s = 192-208-224 s. Neulo sitten palmikkoneuletta 5 x ruutupiirros I, 1 x ruutupiirros II (tällöin palmikkoneule siirtyy 2 s:lla, ts. pienestä palmikosta tulee iso ja isosta pieni) ja sitten loput kappaleesta ruutupiirros III mukaan. Kun työ on 28-30-32 cm, neulo seur. neljällä krs:lla 14 s ainaoikeinneuletta kummassakin sivussa, sijoita s:t siten että koossa S on pieni palmikko keskellä edessä ja kooissa M ja L iso palmikko keskellä edessä. Päätä seur. krs:lla kummassakin sivussa keskimm. 8 ainaoikeinneulotut s:t kädenteitä varten ja neulo yläosat erikseen valmiiksi. Etukappale: = 88-96-104 s. Neulo kädenteiden reunoissa 3 s ainaoikeinneuletta ja kavenna näitten s:iden sisäpuolella joka 2. krs:lla: 2-2-4 x 2 s ja 1-3-3 x 1 s = 78-82-82 s. Kun työ on 42-45-48 cm, siirrä keskimm. 28-36-36 s apulangalle pääntietä varten ja neulo kumpikin puoli erikseen. Siirrä pääntien reunassa edelleen apulangalle joka 2. krs:lla: 2x2 s ja 2x1 s = 40-48-48 s langalla ja 19-17-17 s olalla. Kun työ on 47-50-53 cm, neulo oikealta puolelta 10 krs olan s:illa ja kavenna samalla 3-2-2 s tasavälein = 16-15-15 s. Neulo 2 krs ainaoikeinneuletta ja päätä. Takakappale: = 88-96-104 s. Päätä kädentiet kuten edessä = 78-82-82 s. Kun työ on 46-49-52 cm, siirrä keskimm. 36-44-44 s apulangalle ja neulo kumpikin puoli erikseen. Siirrä pääntien reunassa 2 s apulangalle seur. krs:lla = 19-17-17 s olalla. Kun työ on 47-50-53 cm, neulo oikealta puolelta 1 o krs olan s:illa ja kavenna samalla 3-2-2 s tasavälein = 16-15-15 s. Neulo 2 krs ainaoikeinneuletta ja päätä. Viimeistely: Ompele olkasaumat. Pääntien reunus: Poimi sukkapuikoille nro 4,5 n. 80-100 s pääntien reunasta (s apulangoilta mukaan luettuina). Neulo 1 krs sileää ja kavenna samalla 14-20-20 s tasavälein. Neulo vielä 4 krs ainaoikeinneuletta ja päätä. |
|||||||||||||||||||
Ruutupiirroksen selitykset |
|||||||||||||||||||
|
|||||||||||||||||||
 |
|||||||||||||||||||
 |
|||||||||||||||||||
Oletko tehnyt tämän mallin?Tägää tällöin kuviasi #dropspattern #whiteouttop tai lähetä kuvat #dropsfan galleriaan. Tarvitsetko apua tämän ohjeen kanssa?Löydät 24 ohjevideota, kommentteja/kysymyksiä ja muuta osoitteessa www.garnstudio.com © 1982-2026 DROPS Design A/S. Pidätämme kaikki oikeudet. Tämä tiedosto ja kaikki sen alatiedostot on suojattu tekijänoikeuslailla. Lue lisää siitä, mitä voit tehdä ohjeillamme, verkkosivujemme jokaisen ohjeen alaosasta. |
|||||||||||||||||||


DROPS Design on toiminut neule- ja virkkausalalla yli 40 vuotta ja meillä on yksi kaikkein laajin valikoima ilmaisia ohjeita verkossa - käännettynä 17 kielelle. Tänään meiltä löytyy 325 lehteä ja 12298 ohjetta - joista 11792 ohjetta on käännetty suomeksi.
Työskentelemme ahkerasti, jotta voisimme antaa teille kaikkein parhaimpia neule- ja virkkausohjeita, inspiraatiota ja neuvoja sekä korkealaatuisia lankoja todella edulliseen hintaan! Haluaisitko käyttää ohjeitamme muuhun kuin henkilökohtaiseen käyttöön? Voit lukea säännöistä ohjeiden Tekijänoikeus -tekstissä, joka löytyy kaikkien ohjeidemme alapuolelta. Hauskoja hetkiä käsitöiden parissa!
Lisää kommentti ohjeeseen DROPS 64-9
Haluamme mielellämme kuulla mielipiteesi tästä ohjeesta!
Mikäli haluat esittää kysymyksen, valitse oikea kategoria alla olevasta valikosta - tällä tavoin saat vastauksen nopeammin. Pakolliset kentät on merkitty tähdellä *.