
Suositut kategoriat
Etsitkö tiettyä lankaa?


Kommentit / Kysymykset (6)
![]() Barbara Kamm kirjoitti:
Barbara Kamm kirjoitti:
Thanks you for those latest instructions. So the cable is not really a cable but I. Your last instructions I still don’t see the pattern for the o dented cable like pattern but I guess I can try to figure it out. Are there only 3 stitches in the cable like pattern?
05.09.2023 - 04:41DROPS Design vastasi:
Dear Mrs Kamm, the cable is a real cable but you will either cross the first 6 sts or the last 6 sts - work 3rd row A.1 as follows: slip 3 sts on cable needle behind piece, K 3, K 3 from cable needle, K3, and work 11th row as follows: K3, slip 3 sts on cable needle behind piece, K 3, K 3 from cable needle. Happy knitting!
05.09.2023 - 13:35
![]() Barbara Kamm kirjoitti:
Barbara Kamm kirjoitti:
Wow, that I do not understand. I’m going to have to look for an American pattern. I don’t know how to read diagrams. It’s greek to me. So frustrating
03.09.2023 - 22:39
![]() Barbara Kamm kirjoitti:
Barbara Kamm kirjoitti:
I have 46 stitches on my needles, 4 stitches in garter, purl 1, 29 stitches in stocking knit, that 34 stitches than plus 3 at the end of the row =37, the other nine must be for the cable pattern. Which is on a diagonal. I don’t see any instructions on how to work the cable and the other stitches ?
02.09.2023 - 04:21DROPS Design vastasi:
Dear Mrs Kamm, on right front piece in larger size, work the 46 sts as follows from right side: 4 front band stitches in garter stitch, work the 9 sts A.1 (= knit on 1st row, cable on 3rd row), then purl 1 and knit to the end of the row. from wrong side, work: K3, P29, K1, P9, K4. In A.1 as well as in A.2 all the stitches will not be crossed for the cable; in A.1 cross the first 6 sts and knit the last 3; then knit the first 3 and cross the last 6. Happy knitting!
04.09.2023 - 09:20
![]() Barbara Kamm kirjoitti:
Barbara Kamm kirjoitti:
I am sorry to keep bothering you. But I don’t see in The instructions how to do the cable pattern. I am totally lost
02.09.2023 - 03:57DROPS Design vastasi:
Dear Barbara, the instructions for the cable pattern are in the charts A.1 and A.2, where, on specific rows, you will slip 3 stitches to the cable needle, knit 3 and place the stitches back onto the main needle. So you will have 1 stitch in garter stitch before the cable in A.2 and purl 1 after A.2. On the other front piece you will have A.1 instead of A.2 and 1 purl before the cable and the edge stitch after the cable. Happy knitting!
03.09.2023 - 20:08
![]() Barbara Kamm kirjoitti:
Barbara Kamm kirjoitti:
Hi: I am starting the right front and I am confused with the instructions. I am making the 3X size. I have knitted the first 4 stitches that you call Band. Then it states A.2, P1 which I assume is for pearl 1. That confuses me. Then it states 29 stitches in stocking knit. If I am looking at the picture and the right side is on the left, I am not sure what kind of stitch you do before and after the cable? I would think I would do pearl stitches bebore the cable and the cable is zig zag about
29.08.2023 - 05:39DROPS Design vastasi:
Dear Mrs Kamm, on right front piece, work from RS as follows: 4 sts in garter stitch (K them on every row), then work A.2 (see diagram, read from right towards the left from RS and from the left towards the right from WS), purl 1 (this stitch will be knitted from WS), and work the next 29 sts in stocking stitch (= these stitches will be knitted from RS and purled from WS), end with 3 sts in garter stitch (knit them on every row). Happy knitting!
29.08.2023 - 09:27
![]() Barbara Kamm kirjoitti:
Barbara Kamm kirjoitti:
It confuses me that on the back piece of this sweater it say to do garter stitch on 3 stitches on each side and I interpret that at the beginning and end of the back ?? Why is that? I understand using it on the front pieces
19.08.2023 - 18:05DROPS Design vastasi:
Dear Barbara, the 3 stitches in garter stitch in each side of the back form a small border for the vent at the lower part of the jacket. After finishing the vent, you will have a single edge stitch in garter stitch, which will be used for the seam. Happy knitting!
20.08.2023 - 17:19
|
||||||||||
Winter Sparkle Cardigan |
||||||||||
|
|
||||||||||
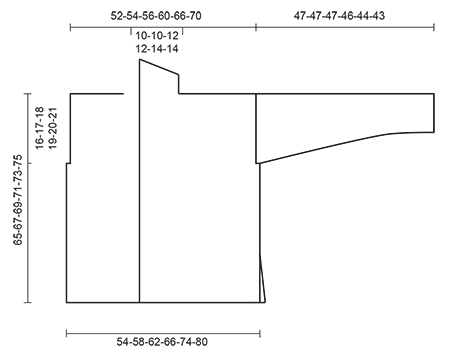
Neulottu DROPS palmikkojakku 1-kertaisesta Cloud- tai 2-kertaisesta Air-langasta. Koot S-XXXL.
DROPS Extra 0-1188 |
||||||||||
|
AINAOIKEINNEULE tasona: Neulo kaikki kerrokset oikein. MALLINEULE: Katso ruutupiirrokset A.1-A.2. Piirrokset näyttävät mallineuletta oikealta puolelta katsottuna. NAPINLÄPI: Tee oikeaan etureunaan työn oikealta puolelta 4 napinläpeä. 1 napinläpi = neulo keskeltä edestä alkaen 2 s, tee 1 langankierto, neulo seuraavat 2 s oikein yhteen. Seuraavalla krs:lla langankierto neulotaan oikein. Tee napinlävet kun työn pituus on n.: KOKO S: 20, 29, 38 ja 47 cm. KOKO M: 20, 29, 38 ja 47 cm. KOKO L: 24, 33, 42 ja 51 cm. KOKO XL: 24, 33, 42 ja 51 cm. KOKO XXL: 25, 35, 45 ja 55 cm. KOKO XXXL: 25, 35, 45 ja 55 cm. ---------------------------------------------------------- TAKAKAPPALE: Neulotaan tasona pyöröpuikolla. Luo 54-58-62-66-74-80 s pyöröpuikolle nro 8 1-kertaisella Cloud- tai 2-kertaisella Air-langalla. Neulo 4 krs AINAOIKEAA (kts. selitys yllä). Vaihda pyöröpuikkoon nro 9. Neulo sileää neuletta, lukuun ottamatta 3 ainaoikeinneulottua s kummassakin reunassa. Kun työn pituus on 14 cm (= halkio), neulo jatkossa kummankin reunan ainoikein -neuleen 3 s:lla sileää neuletta ja luo SAMALLA 2 seuraavan krs:n loppuun kumpaankin reunaan 1 reunas = 56-60-64-68-76-82 s. Reunasilmukat neulotaan ainaoikein -neuleena. TARKISTA NEULETIHEYS! Kun työn pituus on 49-50-51-52-53-54 cm, päätä kummastakin reunasta 2-3-4-4-5-6 s kädenteitä varten = 52-54-56-60-66-70 s. Kun työn pituus on 63-65-67-69-71-73 cm, päätä keskimmäiset 10-10-12-12-14-14 s pääntietä varten (= 21-22-22-24-26-28 s jäljellä kummallakin olalla). Neulo molemmat puolet erikseen. Neulo sileää neuletta, kunnes työn pituus on 64-66-68-70-72-74 cm. Neulo 2 krs ainaoikeaa. Päätä s:t. Neulo pääntien toinen puoli vastaavasti. OIKEA ETUKAPPALE: Luo 31-33-35-37-41-44 s (sis. 4 reunas) pyöröpuikolle nro 8 1-kertaisella Cloud- tai 2-kertaisella Air-langalla. Neulo 4 krs ainaoikeaa ja lisää SAMALLA viimeisellä krs:lla tasavälein 2 s = 33-35-37-39-43-46 s. Vaihda pyöröpuikkoon nro 9. Neulo seuraavasti (1. krs = oikea puoli): 4 s ainaoikeaa, A.2, 1 n, 16-18-20-22-26-29 s sileää neuletta, 3 s ainaoikeaa. Jatka mallineuletta tähän tapaan. Kun työn pituus on 14 cm, neulo oikean puolen krs:n lopussa olevan ainaoikein -neuleen 3 s:lla sileää neuletta ja luo SAMALLA oikean puolen krs:n loppuun 1 reunas = 34-36-38-40-44-47 s. Reunas neulotaan ainaoikein -neuleena. Muista tehdä NAPINLÄVET (kts. selitys yllä). Kun työn pituus on 49-50-51-52-53-54 cm, päätä nurjan puolen krs:n alusta 2-3-4-4-5-6 s kädentietä varten = 32-33-34-36-39-41 s. Kun työn pituus on 64-66-68-70-72-74 cm ja olet viimeksi neulonut oikean puolen krs:n, neulo kaikilla silmukoilla 2 krs ainaoikeaa. Päätä sitten ensimmäiset 21-22-22-24-26-28 s olkaa varten = 11-11-12-12-13-13 s jäljellä huivikaulusta varten. Jatka neulomalla näillä silmukoilla ainaoikeaa ja neulo SAMALLA pääntien reunasta alkaen lyhennettyjä kerroksia näin (1. krs = oikea puoli): *Neulo kaikilla silmukoilla 2 krs ainaoikeaa. Neulo seuraavalla krs:lla (= oikea puoli) 9 o, käännä työ ja neulo takaisin*, toista *-* kunnes työn lyhyimmän reunan pituus olan päätösreunasta mitattuna on 7-7-8-8-9-9 cm. Päätä loput s:t löyhästi. VASEN ETUKAPPALE: Neulo oikean etukappaleen peilikuvaksi. Neulo nyt piirroksen A.2 sijaan mallineuletta piirroksen A.1 mukaisesti. Luo reunas nurjan puolen krs:n loppuun. Päätä kädentien s:t oikean puolen krs:n alusta ja päätä olan s:t oikean puolen krs:n alusta. HIHA: Neulotaan tasona pyöröpuikolla. Luo 24-24-24-26-26-26 s pyöröpuikolle nro 8 1-kertaisella Cloud- tai 2-kertaisella Air-langalla. Neulo 4 krs ainaoikeaa. Vaihda pyöröpuikkoon nro 9. Jatka neulomalla sileää neuletta, lukuun ottamatta 1 ainaoikeinneulottua s kummassakin reunassa. Kun työn pituus on 9 cm, lisää kummankin reunan reunasilmukan sisäpuolelle 1 s. Toista tällaiset lisäykset 9-7-6-5½-4½-4 cm välein vielä 4-5-6-6-7-8 kertaa = 34-36-38-40-42-44 s työssä. Päätä loput s:t kerralla, kun työn pituus on 47-47-47-46-44-43 cm. HUOM! Suurimmissa koissa on lyhyemmät mitat, koska niissä on leveämmät olat. Neulo toinen hiha samoin. VIIMEISTELY: Ompele olkasaumat. Kiinnitä hihat paikoilleen. Ompele hiha- ja sivusaumat yhden reunasilmukan päästä alas kohtaan, johon luotiin reunasilmukka (eli jätä työhön n. 14 cm:n korkuinen halkio). Ompele kaulus yhteen keskeltä takaa. Kiinnitä kaulus takakappaleen pääntien reunaan (ompele reunat vastakkain, jottei saumasta tulisi paksu). Kiinnitä napit vasempaan etukappaleeseen. |
||||||||||
Ruutupiirroksen selitykset |
||||||||||
|
||||||||||
 |
||||||||||
 |
||||||||||
Oletko tehnyt tämän mallin?Tägää tällöin kuviasi #dropspattern tai lähetä kuvat #dropsfan galleriaan. Tarvitsetko apua tämän ohjeen kanssa?Löydät 26 ohjevideota, kommentteja/kysymyksiä ja muuta osoitteessa www.garnstudio.com © 1982-2026 DROPS Design A/S. Pidätämme kaikki oikeudet. Tämä tiedosto ja kaikki sen alatiedostot on suojattu tekijänoikeuslailla. Lue lisää siitä, mitä voit tehdä ohjeillamme, verkkosivujemme jokaisen ohjeen alaosasta. |
||||||||||


DROPS Design on toiminut neule- ja virkkausalalla yli 40 vuotta ja meillä on yksi kaikkein laajin valikoima ilmaisia ohjeita verkossa - käännettynä 17 kielelle. Tänään meiltä löytyy 324 lehteä ja 12291 ohjetta - joista 11720 ohjetta on käännetty suomeksi.
Työskentelemme ahkerasti, jotta voisimme antaa teille kaikkein parhaimpia neule- ja virkkausohjeita, inspiraatiota ja neuvoja sekä korkealaatuisia lankoja todella edulliseen hintaan! Haluaisitko käyttää ohjeitamme muuhun kuin henkilökohtaiseen käyttöön? Voit lukea säännöistä ohjeiden Tekijänoikeus -tekstissä, joka löytyy kaikkien ohjeidemme alapuolelta. Hauskoja hetkiä käsitöiden parissa!
Lisää kommentti ohjeeseen DROPS Extra 0-1188
Haluamme mielellämme kuulla mielipiteesi tästä ohjeesta!
Mikäli haluat esittää kysymyksen, valitse oikea kategoria alla olevasta valikosta - tällä tavoin saat vastauksen nopeammin. Pakolliset kentät on merkitty tähdellä *.