
Suositut kategoriat
Etsitkö tiettyä lankaa?


Kommentit / Kysymykset (114)
Lorraine kirjoitti:
Thankyou heaps for your prompt reply. I am in Australia and didn't know when I thought you may respond. Now I can confidently finish my beanie. Love your site!
23.06.2016 - 09:21Lorraine kirjoitti:
I love this hat. Had to concentrate to understand working of pattern but all has come together great. I am now up to rounds 1-18 of final decreases. Could you please tell me on row 8-13 continue in stocking stitch, knitting in the round would these rows be all knitted or knit 1 row purl 1 row repeated.Thankyou for a wonderful pattern.
23.06.2016 - 08:28DROPS Design vastasi:
Dear Lorraine, when working stocking st in the round, you K all sts on every round. Happy knitting!
23.06.2016 - 09:09
![]() Fanny kirjoitti:
Fanny kirjoitti:
Ma question était pour les tours suivants : les 2 premières mailles du 12e rang sont bien deux m. env. Mais est-ce que les 2 premières mailles des tours suivants seront toujours des m.env., ou alors on respecte le motif A2 (et donc des m.end aux tours 14 et 15) ?
17.05.2016 - 14:50DROPS Design vastasi:
Bonjour Fanny, on tricote en début de rang les 2 dernières m de A.2, ainsi, on a 2 m env x 2 tours, puis 2 m end x 2 tours et ainsi de suite. On tricote bien A.2 sur ces 2 premières m, mais en suivant les 2 dernières m du diagramme pour que le motif tombe juste tout le tour. Bon tricot!
17.05.2016 - 16:06
![]() Fanny kirjoitti:
Fanny kirjoitti:
Bonjour, j'ai fini les côtes, et je commence les motifs A2. On les commence dès le 11e tour. Est-ce qu'aux tours suivants, on suit la consigne "commencer le rang par les 2 dernières mailles de A2" ou alors on tricote de façon à obtenir le motif A2 dès les 2 premières mailles du rang ? Merci pour votre aide.
17.05.2016 - 11:42DROPS Design vastasi:
Bonjour Fanny, on commence A.2 par les 2 dernières m du diagramme soit 2 m env pour commencer, puis on répète A.2 (2 m end, 2 m env). Bon tricot!
17.05.2016 - 12:00
![]() John kirjoitti:
John kirjoitti:
Naald 19 is weggevallen in de vertaling naar het Nederlands
27.03.2016 - 14:22DROPS Design vastasi:
Hoi John. Je hebt gelijk. Ik heb het patroon aangepast. Bedankt voor het melden.
29.03.2016 - 15:48
![]() Le DANG kirjoitti:
Le DANG kirjoitti:
Je pense qu'il y a des fautes dans l'explication du tour 1 et tour 13 pour les diminutions. Si l'on fait 1 diminution sur 2 groupes, cela ne donnera pas 19 diminutions mais seulement 9 ou 10.
30.01.2016 - 11:38DROPS Design vastasi:
Bonjour Mme Le Dang, les explications ont été corrigées - après A.X pour que les diminutions tombent juste. Merci. Bon tricot!
18.02.2016 - 16:29Masome kirjoitti:
Hello. you can't believe where i made the big mistake! I think I should knit rib and then start the pattern A.1.but your explanation help me so much. i don't know how to say thanks to you! thank you sooooooooo much!
28.01.2016 - 19:47Maria kirjoitti:
Hello,I want to knitt this hat with strange needle not C-N. my question is about pattern A.1 , A.2 , A.X: all rows on pattern shows RS rows or odd rows show WS and other rows show RS??? thanks a lot
27.01.2016 - 22:00DROPS Design vastasi:
Dear Maria, 1 square in diagram = 1 st x 1 round, if you want to work the hat in rows (= back and forth), you will have to read from RS from the right towards the left and from WS from left towards the right - make sure that cables are done on a RS row. Happy knitting!
28.01.2016 - 13:16Masome kirjoitti:
Your can't believe how much I'm sorry, but I must ask this question again.I think your description and the picture aren't the same.I can't find the first 10 round of pattern in the picture.in the picture as soon as rib finish, the 12th round of pattern A.1start.I don't know what is in the picture next to pattern A.1, it isn't like rib.please help me.I love this hat and I try to knit it, even by my so poor knowledge of knitting.😞😞😞😞😞
27.01.2016 - 21:01DROPS Design vastasi:
Dear Mrs Masone, on the picture you can see A.1 from the beg, then you have rib around (round starts with K2, then *P3, K2* repeat from *-* and finish round with A.1). After 10 rounds worked like this, work next round dec 1 st in every other P-section in rib + work 11th round in A.1. Then work last 2 sts in A.2 (= P2), repeat A.2 over next 76 sts and finish with A.1 (continue A.1 with 12th round). Happy knitting!
28.01.2016 - 13:14Masome kirjoitti:
Hello So sorry!I'm confused. After rib, we should repeat 16 more times this: k2,p3,k2 and then A.1.but I see some thing else in picture.in the right side of it I see an unknown pattern.would you please explain it! And one more question: every other section means the second section? Thanks a lot!
27.01.2016 - 00:03DROPS Design vastasi:
Dear Mrs Masome, after 10 rounds in rib and A.1 you work a dec round (= 118 sts remain), then work with larger needle: the last 2 sts in A.2 over the first 2 sts on round, repeat A.2 over the next 76 st, and A.1 over the remaining sts. A.2 is the small diagram the top corner on the right side of A.1. Decrease in every other P section means 1 P-section without dec and 1 P-section with dec. Happy knitting!
27.01.2016 - 10:19
|
||||||||||||||||||||||||||||
Finnley's Hat |
||||||||||||||||||||||||||||
|
|
||||||||||||||||||||||||||||
Miehen DROPS palmikkomyssy ”Lima”-langasta.
DROPS Extra 0-1133 |
||||||||||||||||||||||||||||
|
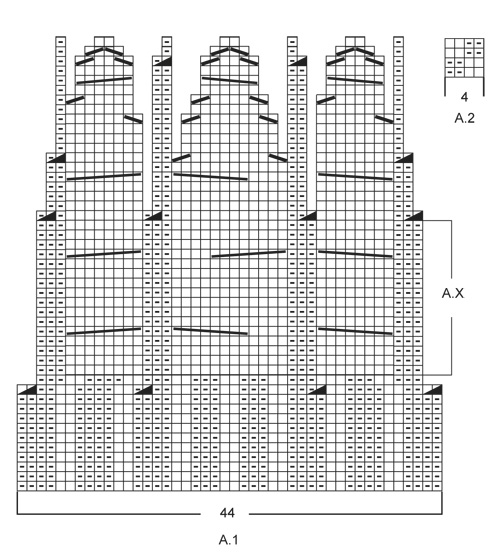
MALLINEULE: Katso ruutupiirrokset A.1 ja A.2. KAVENNUSVINKKI: Kavenna 1 s neulomalla 2 s nurin yhteen. ---------------------------------------------------------- MYSSY: Neulotaan suljettuna neuleena pyöröpuikolla/sukkapuikoilla. Luo 131 s pyöröpuikolle nro 3,5 Lima-langalla. Neulo joustinneuletta seuraavasti: 2 o, *3 n, 2 o*, toista *-* vielä 16 kertaa, A.1 (= 44 s). Jatka neulomista tähän tapaan, kunnes työssä on 10 krs. Kavenna seuraavalla krs:lla ensimmäisten 87 s:n kohdalla, joka toisessa nurjassa raidassa 1 s (LUE KAVENNUSVINKKI). Työstä kapeni 9 s. Neulo sitten piirroksen A.1 11.krs = 118 s. Vaihda pyöröpuikkoon nro 4. Neulo nyt piirroksen A.2 viimeiset 2 s, neulo seuraavilla 76 s:lla piirroksen A.2 mallineuletta Jatka neulomalla mallineuletta piirroksen A.1 mukaisesti. Jatka mallineuletta tähän tapaan ja toista mallikertaa A.X 3 kertaa korkeussuunnassa. TARKISTA NEULETIHEYS! Työn korkeus on n. 21 cm. Neulo nyt piirroksen A.1 loput krs:t lopulliseen mittaan asti. Neulo ja kavenna SAMALLA piirroksen A.2 78 s:n kohdalla seuraavasti: HUOM: Seuraava krs on piirroksen A.2 2. krs! 1.KRS: Neulo jokaisessa nurjassa raidassa 2 s nurin yhteen (työstä kapeni 20 s) = yht. 94 s (58 s + A.1). 2.KRS: Neulo oikeat s:t nurin ja nurjat s:t oikein. 3.KRS: Neulo nurjat s:t nurin ja oikeat s:t oikein. 4.KRS: Neulo oikeat s:t nurin ja nurjat s:t oikein. 5.KRS: Neulo nurjat s:t nurin ja oikeat s:t oikein. 6.KRS: Neulo oikeat s:t nurin ja nurjat s:t oikein. 7.KRS: Neulo kaikissa 2 nurjan s:n raidassa 2 s nurin yhteen (työstä kapeni 19 s) = yht. 71 s (39 s + A.1). 8.KRS-13.KRS: Jatka näillä 39 s:lla sileää neuletta (neulo piirroksen A.1 mallineuletta kuten aiemmin). 14.KRS: Neulo sileää neuletta ja kavenna tasavälein 15 s, neulomalla 2 s oikein yhteen = yht. 48 s (24 s + A.1). 15.-17.KRS: Jatka näillä 24 s:lla sileää neuletta (neulo piirroksen A.1 mallineuletta kuten aiemmin). 18.KRS: Neulo s:t pareittain oikein yhteen = yht. 22 s (12 s + A.1). 19.KRS: Neulo sileää neuletta, katkaise lanka ja vedä lanka jäljellä olevien silmukoiden läpi, kiristä aukko umpeen ja päättele langanpäät hyvin. |
||||||||||||||||||||||||||||
Ruutupiirroksen selitykset |
||||||||||||||||||||||||||||
|
||||||||||||||||||||||||||||
 |
||||||||||||||||||||||||||||
Oletko tehnyt tämän mallin?Tägää tällöin kuviasi #dropspattern tai lähetä kuvat #dropsfan galleriaan. Tarvitsetko apua tämän ohjeen kanssa?Löydät 12 ohjevideota, kommentteja/kysymyksiä ja muuta osoitteessa www.garnstudio.com © 1982-2026 DROPS Design A/S. Pidätämme kaikki oikeudet. Tämä tiedosto ja kaikki sen alatiedostot on suojattu tekijänoikeuslailla. Lue lisää siitä, mitä voit tehdä ohjeillamme, verkkosivujemme jokaisen ohjeen alaosasta. |
||||||||||||||||||||||||||||


DROPS Design on toiminut neule- ja virkkausalalla yli 40 vuotta ja meillä on yksi kaikkein laajin valikoima ilmaisia ohjeita verkossa - käännettynä 17 kielelle. Tänään meiltä löytyy 324 lehteä ja 12290 ohjetta - joista 11706 ohjetta on käännetty suomeksi.
Työskentelemme ahkerasti, jotta voisimme antaa teille kaikkein parhaimpia neule- ja virkkausohjeita, inspiraatiota ja neuvoja sekä korkealaatuisia lankoja todella edulliseen hintaan! Haluaisitko käyttää ohjeitamme muuhun kuin henkilökohtaiseen käyttöön? Voit lukea säännöistä ohjeiden Tekijänoikeus -tekstissä, joka löytyy kaikkien ohjeidemme alapuolelta. Hauskoja hetkiä käsitöiden parissa!
Lisää kommentti ohjeeseen DROPS Extra 0-1133
Haluamme mielellämme kuulla mielipiteesi tästä ohjeesta!
Mikäli haluat esittää kysymyksen, valitse oikea kategoria alla olevasta valikosta - tällä tavoin saat vastauksen nopeammin. Pakolliset kentät on merkitty tähdellä *.