
Suositut kategoriat
Etsitkö tiettyä lankaa?


Kommentit / Kysymykset (49)
![]() Nova kirjoitti:
Nova kirjoitti:
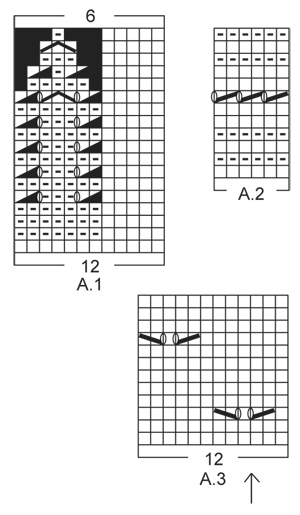
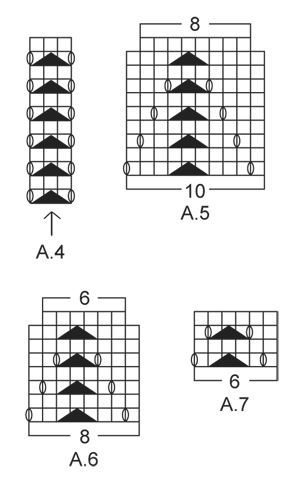
At the beginning of the A4 graph is the YO between the last stitch on the body and the first stitch on the sleeve?
07.04.2021 - 13:43DROPS Design vastasi:
Dear Nova, the stitch with the arrow in A.4 should be the one with the marker at the transitions, so that you will have 1 yarn over, the double decrease with marker in the middle stitch, 1 yarn over; this means there will be one hole (yarn over) on body and on sleeve. Happy knitting!
07.04.2021 - 14:26
![]() Nova kirjoitti:
Nova kirjoitti:
After attaching the sleeves for size L and beginning middle back for the first round, it says to start on the same row for the sleeve as for the body. Does this mean if I’m on row 4 on the body (A1) that I start on row 4 for the sleeves (A3)? Also A1 the arrow designates the middle of the sleeve but the graph starts with A4 which is 3 stitches and A3 is another 3 sts total 6 sts wouldn't the middle be half of 68 sts which is 34 sts?
06.04.2021 - 14:03DROPS Design vastasi:
Dear Nova, you should finish the sleeves 8adjust its length) so you will end up in the same row if the pattern as on the body, so you can continue the pattern without disrupting it. The arrow should match the middle of the sleeves, the upper middle line, put the stitch marked there, and count outwards to find out where you should start. Happy Knitting!
06.04.2021 - 14:26
![]() Nova kirjoitti:
Nova kirjoitti:
This is becoming a real challenge but I’m not going to give up! I am attaching the sleeves to the body but notice you don’t mention double pointed needles in your materials needed for this project. How are you supposed to knit these sleeves together with the body without them? It won’t work.
25.03.2021 - 01:52DROPS Design vastasi:
Dear Nova, when you have knitted the sleeves, you put all the stitches on one curcular needle, (back, sleeve, fron, sleeve), and knot the circular needle on the round. You don't knit "together" as a three needle bind off, but along with the body, in one big circle, that is getting decreased as you get to the neckline. Happy Knitting!
25.03.2021 - 02:26
![]() Nova kirjoitti:
Nova kirjoitti:
Hi again. I’m up to the yoke and I’m really confused about this section of the pattern. The fact that there are 3 graphs to be worked is a challenge in itself. The confusion is in the A4 graph between the body and the sleeves, does this have to do with the shaping of the raglan?
09.03.2021 - 13:31DROPS Design vastasi:
Dear Nova, pattern A.4 is between each body and sleeve, right at the raglan line. Shaping happens before and after this pattern. Happy Knitting!
09.03.2021 - 13:57
![]() Nova kirjoitti:
Nova kirjoitti:
When you get to the side where the first increases have been worked you have two extra stitches so to keep the eyelet pattern uniform, the space between the next eyelet is 9 stitches and that throws the whole eyelet pattern out. I don’t know how you can keep the eyelet pattern 7 stitches between with these increases on the side. The new repeat would make more sense at the beginning of the round.
26.02.2021 - 23:15DROPS Design vastasi:
See answer below - if you can't work a part of decrease (K2 tog, YO), over the new stitches, just work these stitches in stocking stitch without the lace pattern. You shoulud have the correct number of sts between each eyelet in width. Hope this will help. Happy knitting!
01.03.2021 - 08:00
![]() Nova kirjoitti:
Nova kirjoitti:
The beginning of the round the increases can be worked out but it’s the increases halfway on the side marker those stitches throw the whole eyelet pattern out. You can’t do 7 stitches between the pattern it doesn’t work out I’ve tried it
26.02.2021 - 22:52DROPS Design vastasi:
Dear Nova, if you don't have enough stitches to work the whole lace pattern on the side, this means there are not enough stitches yet, just work these stitches in stocking stitch. Work the lace pattern over the new stitches only if you have enough stitches to work them. This means each lace pattern should be worked with 7 knit stitches in between. Happy knitting!
01.03.2021 - 07:58
![]() Nova kirjoitti:
Nova kirjoitti:
Are you saying to read the graph from left to right and then right to left alternately and the added stitches will work out with the eyelet pattern?
26.02.2021 - 16:33DROPS Design vastasi:
Hi Nova, when working in the round all rounds are worked from the right side, and the diagram is read solely from right to left. When starting a new round, simply start working the first symbol on the next row in diagram. Happy knitting!
28.02.2021 - 21:14
![]() Nova kirjoitti:
Nova kirjoitti:
For example on the 3rd round after the first increases there are 4 stitches left at the end of the round and I’m not sure whether to knit those stitches as normal or do the pattern.
26.02.2021 - 15:19DROPS Design vastasi:
Dear Nova, see previous answer, make always sure that the eyelet pattern fit in height, it shouldn't be displaced. Happy knitting!
26.02.2021 - 16:17
![]() Nova kirjoitti:
Nova kirjoitti:
When doing the body and the A3 and making the increases on either side of the markers I notice that those extra stitches will throw the alternate pattern out where the holes should be. Is that how it’s supposed to be?
26.02.2021 - 15:08DROPS Design vastasi:
Dear Nova, the increased stitches should be worked in A.3, this means at the beg of A.3 work the new stitches as a new repeat reading diagram from the left towards the right (= there should be always 7 sts before the next K2 tog, YO in the lace pattern. And at the end of A.3, work the new stitches as a new repeat of A.3 (reading from the right towards the left). Hope this will help. Happy knitting!
26.02.2021 - 16:16
![]() Annette Wollbrecht kirjoitti:
Annette Wollbrecht kirjoitti:
Er der en venlig sjæl som kan fortælle mig, om A4 skal strikkes både før og efter markeringerne (altså 2 gange) eller kun 1 gang?
11.06.2020 - 20:09DROPS Design vastasi:
Hej Annette, A4 skal strikkes én gang i hver raglanovergang og der skal tages ind på hver side ifølge forklaringen til RAGLAN øverst i opskriften. God fornøjelse!
12.06.2020 - 10:19
|
||||||||||||||||||||||||||||
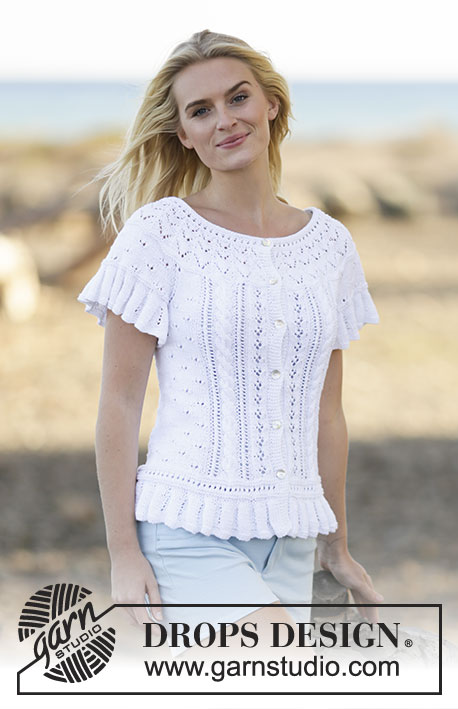
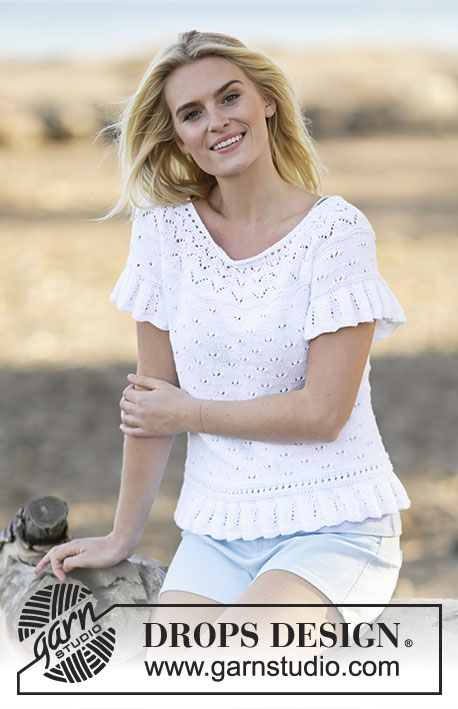
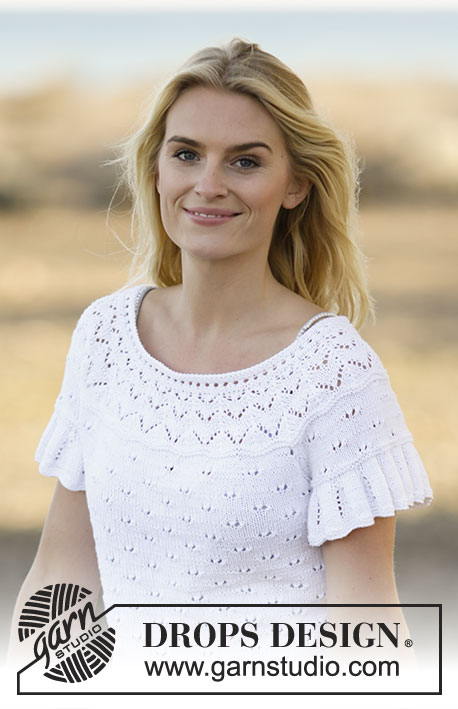
White Romance#whiteromancetop |
||||||||||||||||||||||||||||
 |
 |
|||||||||||||||||||||||||||
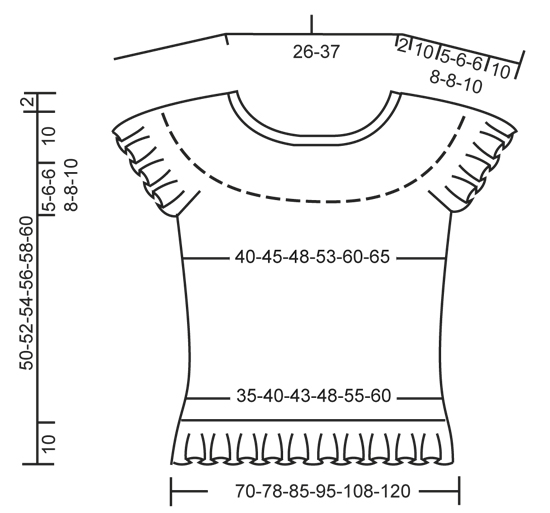
Pitsineuleinen DROPS kaarroketoppi lyhyillä hihoilla ”Safran”-langasta. Koot S-XXXL.
DROPS 159-12 |
||||||||||||||||||||||||||||
|
AINAOIKEINNEULE suljettuna neuleena: Neulo vuorotellen 1 krs oikein ja 1 krs nurin. MALLINEULE: Katso ruutupiirrokset A.1-A.7. Piirrokset näyttävät mallineuletta oikealta puolelta katsottuna. LISÄYSVINKKI: Lisää 1 s tekemällä 1 langankierto puikolle. Seuraavalla krs:lla langankierto neulotaan kiertäen, jottei muodostuisi reikää. Lisätyillä silmukoilla neulotaan sileää neuletta. RAGLANKAVENNUKSET: Tee raglankavennukset jokaisen kappaleiden rajakohdan piirroksen A.4 mallineuleen molemmin puolin seuraavasti. Piirroksen A.4 mallineuleen jälkeen: Nosta 1 s oikein neulomatta, 1 o, vedä nostettu s neulotun yli. Ennen piirroksen A.4 mallineuletta: 2 s oikein yhteen. ---------------------------------------------------------- ETU- JA TAKAKAPPALE: Neulotaan suljettuna neuleena pyöröpuikolla. Luo 336-372-408-456-516-576 s pyöröpuikolle nro 2,5 Safran-langalla. Neulo 4 krs AINAOIKEAA (kts. selitys yllä). Vaihda pyöröpuikkoon nro 3 ja neulo mallineuletta piirroksen A.1 mukaisesti. Kun olet neulonut piirroksen A.1 loppuun, työssä on 168-186-204-228-258-288 s. Jatka neulomalla mallineuletta piirroksen A.2 mukaisesti. Kun olet neulonut piirroksen A.2 loppuun, neulo 2 krs oikein ja lisää SAMALLA viimeisellä krs:lla tasavälein 0-6-0-0-6-0 s = 168-192-204-228-264-288 s. Kiinnitä 1 merkkilanka krs:n alkuun ja 1 merkkilanka 84-96-102-114-132-144 s:n jälkeen (= sivut). Jatka neulomalla mallineuletta piirroksen A.3 mukaisesti. TARKISTA NEULETIHEYS! SAMANAIKAISESTI kun työn pituus on 12 cm, lisää kummankin merkkilangan molemmin puolin 1 s (LUE LISÄYSVINKKI). Työhön lisättiin 4 s. Toista tällaiset lisäykset 4-4-4-5-5-5 cm välein yht. 6 kertaa = 192-216-228-252-288-312 s. HUOM: Lisätyillä silmukoilla neulotaan sileää neuletta. Neulo kunnes työn pituus on 35-36-38-38-40-40 cm. Seuraava krs neulotaan näin: Päätä 5-5-5-6-6-6 s kädentietä varten, neulo 86-98-104-114-132-144 s (= etukappale), päätä 10-10-10-12-12-12 s kädentietä varten (eli päätä merkkilangan molemmin puolin 5-5-5-6-6-6 s), neulo 86-98-104-114-132-144 s (= takakappale) ja päätä loput 5-5-5-6-6-6 s. Jätä työ odottamaan ja neulo hihat. HIHA: Neulotaan suljettuna neuleena pyöröpuikolla. Luo 144-156-156-168-168-180 s pyöröpuikolle nro 2,5 Safran-langalla. Neulo 4 krs AINAOIKEAA (kts. selitys yllä). Vaihda pyöröpuikkoon nro 3 ja neulo mallineuletta piirroksen A.1 mukaisesti. Kun olet neulonut piirroksen A.1 loppuun, työssä on 72-78-78-84-84-90 s. Neulo 4 krs ainaoikeaa ja päätä SAMALLA viimeisellä krs:lla keskeltä hihan alta 10-10-10-12-12-12 s = 62-68-68-72-72-78 s jäljellä työssä. Jätä työ odottamaan ja neulo toinen hiha samoin. KAARROKE: Ota kaikki osat samalle pyöröpuikolle, hihat kädenteitä varten päätettyjen silmukoiden tilalle (tämä tehdään neulomatta silmukoita) = 296-332-344-372-408-444 s. Kiinnitä SAMALLA 1 merkki kummankin hihan ensimmäiseen ja viimeiseen s:aan (= 4 merkkiä). Aloita keskeltä takaa ja neulo etu- ja takakappaleen silmukoilla mallineuletta kuten aiemmin, neulo SAMALLA kummankin hihan silmukoilla piirroksen A.3 mallineuletta (tarkista, että piirrokseen nuolella merkitty kohta tulee keskelle hihan alle, aloita mallineule samalta krs:lta kuin etu- ja takakappaleessa). Neulo lisäksi jokaisessa kappaleiden rajakohdassa piirroksen A.4 mallineuletta (tarkista, että piirrokseen nuolella merkitty s tulee merkityn s:n kohdalle). Kun olet neulonut 2 krs kaikilla silmukoilla, aloita RAGLANKAVENNUKSET (kts. selitys yllä). Työstä kapeni 8 s. Toista tällaiset kavennukset joka 4.krs yht. 4-5-5-7-7-8 kertaa = 264-292-304-316-352-380 s. Neulo kaikilla silmukoilla 4 krs ainaoikeaa suljettuna neuleena, ja kavenna SAMALLA 1. krs:lla tasavälein 4-12-4-6-12-10 s = 260-280-300-310-340-370 s. Neulo 2 krs oikein. Aloita nyt kaarrokkeen kavennukset ja neulo mallineuletta piirroksen A.5 mukaisesti suljettuna neuleena (= 26-28-30-31-34-37 mallikertaa krs:lla). HUOM: Vaihda työhön lyhyempi pyöröpuikko, kun silmukoita on kavennettu tarpeeksi. Kun olet neulonut piirroksen A.5 loppuun, neulo piirroksen A.5 silmukoilla mallineuletta piirroksen A.6 mukaisesti. Kun olet neulonut piirroksen A.6 loppuun, työssä on 156-168-180-186-204-222 s. Neulo sitten piirroksen A.6 silmukoilla mallineuletta piirroksen A.7 mukaisesti. Kun olet neulonut piirroksen A.7 loppuun, tee korotus takana niskassa. Kiinnitä 1 merkkilanka keskelle eteen. Aloita keskeltä takaa ja neulo oikeaa kunnes jäljellä on 14-14-16-16-18-20 s ennen merkkiä. Käännä työ, neulo oikeaa kunnes jäljellä on 14-14-16-16-18-20 s ennen toisen sivun merkkiä. Käännä työ, neulo oikeaa kunnes jäljellä on 30-30-34-34-38-42 s ennen merkkiä. Käännä työ, neulo oikeaa kunnes jäljellä on 30-30-34-34-38-42 s ennen toisen sivun merkkiä. Käännä työ, neulo oikeaa kunnes jäljellä on 46-46-52-52-58-64 s ennen merkkiä. Käännä työ, neulo oikeaa kunnes jäljellä on 46-46-52-52-58-64 s ennen toisen sivun merkkiä. Käännä työ, neulo oikeaa kunnes jäljellä on 62-62-70-70-76-86 s ennen merkkiä. Käännä työ, neulo oikeaa kunnes jäljellä on 62-62-70-70-76-86 s ennen toisen sivun merkkiä. Käännä työ ja neulo oikeaa krs:n alkuun asti. PÄÄNTIEN REUNUS: Vaihda pyöröpuikkoon nro 2,5 ja neulo kaikilla silmukoilla mallineuletta piirroksen A.2 mukaisesti suljettuna neuleena. Kavenna SAMALLA 1. krs:lla tasavälein 22-24-24-26-30-32 s = 134-144-156-160-174-190 s. Kun olet neulonut piirroksen A.2 loppuun, päätä s:t löyhästi oikein silmukoin työn oikealta puolelta. Topin pituus olalta alaspäin mitattuna on n. 52-54-56-58-60-62 cm. VIIMEISTELY: Ompele kainalosaumat. |
||||||||||||||||||||||||||||
Ruutupiirroksen selitykset |
||||||||||||||||||||||||||||
|
||||||||||||||||||||||||||||
 |
||||||||||||||||||||||||||||
 |
||||||||||||||||||||||||||||
 |
||||||||||||||||||||||||||||
Oletko tehnyt tämän mallin?Tägää tällöin kuviasi #dropspattern #whiteromancetop tai lähetä kuvat #dropsfan galleriaan. Tarvitsetko apua tämän ohjeen kanssa?Löydät 30 ohjevideota, kommentteja/kysymyksiä ja muuta osoitteessa www.garnstudio.com © 1982-2026 DROPS Design A/S. Pidätämme kaikki oikeudet. Tämä tiedosto ja kaikki sen alatiedostot on suojattu tekijänoikeuslailla. Lue lisää siitä, mitä voit tehdä ohjeillamme, verkkosivujemme jokaisen ohjeen alaosasta. |
||||||||||||||||||||||||||||


DROPS Design on toiminut neule- ja virkkausalalla yli 40 vuotta ja meillä on yksi kaikkein laajin valikoima ilmaisia ohjeita verkossa - käännettynä 17 kielelle. Tänään meiltä löytyy 324 lehteä ja 12245 ohjetta - joista 11642 ohjetta on käännetty suomeksi.
Työskentelemme ahkerasti, jotta voisimme antaa teille kaikkein parhaimpia neule- ja virkkausohjeita, inspiraatiota ja neuvoja sekä korkealaatuisia lankoja todella edulliseen hintaan! Haluaisitko käyttää ohjeitamme muuhun kuin henkilökohtaiseen käyttöön? Voit lukea säännöistä ohjeiden Tekijänoikeus -tekstissä, joka löytyy kaikkien ohjeidemme alapuolelta. Hauskoja hetkiä käsitöiden parissa!
Lisää kommentti ohjeeseen DROPS 159-12
Haluamme mielellämme kuulla mielipiteesi tästä ohjeesta!
Mikäli haluat esittää kysymyksen, valitse oikea kategoria alla olevasta valikosta - tällä tavoin saat vastauksen nopeammin. Pakolliset kentät on merkitty tähdellä *.