
Suositut kategoriat
Etsitkö tiettyä lankaa?


Kommentit / Kysymykset (123)
Lisa kirjoitti:
Hi, I am working on the sleeve for size S, and after the third increase I already have the total 57 tr/ch stitches , because increasing by 1tr+1ch at each end of the row means there is an increase of 4 stitches for the row, but the pattern only counts 2 to calculate the total. Is that correct, and if so should I end up with a total of 69 stitches? Or am I doing something wrong? thanks
30.04.2017 - 16:33DROPS Design vastasi:
Dear Lisa, number of sts after increase will be check, thank you. Happy crocheting!
02.05.2017 - 10:35
![]() Sylvia kirjoitti:
Sylvia kirjoitti:
What does, A.1B stands for. First time doing symbols. Thanks
02.04.2017 - 07:12DROPS Design vastasi:
Dear Sylvia, diagram A.1 is divided into 3 parts: A.1A = beg of row from RS (= row1: 3 ch, 1 ch, skip 1 st, 1 dc in next st) and end of row from WS, then A.1B to repeat until last 3 sts on row 1 (= *1 ch, skip 1 st, 1 dc in next ch*, repeat from *-* a total of 3 times for 1 repeat of A.1B, repeat these until 2 sts remain on row, and A.1C = end of row from RS, beg of row from WS (row 1 = 1 ch, 1 dc in last st). Your DROPS store will provide you any further invidivual assistance required for reading charts. Happy crocheting!
03.04.2017 - 10:39
![]() Tommie kirjoitti:
Tommie kirjoitti:
Can you send me the pattern for this. I would be happy to pay for a pdf or written out.
03.11.2016 - 02:33DROPS Design vastasi:
Dear Tommie, you will find the pattern for free scrolling down the page. Happy crocheting!
03.11.2016 - 09:45Eva kirjoitti:
Hello!!!Can you tell me the size of the jumper on picture?Thank you.
10.08.2016 - 00:13DROPS Design vastasi:
Dear Eva, our models are usually wearing size M - read more about sizing here. Happy crocheting!
10.08.2016 - 08:45
![]() Wendy kirjoitti:
Wendy kirjoitti:
I am on the back section starting A2 which seems to be a row of treble's. I've done that and I have 5 extra trebles which I don't know how to get rid of but also, because it has gone from a mesh pattern to all treble's, it is very curly. Am I reading the pattern correctly, is it a row of all treble's?
04.08.2016 - 23:51DROPS Design vastasi:
Dear Wendy, A.2 is all trebles - remember to check and keep gauge (17 tr = 10 cm) when working A.1, and do not work too tight the rows with ch and tr. Happy crocheting!
05.08.2016 - 09:45
![]() Wendy kirjoitti:
Wendy kirjoitti:
I really want to make this and looking at it, it appears easy, however, I don't understand the pattern at all. On the back piece, after the foundation row, I've done a treble in the 6th chain from the hook as instructed. It tells me that is A.1A, but the diagram shows it as two chains and a treble. Is it possible to get the written pattern instructions as opposed to looking at the diagram? If not, can you tell me what to do after the first treble in row 2.
31.07.2016 - 01:57DROPS Design vastasi:
Dear Wendy, when you work first row you skip first 5 ch (working in the 6th ch from hook), these first 5 ch are : 1st tr (= 3 ch), 1 ch before next tr + 1 ch skipped before crocheting next tr). At the beg of row 2 work A.1C: 3ch, 1 tr around next ch, then repeat A.1B and finish with A.1C. Happy crocheting!
01.08.2016 - 09:35
![]() Sarah kirjoitti:
Sarah kirjoitti:
I need further clarification on the sleeve increases, inadvertently I am acquiring an extra two stitches when increasing the sleeves leading to too many stitches. I have looked at the pattern to see how I can prevent the extra stitches from occurring but having great difficulty in figuring out how, can you advise further? The first increase stitch is placed at A.1 A and at the end however the extra stitches are occurring in every third row following this, hope this makes sense, Thanks Sarah
11.03.2016 - 23:30DROPS Design vastasi:
Dear Sarah, you inc for sleeve 1 st in each side, ie you will have a total of 2 tr more on every inc row - increase should be done by working 1 tr + 1 ch more in outermost tr in each side. On next row, work in A.1 as before, you will have same as before, but just 2 more tr per inc row. Happy crocheting!
12.03.2016 - 18:03Trishy kirjoitti:
I'm new to the Crotchet world. And was wondering, if I try to make a large size in this jumper, how do I know how many stitches do I need for the back, & front etc?
31.10.2015 - 04:23DROPS Design vastasi:
Dear Trishy, you will find at the bottom of the pattern a measurement chart, compare the measurements (in cm) to a similar garment you have and like the shape and find out the matching size - you can then follow this size in the pattern. Read more about sizing here. Happy crocheting!
31.10.2015 - 18:09
![]() Federica Piucci kirjoitti:
Federica Piucci kirjoitti:
Buon pomeriggio, io intendo confezionare questa maglia in con due colori diversi, uno per la parte superiore e uno per quella inferiore. Indicativamente quanti grammi potrebbero servire per le due parti prese separatamente?
12.10.2015 - 15:06DROPS Design vastasi:
Buongiorno Federica. Non riusciamo ad essere precisi sul quantitativo di filato necessario per lavorare con due colori. Lavorare un piccolo campione con i due diversi motivi potrebbe dare una prima indicazione. Il suo rivenditore di fiducia è a sua disposizione per consigliarla. Se possibile e non troppo oneroso, si informi anche sulla possibilità di restituire eventuali gomitoli di filato integri e non utilizzati. Buon lavoro!
16.10.2015 - 23:39Dalia kirjoitti:
When piece measures 53-54-55-56-57-58 cm / 21''-21¼''-21 5/8''-22''-22½''-22¾'', insert 1 marker in each side (marks where armhole beg). where exactly do I insert my markers?
14.07.2015 - 10:29DROPS Design vastasi:
Dear Dalia, see answer below. Happy crocheting!
27.07.2015 - 11:29
|
|||||||
Donna#donnasweater |
|||||||
 |
 |
||||||
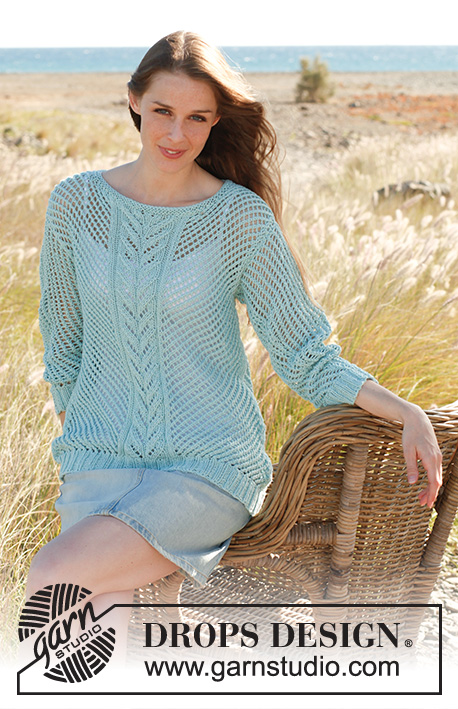
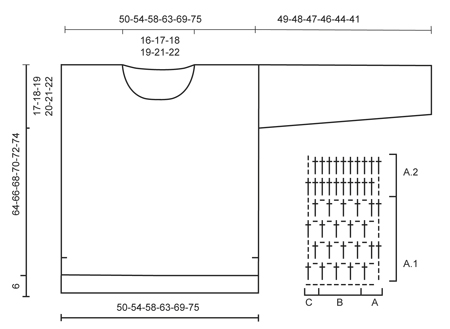
Virkattu DROPS pusero ”Cotton Light” -langasta. Koot S-XXXL.
DROPS 145-19 |
|||||||
|
MALLIVIRKKAUS: Virkataan piirrosten A.1 ja A.2 mukaisesti. KAVENNUSVINKKI: Käännä työ kun jäljellä on 1 p. Työstä kapeni 1 p. LISÄYSVINKKI: Lisää virkkaamalla kummankin reunan reunimmaiseen p:seen 1 p + 1 ylimääräinen kjs. Lisätyillä silmukoilla virkataan mallivirkkausta piirroksen A.1 mukaisesti. ---------------------------------------------------------- TAKAKAPPALE: Virkataan tasona. Takakappale on etukappaletta 6 cm pidempi. Virkkaa 88-94-102-110-120-130 LÖYHÄÄ kjs (on tärkeää, että kjs-ketju on löyhä, koska muuten reunasta tulee liian kireä) koukulla nro 4 ja Cotton Light -langalla. Käännä työ ja Virkkaa 1 p 6. kjs:aan koukusta laskien (piirroksen A.1 A mallikerta on nyt valmis, katso piirros). Virkkaa seuraavien 80-86-94-102-112-122 kjs:n kohdalla mallivirkkausta piirroksen A.1 B mukaisesti, ja virkkaa lopuksi 2 viimeisen kjs:n kohdalla mallivirkkausta piirroksen A.1 C mukaisesti. Jatka mallivirkkausta piirroksen A.1 mukaisesti tähän tapaan. Kun työn pituus on 47-48-49-50-51-52 cm, jatka virkkaamalla seuraavasti: A.2 A, toista piirroksen A.2 B mallikertaa kunnes jäljellä on 2 p/kjs, virkkaa piirros A.2 C = 85-91-99-107-117-127 p. Jatka mallivirkkausta piirroksen A.2 mukaisesti lopulliseen mittaan asti. Kun työn pituus on 53-54-55-56-57-58 cm, kiinnitä 1 merkkilanka kumpaankin reunaan (kädentiet alkavat tästä). Kun työn pituus on 68-70-72-74-76-78 cm, jätä keskimmäiset 27-29-31-33-35-37 p pois työstä = 29-31-34-37-41-45 p jäljellä kummallakin olalla. Virkkaa nyt molemmat puolet erikseen. Jatka mallivirkkausta piirroksen A.2 mukaisesti. Katkaise lanka ja päättele langanpäät, kun työn pituus on 70-72-74-76-78-80 cm. Virkkaa pääntien toinen puoli vastaavasti. ETUKAPPALE: Virkkaa kuten takana, kunnes työn pituus on 41-42-43-44-45-46 cm. HUOM! Takakappale on etukappaletta 6 cm pidempi, tästä syystä pituusmitat poikkeavat takakappaleen mitoista). Jatka virkkaamalla seuraavasti: A.2 A, toista piirroksen A.2 B mallikertaa kunnes jäljellä on 2 p/kjs, virkkaa piirros A.2 C = 85-91-99-107-117-127 p. Jatka mallivirkkausta piirroksen A.2 mukaisesti lopulliseen mittaan asti. Kun työn pituus on 47-48-49-50-51-52 cm, kiinnitä 1 merkkilanka kumpaankin reunaan (kädentiet alkavat tästä). Kun työn pituus on 56-58-60-62-64-66 cm, jätä keskimmäiset 23-25-27-29-31-33 p pois työstä. Virkkaa molemmat puolet erikseen. Kavenna nyt pääntien reunassa joka 2. krs 2 x 1 p (LUE KAVENNUSVINKKI) = 29-31-34-37-41-45 p jäljellä olalla. Jatka mallivirkkausta piirroksen A.2 mukaisesti. Katkaise lanka ja päättele langanpäät, kun työn pituus on 64-66-68-70-72-74 cm. Virkkaa pääntien toinen puoli vastaavasti. HIHA: Virkataan tasona. Virkkaa 48-48-50-52-54-56 LÖYHÄÄ kjs (on tärkeää, että kjs-ketju on löyhä, koska muuten reunasta tulee liian kireä) koukulla nro 4 ja Cotton Light -langalla. Käännä työ ja virkkaa 1 p 6. kjs:aan koukusta laskien (piirroksen A.1 A mallikerta on nyt valmis). Virkkaa seuraavien 40-40-42-44-46-48 kjs:n kohdalla mallivirkkausta piirroksen A.1 A mukaisesti, ja virkkaa lopuksi 2 viimeisen kjs:n kohdalla mallivirkkausta piirroksen A.1 C mukaisesti = 45-45-47-49-51-53 p/kjs. Jatka mallivirkkausta piirroksen A.1 mukaisesti tähän tapaan. Kun työn pituus on 8 cm, lisää kumpaankin reunaan 1 s (LUE LISÄYSVINKKI). Toista tällaiset lisäykset 7-5-4½-3½-3½-3 cm välein vielä 5-7-8-9-9-10 kertaa = 57-61-65-69-71-75 p/kjs. Katkaise lanka ja päättele langanpäät, kun työn pituus on 49-48-47-46-44-41 cm (suurimmissa koissa on lyhyemmät mitat, koska niissä on leveämmät olat). VIIMEISTELY: Ompele olkasaumat. Kiinnitä hihat paikoilleen (olalta alkaen alas etu- ja takakappaleen merkkilankoihin asti). Ompele hiha- ja sivusaumat, lopeta ompeleminen kun takakappaleessa on jäljellä 26 cm ja etukappaleessa on jäljellä 20 cm = halkio. |
|||||||
Ruutupiirroksen selitykset |
|||||||
|
|||||||
 |
|||||||
Oletko tehnyt tämän mallin?Tägää tällöin kuviasi #dropspattern #donnasweater tai lähetä kuvat #dropsfan galleriaan. Tarvitsetko apua tämän ohjeen kanssa?Löydät 5 ohjevideota, kommentteja/kysymyksiä ja muuta osoitteessa www.garnstudio.com © 1982-2026 DROPS Design A/S. Pidätämme kaikki oikeudet. Tämä tiedosto ja kaikki sen alatiedostot on suojattu tekijänoikeuslailla. Lue lisää siitä, mitä voit tehdä ohjeillamme, verkkosivujemme jokaisen ohjeen alaosasta. |
|||||||


DROPS Design on toiminut neule- ja virkkausalalla yli 40 vuotta ja meillä on yksi kaikkein laajin valikoima ilmaisia ohjeita verkossa - käännettynä 17 kielelle. Tänään meiltä löytyy 324 lehteä ja 12290 ohjetta - joista 11712 ohjetta on käännetty suomeksi.
Työskentelemme ahkerasti, jotta voisimme antaa teille kaikkein parhaimpia neule- ja virkkausohjeita, inspiraatiota ja neuvoja sekä korkealaatuisia lankoja todella edulliseen hintaan! Haluaisitko käyttää ohjeitamme muuhun kuin henkilökohtaiseen käyttöön? Voit lukea säännöistä ohjeiden Tekijänoikeus -tekstissä, joka löytyy kaikkien ohjeidemme alapuolelta. Hauskoja hetkiä käsitöiden parissa!
Lisää kommentti ohjeeseen DROPS 145-19
Haluamme mielellämme kuulla mielipiteesi tästä ohjeesta!
Mikäli haluat esittää kysymyksen, valitse oikea kategoria alla olevasta valikosta - tällä tavoin saat vastauksen nopeammin. Pakolliset kentät on merkitty tähdellä *.