
Suositut kategoriat
Etsitkö tiettyä lankaa?


Kommentit / Kysymykset (22)
Raquel kirjoitti:
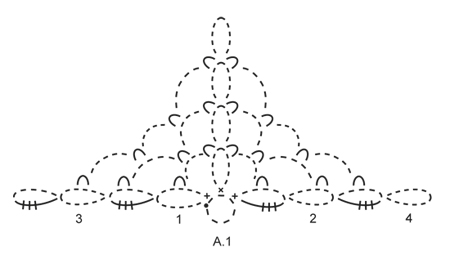
And make like a mini-loop with those 3 chains and then you close the chain in the same spot, so the picot is inbetween chainloop nr 3 in row 1 and chain-loop nr 1 in row 2. So my question is, i obviously make those 3 ch wrong, could you give me some more detailed explanation on how and where to do dose 3 ch? I can count on the picture A.1 that the picot is placed 3 chain from the point where the loop 1 in row 2 start and ends, so how do i come to that spot?
11.05.2016 - 22:17DROPS Design vastasi:
Dear Raquel, the picots are worked around ch-spaces, after the first 11 ch at beg of row 2, work 1 picot in first ch-space, then 5 ch, in next ch-space work 1 picot, 9ch, 1 picot, 5 ch, and in last (3rd ch-space), work 1 picot, 5 ch, 1 triple tr. Happy crocheting!
12.05.2016 - 08:59Raquel kirjoitti:
Hi, i am still having troubble with the second row. I guess that the first 11 ch is to build the first loop in the second row, so the first dc in the first picot is to close the first loop in the second row. so when you close the loop you are in the point where chain-loop 1 in row 2 begins and ends, right after the tripple tr, and that dc that closes the loop is the first move in the picot, then you chain 3
11.05.2016 - 22:17DROPS Design vastasi:
Dear Raquel, at the end of 1st row you have 3 large ch-space, on row 2, work in 1st ch-space: 11 ch,1 dc, 3ch, 1 dc, 5ch, then in 2nd ch-space (mid one) work: 1 dc, 3 ch, 1dc, 9ch, 1 dc, 3 ch, 1 dc, 5 ch and in last ch-space work: 1 dc, 3ch, 1 dc, 5 ch, 1 triple tr. You have now 1 picot in 1st and 3rd ch-space, and in the middle ch-space there are 2 picots with 9 ch in between. Happy crocheting!
12.05.2016 - 08:57Raquel Asplund kirjoitti:
I am having trubble with the first picot. When i end row 1 i end with 1 tripple tr. Then i chain 11 ch from the end of that tripple tr which is in the beginning of the loop with a number 2 under it. So when it says "ROW 2: 11 ch, 1 PICOT - read explanation above - in 1st ch-loop" which loop do they mean? My picot is placed between the loop with a tripple tr and the loop with a 2 under. Help please!
10.05.2016 - 22:09DROPS Design vastasi:
Dear Mrs Asplund, the first picot at beg of row 2 is worked in the ch 5 made at the end of first row, ie in the first ch-space (= last ch-space from previous row which is 5 ch, 1 triple tr). Happy crocheting!
11.05.2016 - 08:50
![]() Jackie kirjoitti:
Jackie kirjoitti:
Är inte picotbeskrivningen felaktig? Bör den inte se ut så här; 1fm om lmb, 3lm, 1stp i 1:a lm, 1fm om samma lmb.
24.03.2016 - 05:29DROPS Design vastasi:
Hej Jackie, Picotbeskrivningen stämmer, så du kan följa den. Tycker du din är finare så gör du den istället. Lycka till!
06.04.2016 - 10:28
![]() Nanni kirjoitti:
Nanni kirjoitti:
Hallo, ich häkel zum ersten Mal so ein Tuch. Muss ich es am Ende spannen? Momentan habe ich noch kein schönes Dreieck.
10.04.2015 - 12:26DROPS Design vastasi:
Ja, Sie können es am Ende anfeuchten, in Form ziehen und trocknen lassen oder unter feuchten Tüchern trocknen lassen. Je nach Wolle, die Sie verwenden, kann es sein, dass es zuerst etwas unregelmäßig wirkt, was sich aber auch schon im Laufe des Häkelns etwas gibt. Achten Sie darauf, dass Sie in der Mitte immer die Zunahme arbeiten, dadurch ergibt sich die Dreiecksform.
11.04.2015 - 09:18
![]() Margreet kirjoitti:
Margreet kirjoitti:
De wol is vandaag binnengekomen. Wat een gigantische bol. Ik heb heel veel zin om er aan te beginnen. Naamvoorstel voor deze doek? Summer sunset
17.01.2013 - 17:46
![]() Tarja kirjoitti:
Tarja kirjoitti:
Aivan ihana
14.01.2013 - 09:46
![]() Gina kirjoitti:
Gina kirjoitti:
Colorato divertente e soffice
08.01.2013 - 16:01
![]() Gina kirjoitti:
Gina kirjoitti:
Colorato vivace e leggero
08.01.2013 - 15:55
![]() Lelel kirjoitti:
Lelel kirjoitti:
Un bonito chal
05.01.2013 - 08:42
|
|||||||||||||||||||
Fire#fireshawl |
|||||||||||||||||||
|
|
|||||||||||||||||||
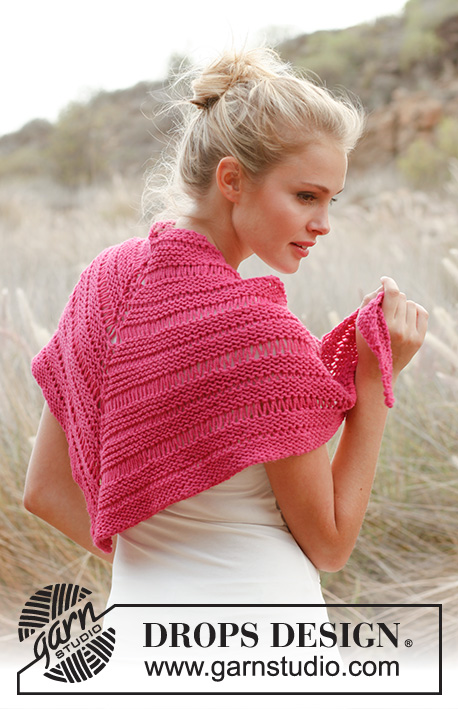
Virkattu DROPS huivi ”Verdi”-langasta.
DROPS 147-32 |
|||||||||||||||||||
|
VIRKKAUSINFO: 1 nirkko = 1 ks kaareen, 3 kjs, 1 ks 3. kjs:aan koukusta laskien, 1 ks samaan kaareen. MALLIVIRKKAUS: Katso piirros A.1, piirros näyttää huivin kerrokset 1.-4. ---------------------------------------------------------- HUIVI: Virkataan tasona keskeltä takaa alkaen, alaspäin kohti huivin kärkeä. Virkkaa 7 kjs, sulje kjs:t renkaaksi 1 ps:lla ensimmäiseen kjs:aan (katso piirros A.1). 1.KRS: 11 kjs, 1 ks renkaaseen, 9 kjs, 1 ks renkaaseen, 5 kjs, 1 3p renkaaseen = 3 kjs-kaarta, käännä työ. 2.KRS: 11 kjs, 1 NIRKKO (ks. selitys yllä) 1. kjs-kaareen, 5 kjs, 1 nirkko seuraavaan kjs-kaareen (= keskikohta), 9 kjs, 1 nirkko samaan kjs-kaareen, 5 kjs, 1 nirkko viimeiseen kjs-kaareen, 5 kjs, 1 3p samaan kjs-kaareen = 4 nirkkoa ja 5 kjs-kaarta, käännä työ. 3.KRS: 11 kjs, 1 nirkko 1. kjs-kaareen, *5 kjs, 1 nirkko seuraavaan kjs-kaareen*, toista *-* vielä kerran, 9 kjs, 1 nirkko samaan kjs-kaareen (= keskikohta), toista *-* vielä 2 kertaa, 5 kjs, 1 3p samaan kjs-kaareen = 6 nirkkoa ja 7 kjs-kaarta, käännä työ. 4.KRS: 11 kjs, 1 nirkko 1. kjs-kaareen, *5 kjs, 1 nirkko seuraavaan kjs-kaareen*, toista *-* vielä 2 kertaa (= yht. 3 kertaa), 9 kjs, 1 nirkko samaan kjs-kaareen (= keskikohta), toista vielä *-* 3 kertaa, 5 kjs, 1 3p samaan kjs-kaareen = 8 nirkkoa ja 9 kjs-kaarta, käännä työ. 5.KRS: 11 kjs, 1 nirkko 1. kjs-kaareen, *5 kjs, 1 nirkko seuraavaan kjs-kaareen*, toista *-* jokaisessa kjs-kaaressa, virkkaa kuitenkin keskikohdan kjs-kaareen 2 nirkkoa ja niiden väliin 9 kjs, virkkaa lopuksi 5 kjs, 1 3p viimeiseen kjs-kaareen, käännä työ. Toista jatkossa 5. krs:ta. Katkaise lanka ja päättele langanpäät, kun työn keskikohdan korkeus on n. 80 cm. |
|||||||||||||||||||
Ruutupiirroksen selitykset |
|||||||||||||||||||
|
|||||||||||||||||||
 |
|||||||||||||||||||
Oletko tehnyt tämän mallin?Tägää tällöin kuviasi #dropspattern #fireshawl tai lähetä kuvat #dropsfan galleriaan. Tarvitsetko apua tämän ohjeen kanssa?Löydät 5 ohjevideota, kommentteja/kysymyksiä ja muuta osoitteessa www.garnstudio.com © 1982-2026 DROPS Design A/S. Pidätämme kaikki oikeudet. Tämä tiedosto ja kaikki sen alatiedostot on suojattu tekijänoikeuslailla. Lue lisää siitä, mitä voit tehdä ohjeillamme, verkkosivujemme jokaisen ohjeen alaosasta. |
|||||||||||||||||||


DROPS Design on toiminut neule- ja virkkausalalla yli 40 vuotta ja meillä on yksi kaikkein laajin valikoima ilmaisia ohjeita verkossa - käännettynä 17 kielelle. Tänään meiltä löytyy 324 lehteä ja 12290 ohjetta - joista 11712 ohjetta on käännetty suomeksi.
Työskentelemme ahkerasti, jotta voisimme antaa teille kaikkein parhaimpia neule- ja virkkausohjeita, inspiraatiota ja neuvoja sekä korkealaatuisia lankoja todella edulliseen hintaan! Haluaisitko käyttää ohjeitamme muuhun kuin henkilökohtaiseen käyttöön? Voit lukea säännöistä ohjeiden Tekijänoikeus -tekstissä, joka löytyy kaikkien ohjeidemme alapuolelta. Hauskoja hetkiä käsitöiden parissa!
Lisää kommentti ohjeeseen DROPS 147-32
Haluamme mielellämme kuulla mielipiteesi tästä ohjeesta!
Mikäli haluat esittää kysymyksen, valitse oikea kategoria alla olevasta valikosta - tällä tavoin saat vastauksen nopeammin. Pakolliset kentät on merkitty tähdellä *.