
Suositut kategoriat
Etsitkö tiettyä lankaa?


Kommentit / Kysymykset (21)
![]() Julia Schueler kirjoitti:
Julia Schueler kirjoitti:
Hallo, ich habe nicht richtig aufgepasst und den Kragenteil nicht rund sondern hin und her gestrickt. Nach 27cm aufgeteilt und eine Seite nun in Hin und Her fertig gestellt. Ich kann mir irgendwie nicht vorstellen, wie das Teil nachher aussieht oder angezogen wird. Ich werde nun den Kragen zusammen naehen, damit er rund wird. Haben Sie noch einen Tipp? Danke im Voraus, Julia
12.12.2014 - 13:42DROPS Design vastasi:
Antwort siehe unten! :-)
14.12.2014 - 10:24
![]() Julia Schueler kirjoitti:
Julia Schueler kirjoitti:
Hallo, ich habe nicht richtig aufgepasst und den Kragenteil nicht rund sondern hin und her gestrickt. Nach 27cm aufgeteilt und eine Seite nun in Hin und Her fertig gestellt. Ich kann mir irgendwie nicht vorstellen, wie das Teil nachher aussieht oder angezogen wird. Ich werde nun den Kragen zusammen naehen, damit er rund wird. Haben Sie noch einen Tipp? Danke im Voraus, Julia
12.12.2014 - 10:48DROPS Design vastasi:
Sie können auf dem Foto ja das Vorderteil sehen, dieser "Lappen", der sich an den Halsteil anschließt. Das sieht auf der Rückseite, im Nacken den Rücken runter, ebenso aus. Wenn Ihnen das hinten zu lang ist, können Sie den hinteren Teil auch einfach kürzer stricken. Sie können den oberen Teil des Kragens, den Halsteil, einfach zusammennähen, das ist kein Problem.
14.12.2014 - 10:01
![]() Kate kirjoitti:
Kate kirjoitti:
V popisu je spatna delka lanka, ma byt 60cm ne 80cm, pro zacatecnika to muze byti matouci. Diky za opravu.
08.12.2014 - 14:52DROPS Design vastasi:
Dobrý den, díky za upozornění - opraveno.
10.12.2014 - 00:10Diane Carlson kirjoitti:
Hi again. I just posted a question but have found my answer in the other comments made for this pattern. Looks like I have to rip out a row and get back to 120 stitches. Oh well, live and learn!
23.11.2014 - 03:08Diane Carlson kirjoitti:
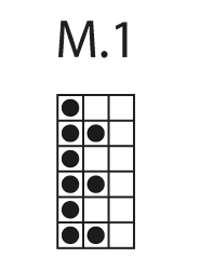
I have started this pattern but am confused about the M1 on all stitches. Will I have 240 stitches on my needle after I M1 on all stitches? Thank you for your help.
23.11.2014 - 03:00DROPS Design vastasi:
Dear Mrss Carlson, you have 120 sts for the neck warmer (ie "collar"), you work M1 on all sts, ie you repeat the 3 sts in diagram a total of 40 times around (Row 1 = *K1, P2* repeat from *-* around). When piece measures 27 cm, divide work in 2 pieces and finished each piece (front & back piece = 60 sts each) separately back and forth on needle. Happy knitting!
24.11.2014 - 11:04
![]() Carole kirjoitti:
Carole kirjoitti:
It did not say in the pattern to start at the bottom right square and read from right to left every round . Now I am dividing the stitches. My last right side row was K1P2 reading from right to left. Now going back on the wrong side am I going to K1P2 or am I going to P2K1? Pattern just not matching.
20.01.2014 - 01:43DROPS Design vastasi:
Dear Carole, look at your last st worked from RS at the end of row and mark it on the diagram, you will then know how where to start from WS. Happy knitting!
20.01.2014 - 09:24
![]() Carole kirjoitti:
Carole kirjoitti:
My last row on right side on 60 stitches was Purl 2 Knit 1 and then I added a stitch on the end to make 61. Please just tell me what to do going back across on the wrong side. I have worked on this all day and keep ripping out. I did not have any trouble until I divided the stitches. Thank you.
04.01.2014 - 06:14DROPS Design vastasi:
Dear Carole, just mark in diagram where you stopped from RS and continue following diag back and forth, reading from right to left the RS rows and from right to left the WS rows. the first 2 sts each side should be worked in garter st. Happy knitting!
04.01.2014 - 10:52
![]() Carole Lewis kirjoitti:
Carole Lewis kirjoitti:
After you cast on stitches, are the first 4 rows worked in the round--Rnd 1-k, Rnd-2 p, Rnd-3 k, and Rnd-4 p. Then do you start working back and forth or continue in the round. Diagram is confusing to me.
28.12.2013 - 02:03DROPS Design vastasi:
Dear Mrs Lewis, after cast on sts, continue in the round until work measures 27 cm, then divide in 2 pieces and work each part separately. In the diagram, 1 square = 1st x 1row, in the round, start on the bottom corner on the right side towards the left every round. When working in rows, read WS rows from left towards the right. Happy knitting!
30.12.2013 - 15:21
![]() Colleen kirjoitti:
Colleen kirjoitti:
Confused when switching from knitting in the round to knitting back and forth. Cannot get the pattern to match. Last row worked (RS) was P1K2 across. What would be the pattern going from row 2 (WS)? Thanks.
09.02.2013 - 14:44DROPS Design vastasi:
Dear Colleen, it seems last round you work was a row 2 in the diagram, so that you have to continue with row 3 in the diagram, seen from WS. Happy knitting!
11.02.2013 - 09:19Maria Del Consuelo Hernandez kirjoitti:
Hola me gustaria que me dijeran como terminar mi prenda gracias
30.11.2011 - 03:13
|
|||||||
Snuggles#snugglesneckwarmer |
|||||||
|
|
|||||||
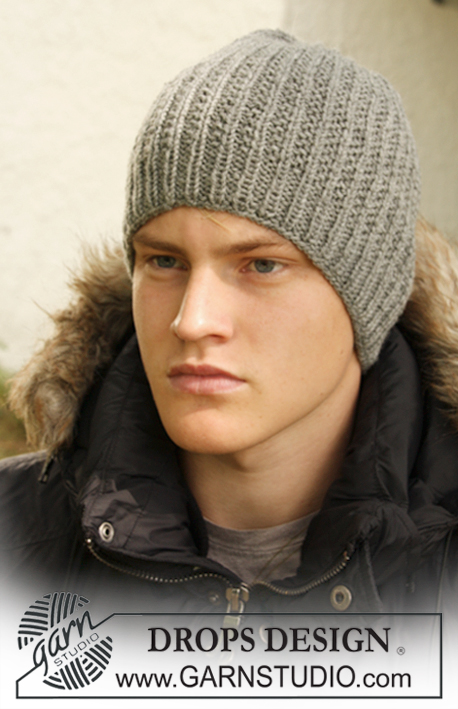
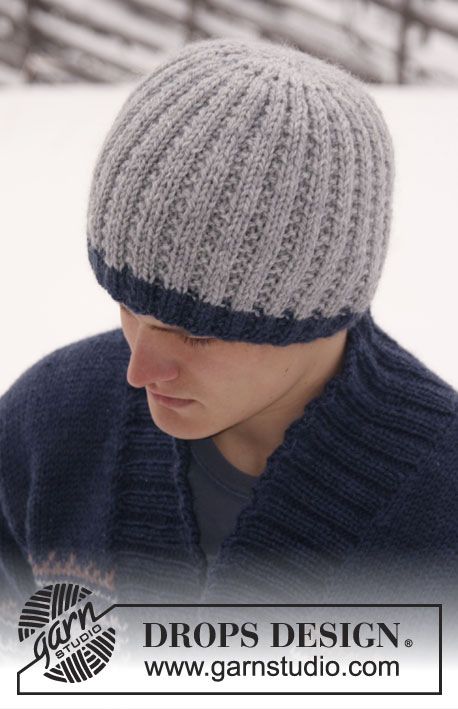
Miehen neulottu kauluri DROPS Karisma-langasta. Työssä on kohoneuletta.
DROPS 135-30 |
|||||||
|
AINAOIKEINNEULE tasona: Neulo kaikki kerrokset oikein. AINAOIKEINNEULE suljettuna neuleena: Neulo vuorotellen 1 krs oikein ja 1 krs nurin. MALLINEULE: Katso ruutupiirros M.1. Piirros näyttää mallineuletta oikealta puolelta katsottuna. ---------------------------------------------------------- KAULURI: Neulotaan ylhäältä alas. TARKISTA NEULETIHEYS! Luo pyöröpuikolle nro 4 Karisma-langalla 120 s ja neulo 4 krs AINAOIKEAA (ks. selitys yllä). Jatka neulomalla kaikilla silmukoilla mallineuletta piirroksen M.1 mukaisesti. Kun työn pituus on 27 cm, jaa työ etu- ja takakappaletta varten. Jätä ensimmäiset 60 s työhön ja siirrä loput 60 s apulangalle. ETUKAPPALE: Neulo työn 60 s:lla tasona mallineuletta kuten aiemmin ja luo SAMALLA 1. krs:n loppuun 1 s = 61 s. Jatka mallineuletta piirroksen M.1 mukaisesti, lukuun ottamatta 2 AINAOIKEINNEULOTTUA (ks. selitys yllä) s kummassakin reunassa. Kun etukappaleen pituus on n. 12 cm (mittaa kohdasta, jossa työ jaettiin etu- ja takakappaletta varten), neulo kaikilla silmukoilla 4 krs ainaoikeaa. Päätä s:t löyhästi. Työn korkeus on nyt n. 40 cm. TAKAKAPPALE: Ota apulangalla odottavat s:t takaisin työhön ja neulo kuten etukappale. |
|||||||
Ruutupiirroksen selitykset |
|||||||
|
|||||||
 |
|||||||
Oletko tehnyt tämän mallin?Tägää tällöin kuviasi #dropspattern #snugglesneckwarmer tai lähetä kuvat #dropsfan galleriaan. Tarvitsetko apua tämän ohjeen kanssa?Löydät 11 ohjevideota, kommentteja/kysymyksiä ja muuta osoitteessa www.garnstudio.com © 1982-2026 DROPS Design A/S. Pidätämme kaikki oikeudet. Tämä tiedosto ja kaikki sen alatiedostot on suojattu tekijänoikeuslailla. Lue lisää siitä, mitä voit tehdä ohjeillamme, verkkosivujemme jokaisen ohjeen alaosasta. |
|||||||


DROPS Design on toiminut neule- ja virkkausalalla yli 40 vuotta ja meillä on yksi kaikkein laajin valikoima ilmaisia ohjeita verkossa - käännettynä 17 kielelle. Tänään meiltä löytyy 325 lehteä ja 12298 ohjetta - joista 11738 ohjetta on käännetty suomeksi.
Työskentelemme ahkerasti, jotta voisimme antaa teille kaikkein parhaimpia neule- ja virkkausohjeita, inspiraatiota ja neuvoja sekä korkealaatuisia lankoja todella edulliseen hintaan! Haluaisitko käyttää ohjeitamme muuhun kuin henkilökohtaiseen käyttöön? Voit lukea säännöistä ohjeiden Tekijänoikeus -tekstissä, joka löytyy kaikkien ohjeidemme alapuolelta. Hauskoja hetkiä käsitöiden parissa!
Lisää kommentti ohjeeseen DROPS 135-30
Haluamme mielellämme kuulla mielipiteesi tästä ohjeesta!
Mikäli haluat esittää kysymyksen, valitse oikea kategoria alla olevasta valikosta - tällä tavoin saat vastauksen nopeammin. Pakolliset kentät on merkitty tähdellä *.